
Looking for a yarn?


Comments / Questions (8)
![]() Brigitte wrote:
Brigitte wrote:
Bonjour, la réhausse correspond à des rangs raccourcis en aller-retour, pourquoi ne pas faire des "wrap and turn" ? Et je pense qu'il manque un retour puisque cela devrait être symétrique par rapport à la maille centrale ? et cette maille centrale n'est pas comptée : par exemple taille M, tricoter 13 mailles au delà de la maille centrale et au retour 26 ! Cela devrait être plutôt 13+1+13=27.
18.01.2022 - 17:13DROPS Design answered:
Bonjour Brigitte, vous pouvez tout à fait tricoter les rangs raccourcis en "wrap and turn" si vous le souhaitez. Les rangs raccourcis se terminent bien par un rang sur l'envers jusqu'aux mailles de la bordure devant, au rang suivant sur l'endroit, vous tricoterez comme indiqué et toutes les mailles. Votre réflexion sur le nombre de mailles va être transmis à nos stylistes, merci. Bon tricot!
19.01.2022 - 08:21
![]() May-Liv wrote:
May-Liv wrote:
Hvorfor har der ikke denne i oppskrift hvor vi kan begynne nedenifra?
02.01.2021 - 16:35DROPS Design answered:
Hej May-Liv, svaret på dit spørgsmål er at vi har rigtig mange strikkere som foretrækker at strikke oppefra og ned. Men du kan helt sikkert finde en jakke som strikkes nedefra og op hvor du kan bruge disse diagrammer :)
08.01.2021 - 10:14
![]() Selma Olsson wrote:
Selma Olsson wrote:
I have two questions: 1. What is women's bust sizes for this pattern in sizes medium and large? 2. The photo in this pattern looks like the rib stitch and the pattern is calling for the seed stitch?
04.02.2020 - 15:41DROPS Design answered:
Dear Mrs Olsson, please find here how to read a measurement chart. The ribbed edges on this pattern are worked with K1, 3 sts in seed stitch - the K1 of this rib should be always P from WS and the 3 sts in seed stitch should be worked with P over K and K over P. Happy knitting!
04.02.2020 - 15:50
![]() Bente Gaarden wrote:
Bente Gaarden wrote:
Kjøpt mæ garnpakke te denne kofta, fulgte oppskrifta til punkt å prikke, ble for kort i armene å for vid i livet. Veldi fint mønster hadde gleda meg til å bli ferdi med den. Men no er jeg bare veldi skuffa. Den ble jo ikke bra.
17.01.2020 - 00:06Heidi Laine wrote:
Jag har problem med att förstå mönstret A.1A & A.1B, när det inte går jämt ut på varvet. Ska man läsa mönstret från vänster-höger när man stickar avigvarvet? Eller ska jag läsa varje varv från hög-vän? Nu när jag kommit till delen med mellangrå med natur-färg inslag och stickat avigvarvet med två grå-tre natur-en grå, hur ska jag fortsätta följande rätvarv när det inte passar in med mönstret? Från rätsidan sett så har jag 5 kantmaskor, 1 grå, 2 natur, 3 grå.
03.04.2018 - 19:27DROPS Design answered:
Hei Heidi, Diagrammet viser alltid mønsteret som det ser ut fra rettsiden. Det vil si at du starter fra rettsiden i nederste høyre hjørne på diagrammet og strikker mot venstre. Neste pinne strikker du fra vrangen, du starter da på pinn nr 2 (nedenfra i diagrammet) i venstre side og strikker mot høyre Slik strikker du hver pinne hele veien oppover, innenfor de 5 kantmaskene. Her er en video av hvordan å strikke mønster med 2 farger. God fornøyelse
18.04.2018 - 13:42
![]() Gabriele Bicen wrote:
Gabriele Bicen wrote:
Einfach toll eure Anleitungen...wunderschöne Jacke. Die wird mein nächstes Projekt von euch
10.03.2018 - 04:01
![]() Ulla wrote:
Ulla wrote:
Ich auch!!!!!!!
23.06.2017 - 11:08
![]() Conny wrote:
Conny wrote:
Freue mich auf die Anleitung....aufs stricken....und aufs anziehen
07.06.2017 - 14:41
|
|||||||||||||||||||
Telemark Jacket#telemarkjacket |
|||||||||||||||||||
 |
 |
||||||||||||||||||
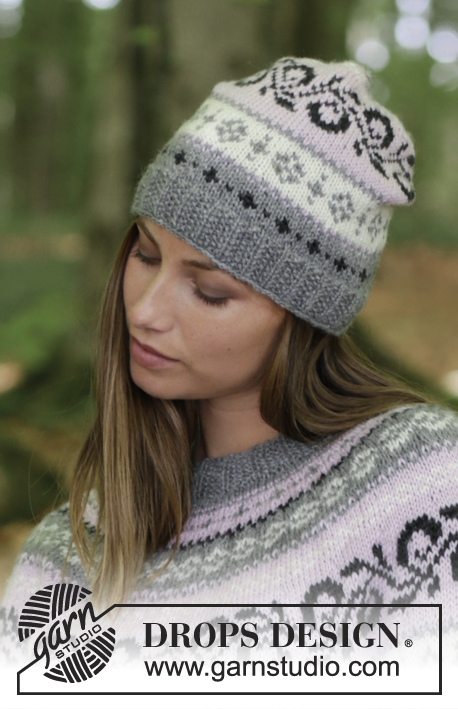
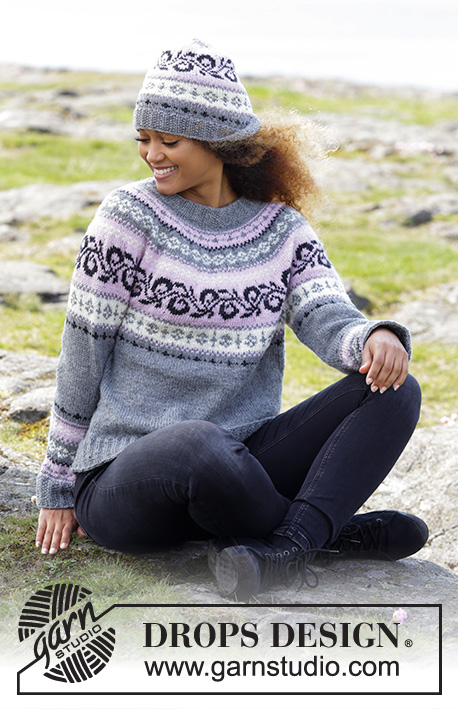
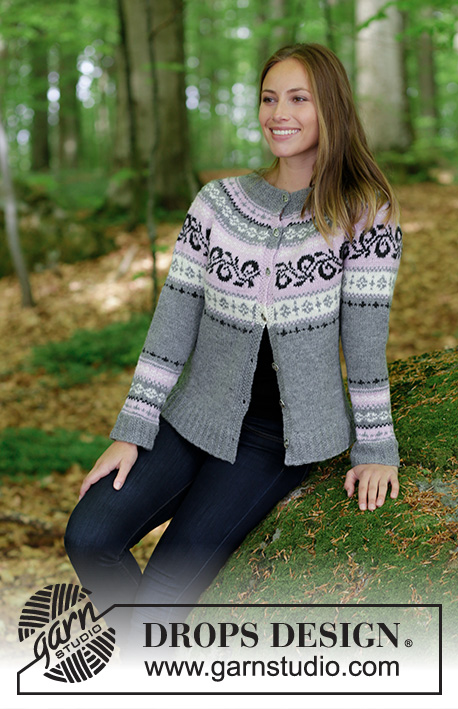
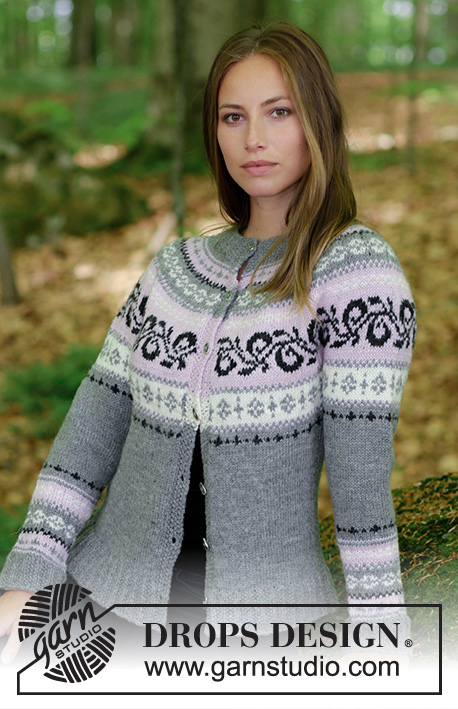
Knitted jacket with round yoke and multi-colored Norwegian pattern, worked top down. Sizes S - XXXL. The piece is worked in DROPS Merino Extra Fine.
DROPS 179-10 |
|||||||||||||||||||
|
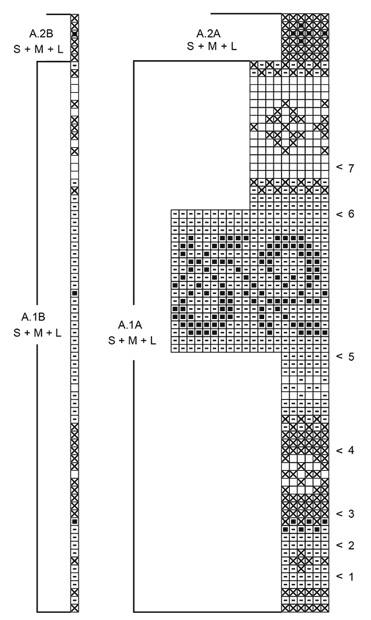
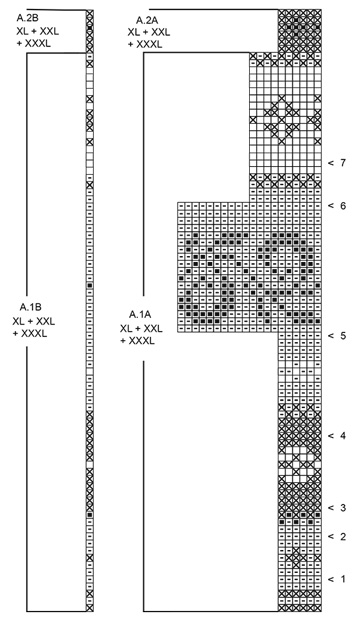
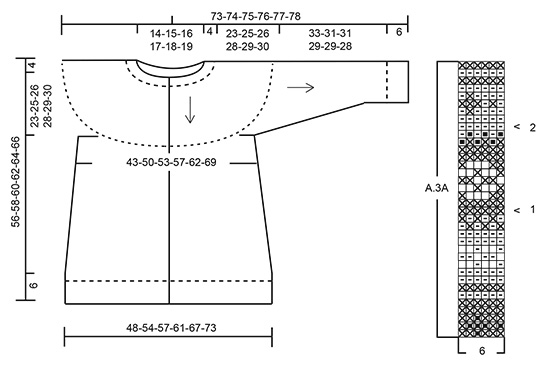
INFORMATION FOR THE PATTERN: SEED STITCH: ROW 1: * Knit 1, purl 1 *, work from *-*. ROW 2: Knit over purl and purl over knit. Repeat row 2. INCREASE TIP-1 (evenly spaced): To work out how to increase evenly, count the total number of stitches on the needle (e.g. 99 stitches), minus the bands (e.g. 10 stitches) and divide the remaining stitches by the number of increases to be made (= e.g. 8) = 11.1. In this example, increase after approx. every 11th stitch (do not increase over the bands). Increase 1 stitch by making 1 yarn over. On the next row, work the yarn overs twisted to prevent holes. INCREASE TIP-2 (for sides on body): All increases are worked from the right side! Start 4 stitches before the marker thread, make 1 yarn over, knit 8 (the marker thread sits in the middle of these 8 stitches), make 1 yarn over (= 2 stitches increased). On the next row (wrong side) purl the yarn overs twisted to prevent holes. ELEVATION: Insert 1 marker thread in the middle stitch on the needle, i.e. the 54th-57th-60th-63rd-66th-69th stitch (= mid back). Start from the right side and knit until 12-13-14-14-15-15 stitches have been worked past the stitch with the marker thread, turn, tighten the strand and purl 24-26-28-28-30-30 stitches. Turn, tighten the strand and knit 36-39-42-42-45-45 stitches, turn, tighten the strand and purl 48-52-56-56-60-60 stitches. Turn, tighten the strand and knit 60-65-70-70-75-75 stitches, turn, tighten the strand and purl to end of row (the bands are worked as before). PATTERN: See diagrams A.1 to A.3. (Choose diagram for your size – applies to A.1 and A.2). The whole pattern is worked in stockinette stitch. All rows in the diagram show the pattern seen from the right side. KNITTING TIP: To prevent the knitting gauge becoming tighter when working pattern, it is important that the strands at the back of the piece are not tight. You can increase a needle size when working pattern if this is a problem. On rows with pattern border, work the background color in the border also over the 5 band stitches in each side. DECREASE TIP-1 (for mid under sleeve): Start 3 stitches before the marker thread, knit 2 together, knit 2 (the marker thread sits in the middle of these 2 stitches), slip 1 stitch as if to knit, knit 1, pass the slipped stitch over the knitted stitch (= 2 stitches decreased). DECREASE TIP-2 (evenly spaced): To work out how to decrease evenly, count the total number of stitches on the needle (e.g. 60 stitches) and divide by the number of decreases to be made (e.g. 6) = 10. In this example knit every 9th and 10th stitch together. BUTTONHOLE: Work the buttonholes on the right band (when the garment is worn). Work from the right side until there are 3 stitches left on the needle, make 1 yarn over, purl 2 stitches together and finish with knit 1. On the next row, knit the yarn over to leave a hole. The first buttonhole is worked when the neckline measures approx. 1½-2 cm / ½"-¾", then work the other buttonholes in the different sizes when the piece measures: S: 10, 18, 26, 34, 42 and 50 cm M: 10, 18, 26, 34, 43 and 52 cm L: 10, 18, 27, 36, 45 and 54 cm XL: 10, 20, 29, 38, 47 and 56 cm XXL: 10, 20, 30, 40, 50 and 60 cm XXXL: 12, 22, 32, 42, 52 and 62 cm ---------------------------------------------------------- JACKET: The piece is worked back and forth with circular needle, top down. The sleeves are worked in the round with double pointed needles. NECKLINE: Cast on 99-107-111-115-119-123 stitches (including 5 band stitches in each side towards mid front) with circular needle size 3.5 mm / US 4 and medium gray. Purl 1 row (= wrong side). The next row is worked as follows from the right side: 5 band stitches in SEED STITCH – see description above, * knit 1, 3 stitches seed stitch *, work from *-* until there are 6 stitches left on the needle, knit 1 and finish with 5 band stitches in seed stitch. Continue the rib in this way for 4 cm / 1½", but after 1½ - 2 cm / ½"-¾" work BUTTONHOLE on the right band – see description above. The 5 band stitches in each side are worked in seed stitch to finished length. After the rib, knit 1 row from the right side where you increase 8-6-8-10-12-14 stitches evenly on row – read INCREASE TIP-1 (evenly spaced) = 107-113-119-125-131-137 stitches. Purl 1 row from the wrong side (the yarn overs from the previous row are purled twisted to prevent holes). For a better fit, work a small ELEVATION in the back of the neck – see description above. YOKE: Change to circular needle size 4 mm / US 6. Continue with 2-2-4-4-6-6 rows stockinette stitch. Now work PATTERN and increase stitches - Read KNITTING TIP! The first row is worked as follows - from the right side: 5 band stitches as before, work A.1A (= 16-17-18-19-20-21 repeats of 6 stitches on the first row in the diagram) until there are 6 stitches left on the needle, work A.1B (= 1 stitch) and finish with 5 band stitches as before. Continue pattern in this way. REMEMBER THE GAUGE! AT THE SAME TIME on each row from the right side marked with an arrow in the diagram, increase evenly as follows – remember INCREASE TIP (evenly spaced): Arrow-1: Increase 30-36-42-42-48-48 stitches evenly on row = 137-149-161-167-179-185 stitches. Arrow-2: Increase 30-36-42-42-48-48 stitches evenly on row = 167-185-203-209-227-233 stitches. Arrow-3: Increase 30-36-36-42-42-48 stitches evenly on row = 197-221-239-251-269-281 stitches. Arrow-4: Increase 30-36-36-42-42-48 stitches evenly on row = 227-257-275-293-311-329 stitches. Arrow-5: Increase 24-34-36-38-40-42 stitches evenly on row = 251-291-311-331-351-371 stitches. Arrow-6: Increase 30 stitches evenly on row in all sizes = 281-321-341-361-381-401 stitches. Arrow-7: Increase 20-20-20-30-30-40 stitches evenly on row = 301-341-361-391-411-441 stitches. When the piece measures 27-29-30-32-33-34 cm / 10½"-11½"-11¾"-12½"-13"-13½" from the cast-on edge and down along the bands mid front, divide the stitches for body and sleeves as follows (A.1A and A.1B have not been finished, so are continued as before): Work 46-54-55-60-64-71 stitches as before (= front piece), place the next 63-68-75-80-82-84 stitches on a thread (= sleeve), cast on 8-8-10-10-12-14 new stitches (= in side under sleeve), work 83-97-101-111-119-131 stitches as before (= back piece), place the next 63-68-75-80-82-84 stitches on a thread (= sleeve), cast on 8-8-10-10-12-14 new stitches (= in side under sleeve) and work the remaining 46-54-55-60-64-71 stitches as before (= front piece). Body and sleeves are now finished separately. THE PIECE IS NOW MEASURED FROM HERE! BODY: = 191-221-231-251-271-301 stitches. Continue with A.1A and A.1B as before with 5 band stitches in seed stitch in each side. When A.1A and A.1B have been completed in height continue with A.2A over A.1A and A.2B over A.1B, BUT on the first row in A.2A and A.2B increase 0-0-2-0-4-4 stitches evenly on row = 191-221-233-251-275-305 stitches. When A.2A/A.2B have been completed in height, insert 1 marker thread in each side. Insert 1 marker thread 55-57-60-65-71-78 stitches in from each side of mid front. Continue with medium gray and stockinette stitch to finished length with 5 band stitches in seed stitch as before. On the next row from the right-side increase 2 stitches in each side – read INCREASE TIP-2 (for sides on body)! Increase in this way approx. every 4-5-5-5-5-5 cm / 1½"-2"-2"-2"-2"-2" 5-4-4-4-4-3 times = 211-237-249-267-291-317 stitches. When the piece measures 23-23-24-24-25-26 cm / 9"-9"-9½"-9½"-9¾"-10¼" increase 32-34-38-40-40-42 stitches evenly on the next row from the right side = 243-271-287-307-331-359 stitches. Work 1 row back from the wrong side (all the yarn overs are purled twisted to prevent holes). Change to circular needle size 3.5 mm / US 4. Now work rib as follows: 5 band stitches as before, * knit 1, 3 stitches seed stitch *, work from *-* until there are 6 stitches left on the needle, knit 1 and 5 band stitches as before. Continue in this way until the rib measures 6 cm / 2⅜". Bind off with knit over knit and purl over purl. To avoid the bind-off edge being tight, you can bind off with a larger needle size. The jacket measures approx. 56-58-60-62-64-66 cm / 22"-22¾"-23⅝"-24⅜"-25¼"-26" from the shoulder down. SLEEVE: Place the 63-68-75-80-82-84 stitches from the thread in the one side of the piece on double pointed needles size 4 mm / US 6 and, in addition, knit up 1 stitch in each of the 8-8-10-10-12-14 new stitches cast on under the sleeve (knit up stitches with background color in the next round in the pattern) = 71-76-85-90-94-98 stitches. Continue A.1A in the round on the sleeve (pattern on the sleeve should match pattern on the yoke) – NOTE: In sizes S, M, L, XXL and XXXL the pattern will not fit the number of stitches mid under the sleeve, but to avoid too large a gap, it is recommended that you work as many stitches of A.1A as possible on the round. When A.1A has been completed in height, work A.2A over A.1A in the round, AT THE SAME TIME on the first round adjust the number of stitches to 72-78-84-90-96-96 stitches (so that pattern A.2A will fit the number of stitches). When A.2A has been completed in height, insert a marker thread in the middle of the 8-8-10-10-12-14 new stitches cast on under the sleeve (= 4-4-5-5-6-7 new stitches on each side of the marker thread). THE PIECE IS NOW MEASURED FROM HERE! Continue working with medium gray. On the next round decrease 2 stitches mid under the sleeve – read DECREASE TIP-1! Decrease in this way approx. every 6th-3rd-3rd-2nd-2nd-2nd round a total of 6-9-9-12-12-12 times = 60-60-66-66-72-72 stitches. When the piece measures 14-12-12-10-10-9 cm / 5½"-4¾"-4¾"-4"-4"-3½" work pattern A.3 (= 6 stitches) in the round, AT THE SAME TIME on the rounds marked with an arrow in the diagram decrease evenly as follows – read DECREASE TIP-2 (evenly spaced): Arrow-1: Decrease 6 stitches evenly on round = 54-54-60-60-66-66 stitches. Arrow-2: Decrease 6-6-12-12-12-12 stitches evenly on round = 48-48-48-48-54-54 stitches. When A.3 has been completed in height, the piece measures 33-31-31-29-29-28 cm / 13"-12¼"-12¼"-11½"-11½"-11" from the separation. Continue with medium gray. Work 1 round where you increase 4-4-8-8-8-8 stitches evenly on round = 52-52-56-56-62-62 stitches. Change to double pointed needles size 3.5 mm / US 4. Work rib in the round (= knit 1 /3 stitches seed stitch) for 6 cm / 2⅜". Bind off with knit over knit and purl over purl. The sleeve measures approx. 39-37-37-35-35-34 cm / 15 1/42-14½"-14½"-13¾"-13¾"-13½" from the separation. Work the other sleeve in the same way. ASSEMBLY: Sew the buttons onto the left band. |
|||||||||||||||||||
Diagram explanations |
|||||||||||||||||||
|
|||||||||||||||||||
|
|||||||||||||||||||
|
|||||||||||||||||||
|
|||||||||||||||||||
Have you finished this pattern?Tag your pictures with #dropspattern #telemarkjacket or submit them to the #dropsfan gallery. Do you need help with this pattern?You'll find 30 tutorial videos, a Comments/Questions area and more by visiting the pattern on garnstudio.com. © 1982-2025 DROPS Design A/S. We reserve all rights. This document, including all its sub-sections, has copyrights. Read more about what you can do with our patterns at the bottom of each pattern on our site. |
|||||||||||||||||||


With over 40 years in knitting and crochet design, DROPS Design offers one of the most extensive collections of free patterns on the internet - translated to 17 languages. As of today we count 314 catalogs and 11822 patterns - 11812 of which are translated into English (US/in).
We work hard to bring you the best knitting and crochet have to offer, inspiration and advice as well as great quality yarns at incredible prices! Would you like to use our patterns for other than personal use? You can read what you are allowed to do in the Copyright text at the bottom of all our patterns. Happy crafting!
Post a comment to pattern DROPS 179-10
We would love to hear what you have to say about this pattern!
If you want to leave a question, please make sure you select the correct category in the form below, to speed up the answering process. Required fields are marked *.