
Looking for a yarn?


Comments / Questions (15)
![]() Lonnie wrote:
Lonnie wrote:
Jeg strikker str 38/40 og oplever at efter hælindtagning og når jeg skal strikke foden, har jeg to hvide ved siden af hinanden i overgangen fra underfod til overfod. Kan det passe? Det ødelægger lidt det stribede mønster
23.10.2024 - 08:05DROPS Design answered:
Hej Lonnie, kan det være dem du strikker sammen når du tager ind til tå?
24.10.2024 - 09:45
![]() Adriana wrote:
Adriana wrote:
I haven't seen such a beautiful work: the pattern itself, the colors, "The Flower Music" is worth the name. Congratulations to all of you ladies who have put your most creative skills and talents into each pattern/model on this site, second to none that I have seen.
12.07.2024 - 15:17
![]() Britt wrote:
Britt wrote:
Herzlichen Dank für die schnelle Antwort! dann gehts jetzt los :))
14.03.2023 - 15:06
![]() Britt wrote:
Britt wrote:
Danke für das wunderschöne Muster! aber: Welche von beiden Farben wurde als Hauptfarbe gestrickt, bzw. ist weiß im Vordergrund oder picnic?
13.03.2023 - 11:33DROPS Design answered:
Liebe Britt, bei den Socken wird man das Muster mit natur und die Grundfarben mit pickinick stricken. Viel Spaß beim stricken!
13.03.2023 - 13:26
![]() Jannike wrote:
Jannike wrote:
Jag har löst det nu. Jag skall först fälla 2 m på sista varvet av A1.... det var lite otydligt eller jag var för snabb. Allt är gott igen!
04.08.2022 - 13:14
![]() Jannike wrote:
Jannike wrote:
Hej. Jag får problem när jag vill sticka i storlek 41-43 och har 70 maksor kvar innan mönster A1=12 m. Det går inte upp?
04.08.2022 - 13:08DROPS Design answered:
Hej Jannike, når du strikke A.1 har du 72 masker, det er først efter A.1 du tager ind til 70 masker :)
05.08.2022 - 14:12
![]() Hanne Cramon wrote:
Hanne Cramon wrote:
Findes dette smukke diagram også i en bluse/sweaterversion? Vh Hanne
07.08.2021 - 09:50DROPS Design answered:
Hej Hanne, nej desværre, men prøv at søge i vores Nordiske mønstre :)
11.08.2021 - 16:03
![]() Suse wrote:
Suse wrote:
Wunderschöne Socken, bin bis jetzt gut klar gekommen. Nun bin ich an der Ferse☹️ Stricke ich die 31 Maschen auf zwei oder vier Nadeln? Ich bekomme das nicht hin. Bitte vielleicht noch etwas detaillierter für mich erklären??! Danke Suse
15.04.2021 - 14:16
![]() Naomi wrote:
Naomi wrote:
Eenmaal de hiel gebreid (13 steken aan beiden kanten opgenomen) staat in het patroon: "Minder om de naald 6 keer in totaal= 64 steken". Betekent dit 1 toer minderen en daarna 1 toer niet?
26.03.2021 - 13:57DROPS Design answered:
Dag Naomi,
Inderdaad, met om de naald wordt bedoeld de ene naald wel en de andere naald niet.
26.03.2021 - 15:38
![]() Maria wrote:
Maria wrote:
Hej, jag kan bara se diagram A5 och A4 i mönstret ovan, är det något fel på mönstret?
09.01.2021 - 20:10DROPS Design answered:
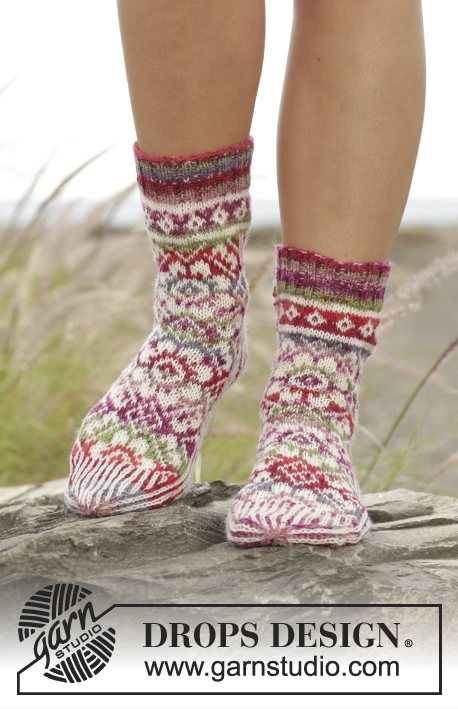
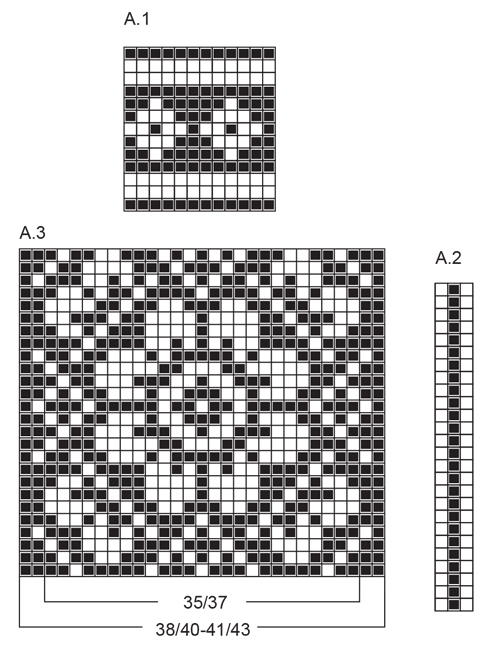
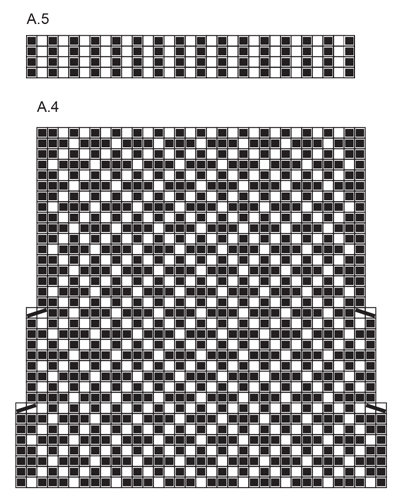
Hei Maria. Det er 5 diagram til denne sokken. A.1 ser du øverst på sokken som går rundt hele ankelen. Diagram A.2 er stripene på sidene av sokken og A.3 ser du på fronten av sokken. Diagram A.4 ser du på baksiden av sokken og diagram A.5 over hælen av sokken. mvh DROPS design
18.01.2021 - 12:52
|
|||||||||||||
Flower Music#flowermusicsocks |
|||||||||||||
 |
 |
||||||||||||
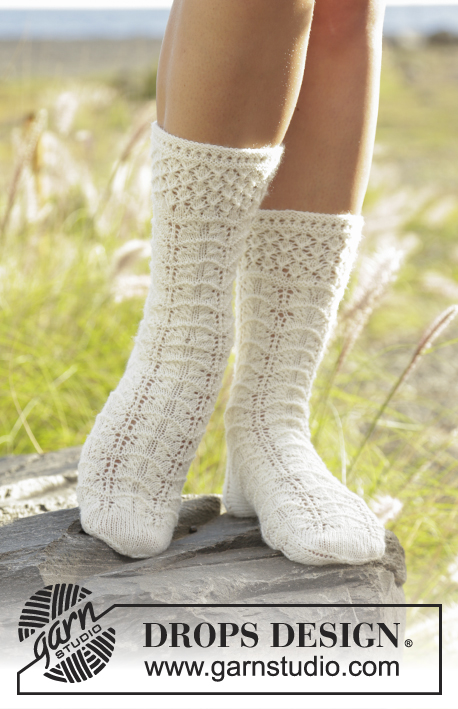
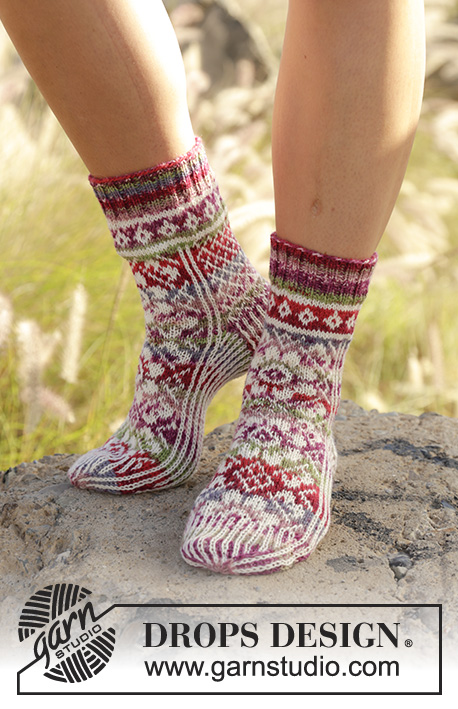
Knitted socks in multi-colored pattern in DROPS Fabel.
DROPS 178-13 |
|||||||||||||
|
PATTERN: See diagrams A.1 to A.5. Work all diagrams in stockinette stitch. HEEL DECREASE: Row 1 (= right side): Knit until 9 stitches remain, slip next stitch as if to knit, knit 1, pass slipped stitch over stitch knitted, turn piece. Row 2 (= wrong side): Purl until 9 stitches remain, slip next stitch as if to purl, purl 1, pass slipped stitch over stitch purled, turn piece. Row 3 (= right side): Knit until 8 stitches remain, slip next stitch as if to knit, knit 1, pass slipped stitch over stitch knitted, turn piece. Row 4 (= wrong side): Purl until 8 stitches remain, slip next stitch as if to purl, purl 1, pass slipped stitch over stitch purled, turn piece. Continue decrease like this with 1 stitch less before each decrease until there are 15 stitches on needle. -------------------------------------------------------- SOCK: Worked in the round on double pointed needles. Cast on 72 stitches in all sizes on double pointed needles size 2.5 mm / US 1.5 with picnic. Knit 1 round, continue with rib = knit 2/purl 2 for 4 cm / 1½". Switch to double pointed needles size 3 mm / US 2.5. REMEMBER THE KNITTING GAUGE Continue with A.1 - AT THE SAME TIME on first round decrease 6-0-0 stitches evenly = 66-72-72 stitches, and on last round decrease 0-2-2 stitches evenly = 66-70-70 stitches. When A.1 has been worked 1 time vertically, work as follows: A.2 (= 3 stitches), A.3 (= 25-29-29 stitches), A.2 (= 3 stitches) and A.4 (= 35 stitches) - decrease as shown in A.4. When A.4 has been worked 1 time vertically, there are 62-66-66 stitches on needle (When A.3 has been worked 1 time vertically, repeat A.3 upwards). Now slip the first 31-35-35 stitches on 1 stitch holder (= stitches over A.2 + A.3 + A.2) = 31 stitches remain on needle for heel. Work A.5 over heel stitches for 5-5½-6 cm / 2"-2¼"-2½", insert 1 marker on last row, then work HEEL DECREASE – see explanation above. After heel decrease, work in stockinette stitch in the round: First work A.5 over the 15 heel stitches, pick up 12-13-14 stitches in A.5 on side of heel, work A.2 and A.3 as before over stitches on stitch holder and pick up 12-13-14 stitches in A.5 on the other side of heel = 70-76-78 stitches. Then decrease on each side of the 31-35-35 stitches on top of foot as follows: Knit the 2 stitches before the 31-35-35 stitches on top of foot together and knit the 2 stitches after the 31-35-35 stitches on top of foot twisted together. Decrease every other round 6 times in total = 58-64-66 stitches. Continue pattern until piece measures 18-19-22 cm / 7"-7½"-8¾" from marker on heel (= approx. 4-5-5 cm / 1½"-2"-2" remain). Then work as follows: A.2 as before over the stitches in each side, A.5 over the 25-29-29 stitches on top of foot and the 27-29-31 stitches under foot - AT THE SAME TIME decrease for toe on each side of A.2 in each side as follows: Work until 2 stitches remain before A.2, knit 2 together, work A.2, then knit 2 twisted together. Repeat decrease every other round 3-6-6 more times and then every round 5-3-3 times = 22-24-26 stitches remain on round. On next round knit all stitches together 2 by 2 with picnic = 11-12-13 stitches. Cut the yarn and pull it through the remaining stitches, tighten together and fasten |
|||||||||||||
Diagram explanations |
|||||||||||||
|
|||||||||||||
|
|||||||||||||
|
|||||||||||||
Have you finished this pattern?Tag your pictures with #dropspattern #flowermusicsocks or submit them to the #dropsfan gallery. Do you need help with this pattern?You'll find 21 tutorial videos, a Comments/Questions area and more by visiting the pattern on garnstudio.com. © 1982-2025 DROPS Design A/S. We reserve all rights. This document, including all its sub-sections, has copyrights. Read more about what you can do with our patterns at the bottom of each pattern on our site. |
|||||||||||||


With over 40 years in knitting and crochet design, DROPS Design offers one of the most extensive collections of free patterns on the internet - translated to 17 languages. As of today we count 314 catalogs and 11822 patterns - 11812 of which are translated into English (US/in).
We work hard to bring you the best knitting and crochet have to offer, inspiration and advice as well as great quality yarns at incredible prices! Would you like to use our patterns for other than personal use? You can read what you are allowed to do in the Copyright text at the bottom of all our patterns. Happy crafting!
Post a comment to pattern DROPS 178-13
We would love to hear what you have to say about this pattern!
If you want to leave a question, please make sure you select the correct category in the form below, to speed up the answering process. Required fields are marked *.