
Looking for a yarn?


Comments / Questions (105)
![]() Bea wrote:
Bea wrote:
Hola, estoy tejiendo la talla xl y estoy confusa el la parte de las vueltas cortas. Pueden aclararme la parte de 6 pts menos por cada giro 1-2 veces de cada lado de la pieza y 4 pts menos por cada giro 3-2 veces de cada lado de la pieza. ¿Cuántas vueltas cortas hay en total? Gracias.
19.04.2025 - 17:39DROPS Design answered:
Hola Bea, quiere decir que trabajas hasta que queden 6 puntos menos que en la vuelta anterior antes de girar. Por ejemplo, si tenías 23, trabajar hasta que queden 17 y girar, trabajar de vuelta hasta que queden 17 puntos, girar, trabajar de vuelta hasta que queden 11 puntos, girar, trabajar de vuelta hasta que queden 11 puntos, girar. Ahora 4 pts menos: trabajar hasta que queden 7 puntos, girar, trabajar hasta que queden 7 puntos, girar, trabajar hasta que queden 3 puntos, girar, trabajar hasta que queden 3 puntos, girar. Cada vez son 2 filas (1 giro en cada lado), así que 2 y 2 veces son 8 filas (4 de 6 pts menos y 4 de 4 pts menos).
21.04.2025 - 00:21
![]() Hannele wrote:
Hannele wrote:
Teen kokoa XL. Kuinka monta silmukkaa pitää olla jäljellä kun lyhennetyt kerrokset on tehty? En ymmärrä, mitä ohjeen 'neulo 1-2 kertaa kummassakin reunassa...'.
02.04.2025 - 17:15DROPS Design answered:
Hei, neulot aina 6 silmukkaa vähemmän, kunnes kummassakin reunassa on yhteensä 3 kääntymiskohtaa. Sitten neulot aina 4 silmukkaa vähemmän, kunnes kummassakin reunassa on 2 uutta kääntymiskohtaa.
04.04.2025 - 17:13
![]() Sabine Hülkenberg wrote:
Sabine Hülkenberg wrote:
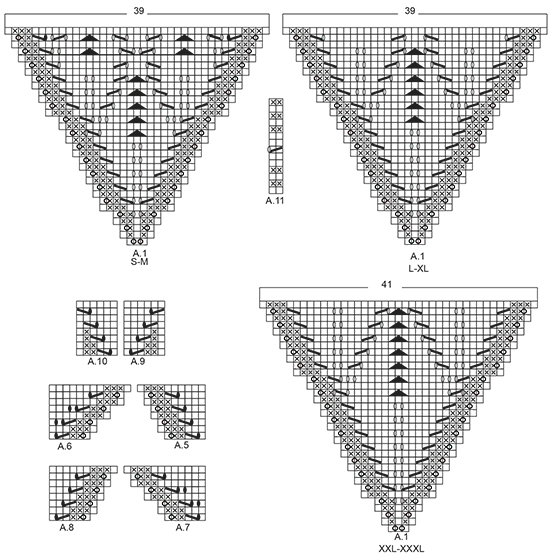
Hallo und herzlichen Dank für diese großartige Anleitung. Aber wo bitte finde ich das Diagramm A11? Liebe Grüße Sabine Hülkenberg
09.03.2025 - 21:24DROPS Design answered:
Liebe Sabine, das Diagramm A.11 finden Sie in der ersten Reihe oben, in der Mitte zwischen den Diagrammen A.1 (S-M) und A.1 (L-XL). Viel Spaß beim Stricken!
09.03.2025 - 21:37
![]() Ewa Kuczek wrote:
Ewa Kuczek wrote:
Proszę o pomoc. Robię tył topu , przerobiłam schemat A1 i mam 156 oczek nie wiem co dalej czy tak jak przód ale mam cztery elementy A1 i według opisu mam zrobić A12 A3 i A13 a jeden element mam zdjąć na nić pomocniczą ale on nie jest dokończony , jak go dokończyć. Nie rozumiem i proszę o pomoc. Pozdrawiam
05.02.2025 - 22:16DROPS Design answered:
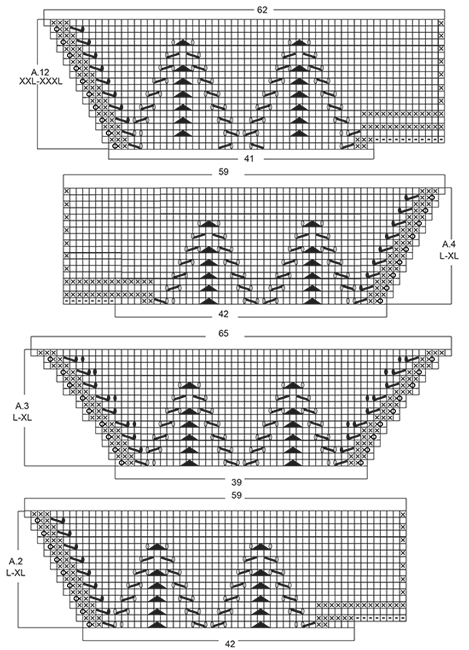
Witaj Ewo, schemat A.1 musi być zakończony, na wszystkich bokach – otrzymujesz kwadrat. Dalej przerabiasz następująco: schemat A.12 ponad 39-39-39-39-41-41 pierwszymi o. (lewy bok kwadratu, lewa strona topu), przer. schemat A.3 ponad 39-39-39-39-41-41 nast. o. (dół kwadratu, dół topu) i A.13 ponad 39-39-39-39-41-41 ost. o. (prawa strona topu; nabierasz 11 o. na końcu rzędu na ramię zgodnie ze schematem), zdjąć pozostałe o. na drut pomocniczy na brzeg/obszycie dekoltu (= 39-39-39-39-41-41 o.). Pozdrawiamy!
06.02.2025 - 11:10
![]() Jill wrote:
Jill wrote:
What are the measurements of each size? I am between US sizes and would like more precision when planning cast-on. Thanks!
08.12.2024 - 20:06DROPS Design answered:
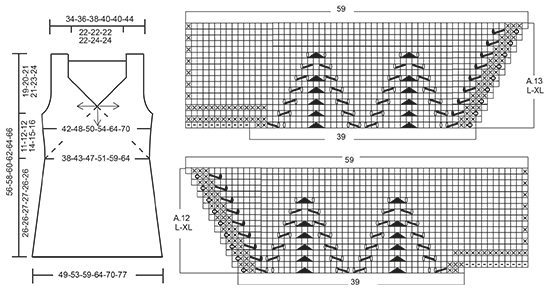
Dear Jill, all the measurements can be seen on the scematic drawing, at the bottom of the pattern. We suggest, you take a piece that fits the intended wearer, and compare the measurements to those at the schematic drawing. Happy Knitting!
09.12.2024 - 01:46
![]() Barb Cowper wrote:
Barb Cowper wrote:
When you do the first row of A2 you end up with 45 stitches not the 44 stitches
10.09.2024 - 13:24DROPS Design answered:
Dear Mrs Cowper, you are right, you will increase at the beginning of the first row from RS in A.2, but the first row is worked over the 41 sts on A.1 + the first 3 sts in garter stitch, see diagram the 41 sts are marked under diagram. Happy knitting!
11.09.2024 - 07:52
![]() Barb Cowper wrote:
Barb Cowper wrote:
When you go from A1 toA2 it says you have 44 stitches but you end up with 45. Stitches
09.09.2024 - 16:28DROPS Design answered:
Dear Mrs Cowper, you should have 41 sts (in the last 2 sizes) when A.1 is done - see diagram, then you work A.2 over the first 44 sts, ie over the first 3 sts in garter stitch + the 41 sts A.1 = 44 sts. Happy knitting!
10.09.2024 - 09:00
![]() Philippart wrote:
Philippart wrote:
Bonjour, je tricote ce joli top en taille L je ne comprends pas pour A5-A8. Au premier rang je dois laisser à la fin 24m. puis tourner tricoter le deuxième rang en laissant de nouveau 24 mailles. Ensuite au troisième rang je laisse 30 mailles non tricotées et je tourne? Merci d'avance pour votre réponse.
31.08.2024 - 21:23DROPS Design answered:
Bonjour Mme Philippart, tout à fait, c'est bien ainsi que vous devez procéder. Bon tricot!
02.09.2024 - 08:10
![]() Tirmarche wrote:
Tirmarche wrote:
Dans ce modèle, je coince sur A1!. La ligne 5: est ce: 1m endroit, jeté, 2 mailles envers, jeté, 1 maille endroit, 2 mailles envers, jeté. Pas très lisible sur le dessin. Merci de votre aide car je voudrais vraiment le faire! Tellement beau!
15.07.2024 - 17:15DROPS Design answered:
Bonjour, on est sur l’endroit : 1 m end ; 1 jeté entre 2 m (tricoter le jeté à l'end au rang suivant, pour former un jour) ; 2 m env ; 1 jeté entre 2 m (tricoter le jeté à l'env au rang suivant, pour former un jour) ; 1 m end ; 1 jeté entre 2 m (tricoter le jeté à l'env au rang suivant, pour former un jour) ; 2 m env ; 1 jeté entre 2 m (tricoter le jeté à l'end au rang suivant, pour former un jour) ; 1 m end. Bon tricot!
15.07.2024 - 17:43
![]() Petra Wisiak wrote:
Petra Wisiak wrote:
Hallo! Ich bin beim Rückenteil an den Punkt, wo man wie beim Vorderteil vorgehen soll. Bedeutet das auch, das man die verkürzten Reihen stricken muss, oder wo muss ich hier beginnen. Vielen Dank und liebe Grüße
02.06.2024 - 22:33DROPS Design answered:
Liebe Frau Wisiak, die 1. verkürzte Reihe ist eine Hinreihe, wo man bis 26-26-24-23-18-18 M strickt, dann wendet man und strickt wie zuvor bis 26-26-24-23-18-18 M am Ende der Reihe übrig sind, so wurde nur die mittleren Maschen gestrickt, und so weiter stricken, dh je nach der Größe immer mehr Maschen stilllegen/nicht stricken. Viel Spaß beim Stricken!
03.06.2024 - 08:17
|
|||||||||||||||||||||||||||||||
Butterfly Heart Top#butterflyhearttop |
|||||||||||||||||||||||||||||||
 |
 |
||||||||||||||||||||||||||||||
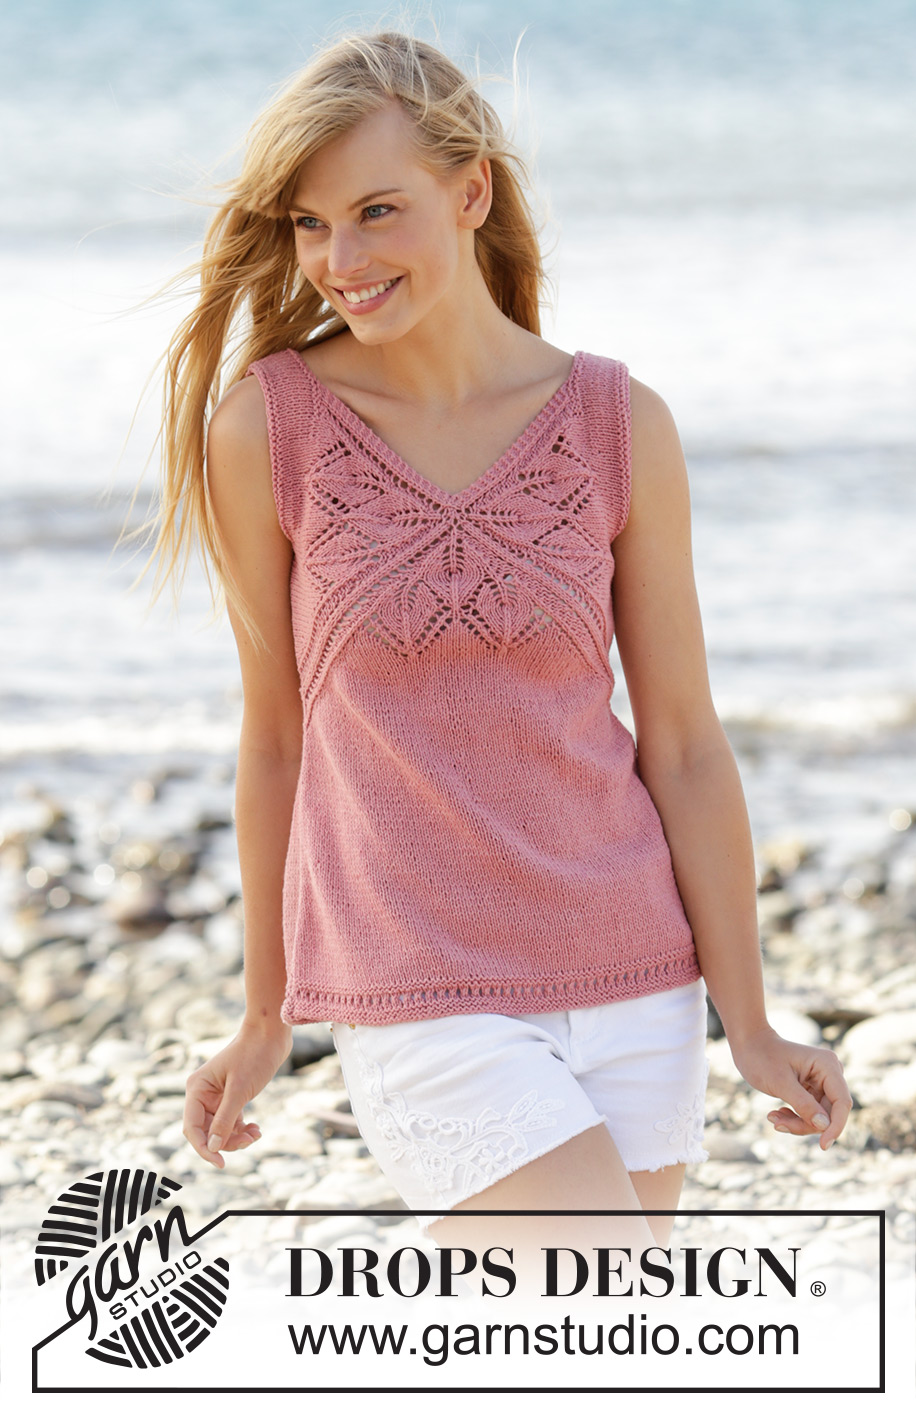
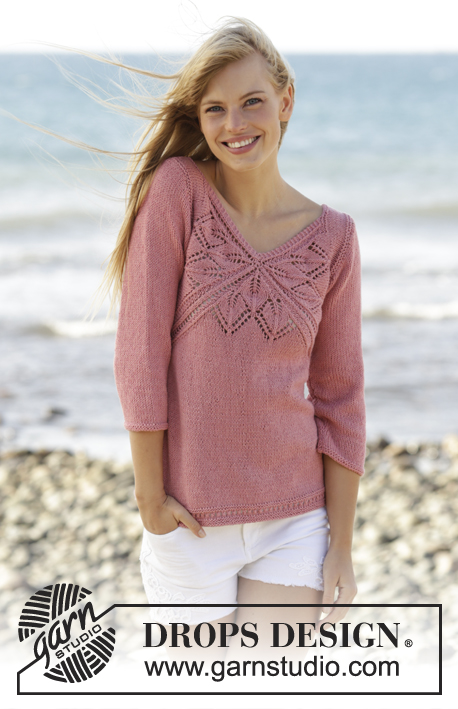
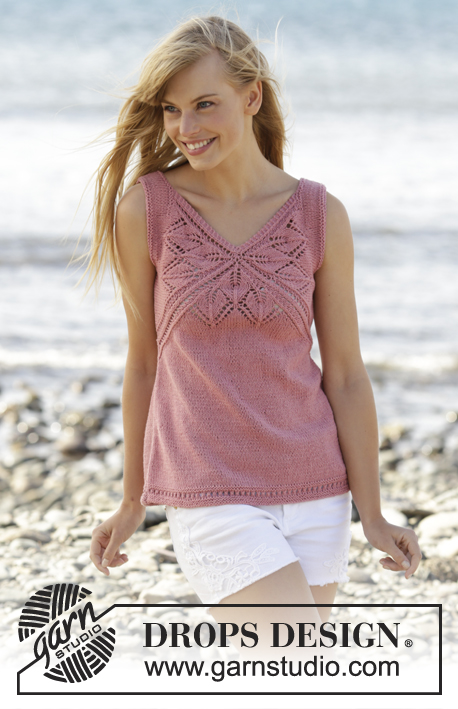
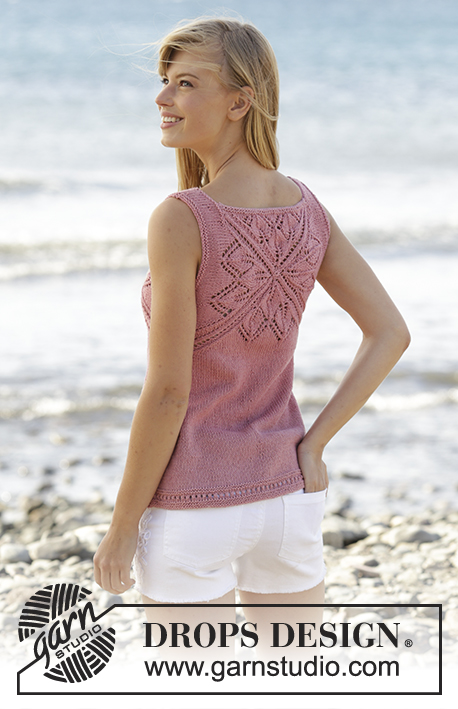
Knitted DROPS top with lace pattern and V-neck in ”Belle”. Worked top down. Size: S - XXXL.
DROPS 170-4 |
|||||||||||||||||||||||||||||||
|
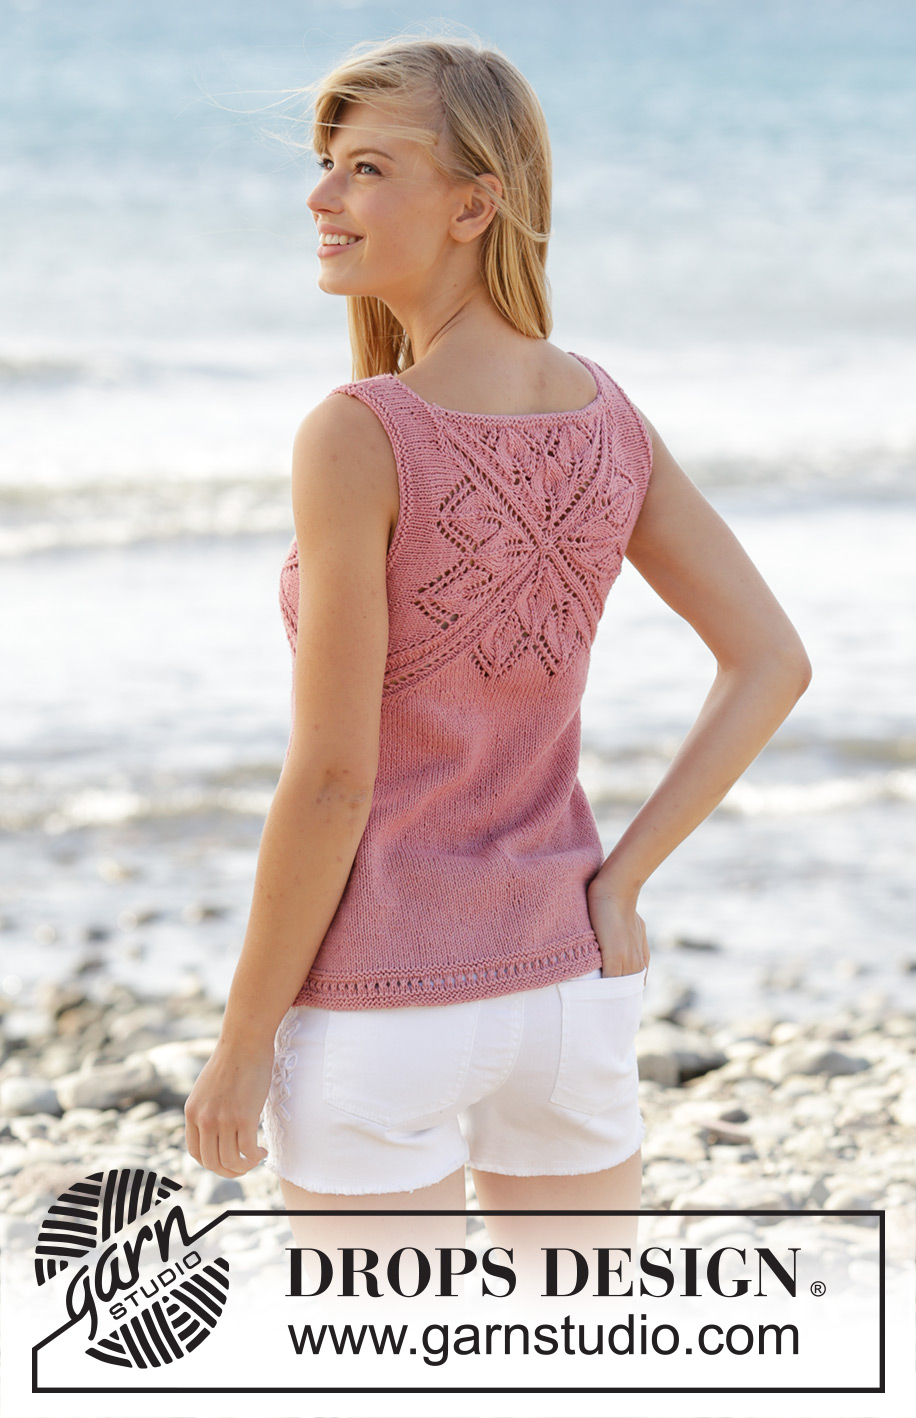
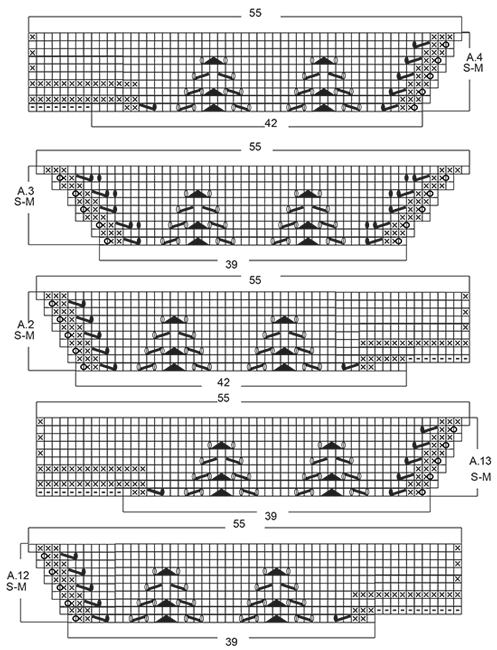
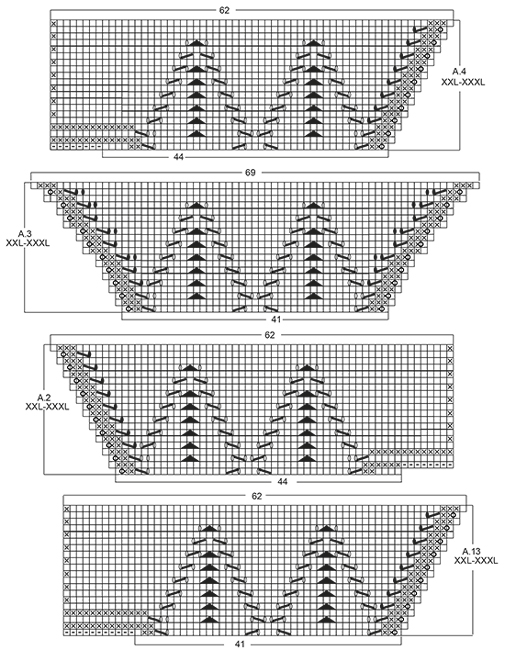
GARTER ST (back and forth): K all rows. 1 ridge = K2 rows. PATTERN: See diagrams A.1 to A.13. The diagrams show all rows in pattern seen from RS. See diagram for correct size. SHORT ROWS: When turning in short rows, slip first st as if to K. Tighten thread and make sure to avoid big holes. INCREASE TIP: All inc are done from RS. Inc 1 st by making 1 YO, on next row P YO twisted to avoid holes. ---------------------------------------------------------- TOP: Work from the middle of V-neck and out in 3 triangles on front piece and 4 triangles on back piece, then work downwards. FRONT PIECE: Work back and forth from neck and down. Cast on 8 sts on circular needle size 4 mm / US 6 with Belle. K 1 row. On next row inc as follows: * K 1, 1 YO *, repeat from *-* until 1 st remains and finish with K 1 = 15 sts on needle. Work next row as follows (from RS): Work YOs from previous row twisted, they should not make holes. Work 3 sts in GARTER ST - see explanation above, A.1, insert 1st marker, A.1, insert 2nd marker, A.1 (= repeat A.1 3 times in total on row), finish with 3 sts in garter st. REMEMBER THE KNITTING GAUGE When A.1 has been worked 1 time vertically, there are 123-123-123-123-129-129 sts on needle. Piece measures approx. 11-11-11-11-12-12 cm / 4½"-4½"-4½"-4½"-4 3/4"-4 3/4" from cast-on edge. Work next row as follows from RS: Work A.2 over the first 42-42-42-42-44-44 sts, A.3 over the next 39-39-39-39-41-41 sts and A.4 over the last 42-42-42-42-44-44 sts, after A.4 cast on 8 sts at the end of row for shoulder (see diagram). Work A.4 to A.2 on next row, after A.2 cast on 8 sts at the end of row for shoulder (see diagram). When A.2 to A.4 have been worked 1 time vertically, there are 165-165-183-183-193-193 sts on needle. Piece measures approx. 15-15-17-17-19-19 cm / 6"-6"-6 3/4"-6 3/4"-7½"-7½" from cast-on edge. READ ALL OF THE FOLLOWING SECTION BEFORE CONTINUING! WORK PATTERN AS BEFORE WHILE AT THE SAME TIME WORKING SHORT ROWS IN EACH SIDE OF PIECE. PATTERN: Work next row as follows from RS: Work 1 st in garter st, 48-48-52-52-55-55 sts in stockinette st, work A.5 over the next 6 sts, (marker), A.6 over the next 6 sts, 43-43-53-53-57-57 sts in stockinette st, A.7 over the next 6 sts, (marker), A.8 over the next 6 sts, 48-48-52-52-55-55 sts in stockinette st, finish with 1 st in garter st. Repeat A.5 to A.8 over the 6 sts on each side of each marker 2-3-2-3-4-5 times in total, then repeat the first 0-0-6-4-4-4 rows of A.5 to A.8 1 more times. SHORT ROWS: AT THE SAME TIME when 2-6-0-2-0-6 rows of A.5 to A.8 have been worked, work SHORT ROWS - see explanation above - in each side of piece as follows: Work until 26-26-24-23-18-18 sts remain on row (work A.5 to A.8 as before), turn and work until 26-26-24-23-18-18 sts remain, turn piece. Then work short rows in the different sizes as follows: SIZE M: Work 6 sts less for every turn 2 times in each side of piece. SIZE L-XL: Work 6 sts less for every turn 1-2 times in each side of piece, then work 4 sts less on every turn 3-2 times in each side of piece. SIZE XXL-XXXL: Work 6 sts less for every turn 1-1 time in each side of piece, then work 4 sts less for every turn 4-4 times in each side of piece, then work 2 sts less on every turn 4-5 times in each side of piece. ALL SIZES: When the short rows have been worked, work last row from WS, so that next row beg from shoulder. Then work over all sts from RS as follows: Work in garter st over the first 42-44-46-48-50-52 sts AT THE SAME TIME inc 0-2-4-4-6-6 sts evenly, work as before (i.e. A.5 to A.8 and stockinette st) until 42-44-46-48-50-52 sts remain, work in garter st over the last sts AT THE SAME TIME inc 0-2-4-4-6-6 sts evenly (= 42-46-50-52-56-58 sts in garter st in each side of piece). Work 3 rows in garter st over the outermost 42-46-50-52-56-58 sts in garter st in each side of piece, pattern and stockinette st over the remaining sts. On next row from WS work as follows: bind off with K over the first 40-44-48-50-54-56 sts for armhole, work 2 sts in garter st, work in stockinette st and pattern as before until 42-46-50-52-56-58 sts remain, 2 sts in garter st, bind off with K over the last 40-44-48-50-54-56 sts for armhole. Cut the yarn. 8-8-8-12-12-12 rows of A.5 to A.8 remain. Beg next row from RS. Continue to work in garter st over the first and last 2 sts in each side of piece. When A.5 to A.8 have been worked, there are 23-25-26-27-32-34 sts before 1st marker, 79-91-99-107-123-135 sts between 1st and 2nd marker and 23-25-26-27-32-34 sts after 2nd marker = 125-141-151-161-187-203 sts in total on row. Piece measures approx. 21-24-25-27-32-35 cm / 8 1/4"-9½"-9 3/4"-10½"-12½"-13 3/4" on the widest measured from cast-on edge. Insert 1 marker in piece, NOW MEASURE PIECE FROM HERE. On next row from RS loosely bind off the first 22-24-25-26-31-33 sts with K, work 1 edge st in garter st, (marker), work A.9 over the first 6 sts after marker, stockinette st over the next 67-79-87-95-111-123 sts, A.10 over the last 6 sts before second marker, (marker), 1 edge st in garter st, loosely bind off the last 22-24-25-26-31-33 sts = 81-93-101-109-125-137 sts remain on needle. Cut the yarn. Work next row from WS over the remaining sts as follows: 1 edge st in garter st, A.10 as before, stockinette st over the next 67-79-87-95-111-123 sts, A.9 as before, 1 edge st in garter st. When A.9 and A.10 have been worked 1 time vertically, continue in stockinette st with 1 edge st in garter st in each side of piece. When piece measures 3 cm / 1'' from marker, inc 1 st in each side of piece inside 1 edge st (= 2 sts inc) - READ INCREASE TIP. Repeat inc every 1½-1½-1½-1-1-1 cm / ½"-½"-½"-3/8"-3/8"-3/8" 12-10-12-14-12-13 times in total = 105-113-125-137-149-163 sts on needle. When piece measures 23-23-24-24-23-23 cm / 9"-9"-9½"-9½"-9"-9" from marker (piece measures 53-55-57-59-61-63 cm / 21''-21 5/8''-22½''-23¼''-24''-24¾'' in total from shoulder), adjust so that next row is from RS, switch to circular needle size 3.5 mm / US 4. Work next row from RS as follows: Work 1 edge st in garter st, work A.11 (= 2 sts) until 2 sts remain, work first st in A.11, finish with 1 edge st in garter st. On row with holes (i.e. 7th row) work next to last st K. Bind off when A.11 has been worked 1 time vertically. Piece measures 56-58-60-62-64-66 cm / 22''-22¾''-23 5/8''-24 3/8''-25¼''-26'' in total from shoulder. BACK PIECE: Piece is first worked in the round, then worked as front piece. Cast on 6 sts on double pointed needles size 4 mm / US 6 with Belle, switch to circular needle when needed. K 1 row. On next row inc as follows: * K 1, 1 YO *, repeat from *-* = 12 sts on row, K YOs twisted on next row, they should not make holes. Work A.1 4 times in total, insert 1 marker between each A.1 (= 4 markers). When A.1 has been worked 1 time vertically, there are 156-156-156-156-164-164 sts on needle. Continue as follows: A.12 over the first 39-39-39-39-41-41 sts, work A.3 over the next 39-39-39-39-41-41 sts and A.13 over the last 39-39-39-39-41-41 sts, slip the remaining sts on a stitch holder for neck edge (= 39-39-39-39-41-41 sts), after A.13 cast on 11 sts at the end of row for shoulder (see diagram). Then work back and forth on needle. Work A.13/A.3/A.12 on next row, after A.12 cast on 11 sts at the end of row for shoulder (see diagram). When A.12/A.3/A.13 have been worked 1 time vertically, there are 165-165-183-183-193-193 sts on needle. Piece measures approx. 15-15-17-17-19-19 cm / 6"-6"-6 3/4"-6 3/4"-7½"-7½" from cast-on edge. Now continue back piece as front piece. NECK EDGE: Worked back and forth on needle. Slip sts from stitch holder for neck edge on back piece back on circular needle size 3.5 mm / US 4. Work 2 ridges. Fasten ridges where sts were cast on for shoulder. Fasten off. ASSEMBLY: Sew the side seams inside 1 edge st in garter st. Sew shoulder seams inside 1 edge st in garter st. Tighten tog the middle (i.e. cast-on edge) on both front and back piece. |
|||||||||||||||||||||||||||||||
Diagram explanations |
|||||||||||||||||||||||||||||||
|
|||||||||||||||||||||||||||||||
|
|||||||||||||||||||||||||||||||
|
|||||||||||||||||||||||||||||||
|
|||||||||||||||||||||||||||||||
|
|||||||||||||||||||||||||||||||
|
|||||||||||||||||||||||||||||||
Have you finished this pattern?Tag your pictures with #dropspattern #butterflyhearttop or submit them to the #dropsfan gallery. Do you need help with this pattern?You'll find 23 tutorial videos, a Comments/Questions area and more by visiting the pattern on garnstudio.com. © 1982-2025 DROPS Design A/S. We reserve all rights. This document, including all its sub-sections, has copyrights. Read more about what you can do with our patterns at the bottom of each pattern on our site. |
|||||||||||||||||||||||||||||||


With over 40 years in knitting and crochet design, DROPS Design offers one of the most extensive collections of free patterns on the internet - translated to 17 languages. As of today we count 314 catalogs and 11822 patterns - 11812 of which are translated into English (US/in).
We work hard to bring you the best knitting and crochet have to offer, inspiration and advice as well as great quality yarns at incredible prices! Would you like to use our patterns for other than personal use? You can read what you are allowed to do in the Copyright text at the bottom of all our patterns. Happy crafting!
Post a comment to pattern DROPS 170-4
We would love to hear what you have to say about this pattern!
If you want to leave a question, please make sure you select the correct category in the form below, to speed up the answering process. Required fields are marked *.