DROPS Alpaca
DROPS Alpaca
100% Alpaca
from 4.85 $ /50g
DROPS Brushed Alpaca Silk
77% Alpaca, 23% Silk
from 3.95 $ /25g
Get the yarn to make this pattern from 44.00$.

The yarn cost is calculated from the pattern’s smallest size and the yarn’s cheapest product type. Looking for an even better price? You might find it on the DROPS Deals!

DROPS SS24

Letizia

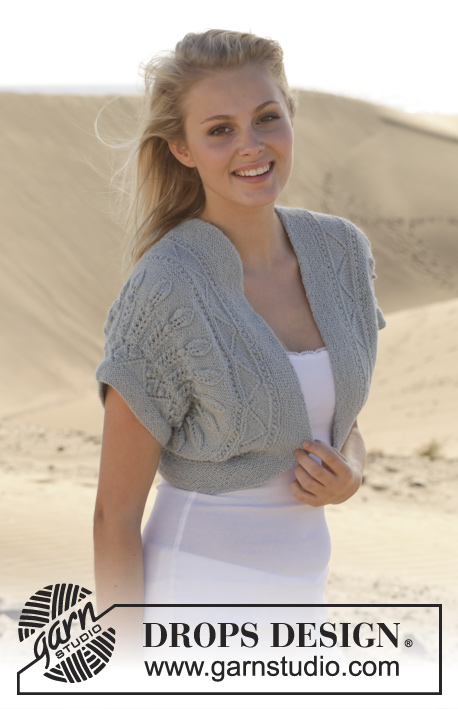
Knitted DROPS jacket with cables in "Alpaca" and "Alpaca Silk" or "Vivaldi". Size: S - XXXL.

DROPS 153-16
DROPS design: Pattern no z-666
Yarn group A + C or D
-----------------------------------------------------------
Size: S - M - L - XL - XXL - XXXL
Finished measurements:
Bust: 80-88-96-106-118-130 cm / 31½"-34⅝"-37¾"-41¾"-46½"-51"
Full length: 70-72-74-76-78-80 cm / 27½"-28⅜"-29⅛"-30"-30¾"-31½

Materials:
DROPS ALPACA from Garnstudio
250-300-350-350-400-450 g color no 8105, light steel blue

And use:

DROPS ALPACA SILK from Garnstudio
150-175-200-200-225-250 g color no 14, light grayish green
Or
DROPS VIVALDI from Garnstudio
150-200-200-200-250-250 g color no 09, light blue

DROPS CIRCULAR NEEDLE (60 and 80 cm / 24" and 32") SIZE 4.5 mm / US 7 - or size needed to get 16 sts x 20 rows in stockinette st = 4" x 4" (10 x 10 cm).
DROPS MOTHER-OF-PEARL BUTTON NO 522: 2 pieces for all sizes

-------------------------------------------------------

Alternative Yarn – See how to change yarns here
Yarn Groups A to F – Use the same pattern and change the yarn here
Yarn usage using an alternative yarn – Use our yarn converter here

-------------------------------------------------------

DROPS Alpaca
DROPS Alpaca
100% Alpaca
from 4.85 $ /50g
DROPS Brushed Alpaca Silk
77% Alpaca, 23% Silk
from 3.95 $ /25g
Get the yarn to make this pattern from 44.00$.

The yarn cost is calculated from the pattern’s smallest size and the yarn’s cheapest product type. Looking for an even better price? You might find it on the DROPS Deals!

Pattern instructions

NOTE: This pattern is written in American English. All measurements in charts are in cm. For conversion from inches to cm - click here. There are different terms for crocheting in American and British English. If this pattern includes crochet, click for "crochet terms" here. For this pattern in British English, please click here.
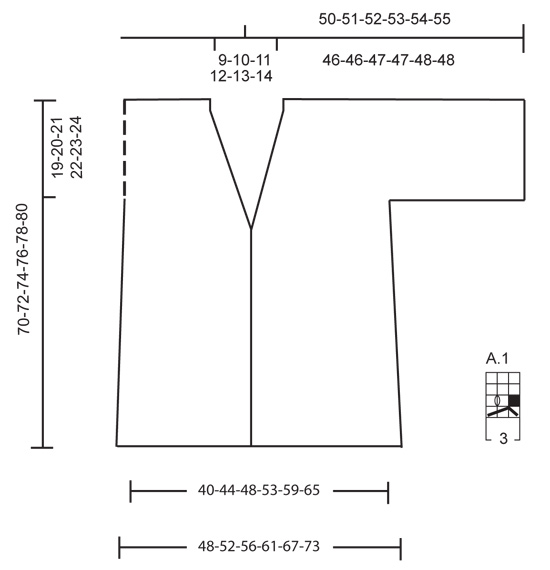
GARTER ST (back and forth on needle):
K all rows. 1 ridge = K2 rows.

PATTERN:
See diagram A.1. The diagram shows all rows in pattern seen from RS.

DECREASE TIP:
Dec inside 1 edge st. All dec are done from RS!
Dec before 1 edge st as follows: K 2 tog.
Dec after 1 edge st as follows: Slip 1 st as if to K, K 1, psso.

BUTTONHOLES:
Dec for buttonholes on right band. 1 buttonhole = K tog fourth and fifth st from edge and make 1 YO.
Dec for buttonholes when piece measures:
SIZE S: 36 and 43 cm / 14¼" and 17".
SIZE M: 37 and 44 cm / 14½" and 17¼".
SIZE L: 38 and 45 cm / 15" and 17¾".
SIZE XL: 39 and 46 cm / 15¼" and 18".
SIZE XXL: 40 and 47 cm / 15¾" and 18½".
SIZE XXXL: 41 and 48 cm / 16⅛" and 19".
----------------------------------------------------------

BACK PIECE:
Worked back and forth on circular needle.
Cast on 82-87-93-101-111-123 sts (includes 1 edge st in each side) on circular needle size 4.5 mm / US 7 with 1 strand Alpaca + 1 strand Alpaca Silk (= 2 strands). P 1 row from WS. Then work next row as follows: 1 edge st, P 11-11-11-12-11-11, * A.1 (= 3 sts), P 8-9-8-9-9-9 * repeat from *-* 5-5-6-6-7-8 times in total, A.1, finish with P 11-11-11-12-11-11 and 1 edge st. Continue this pattern AT THE SAME TIME when piece measures 5 cm / 2", dec 1 st in each side every 6-6-6-6½-6½-6½ cm / 2⅜"-2⅜"-2⅜"-2½"-2½"-2½" 7 times in total = 68-73-79-87-97-109 sts. When piece measures 51-52-53-54-55-56 cm / 20"-20½"-21"-21¼"-21⅝"-22", cast on 46-45-44-41-38-34 new sts at the end of the next 2 rows = 160-163-167-169-173-177 sts. Then work as follows from RS: 5 sts in garter st, P 2-9-0-6-2-10, * A.1, P 8-9-8-9-9-9 * repeat from *-* 13-11-14-12-13-12 times in total, A.1, finish with P 2-9-0-6-2-10 and 5 sts in garter st. Continue this pattern. When piece measures 66-68-70-72-74-76 cm / 26"-26¾"-27½"-28⅜"-29⅛"-30" / 26"-26¾"-27½"-28⅜"-29⅛"-30", work in garter st over the middle 28-29-31-33-35-37 sts, work the other sts as before. When piece measures 68-70-72-74-76-78 cm / 26¾"-27½"-28⅜"-29⅛"-30"-30¾", bind off the middle 12-13-15-17-19-21 sts for neck. Then dec 1 st inside 8 sts in garter st on next row towards the neck = 73-74-75-75-76-77 sts remain on each shoulder/sleeve. Bind off when piece measures 70-72-74-76-78-80 cm / 27½"-28⅜"-29⅛"-30"-30¾"-31½.

RIGHT FRONT PIECE:
Cast on 54-56-59-63-68-74 sts (includes 1 edge st in the side) on circular needle size 4.5 mm / US 7 with 1 strand of each yarn (= 2 strands). P 1 row from WS. Then work next row as follows: 8 band sts in garter st, K 1, P 3, K 1, P 4-4-9-10-4-10, * A.1 (= 3 sts), P 8-9-8-9-9-9 * repeat from *-* 2-2-2-2-3-3 times in total, A.1, finish with P 11-11-11-12-11-11 and 1 edge st. Continue this pattern AT THE SAME TIME when piece measures 5 cm / 2", dec 1 st 7 times in the side as on back piece = 47-49-52-56-61-67 sts. Remember BUTTONHOLES - see explanation above. When piece measures 45-46-47-48-49-50 cm / 17¾"-18"-18½"-19"-19¼"-19¾", dec for neck inside 8 band sts in garter st, K 1, P 3, K 1: Dec 1 st by P 2 tog every 1½ cm /½" 14-14-15-16-17-19 times in total. AT THE SAME TIME when piece measures 51-52-53-54-55-56 cm / 20"-20½"-21"-21¼"-21⅝"-22", cast on 46-45-44-41-38-34 new sts for sleeve at the end of next row from RS.
Then work as follows from WS: 5 sts in garter st, K 2-9-0-6-2-10, * A.1, K 8-9-8-9-9-9 * repeat from *-* 6-5-6-5-6-6 times in total, and continue with pattern, neck dec and band as before the rest of row.
Continue to work like this until neck dec is done and piece measures 70-72-74-76-78-80 cm / 27½"-28⅜"-29⅛"-30"-30¾"-31½. 79-80-81-81-82-82 sts remain for shoulder/sleeve and band. On next row from WS bind off the first 71-72-73-73-74-74 sts = 8 sts in garter st remain for band. Continue in garter st back and forth until piece measures approx. 7-7-8-8-9-9 cm / 2¾"-2¾"-3⅛"-3⅛"-3½"-3½" from shoulder. Bind off.

LEFT FRONT PIECE:
Work as right front piece but reversed. and without dec for buttonholes.

ASSEMBLY:
Sew the shoulder seams. Sew sleeve and side seams in one inside 1 edge st. Sew bands tog mid back and sew it to the neck. Sew on buttons.

Diagram

All measurements in charts are in cm.

symbols = K from RS, P from WS
symbols = this st is not counted – skip this square
symbols = slip 1 st as if to K, K 2, psso
symbols = 1 YO between 2 sts
diagram
Do you have a question? See a list of frequently asked questions (FAQ)

Knitting tension is what determines the final measurements of your work, and is usually measured per 10 x 10 cm. It is provided like so: number of stitches in width x number of rows in height - eg: 19 stitches x 26 rows = 10 x 10 cm.

The knitting tension is very individual; some people knit/crochet loosely while others work tightly. You adjust the knitting tension with the needle size, which is why the suggested needle size only serve as a guide! You need to adjust this (up or down) to ensure that YOUR knitting tension matches the knitting tension provided in the pattern. If you work with a different knitting tension than provided you will have a different yarn consumption, and your work will have different measurements than what the pattern suggests.

The knitting tension also determines which yarns can replace each other. As long as you achieve the same knitting tension you can replace one yarn with another.

See DROPS lesson: How to measure your tension/gauge

See DROPS video: How to make a gauge tension swatch

The required amount of yarn is provided in grams, eg: 450 g. To calculate how many balls you’ll need you first need to know how many grams are in 1 ball (25g, 50g or 100g). This information is available if you click on the individual yarn quality on our pages. Divide the amount required with the amount of each ball. For example, if each ball is 50g (the most common amount), the calculation will be as follows: 450 / 50 = 9 balls.

The important thing when changing from one yarn to another is that the knitting/crochet tension remains the same. This is so that the measurements of the finished piece will be the same as on the sketch provided. It is easier to achieve the same knitting tension using yarns from the same yarn group. It is also possible to work with multiple strands of a thinner yarn to achieve the knitting tension of a thicker one. Please try our yarn converter. We recommend you to always work a test swatch.

Please NOTE: when changing yarn the garment might have a different look and feel to the garment in the photo, due to individual properties and qualities of each yarn.

See DROPS lesson: Can I use a different yarn than the one mentioned in the pattern?

All our yarns are categorised into yarn groups (from A to F) according to thickness and knitting tension – group A contains the thinnest yarns and group F the thickest. This makes it easier for you to find alternative yarns to our patterns, should you wish to switch yarn. All yarns within the same group have a similar knitting tension and can easily replace each other. However, different yarn qualities have different structures and properties which will give the finished work a unique look and feel.

Click here for an overview of the yarns in each yarn group

At the top of all our patterns you’ll find a link to our yarn converter, which is a helpful tool should you wish to use a different yarn than suggested. By filling in the yarn quality you wish to replace, the amount (in your size) and number of strands, the converter will present good alternative yarns with the same knitting tension. Additionally it will tell you how much you’ll require in the new qualities and whether you’ll need to work with multiple strands. Most skeins are 50g (some are 25g or 100g).

If the pattern is worked with multiple colours, every colour will have to be converted separately. Similarly, if the pattern is worked with several strands of different yarns (for example 1 strand Alpaca and 1 strand Kid-Silk) you will have to find alternatives for each, individually.

Click here to see our yarn converter

Since different yarns have different qualities and textures we have chosen to keep the original yarn in our patterns. However, you can easily find options among our available qualities by using our yarn converter, or simply pick a yarn from the same yarn group.

It is possible that some retailers still have discontinued yarns in stock, or that someone has a few skeins at home that they would like to find patterns for.

The yarn converter will provide both alternative yarn as well as required amount in the new quality.

If you think it's hard to decide what size to make, it can be a good idea to measure a garment you own already and like the size of. Then you can pick the size by comparing those measures with the ones available in the pattern's size chart.

You'll find the size chart at the bottom of the pattern.

See DROPS lesson: How to read size chart

The needle size provided in the pattern serves only as a guide, the important thing is to follow the knitting tension. And since knitting tension is very individual, you will have to adjust the needle size to ensure that YOUR tension is the same as in the pattern – maybe you’ll have to adjust 1, or even 2 needle sizes, up or down to achieve the correct tension. For this, we recommend that you work test swatches.

Should you work with a different knitting tension than the one provided, the measurements of the finished garment might deviate from the measurement sketch.

See DROPS lesson: How to measure your tension/gauge

See DROPS video: How to make a gauge tension swatch

Working a garment top-down provides more flexibility and room for personal adjustment. For example it is easier to try the garment on while working, as well as making adjustments to length of yoke and shoulder caps.

The instructions are carefully explaining every step, in the correct order. Diagrams are adjusted to the knitting direction and are worked as usual.

The diagram depicts all rows/rounds, and every stitch seen from the right side. It is read from bottom to top, from right to left. 1 square = 1 stitch.

When working back and forth, every other row is worked from the right side and every other row is worked from the wrong side. When working from the wrong side, the diagram will have to be worked reversed: from left to right, knit stitches are purled, purl stitches are knit etc.

When working in the round every round is worked from the right side and the diagram are worked from right to left on all rounds.

See DROPS lesson: How to read knitting diagrams

The diagram depicts all rows/rounds, and every stitch seen from the right side. It is worked from bottom to top, from right to left.

When working back and forth every other row is worked from the right side: from right to left and every other row is worked from the wrong side: from left to right.

When working in the round, every row in the diagram are worked from the right side, from right to left.

When working a circular diagram you start in the middle and work your way outwards, counter clockwise, row by row.

The rows usually start with a given number of chain stitches (equivalent to the height of the following stitch), this will either be depicted in the diagram or explained in the pattern.

See DROPS lesson: How to read crochet diagrams

Instructions for working several diagrams after each other on the same row/round, will often be written like so: “work A.1, A.2, A.3 a total of 0-0-2-3-4 times". This means you work A.1 once, then A.2 is worked once, and A.3 is repeated (in width) the number of times provided for your size – in this case like so: S = 0 times, M = 0 times, L=2 times, XL= 3 times and XXL = 4 times.

The diagrams are worked as usual: begin with the first row in A.1, then work the first row in A.2 etc.

See DROPS lesson: How to read knitting diagrams

See DROPS lesson: How to read crochet diagrams

The total width of the garment (from wrist-to-wrist) will be larger in the larger sizes, despite the actual sleeves being shorter. The larger sizes have longer sleeve caps and wider shoulders, so there will be a good fit in all sizes.

The measurement sketch/schematic drawing provides information regarding the full length of the garment. If it’s a jumper or a jacket the length is measured from the highest point on the shoulder (usually closest to the neckline), and straight down to the bottom of the garment. It is NOT measured from the tip of shoulder. Similarly, the length of yoke is measured from the highest point on the shoulder and down to where yoke is split into body and sleeves.

See DROPS lesson: How to read a schematic drawing

Diagrams are often repeated on the round or in height. 1 repeat is the diagram the way it appears in the pattern. If it says to work 5 repeats of A.1 in the round, then you work A.1 a total of 5 times after/next to each other in the round. If it says to work 2 repeats of A.1 vertically/in height you work the entire diagram once, then begin again at the start and work the entire diagram one more time.

Chain stitches are slightly narrower than other stitches and to avoid working the cast-on edge too tight, we simply chain more stitches to begin with. The stitch count will be adjusted on the following row to fit the pattern and measurement sketch.

The rib edge is more elastic and will contract slightly compared to, for example, stocking stitch. By increasing before the rib edge, you avoid a visible difference in width between the rib edge and the rest of the body.

It’s very easy to cast off too tightly, and by making yarn overs while casting off (and simultaneously casting these off) you avoid a too tight cast off edge.

See DROPS video: How to bind off with yarn overs (yo)

To achieve an even increase (or decrease) you can increase on, for example: every 3rd and 4th row alternately, like so: work 2 rows and increase on the 3rd row, work 3 rows and increase on the 4th. Repeat this until the increase is complete.

See DROPS lesson: Increase or decrease 1 st on every 3rd and 4th row alternately

Should you prefer to work in the round instead of back and forth, you may of course adjust the pattern. You’ll need to add steeks mid-front (usually 5 stitches), and follow the instructions. When you would normally turn and work from the wrong side, simply work across the steek and continue in the round. At the end you’ll cut the piece open, pick up stitches to work bands, and cover the cut edges.

See DROPS video: How to knit steeks and cut open

Should you prefer to work back and forth instead of in the round, you may of course adjust the pattern so you work the pieces separately and then assemble them at the end. Divide the stitches for the body in 2, add 1 edge stitch in each side (for sewing) and work the front and back pieces separately.

See DROPS lesson: Can I adapt a pattern for circular needles into straight needles?

Pattern repeats can vary slightly in the different sizes, in order to get the correct proportions. If you’re not working the exact same size as the garment in the photo, yours might deviate slightly. This has been carefully developed and adjusted so that the complete impression of the garment is the same in all sizes.

Make sure to follow instructions and diagrams for your size!

If you have found a pattern you like which is available in women’s size it’s not very difficult to convert it to men’s size. The biggest difference will be the length of sleeves and body. Start working on the women size that you think would fit across the chest. The additional length will be worked right before you cast off for the armhole/sleeve cap. If the pattern is worked top-down you can add the length right after the armhole or before the first decrease on sleeve.

Regarding additional yarn amount, this will depend on how much length you add, but it is better with a skein too many than too few.

All yarns will have excess fibres (from production) that might come off as lint or shedding. Brushed yarns (ie hairier yarns) have more of these loose, excess fibres, causing more shedding.

Shedding also depends on what is worn under or over the garment, and whether this pulls at the yarn fibres. It’s therefore not possible to guarantee that there will be no shedding

Below are some tips on how to get the best result when working with hairier yarns:

1. When the garment is finished (before you wash it) shake it vigorously so the looser hairs come off. NOTE: do NOT use a lint roller, brush or any method that pulls at the yarn.

2. Place the garment in a plastic bag and put it in your freezer - the temperature will cause the fibres to become less attached to each other, and excess fibres will come off easier.

3. Leave in the freezer for a few hours before taking it out and shaking it again.

4. Wash the garment according to the instructions on the yarn label.

Pilling is a natural process that happens to even the most exclusive of fibers. It's a natural sign of wear and tear that is hard to avoid, and that is most visible in high friction areas of your garment like a sweater's arms and cuffs.

You can make your garment look as new by removing the pilling, using a fabric comb or a pill/lint remover.

Still can't find the answer you need? Then scroll down and leave your question so one of our experts can try to help you. This will be done normally within 5 to 10 working days.
In the meantime, you can read the questions and answers that others have left to this pattern or join the DROPS Workshop on Facebook to get help from fellow knitters/crocheters!

You might also like...

Post a comment to pattern DROPS 153-16

We would love to hear what you have to say about this pattern!

If you want to leave a question, please make sure you select the correct category in the form below, to speed up the answering process. Required fields are marked *.

Comments / Questions (44)

country flag NZINA wrote:

Bonjour je suis vraiment désolée je vous ai donné des chiffres pour le devant droit. Pardon. Je tricote le modèle en plus grande taille qui est XXXL. Ma question se pose pour le demi devant droit. Merci.

04.08.2022 - 10:59

DROPS Design answered:

Bonjour Mme Nzina, pas de souci, voici donc pour la taille XXXL: vous montez 74 mailles, diminuez 7 mailles sur le côté + 19 mailles pour l'encolure et montez 34 mailles pour la manche: 74-7-19+34= 82 mailles. Vous rabattez 74 mailles = il reste 8 mailles. Est-ce plus clair ainsi? Bon tricot!

04.08.2022 - 12:34

country flag NZINA wrote:

Bonjour je monte 74 m pour le dos. Je diminue 7 m de chaque côté = 74-14=60 m. Si 60 m/2 = 30 m pour chaque côté. Donc 30 m-19 = 11 m. Je monte 34 m pour la manche = 11 m + 34 m =45 m. Là on est loin des 82 m ( 82- 8 =74 m) c'est à dire 74 m pour l'épaule et la manche et 8 m de bordure encolure dos. Où se trouve l'erreur ? Merci pour votre réponse. Bonne journée.

03.08.2022 - 17:09

DROPS Design answered:

Bonjour Mme Nzina, vous devez monter 82 mailles au minimum pour la 1ère taille pour commencer le dos - vous diminuez ensuite 7 m x 2 = 14 m au total => il reste 68 mailles, vous montez 2 x 46 mailles pour les manches soit: 68+46+46=160 mailles. Vous rabattez lez 12 m centrales = il reste 74 mailles pour chaque épaule/manche et vous diminuez 1 maille côté encolure = il reste 73 mailles pour l'épaule/manche. Tricotez-vous une autre taille? Je ne retrouve pas tous vos nombres dans le modèle.

03.08.2022 - 17:18

country flag NZINA wrote:

Bonjour le problème est que j'ai moins de mailles sur le dos après les diminutions. Dois-je diminuer une seule fois 1 maille à 8 mailles point mousse pour l'encolure dos ou bien 8 fois et de toutes les façons ça ne tombe pas juste. J'ai défait trois fois et recommencé et je bloque. J'ai besoin de votre aide. Merci

02.08.2022 - 12:39

DROPS Design answered:

Bonjour Mme Nzina, pourquoi avez-vous moins de mailles? Avez-vous diminué trop de mailles? Vous commencez avec 82-87-93-101-111-123 m et diminuez 8 fois 1 m de chaque côté = soit 16 m au total - vous montez ensuite 46-45-44-41-38-34 m de chaque côté, rabattez les 12-13-15-17-19-21 m centrales pour l'encolure puis diminuez 1 m pour l'encolure, il doit vous rester 73-74-75-75-76-77 m pour chacune des épaules/manches du dos. Est-ce que ceci peut vous aider?

02.08.2022 - 13:17

country flag NZINA wrote:

Bonsoir après avoir effectué toutes les diminutions de dos et devant il me reste plus de mailles sur le devant. Je ne comprends pas. J'ai besoin de votre aide. Merci.

01.08.2022 - 19:27

DROPS Design answered:

Bonjour Nzina, vous montez 54-56-59-63-68-74 m et diminuez 7 mailles sur le côté, puis vous diminuez 14-14-15-16-17-19 m pour l'encolure et vous montez 46-45-44-41-38-34 m pour la manche, vous avez maintenant 79-80-81-81-82-82 m, rabattez les 71-72-73-73-74-74 m pour l'épaule/manche, il reste 8 m. En espérant que ce décompte puisse vous aider. Bon tricot!

02.08.2022 - 08:54

country flag Alena wrote:

Dobrý večer, paní Hano, děkuji Vám za vysvětlení a za video! je to opravdu snadné.\r\nS pozdravem a přáním pěkného večera, Alena.

18.04.2021 - 20:21

country flag Alena wrote:

Dobrý večer, mohla byste mi poradit, jak se pletou copánky na tomto modelu? Je tu popis jen vzoru A1... Děkuji Vám za pomoc, s pozdravem Alena.

16.04.2021 - 21:31

DROPS Design answered:

Dobrý den, Aleno! Copánky na tomto modelu jsou snadné, tzv. falešné a nepotřebují klasické křížení za pomoci copánkové jehlice - vytváří se jednoduchým nahazováním a přetahováním ok. Vzor A1 na ně tedy úplně stačí. Podívejte se na video-ukázku zde - je to opravdu hračka :-) Hodně zdaru! Hana

18.04.2021 - 11:48

country flag Natalia wrote:

Hallo, mir ist nicht ganz klar, ob das Diagramm nur Hinreihen zeigt oder sind die Reihen 2 und 4 (auf dem Diagramm) Rückreihen?

07.04.2020 - 22:40

DROPS Design answered:

Liebe Natalia, alle Reihen sind im Diagram gezeigt, dh die Hin- sowie die Rückreihen - mehr über Diagramme lesen Sie hier. Viel Spaß beim stricken!

09.04.2020 - 16:05

country flag Birgit wrote:

Die Abnahmen an den Seiten werden in einer Hinreihe - hier sind linke Maschen mit rechten Maschen gemacht?

30.12.2018 - 15:24

DROPS Design answered:

Liebe Birgit, unser DesignTeam wird das Abnahme-Tipp mal prüfen, ich würde also 2 M links zusammen stricken (= bei den Hinreihen). Viel Spaß beim stricken!

02.01.2019 - 10:55

country flag Jane wrote:

Is the back piece meant to be narrower than the front pieces? Even allowing for 8 stitches for the band, the front pieces together are made up of 46 + 46 = 92 (in the smallest size) but the back piece has only 82 stitches.

08.08.2015 - 14:36

DROPS Design answered:

Dear Jane, Yes, this jacket is meant to be loose. Happy knitting!

18.12.2015 - 12:02

country flag Iliane wrote:

Hallo, kann ich die Jacke auch mit 2 Fäden Alpaca stricken? Danke für die Antwort!

09.09.2014 - 17:48

DROPS Design answered:

Liebe Iliane, das geht leider nicht. Um die Stärke C zu erreichen bräuchten Sie 2 weitere Fäden Alpaca, also insgesamt 3 Fäden Alpaca (Garngruppe A + C).

09.09.2014 - 19:42