
Popular categories
Looking for a yarn?


|
|||||||||||||||||||||||||
Sevilla |
|||||||||||||||||||||||||
 |
 |
||||||||||||||||||||||||
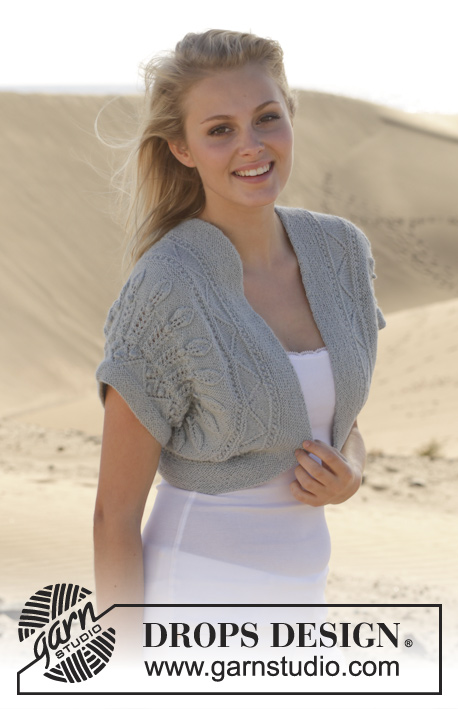
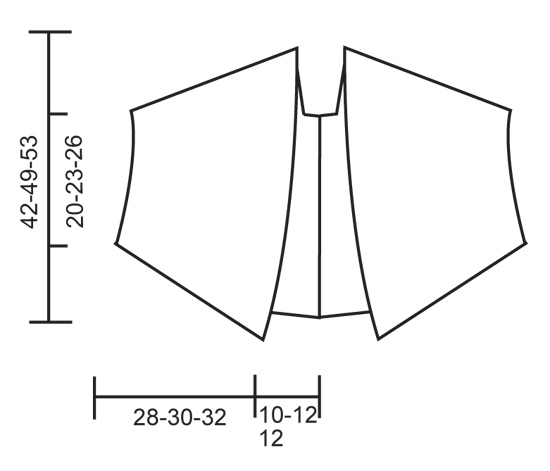
Knitted DROPS bolero with lace pattern in ”Alpaca”. Size: S - XXXL.
DROPS 153-15 |
|||||||||||||||||||||||||
|
GARTER ST (in the round on double pointed needles): * K 1 round and P 1 round *, repeat from *-*. 1 ridge = 2 rounds. GARTER ST (back and forth on needle): K all rows. 1 ridge = K2 rows. BIND OFF WITH YO: * bind off 3 sts, make 1 YO on right needle, bind off YO *, repeat from *-*. PATTERN: See diagrams A.1-A.5. ---------------------------------------------------------- BOLERO: Worked in two parts that are sewn tog when finished. PART 1: Worked in the round on double pointed needles, switch to circular needle when needed. Cast on 96-112-128 sts with Alpaca on double pointed needles size 2.5 mm / US 1.5. Work in GARTER ST - see explanation above. Continue until piece measures 3 cm / 1". Switch to double pointed needles/circular needle size 3 mm / US 2.5. Work A.1 (= 16 sts) - SEE EXPLANATION ABOVE - 6-7-8 times in width in total. AT THE SAME TIME on last round of A-1, inc 32 sts evenly = 128-144-160 sts on needle. Then work A.2A (= 8 sts) 16-18-20 times in width in total. Repeat A.2A 4-6-8 more times vertically. Then work A.2B AT THE SAME TIME inc 2 sts in every P-section (= 32-36-40 sts inc) = 160-180-200 sts on needle. Then work A.3 (= 10 sts) over A.2 (i.e. bobble on last round in A.2 is over the middle K st in A.3) 16-18-20 times in width in total. NOTE! Inc 2 sts in A.3 - see diagram. When A.3 has been worked 1 time vertically, there are 192-216-240 sts on needle. Work A.5 (= 4 sts) over all sts, AT THE SAME TIME on last round inc 0-8-0 sts evenly = 192-224-240 sts. Work A.4 (= 16 sts) 12-14-15 times in width in total. NOTE! Inc 2 sts in A.4 - see diagram. On last round in diagram A.4, inc 8-8-10 sts evenly = 224-260-280 sts on needle. Then work A.5 (= 4 sts) over all sts. On next round, inc 32-36-40 sts evenly (approx. after every 7th st) = 256-296-320 sts on needle. Switch to circular needle size 2.5 mm / US 1.5. Work in garter st for 5 cm / 2". Piece measures approx. 35-37-39 cm / 13¾"-14½"-15¼". Loosely bind off - read BIND OFF WITH YO above - the first 164-192-208 sts = 92-104-112 sts remain on needle. Now work back and forth in GARTER ST - see explanation above. Bind off on every other row as follows, beg from RS: Work * 1 row over all sts, bind off the first 4 sts on next row and work the rest of row * , repeat from *-* 3 times in total = 80-92-100 sts on needle. Then work back and forth in garter st over the 80-92-100 sts for 2 cm / ¾". Then continue in garter st AT THE SAME TIME bind off on every other row as follows, beg from RS: Work * 1 row over all sts, bind off the first 4 sts on next row and work the rest of row * , repeat from *-* until all sts have been bound off. PART 2: Work as part 1 but reversed, i.e. Bind off the last 164-192-208 sts instead of the first. ASSEMBLY: Sew the 2 parts tog mid back. |
|||||||||||||||||||||||||
Diagram explanations |
|||||||||||||||||||||||||
|
|||||||||||||||||||||||||

|
|||||||||||||||||||||||||

|
|||||||||||||||||||||||||
|
|||||||||||||||||||||||||
|
Have you made this or any other of our designs? Tag your pictures in social media with #dropsdesign so we can see them! Do you need help with this pattern?You'll find tutorial videos, a Comments/Questions area and more by visiting the pattern on garnstudio.com. © 1982-2024 DROPS Design A/S. We reserve all rights. This document, including all its sub-sections, has copyrights. Read more about what you can do with our patterns at the bottom of each pattern on our site. |
|||||||||||||||||||||||||


With over 40 years in knitting and crochet design, DROPS Design offers one of the most extensive collections of free patterns on the internet - translated to 17 languages. As of today we count 304 catalogs and 11422 patterns - 11417 of which are translated into English (US/in).
We work hard to bring you the best knitting and crochet have to offer, inspiration and advice as well as great quality yarns at incredible prices! Would you like to use our patterns for other than personal use? You can read what you are allowed to do in the Copyright text at the bottom of all our patterns. Happy crafting!
Comments / Questions (37)
Are there directions for finishing the edge?
03.08.2019 - 15:02DROPS Design answered:
Hello Anne Kelly. You just cast off the sts as explained in the text. Happy knitting!
03.08.2019 - 19:28Mi scusi ma ancora bisogno di un chiarimento. Sono quasi arrivata alla fine della parte 1, sto facendo l'ultimo diagramma A5, e non ho ben capito quando devo fare i 32 aumenti. C'è scritto "al ferro successivo", ma successivo a cosa? Grazie della disponibilità cordiali saluti
24.07.2017 - 17:02DROPS Design answered:
Buongiorno Donatella. Lavora tutto il diagramma A5. Al primo giro dopo aver completato il diagramma A5, aumenta 32 maglie. Buon lavoro!
24.07.2017 - 17:13OK, ancora una domanda sul punto nocciolina: ma quando giro il ferro e mi trovo quindi sul rovescio, come devo lavorare le maglie? Al diritto o al rovescio? E viceversa quando mi ritrovo sul ferro a diritto, come le lavoro? Grazie per l'aiuto buona giornata
18.07.2017 - 15:26DROPS Design answered:
Buongiorno Donatella. Sul rovescio del lavoro lavora le maglie a rovescio, sul diritto del lavoro a diritto. La nocciolina deve risultare lavorata a maglia rasata. Buon lavoro!
18.07.2017 - 15:46Buongiorno, il video del punto nocciolina non mi è chiaro perché non è lavorato in tondo. Mi chiedo: devo lavorare tutto a maglia diritta? Nel video i ferri vengono girati ma in tondo come devo comportarmi? Cordiali saluti e grazie
17.07.2017 - 11:21DROPS Design answered:
Buongiorno Donatella. Deve lavorare come indicato nel video e spiegato nella legenda. Anche se il bolero è lavorato in tondo, per la nocciolina lavora avanti e indietro solo sulle 4 maglie che formeranno la nocciolina. Verifichi di effettuare l’ultimo passaggio della nocciolina (quando accavalla le maglie) sul diritto del lavoro. Buon lavoro!
17.07.2017 - 12:03Är nu i slutpartiet med rätstickning fram och tillbaka och skall börja avmaska, och ser då att skarven i det rundstickade partiet skall sitta synligt på axeln, istället för dolt under armen - varför? Får skarven ett bättre fall utsträckt på axeln än "hängande löst" under armen? Skall det efterlikna en axelsöm? Är det bara en smaksak? Jag själv skulle helst dölja skarven, men undrar nu om det finns en praktisk funktion med att göra som i mönstret?
13.12.2016 - 20:29DROPS Design answered:
Hej Ingela. Jeg er ikke helt sikker, men jeg tror det er en smagssag. Hvis du ikke vil have den ovenpaa skulderen, saa kan du teste lidt og se om det er paenere under.
14.12.2016 - 14:14Is de kant dat ik,op,laatst afkant, dus om de naald 4steken, de midden rug die ik dan moet aan elkaar naaien? Omdat op de tekening de midden Rug. een rechte lijn is.
21.02.2016 - 17:28DROPS Design answered:
Hoi Conny. Ja, klopt. De rand is na het afkanten niet recht, maar als beide delen aan elkaar genaaid zijn, dan is deze naad verticaal middachter bij het dragen, zoals ook op de foto te zien is.
25.02.2016 - 10:28Ma petite mamie m'a tricoté ce merveilleux gilet. Finesse des points et délicatesse de la pièce. Elle a 85 ans, et elle s'en est sortie comme un chef ! Trop forte ma mamie !!!
03.09.2015 - 17:10Ska det verkligen stickas runt på en rundsticka. Stickar man inte fran m och tillbaka på rundstickan. Hur gör jag
28.12.2014 - 17:17Je suis en train de faire ce modèle , et je me pose la question suivante, diagramme A3 à la fin on voit une maille jete et au tour suivant deux mailles en plus, n'y en a-t-il pas une en trop ?
13.04.2014 - 09:51DROPS Design answered:
Bonjour Mme Wiciendra, nous vérifions le diagramme pour vous répondre dès que possible. Merci pour votre patience.
24.04.2014 - 09:59Vorrei sapere come sono contati i ferri del diagramma se sono contati di seguito 1-2-3-4-5-6 eccc.... oppure se sono contati 1-3-5-7 e come si lavorano i ferri pari. Grazie.
26.03.2014 - 19:14DROPS Design answered:
Buonasera Carmelina, i diagrammi mostrano tutti i ferri del motivo, si leggono dal basso verso l'alto e sempre da destra verso sinistra, dal momento che il modello è lavorato in tondo. Ci riscriva se ha altri dubbi. Buon lavoro!!
26.03.2014 - 19:20