
Looking for a yarn?


Comments / Questions (52)
![]() Bettina wrote:
Bettina wrote:
Hallo, ich habe ein Problem beim Rückenteil, nachdem ich wieder alle stillgelegten Maschen auf der Nadel habe. Ich habe in Runden weitergestrickt, allerdings habe ich jetzt Löcher bei den Maschen, wo ich gewendet habe. Was hab ich falsch gemacht? VG
12.02.2025 - 14:28DROPS Design answered:
Liebe Bettina, um dieses Loch zu vermeiden, kann der Querfaden zwischen den Maschen aufgefasst und mit der ersten Masche im Übergang zwischen den verkürzten Reihen verschränkt zusammengestrickt wird. Viel Spaß beim Stricken!
12.02.2025 - 16:05
![]() Rene Gould wrote:
Rene Gould wrote:
I don't like knitting with dpn is there any way I can stick to two needles
13.09.2020 - 00:50DROPS Design answered:
Dear Rene, you can convert the pattern for using straight needles. You can find our lesson that will explain how to do it HERE . I hope that helps. Happy Knitting!
13.09.2020 - 23:16
![]() Agnieszka wrote:
Agnieszka wrote:
Dear Drops Team, I wanted to knit this model with Fabel and Brushed Alpaca Silk, but whan I work on the sample I see that the Brushed Alpaca Silk is making the project very "furry" it takes a bit over the Fabel which is less visible (almost not at all actually- the color is lost). Is my feeling correct, is Brushed Alpaca Silk, that diffrent to Kid Silk, or is it just impression that will pass when the project is bigger? Best
15.01.2020 - 09:43DROPS Design answered:
Dear Agnieszka, Brushed Alpaca Silk belongs to yarn group C while kid-Silk belongs to yarn group A (just as Fabel), so that you won't have same tension working with Fabel and Brushed Alpaca Silk (= A+C) or when workign with Fabel and Kid-Silk (A+A) and the Fabel colour will then automatically look different. Your DROPS store can provide you any further assistance choosing the best matching yarn, even per mail or telephone. Happy knitting!
15.01.2020 - 09:57
![]() Erika wrote:
Erika wrote:
¿Como hago este patrón solo con dos agujas en vez de con agujas circulares? Muchas gracias
01.09.2019 - 03:21DROPS Design answered:
Hola Erika! Tienes que ver la leccion DROPS Puedo adaptar un patrón para agujas circulares y tejerlo con agujas rectas? Buen trabajo!
02.09.2019 - 17:17
![]() Agnieszka wrote:
Agnieszka wrote:
Dzień dobry Gdybym chciała zrobić ten sweter tylko z włóczki Fabel, używając 2 nici, to ile będę potrzebować na rozmiar S? Pozdrawiam
08.10.2018 - 07:35DROPS Design answered:
Witaj Agnieszko! Jeśli chcesz wykonać ten sweter podwójną nitką włóczki Fabel, w rozmiarze S będziesz potrzebować 400 g tej włóczki. Miłej pracy!
08.10.2018 - 19:39
![]() Winnie wrote:
Winnie wrote:
Hej, jeg vil gerne strikke denne. Jeg har en masse Baby Merino. Kan jeg bruge det? Kan jeg strikke med dobbelt garn? Har prøvet at lave en strikkeprøve med dbl. garn og p.7, det gav den brede og højde som er anbefalet på garnet. på forhånd tak :-)
24.10.2017 - 10:07DROPS Design answered:
Hei Winnie. Garnet som er brukt i 148-17 er DROPS Fabel og DROPS Kid-Silk, begge disse kvalitetene tilhører garngruppe A, den same garngruppen som DROPS Baby Merino. Så ja, du kan bruke 2 tråder DROPS Baby Merino istedenfor DROPS Fabel og DROPS Kid-Silk. Bare husk å omregne hvor mye DROPS Baby Merino du trenger ut fra den garnmengden som er oppgitt i oppskriften. God Fornøyelse!
24.10.2017 - 13:05
![]() Åse Johansson wrote:
Åse Johansson wrote:
I slutet står det "byt till stickor 5 och öka samtidigt x maskor för att sticka resår" Varför öka? I de flesta beskrivningar brukar man minska för resåren. Kan ni förklara?
09.08.2017 - 08:49DROPS Design answered:
Hei Åse. I tidligere/gamle oppskrifter var nok motebildet litt annerledes og man ønsket en stram vrangbord. Når man nå strikker et plagg der det økes på vrangborden, vil vrangborden trekke seg sammen naturlig og det vil bli penest, mener vi.
09.08.2017 - 10:53
![]() Frid wrote:
Frid wrote:
Oppskrift "Skagen", Modell nr fa-228: På slutten av 2. pinne står det "Nå legges det opp 4 m på p til forsk". Skal man legge det opp på slutten av pinnen? Skjønner ikke.
05.12.2016 - 20:56DROPS Design answered:
Hej Frid. Du strikker frem og tilbage, saa naar du er faerdig med 2. p, vender du og legger de 4 m op i starten af p. Saa strikker du 3. p og naar du er faerdig med den legger du 4 m op igen, denne gang i den anden ende af p.
06.12.2016 - 15:21
![]() Anna Maria wrote:
Anna Maria wrote:
Non riesco a capire come vanno inseriti i segnapunti nel ferro3,grazie.
07.12.2015 - 15:49DROPS Design answered:
Buongiorno Anna Maria. Quando ha finito il ferro 3, inserisce due nuovi segnapunti: uno dopo le prime 4 m, l’altro prima delle ultime 4 m. Lascia nella stessa posizione gli altri 2 segnapunti già presenti. In tutto deve avere 4 segnapunti. Buon lavoro!
07.12.2015 - 16:27
![]() Huguenet wrote:
Huguenet wrote:
Bonjour, pour le drops 148-17 pouvez_vous m'expliquer en détail le rang 2 et 3 pour la position des marqueurs Dans l'attente de votre reponse Salutations
30.07.2015 - 16:01DROPS Design answered:
Bonjour Mme Huguenet, les marqueurs sont placés au 1er rang, où on tricote à l'env sur l'envers en plaçant 1 marqueur à 8-8-8-8-6-6 m de chaque côté (on a ainsi 32-34-36-36-40-46 m entre les marqueurs pour le dos). Pour les rangs 2 et 3 voir réponse précédente ci-dessous. Bon tricot!
30.07.2015 - 16:19
|
||||
Skagen#skagensweater |
||||
 |
 |
|||
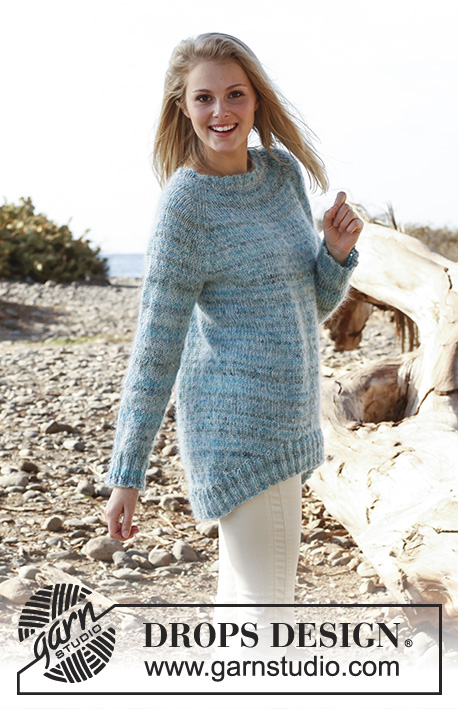
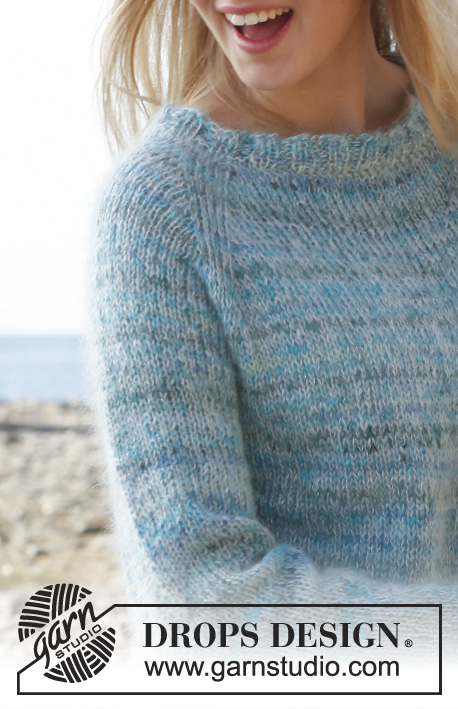
Knitted DROPS top down jumper with raglan in “Fabel”, “Kid Silk” and “Glitter”. Size: S - XXXL
DROPS 148-17 |
||||
|
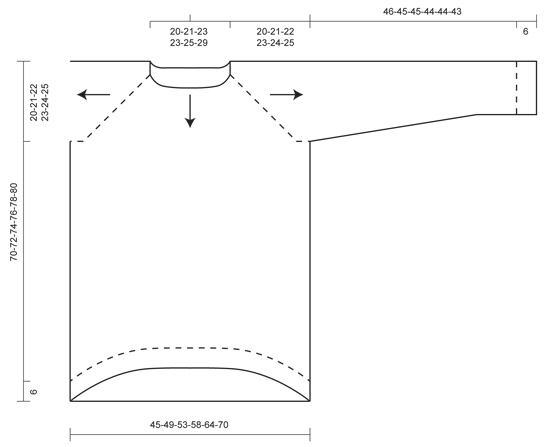
INCREASE TIP: Back and forth on needle: Inc 1 st from RS by making 1 YO, on next row P YO twisted. In the round on needle: Inc 1 st by making 1 YO, on next round K YO twisted. DECREASE TIP: Dec 1 st on each side of marker as follows: Work until 3 sts remain before marker, slip 1 st as if to K, K 1, psso, K 2 (marker is between these sts), K the next 2 tog. --------------------------------------------------------- RAGLAN: The piece is worked from the neck and down. First work back and forth until front piece has been cast on, then work in the round. Cast on 48-50-52-52-52-58 sts on circular needle size 5.5 mm / US 9 with 1 strand of each yarn. ROW 1 (= WS): P all sts. Insert 1 marker 8-8-8-8-6-6 sts in from each side (= 8-8-8-8-6-6 sts on sleeve in each side, 32-34-36-36-40-46 sts on back piece between markers). Move the markers upwards when working. ROW 2 (= RS): K 2, * inc 1 st - READ INCREASE TIP, K until 2 sts remain before next marker, inc 1 st, K 4 (marker is between these sts), inc 1 st, K until 2 sts remain before next marker, inc 1 st, K 4 (marker is between these sts), inc 1 st *, K until 2 sts remain, inc 1 st, K 2 = 6 inc sts. Now cast on 4 sts on needle for front piece = 58-60-62-62-62-68 sts on needle. ROW 3: P all sts, at the end of row cast on 4 sts = 62-64-66-66-66-72 sts. Insert 1 new marker 4 sts in from each side (= 4 sts on front piece in each side, 4 markers in total in piece). ROW 4: K 6, (1st marker is after the first 4 sts), repeat from *-* on 2nd row, K until 2 sts remain before last marker, inc 1 st, K 6 (last marker is before the last 4 sts) = 6 inc sts. Cast on 4 sts = 72-74-76-76-76-82 sts on needle. ROW 5: P all sts, at the end of row cast on 4 sts = 76-78-80-80-80-86 sts (= 8 sts on front piece in each side). ROW 6: K 10, (1st marker is after the first 8 sts), repeat from *-* on 2nd row, K until 2 sts remain before last marker, inc 1 st, K 10 = 6 inc sts (last marker is before the last 8 sts). Cast on 11-12-13-13-15-18 sts = 93-96-99-99-101-110 sts on needle. ROW 7: P all sts, at the end of row cast on 11-12-13-13-15-18 sts = 104-108-112-112-116-128 sts on needle (= 19-20-21-21-23-26 sts on front piece in each side, 38-40-42-42-46-52 sts on back piece and 14-14-14-14-12-12 sts on each sleeve). REMEMBER THE GAUGE! Then work the piece in the round on needle as follows: ROUND 1: * K until 2 sts remain before next marker, inc 1 st, K 4 (marker is between these sts), inc 1 st *, repeat from *-* 3 more times (= 4 times in total), K the remaining sts = 8 inc sts. ROUND 2: K all sts. Then inc 8 sts on round the same way - i.e. inc 1 st on each side of every marker - every other round 10-11-12-17-20-21 more times (11-12-13-18-21-22 inc in total on front piece), then every 4th round 3-3-3-1-0-0 times in total. When all inc are done, there are 216-228-240-264-284-304 sts on needle (= 66-70-74-80-88-96 sts on front and back piece, 42-44-46-52-54-56 sts on each sleeve). NOTE! Insert 1 marker in the middle of front piece (marks front piece which has shorter raglan). BODY: Worked in the round. Work next round as follows: Work 66-70-74-80-88-96 sts on front piece, * slip the next 42-44-46-52-54-56 sts (= sleeve) on 1 stitch holder, cast on 6-8-10-12-14-16 sts for armhole *, work the next 66-70-74-80-88-96 sts on back piece, repeat from *-* 1 more time = 144-156-168-184-204-224 sts on needle. Then work in stockinette st over all sts. NOTE: Insert 1 new marker mid under left armhole, i.e. between the 6-8-10-12-14-16 new sts for armhole (= beg of round), insert 1 new marker mid under right armhole, i.e. between the 6-8-10-12-14-16 new sts for armhole (= the side) = 72-78-84-92-102-112 sts between markers. Move the markers upwards when working. Continue in the round in stockinette st. When piece measures 52-54-55-57-58-60 cm / 20½"-21¼"-21⅝"-22½"-22¾"-23⅝" in total vertically (measured on back piece), insert 1 marker on each side of the middle 22-28-28-36-38-46 sts on front piece. Then work back and forth as follows: Row 1 (= RS): Work until 1st marker before the middle sts on front piece, slip the next 22-28-28-36-38-46 sts on 1 stitch holder, turn piece. Row 2 (= WS): P all sts on needle. Row 3: K until 3 sts remain on needle, slip the last 3 sts on stitch holder, turn piece. Row 4: P until 3 sts remain on needle, slip the last 3 sts on stitch holder, turn piece. Then slip sts at the end of every row on stitch holder the same way as follows: 3 sts 0-0-1-1-3-4 more times (1-1-2-2-4-5 times in total), 2 sts 10-10-10-10-9-8 times in total = 2 sts remain before each marker in the side. Now slip all sts on stitch holder on to same circular needle = 144-156-168-184-204-224 sts on needle as before. Then work in the round until finished measurements. On next round switch to circular needle size 5 mm / US 8 and K while AT THE SAME TIME inc 36-40-44-48-52-56 sts evenly on round = 180-196-212-232-256-280 sts. Then work rib as follows: * K 2, P 2 *, repeat from *-* the entire round. When rib measures 6 cm / 2⅜", loosely bind off with K over K and P over P, piece measures approx. 70-72-74-76-78-80 cm / 27½"-28⅜"-29⅛"-30"-30¾"-31½ in total. SLEEVE: Worked in the round on double pointed needles size 5.5 mm / US 9. Cast on 3-4-5-6-7-8 sts on double pointed needles with 1 strand of each yarn, pick up 42-44-46-52-54-56 sts on stitch holder from one sleeve, cast on 3-4-5-6-7-8 sts on double pointed needles = 48-52-56-64-68-72 sts in total (= 6-8-10-12-14-16 sts for armhole). Insert 1 marker at beg of round (= mid under sleeve). NOTE: Now measure the piece from here. Then work in stockinette st in the round for 3 cm / 1⅛". On next round dec 1 st - READ DECREASE TIP - on each side of marker. Repeat dec every 5½-5-4-2½-2½-2 cm / 2¼"-2"-1½"-⅞"-⅞"-¾" 6-7-8-12-13-14 more times (7-8-9-13-14-15 times in total) = 34-36-38-38-40-42 sts. Continue in stockinette st until piece measures 40-39-39-38-38-37 cm / 15¾"-15¼"-15¼"-15"-15"-14½". On next round switch to double pointed needles size 5 mm / US 8 and K while AT THE SAME TIME inc 10-8-10-10-12-10 sts evenly on round = 44-44-48-48-52-52 sts. Continue to work rib as follows: * K 2, P 2 *, repeat from *-* the entire round. When rib measures 6 cm / 2⅜", loosely bind off with K over K and P over P, piece measures approx. 46-45-45-44-44-43 cm / 18"-17¾"-17¾"-17¼"-17¼"-17" (shorter measurements in the larger sizes because of wider shoulders). ASSEMBLY: Sew the openings under the sleeves. NECK EDGE: Worked in the round on double pointed needles size 5 mm / US 8. Beg at transition between back piece and left sleeve, pick up from RS approx. 90 to 110 sts around the entire neck edge with 1 strand of each yarn. K next round - while AT THE SAME TIME adjusting no of sts to 80-88-92-96-100-108. Continue to work rib as follows: * K 2, P 2 *, repeat from *-* the entire round. When rib measures 2 cm / ¾", loosely bind off all sts with K over K and P over P. |
||||
Diagram explanations |
||||
|
||||
|
||||
Have you finished this pattern?Tag your pictures with #dropspattern #skagensweater or submit them to the #dropsfan gallery. Do you need help with this pattern?You'll find 17 tutorial videos, a Comments/Questions area and more by visiting the pattern on garnstudio.com. © 1982-2025 DROPS Design A/S. We reserve all rights. This document, including all its sub-sections, has copyrights. Read more about what you can do with our patterns at the bottom of each pattern on our site. |
||||


With over 40 years in knitting and crochet design, DROPS Design offers one of the most extensive collections of free patterns on the internet - translated to 17 languages. As of today we count 314 catalogs and 11822 patterns - 11812 of which are translated into English (US/in).
We work hard to bring you the best knitting and crochet have to offer, inspiration and advice as well as great quality yarns at incredible prices! Would you like to use our patterns for other than personal use? You can read what you are allowed to do in the Copyright text at the bottom of all our patterns. Happy crafting!
Post a comment to pattern DROPS 148-17
We would love to hear what you have to say about this pattern!
If you want to leave a question, please make sure you select the correct category in the form below, to speed up the answering process. Required fields are marked *.