Viggo by DROPS Design

Knitted vest with stripes for baby and children in DROPS BabyAlpaca Silk

DROPS Baby 21-33
DROPS design: Pattern no BS-001-by
Yarn group A
--------------------------------------------------------
Size: 1/3 - 6/9 - 12/18 months (2 - 3/4) years
Finished measurements:
Bust: 44-50-56 (62-68) cm / 17 1/4"-19 3/4"-22" (24½"-26 3/4")
Full length: 25-27-29 (31-33) cm / 9 3/4"-10½"-11½" (12 1/4"-13")

Materials: DROPS BABY ALPACA SILK from Garnstudio
50-50-100 (100-100) g color no 7402, light sea green
50-50-50 (50-100) color no 7219, pistachio

DROPS CIRCULAR NEEDLE size 2.5 mm / US 1.5 (40 or 60 cm / 16'' or 24") - or size needed to get 26 sts x 34 rows in stockinette st = 10 x 10 cm / 4'' x 4''.
DROPS CIRCULAR NEEDLE SIZE 2 mm/US 0 (40 or 60 cm / 16" or 24") - for rib.

DROPS WOODEN BUTTONS LIGHT, NO 503: 4 pieces

-------------------------------------------------------

Knitting tension – See how to measure it and why here
Alternative Yarn – See how to change yarns here
Yarn Groups A to F – Use the same pattern and change the yarn here
Yarn usage using an alternative yarn – Use our yarn converter here

-------------------------------------------------------

Pattern instructions

NOTE: This pattern is written in American English. All measurements in charts are in cm. For conversion from inches to cm - click here. There are different terms for crocheting in American and British English. If this pattern includes crochet, click for "crochet terms" here. For this pattern in British English, please click here.
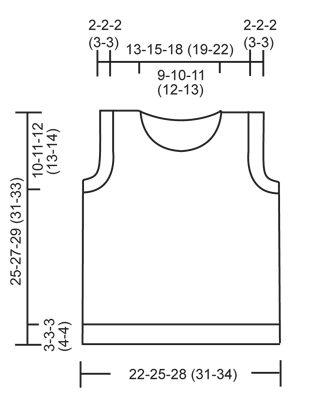
RIB: * K 2, P 2 *, repeat from *-*.

STRIPES: * 2 rounds/rows pistachio, 2 rounds/rows light sea green *, repeat from *-*.
--------------------------------------------------------

BODY:
Cast on 152-172-192 (212-232) sts on circular needle size 2 mm / US 0 with light sea green Baby Alpaca Silk. Work in RIB - see explanation above - for 3-3-3 (4-4) cm / 1 1/8''-1 1/8''-1 1/8'' (1½''-1½'') . Switch to circular needle size 2.5 mm / US 1.5 and work in stockinette st and STRIPES - see explanation above - while AT THE SAME TIME dec 38-42-46 (50-56) sts evenly on 1st round = 114-130-146 (162-176) sts. Insert a marker at beg of round and a marker after 57-65-73 (81-88) sts = mid of each side. REMEMBER THE GAUGE! When piece measures 15-16-17 (18-19) cm / 6''-6¼''-6¾'' (7''-7½''), bind off 8-8-8 (10-12) sts in each side for armholes (i.e. 4-4-4 (5-6) sts on each side of both markers). Then finish front and back piece separately.

BACK PIECE:
= 49-57-65 (71-76) sts. Continue to bind off for armholes in each side as follows: 2 sts 3 times and 1 st 2-3-3 (5-4) times = 33-39-47 (49-56) sts. When piece measures 23-25-27 (29-31) cm / 9"-9 3/4"-10½" (11½"-12 1/4"), bind off the middle 19-21-25 (27-30) sts for neck and finish each shoulder separately. Continue to bind off 2 sts on next row from neck = 5-7-9 (9-11) sts remain on shoulder. Bind off when piece measures 24-26-28 (29½-31½) cm / 9½"-10 1/4"-11 1/4" (11½"-12 1/4").

FRONT PIECE:
= 49-57-65 (71-76) sts. Continue to bind off for armholes in each side as on back piece. AT THE SAME TIME when piece measures 20-22-23 (25-26) cm / 8"-8 3/4"-9" (9 3/4"-10 1/4"), slip the middle 9-11-15 (17-20) sts on a stitch holder for neck and finish each shoulder separately. Continue to bind off for neck at beg of every row from neck: 2 sts 2 times and 1 st 3 times. After all bind offs and dec are done, 5-7-9 (9-11) sts remain on shoulder. Bind off when piece measures 24-26-28 (29½-31½) cm / 9½"-10 1/4"-11 1/4" (11½"-12 1/4").

FRONT NECK EDGE:
Knit up from RS approx. 48-60-68 (72-80) sts including sts on stitch holder at the front (divisible by 4) along the neck line at the front on circular needle size 2 mm/US 0 with light sea green. Work rib back and forth on needle with 1 edge st in garter st and 2 K sts in each side (seen from RS). When neck edge measures 2-2-2 (3-3) cm / 3/4''-3/4''-3/4'' (1 1/8''-1 1/8''), loosely bind off with K over K and P over P.

BACK NECK EDGE:
Knit up from RS approx. 36-40-44 (48-52) sts (divisible by 4) along the neck line at the back and work rib as on front piece.

SLEEVE EDGE:
Knit up from RS approx. 76-84-88 (96-104) sts (divisible by 4) along one armhole on circular needle size 2 mm/US 0 with light sea green. Work rib back and forth as on neck edge. Repeat along the other armhole.

FRONT SHOULDER EDGE:
Knit up from RS along the front of one shoulder (also over sleeve and neck edge) approx. 20-24-28 (32-36) sts (divisible by 4) on circular needle size 2 mm/US 0 with light sea green. Work rib back and forth with 1 edge st in garter st and 2 K sts in each side (seen from RS). When edge measures approx. 1-1.5 cm / 3/8''-½'', bind off for 2 button holes. 1 button hole = bind off 2 sts and cast on 2 new sts on next row over these sts. Each button hole should be at least 3 sts from the edge in each side. When edge measures 2-2-2 (3-3) cm / 3/4''-3/4''-3/4'' (1 1/8''-1 1/8''), bind off with K over K and P over P. Repeat at the front on the other shoulder.

BACK SHOULDER EDGE:
Knit up along the back of one shoulder as on front piece and work rib as on front piece but do not bind off for button holes. Repeat at the back on the other shoulder. Sew on buttons.

Diagram

All measurements in charts are in cm.

diagram measurements

Do you need help with this pattern?

Thank you for choosing a DROPS Design pattern. We take pride in providing patterns that are correct and easy to understand. All patterns are translated from Norwegian and you can always check the original pattern (DROPS Baby 21-33) for measurements and calculations.

Are you having trouble following the pattern? See below for a list of resources to help you finish your project in no time - or why not, learn something new.

signature-image signature

Are you having trouble following the pattern? See below for a list of resources to help you finish your project in no time - or why not, learn something new.

We have also step-by-step guides for different techniques which you'll find here.

1) Why is the knitting/crochet tension so important?

Knitting tension is what determines the final measurements of your work, and is usually measured per 10 x 10 cm. It is provided like so: number of stitches in width x number of rows in height - eg: 19 stitches x 26 rows = 10 x 10 cm.

The knitting tension is very individual; some people knit/crochet loosely while others work tightly. You adjust the knitting tension with the needle size, which is why the suggested needle size only serve as a guide! You need to adjust this (up or down) to ensure that YOUR knitting tension matches the knitting tension provided in the pattern. If you work with a different knitting tension than provided you will have a different yarn consumption, and your work will have different measurements than what the pattern suggests.

The knitting tension also determines which yarns can replace each other. As long as you achieve the same knitting tension you can replace one yarn with another.

See DROPS lesson: How to measure your tension/gauge

See DROPS video: How to make a gauge tension swatch

to top

2) What are the yarn groups?

All our yarns are categorised into yarn groups (from A to F) according to thickness and knitting tension – group A contains the thinnest yarns and group F the thickest. This makes it easier for you to find alternative yarns to our patterns, should you wish to switch yarn. All yarns within the same group have a similar knitting tension and can easily replace each other. However, different yarn qualities have different structures and properties which will give the finished work a unique look and feel.

Click here for an overview of the yarns in each yarn group

to top

3) Can I use a different yarn than what the pattern suggests?

The important thing when changing from one yarn to another is that the knitting/crochet tension remains the same. This is so that the measurements of the finished piece will be the same as on the sketch provided. It is easier to achieve the same knitting tension using yarns from the same yarn group. It is also possible to work with multiple strands of a thinner yarn to achieve the knitting tension of a thicker one. Please try our yarn converter. We recommend you to always work a test swatch.

Please NOTE: when changing yarn the garment might have a different look and feel to the garment in the photo, due to individual properties and qualities of each yarn.

See DROPS lesson: Can I use a different yarn than the one mentioned in the pattern?

to top

4) How do I use the yarn converter?

At the top of all our patterns you’ll find a link to our yarn converter, which is a helpful tool should you wish to use a different yarn than suggested. By filling in the yarn quality you wish to replace, the amount (in your size) and number of strands, the converter will present good alternative yarns with the same knitting tension. Additionally it will tell you how much you’ll require in the new qualities and whether you’ll need to work with multiple strands. Most skeins are 50g (some are 25g or 100g).

If the pattern is worked with multiple colours, every colour will have to be converted separately. Similarly, if the pattern is worked with several strands of different yarns (for example 1 strand Alpaca and 1 strand Kid-Silk) you will have to find alternatives for each, individually.

Click here to see our yarn converter

to top

5) Why do I get the wrong knitting tension with the suggested needle size?

The needle size provided in the pattern serves only as a guide, the important thing is to follow the knitting tension. And since knitting tension is very individual, you will have to adjust the needle size to ensure that YOUR tension is the same as in the pattern – maybe you’ll have to adjust 1, or even 2 needle sizes, up or down to achieve the correct tension. For this, we recommend that you work test swatches.

Should you work with a different knitting tension than the one provided, the measurements of the finished garment might deviate from the measurement sketch.

See DROPS lesson: How to measure your tension/gauge

See DROPS video: How to make a gauge tension swatch

to top

6) Why is the pattern worked top-down?

Working a garment top-down provides more flexibility and room for personal adjustment. For example it is easier to try the garment on while working, as well as making adjustments to length of yoke and shoulder caps.

The instructions are carefully explaining every step, in the correct order. Diagrams are adjusted to the knitting direction and are worked as usual.

to top

7) Why are the sleeves shorter in larger sizes?

The total width of the garment (from wrist-to-wrist) will be larger in the larger sizes, despite the actual sleeves being shorter. The larger sizes have longer sleeve caps and wider shoulders, so there will be a good fit in all sizes.

to top

8) What is a repeat?

Diagrams are often repeated on the round or in height. 1 repeat is the diagram the way it appears in the pattern. If it says to work 5 repeats of A.1 in the round, then you work A.1 a total of 5 times after/next to each other in the round. If it says to work 2 repeats of A.1 vertically/in height you work the entire diagram once, then begin again at the start and work the entire diagram one more time.

to top

9) How do I work according to a knitting diagram?

The diagram depicts all rows/rounds, and every stitch seen from the right side. It is read from bottom to top, from right to left. 1 square = 1 stitch.

When working back and forth, every other row is worked from the right side and every other row is worked from the wrong side. When working from the wrong side, the diagram will have to be worked reversed: from left to right, knit stitches are purled, purl stitches are knit etc.

When working in the round every round is worked from the right side and the diagram are worked from right to left on all rounds.

See DROPS lesson: How to read knitting diagrams

to top

10) How do I work according to a crochet diagram?

The diagram depicts all rows/rounds, and every stitch seen from the right side. It is worked from bottom to top, from right to left.

When working back and forth every other row is worked from the right side: from right to left and every other row is worked from the wrong side: from left to right.

When working in the round, every row in the diagram are worked from the right side, from right to left.

When working a circular diagram you start in the middle and work your way outwards, counter clockwise, row by row.

The rows usually start with a given number of chain stitches (equivalent to the height of the following stitch), this will either be depicted in the diagram or explained in the pattern.

See DROPS lesson: How to read crochet diagrams

to top

11) How do I work several diagrams simultaneously on the same row/round?

Instructions for working several diagrams after each other on the same row/round, will often be written like so: “work A.1, A.2, A.3 a total of 0-0-2-3-4 times". This means you work A.1 once, then A.2 is worked once, and A.3 is repeated (in width) the number of times provided for your size – in this case like so: S = 0 times, M = 0 times, L=2 times, XL= 3 times and XXL = 4 times.

The diagrams are worked as usual: begin with the first row in A.1, then work the first row in A.2 etc.

See DROPS lesson: How to read knitting diagrams

See DROPS lesson: How to read crochet diagrams

to top

12) Why does the piece start with more chain stitches than it’s worked with?

Chain stitches are slightly narrower than other stitches and to avoid working the cast-on edge too tight, we simply chain more stitches to begin with. The stitch count will be adjusted on the following row to fit the pattern and measurement sketch.

to top

13) Why increase before the rib edge when the piece is worked top-down?

The rib edge is more elastic and will contract slightly compared to, for example, stocking stitch. By increasing before the rib edge, you avoid a visible difference in width between the rib edge and the rest of the body.

to top

14) Why increase in the cast-off edge?

It’s very easy to cast off too tightly, and by making yarn overs while casting off (and simultaneously casting these off) you avoid a too tight cast off edge.

See DROPS video: How to bind off with yarn overs (yo)

to top

15) How do I increase/decrease on every 3rd and 4th row/round alternately?

To achieve an even increase (or decrease) you can increase on, for example: every 3rd and 4th row alternately, like so: work 2 rows and increase on the 3rd row, work 3 rows and increase on the 4th. Repeat this until the increase is complete.

See DROPS lesson: Increase or decrease 1 st on every 3rd and 4th row alternately

to top

16) Why is the pattern slightly different than what I see in the photo?

Pattern repeats can vary slightly in the different sizes, in order to get the correct proportions. If you’re not working the exact same size as the garment in the photo, yours might deviate slightly. This has been carefully developed and adjusted so that the complete impression of the garment is the same in all sizes.

Make sure to follow instructions and diagrams for your size!

to top

17) How can I work a jacket in the round instead of back and forth?

Should you prefer to work in the round instead of back and forth, you may of course adjust the pattern. You’ll need to add steeks mid-front (usually 5 stitches), and follow the instructions. When you would normally turn and work from the wrong side, simply work across the steek and continue in the round. At the end you’ll cut the piece open, pick up stitches to work bands, and cover the cut edges.

See DROPS video: How to knit steeks and cut open

to top

18) Can I work a jumper back and forth instead of in the round?

Should you prefer to work back and forth instead of in the round, you may of course adjust the pattern so you work the pieces separately and then assemble them at the end. Divide the stitches for the body in 2, add 1 edge stitch in each side (for sewing) and work the front and back pieces separately.

See DROPS lesson: Can I adapt a pattern for circular needles into straight needles?

to top

19) Why do you show discontinued yarns in the patterns?

Since different yarns have different qualities and textures we have chosen to keep the original yarn in our patterns. However, you can easily find options among our available qualities by using our yarn converter, or simply pick a yarn from the same yarn group.

It is possible that some retailers still have discontinued yarns in stock, or that someone has a few skeins at home that they would like to find patterns for.

The yarn converter will provide both alternative yarn as well as required amount in the new quality.

to top

20) How do I make a women’s size garment into a men’s size one?

If you have found a pattern you like which is available in women’s size it’s not very difficult to convert it to men’s size. The biggest difference will be the length of sleeves and body. Start working on the women size that you think would fit across the chest. The additional length will be worked right before you cast off for the armhole/sleeve cap. If the pattern is worked top-down you can add the length right after the armhole or before the first decrease on sleeve.

Regarding additional yarn amount, this will depend on how much length you add, but it is better with a skein too many than too few.

to top

21) How do I prevent a hairy garment from shedding?

All yarns will have excess fibres (from production) that might come off as lint or shedding. Brushed yarns (ie hairier yarns) have more of these loose, excess fibres, causing more shedding.

Shedding also depends on what is worn under or over the garment, and whether this pulls at the yarn fibres. It’s therefore not possible to guarantee that there will be no shedding

Below are some tips on how to get the best result when working with hairier yarns:

1. When the garment is finished (before you wash it) shake it vigorously so the looser hairs come off. NOTE: do NOT use a lint roller, brush or any method that pulls at the yarn.

2. Place the garment in a plastic bag and put it in your freezer - the temperature will cause the fibres to become less attached to each other, and excess fibres will come off easier.

3. Leave in the freezer for a few hours before taking it out and shaking it again.

4. Wash the garment according to the instructions on the yarn label.

to top

22) Where on the garment is the length measured?

The measurement sketch/schematic drawing provides information regarding the full length of the garment. If it’s a jumper or a jacket the length is measured from the highest point on the shoulder (usually closest to the neckline), and straight down to the bottom of the garment. It is NOT measured from the tip of shoulder. Similarly, the length of yoke is measured from the highest point on the shoulder and down to where yoke is split into body and sleeves.

See DROPS lesson: How to read a schematic drawing

to top

23) How do I know how many balls of yarn I need?

The required amount of yarn is provided in grams, eg: 450 g. To calculate how many balls you’ll need you first need to know how many grams are in 1 ball (25g, 50g or 100g). This information is available if you click on the individual yarn quality on our pages. Divide the amount required with the amount of each ball. For example, if each ball is 50g (the most common amount), the calculation will be as follows: 450 / 50 = 9 balls.

to top

Have you purchased DROPS yarn to make this pattern? Then you are entitled to receive help from the store where you bought the yarn. Find a list of DROPS stores here!
Still can't find the answer you need? Then scroll down and leave your question so one of our experts can try to help you. This will be done normally within 5 to 10 working days. In the meantime, you can read the questions and answers that others have left to this pattern or join the DROPS Workshop on Facebook to get help from fellow knitters/crocheters!

Comments / Questions (72)

country flag Luisa wrote:

Buongiorno, avrei due domande (taglia 0-3)” Quando il lavoro misura 15” s’intende dalla fine del bordo o compreso il bordo? “ Proseguire a intrecciare per gli scalfi da ciascun lato come segue: 2 m per 3 volte e 1 m per 2” . L’intreccio va fatto ad ogni ferro o a ferri alternati? Grazie cordiali saluti

30.04.2023 - 14:14

DROPS Design answered:

Buongiorno Luisa, le misure, se non diversamente indicato, si intendono dall'inizio del lavoro. Per quanto riguarda gli scalfi, deve intrecciare a ogni lato su ogni ferro. Buon lavoro!

01.05.2023 kl. 12:07

country flag Jana Smit wrote:

Bij de omschrijving van de omboording vh armsgat staat aan het eind: brei de andere armsgatEN op zelfde manier. Daardoor dacht ik dat de beschrijving sloeg op alleen een armsgatdeel van een enkel pand, anders konden er niet meerdere zijn. Probleem was dat ik maar maximaal 55 steken voor een half en dus 110 voor een heel armsgat op kon nemen. Werd natuurlijk veel te wijd. Heb ze overnieuw moeten breien. Beveel aan Nederlandse tekst te corrigeren…

18.10.2022 - 23:27

country flag Sylwia wrote:

W opisie w języku polskim używane jest jedno słowo „zamykać oczka” w miejsce różnych angielskich o rożnym znaczeniu tj „bind off” i „reduce”. Jest to mylące. Proponuje dodać choćby wyjaśnienie w nawiasie, że chodzi o przerobienie dwóch oczek a nie zamknięcie.

18.10.2022 - 19:05

country flag Sylwia wrote:

Jestem na etapie zamykania oczek na pokroje rękawów (rozmiar 12-18m). Powinnam zamykać 8 oczek na początku okrążenia (po 4 z obu stron), natomiast akurat na 17cm wypada w tym miejscu zmiana kolorów nici. Jak zmieniać kolor nici na paski w takiej sytuacji?

18.10.2022 - 19:01

DROPS Design answered:

Witaj Sylwio, zamknij te 8 oczek kolorem poprzedniego paska, a nowy kolor dołącz za tymi 8 zamkniętymi oczkami. Pozdrawiamy!

19.10.2022 kl. 09:11

country flag Helene wrote:

Hej. Jag är klar med västen och så nöjd men nu undrar jag. Ska axlarna sys ihop omlott eller bara fästas med knapp?

15.03.2022 - 21:03

DROPS Design answered:

Hej Helene. Så roligt att du är nöjd med västen. Det är tänkt att axlarna bara ska fästas med hjälp av knapparna. Mvh DROPS Design

16.03.2022 kl. 09:10

country flag Angelina wrote:

Bin etwas verwirrt wie hoch ist die gesamthöhe . Gr 62.

09.02.2022 - 16:47

DROPS Design answered:

Liebe Angelina, die gesamte Höhe in Gr. 1/3 Monate bzw 56/62 cm ist 25 cm: 15 cm vor Armausschnitt (einschl. 3 cm Bündchen) + 10 cm Armausschnitt. Viel Spaß beim stricken!

10.02.2022 kl. 08:56

country flag Lenka Čípelová wrote:

Dobrý den, ve spotřebě příze je v českém návodu pro velikost 80/86 chyba.

07.01.2022 - 21:35

DROPS Design answered:

Dobrý den, Lenko, děkujeme za upozornění - opraveno. Hezký den! Hana

13.01.2022 kl. 05:06

country flag Christine wrote:

Hallo! Ich bin etwas verwirrt: Strickt man den Pullunder in Runden auf der Rundstricknadel oder ‚hin und her‘? Das geht aus der Anleitung für mich nicht hervor. Viele Grüße Christine

27.11.2021 - 10:01

DROPS Design answered:

Liebe Christine, Rumpfteil wird zuerst in Runden bis Armauschnitt gestrickt, dann wird die Arbeit in 2 Teilen verteilt und Rücken- und Vorderteil werden dann in Hin- und Rückreihen separat gestrickt. Viel Spaß beim stricken!

29.11.2021 kl. 07:38

country flag Jesse wrote:

Hi, I'm having some difficulty understand the part of the FRONT PIECE. First it is written to slip the middle stitches 'AT THE SAME TIME' as I'm casting of on the sides but my decreases are long done by the time I reach the required length so how are the casting off and slipping stitches at the same time..? And then it says 'after all the cast offs and dec'.. but we haven't done any decreases so far right..? Just cast offs..? Please tell me if I'm reading it wrong. Thank you

28.08.2021 - 22:13

DROPS Design answered:

Dear Jessee, after dividing piece work as before decreasing for the armhole on each sdie, then slip the middle stitches on a thread for neck, if all decreases for the sides are done, it's okay, just shape now neck. Happy knitting!

30.08.2021 kl. 07:42

country flag Tissa Van De Wege - Van Der Does De Bye wrote:

Waarom wordt er nadat je het boord hebt gebreid geminderd en niet gemeerderd zoals dat altijd gebeurt. Dat klopt toch niet? Bijvoorbeeld 172 steken in boordsteek, nadat je het boord hebt gebreid dan meerder je verdeeld 42 steken zodat er 172 + 42 = 214 steken in plaats van 130.

23.07.2021 - 02:09

DROPS Design answered:

Dag Tissa,

Dit is om te voorkomen dat de boordsteek te strak wordt. Er wordt inderdaad vaak gemeerderd om de boord meer aan te laten sluiten, maar in dit geval heeft de ontwerper het juist anders bedacht :)

19.08.2021 kl. 14:20

Post a comment to pattern DROPS Baby 21-33

We would love to hear what you have to say about this pattern!

If you want to leave a question, please make sure you select the correct category in the form below, to speed up the answering process. Required fields are marked *.

From the #dropsfan gallery

Baby vest Viggo

pres_knits, Bulgaria

Viggo vest

Len O'Re Arts & Crafts, Italy

B21-33 Viggo

Anne, Germany

See more