
Popular categories
Looking for a yarn?


|
|
Viggo |
|
|
|
|
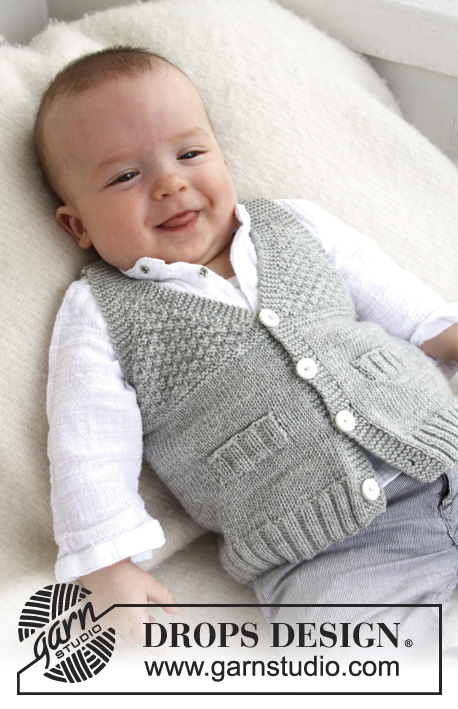
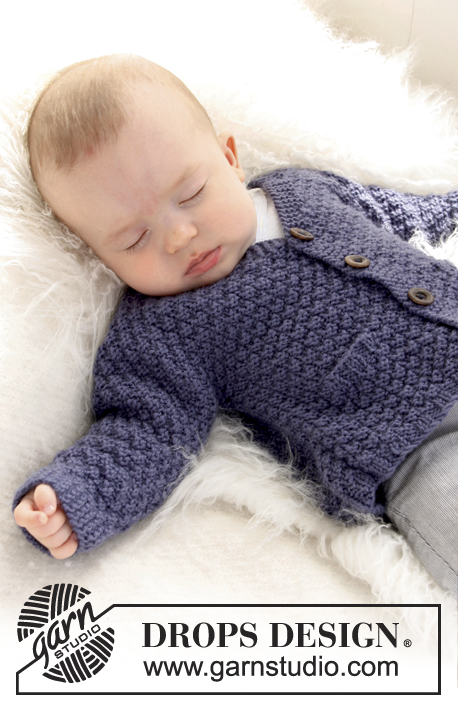
Knitted vest / slipover with stripes for baby and children in DROPS BabyAlpaca Silk
DROPS Baby 21-33 |
|
|
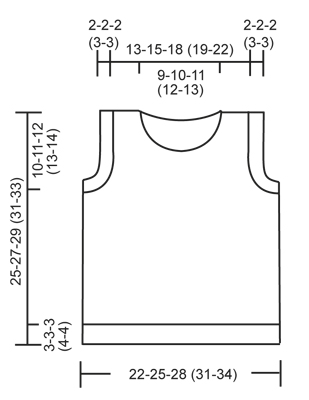
RIB: * K 2, P 2 *, repeat from *-*. STRIPES: * 2 rounds/rows pistachio, 2 rounds/rows light sea green *, repeat from *-*. -------------------------------------------------------- -------------------------------------------------------- BODY: Cast on 152-172-192 (212-232) sts on circular needle size 2 mm with light sea green Baby Alpaca Silk. Work in RIB - see explanation above - for 3-3-3 (4-4) cm. Switch to circular needle size 2.5 mm and work in stocking st and STRIPES - see explanation above - while AT THE SAME TIME dec 38-42-46 (50-56) sts evenly on 1st round = 114-130-146 (162-176) sts. Insert a marker at beg of round and a marker after 57-65-73 (81-88) sts = mid of each side. REMEMBER THE KNITTING TENSION! When piece measures 15-16-17 (18-19) cm, cast off 8-8-8 (10-12) sts in each side for armholes (i.e. 4-4-4 (5-6) sts on each side of both markers). Then finish front and back piece separately. BACK PIECE: = 49-57-65 (71-76) sts. Continue to cast off for armholes in each side as follows: 2 sts 3 times and 1 st 2-3-3 (5-4) times = 33-39-47 (49-56) sts. When piece measures 23-25-27 (29-31) cm, cast off the middle 19-21-25 (27-30) sts for neck and finish each shoulder separately. Continue to cast off 2 sts on next row from neck = 5-7-9 (9-11) sts remain on shoulder. Cast off when piece measures 24-26-28 (29½-31½) cm. FRONT PIECE: = 49-57-65 (71-76) sts. Continue to cast off for armholes in each side as on back piece. AT THE SAME TIME when piece measures 20-22-23 (25-26) cm, slip the middle 9-11-15 (17-20) sts on a stitch holder for neck and finish each shoulder separately. Continue to cast off for neck at beg of every row from neck: 2 sts 2 times and 1 st 3 times. After all cast offs and dec are done, 5-7-9 (9-11) sts remain on shoulder. Cast off when piece measures 24-26-28 (29½-31½) cm. FRONT NECK EDGE: Knit up from RS approx. 48-60-68 (72-80) sts incl sts on stitch holder at the front (divisible by 4) along the neck line at the front on circular needle size 2 mm with light sea green. Work rib back and forth on needle with 1 edge st in garter st and 2 K sts in each side (seen from RS). When neck edge measures 2-2-2 (3-3) cm, loosely cast off with K over K and P over P. BACK NECK EDGE: Knit up from RS approx. 36-40-44 (48-52) sts (divisible by 4) along the neck line at the back and work rib as on front piece. SLEEVE EDGE: Knit up from RS approx. 76-84-88 (96-104) sts (divisible by 4) along one armhole on circular needle size 2 mm with light sea green. Work rib back and forth as on neck edge. Repeat along the other armhole. FRONT SHOULDER EDGE: Knit up from RS along the front of one shoulder (also over sleeve and neck edge) approx. 20-24-28 (32-36) sts (divisible by 4) on circular needle size 2 mm with light sea green. Work rib back and forth with 1 edge st in garter st and 2 K sts in each side (seen from RS). When edge measures approx. 1-1.5 cm, cast off for 2 button holes. 1 button hole = cast off 2 sts and cast on 2 new sts on next row over these sts. Each button hole should be at least 3 sts from the edge in each side. When edge measures 2-2-2 (3-3) cm, cast off with K over K and P over P. Repeat at the front on the other shoulder. BACK SHOULDER EDGE: Knit up along the back of one shoulder as on front piece and work rib as on front piece but do not cast off for button holes. Repeat at the back on the other shoulder. Sew on buttons. |
|
|
|
|
Have you made this or any other of our designs? Tag your pictures in social media with #dropsdesign so we can see them! Do you need help with this pattern?You'll find tutorial videos, a Comments/Questions area and more by visiting the pattern on garnstudio.com. © 1982-2024 DROPS Design A/S. We reserve all rights. This document, including all its sub-sections, has copyrights. Read more about what you can do with our patterns at the bottom of each pattern on our site. |

With over 40 years in knitting and crochet design, DROPS Design offers one of the most extensive collections of free patterns on the internet - translated to 17 languages. As of today we count 304 catalogues and 11422 patterns - 11422 of which are translated into English (UK/cm).
We work hard to bring you the best knitting and crochet have to offer, inspiration and advice as well as great quality yarns at incredible prices! Would you like to use our patterns for other than personal use? You can read what you are allowed to do in the Copyright text at the bottom of all our patterns. Happy crafting!
Comments / Questions (74)
No me queda claro a que se refiere el 21-33
22.08.2023 - 15:20DROPS Design answered:
Hola Daphne, Baby 21-33 es el número del modelo. Puedes ver las tallas en meses y en cm debajo, justo antes de la sección de materiales.
27.08.2023 - 22:43Hello, is there any alternative yarn I can use for this pattern as the alpaca silk is discontinued Thank you
27.06.2023 - 19:34DROPS Design answered:
Hi Wendy, All the yarns in Group A, which is the group Baby Alpaca Silk belonged to, can be used for this pattern. Click on Yarns at the top of the page and select Yarn Groups. Happy knitting!
28.06.2023 - 06:41Buongiorno, avrei due domande (taglia 0-3)” Quando il lavoro misura 15” s’intende dalla fine del bordo o compreso il bordo? “ Proseguire a intrecciare per gli scalfi da ciascun lato come segue: 2 m per 3 volte e 1 m per 2” . L’intreccio va fatto ad ogni ferro o a ferri alternati? Grazie cordiali saluti
30.04.2023 - 14:14DROPS Design answered:
Buongiorno Luisa, le misure, se non diversamente indicato, si intendono dall'inizio del lavoro. Per quanto riguarda gli scalfi, deve intrecciare a ogni lato su ogni ferro. Buon lavoro!
01.05.2023 - 12:07Bij de omschrijving van de omboording vh armsgat staat aan het eind: brei de andere armsgatEN op zelfde manier. Daardoor dacht ik dat de beschrijving sloeg op alleen een armsgatdeel van een enkel pand, anders konden er niet meerdere zijn. Probleem was dat ik maar maximaal 55 steken voor een half en dus 110 voor een heel armsgat op kon nemen. Werd natuurlijk veel te wijd. Heb ze overnieuw moeten breien. Beveel aan Nederlandse tekst te corrigeren…
18.10.2022 - 23:27W opisie w języku polskim używane jest jedno słowo „zamykać oczka” w miejsce różnych angielskich o rożnym znaczeniu tj „bind off” i „reduce”. Jest to mylące. Proponuje dodać choćby wyjaśnienie w nawiasie, że chodzi o przerobienie dwóch oczek a nie zamknięcie.
18.10.2022 - 19:05Jestem na etapie zamykania oczek na pokroje rękawów (rozmiar 12-18m). Powinnam zamykać 8 oczek na początku okrążenia (po 4 z obu stron), natomiast akurat na 17cm wypada w tym miejscu zmiana kolorów nici. Jak zmieniać kolor nici na paski w takiej sytuacji?
18.10.2022 - 19:01DROPS Design answered:
Witaj Sylwio, zamknij te 8 oczek kolorem poprzedniego paska, a nowy kolor dołącz za tymi 8 zamkniętymi oczkami. Pozdrawiamy!
19.10.2022 - 09:11Hej. Jag är klar med västen och så nöjd men nu undrar jag. Ska axlarna sys ihop omlott eller bara fästas med knapp?
15.03.2022 - 21:03DROPS Design answered:
Hej Helene. Så roligt att du är nöjd med västen. Det är tänkt att axlarna bara ska fästas med hjälp av knapparna. Mvh DROPS Design
16.03.2022 - 09:10Bin etwas verwirrt wie hoch ist die gesamthöhe . Gr 62.
09.02.2022 - 16:47DROPS Design answered:
Liebe Angelina, die gesamte Höhe in Gr. 1/3 Monate bzw 56/62 cm ist 25 cm: 15 cm vor Armausschnitt (einschl. 3 cm Bündchen) + 10 cm Armausschnitt. Viel Spaß beim stricken!
10.02.2022 - 08:56Dobrý den, ve spotřebě příze je v českém návodu pro velikost 80/86 chyba.
07.01.2022 - 21:35DROPS Design answered:
Dobrý den, Lenko, děkujeme za upozornění - opraveno. Hezký den! Hana
13.01.2022 - 05:06Hallo! Ich bin etwas verwirrt: Strickt man den Pullunder in Runden auf der Rundstricknadel oder ‚hin und her‘? Das geht aus der Anleitung für mich nicht hervor. Viele Grüße Christine
27.11.2021 - 10:01DROPS Design answered:
Liebe Christine, Rumpfteil wird zuerst in Runden bis Armauschnitt gestrickt, dann wird die Arbeit in 2 Teilen verteilt und Rücken- und Vorderteil werden dann in Hin- und Rückreihen separat gestrickt. Viel Spaß beim stricken!
29.11.2021 - 07:38