DROPS Karisma
DROPS Karisma
100% Wool
from 3.00 $ /50g
Get the yarn to make this pattern from 15.00$.

The yarn cost is calculated from the pattern’s smallest size and the yarn’s cheapest product type. Looking for an even better price? You might find it on the DROPS Deals!

DROPS SS24
DROPS Baby 10-1
JUMPER:
Size: 1/3 – 6/9 – 12 – 24 months
All measurements in chart below are in cm.

Materials: DROPS Karisma Superwash from Garnstudio
100-100-150-150 g color no 41, blue
100-100-100-100 g color no 07, corn blue
50-50-50-50 g color no 47, olive

DROPS circular and double pointed needles size 2.5 mm/US 1or2 and 4 mm/US 6
DROPS crochet hook size 3mm/C or D (for borders)
DROPS Inka button, no 531, 2 pcs

-------------------------------------------------------

Alternative Yarn – See how to change yarns here
Yarn Groups A to F – Use the same pattern and change the yarn here
Yarn usage using an alternative yarn – Use our yarn converter here

-------------------------------------------------------

DROPS Karisma
DROPS Karisma
100% Wool
from 3.00 $ /50g
Get the yarn to make this pattern from 15.00$.

The yarn cost is calculated from the pattern’s smallest size and the yarn’s cheapest product type. Looking for an even better price? You might find it on the DROPS Deals!

Pattern instructions

NOTE: This pattern is written in American English. All measurements in charts are in cm. For conversion from inches to cm - click here. There are different terms for crocheting in American and British English. If this pattern includes crochet, click for "crochet terms" here. For this pattern in British English, please click here.
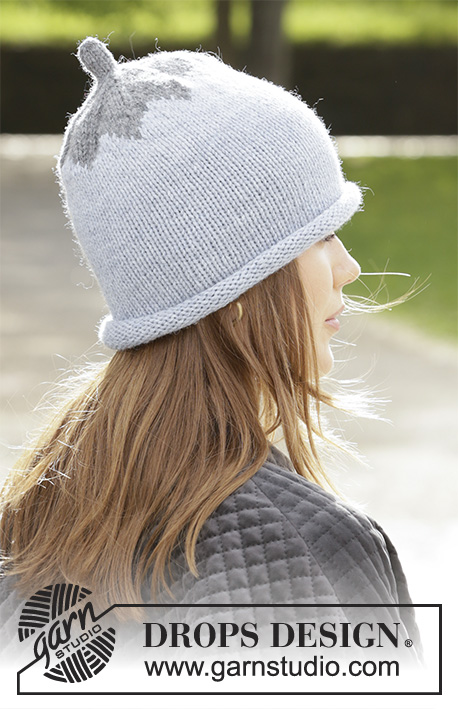
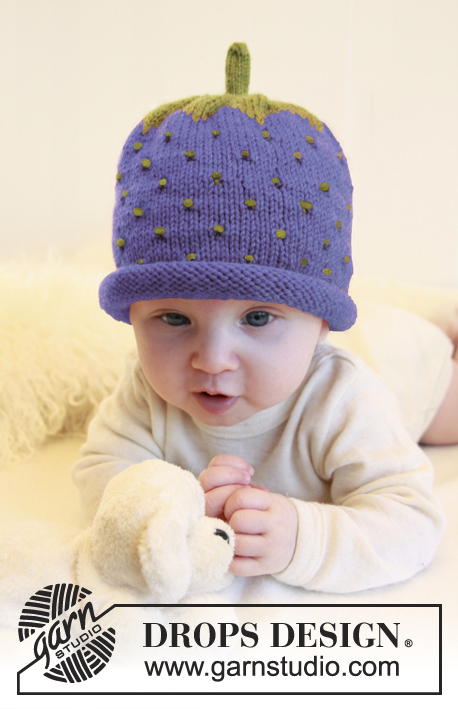
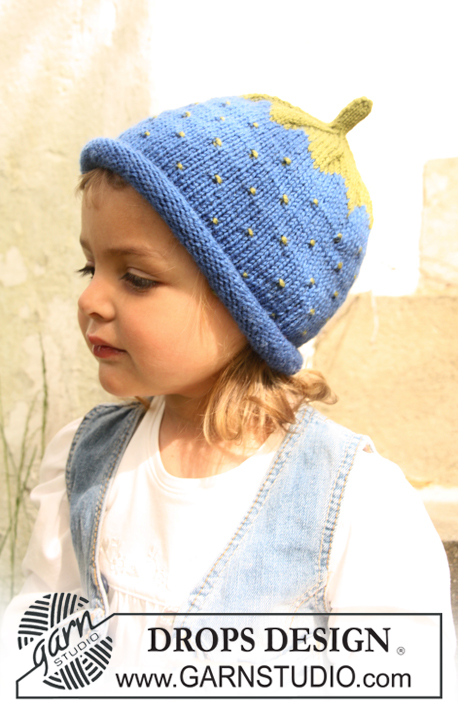
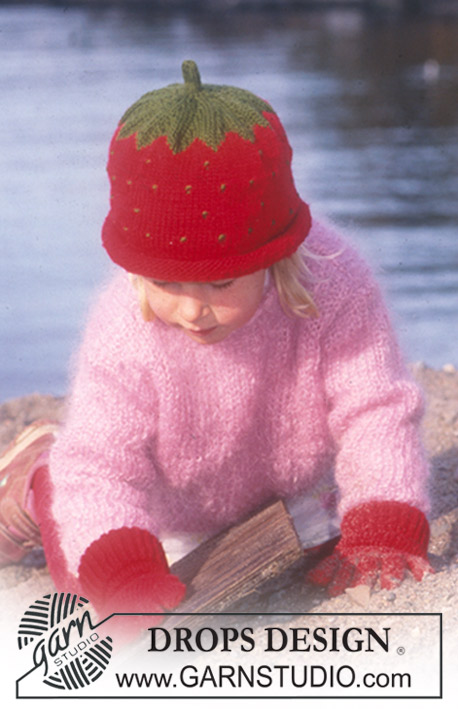
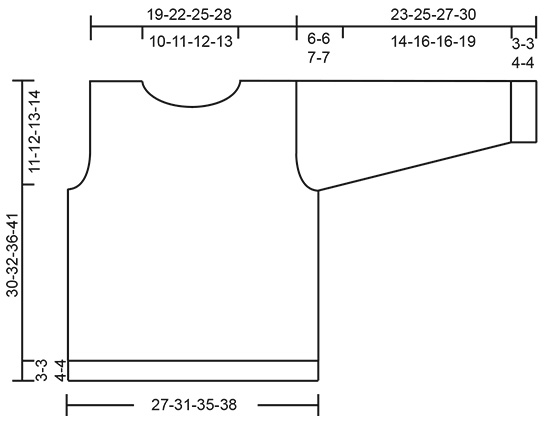
JUMPER:
Gauge: 21 sts x 28 rows in stockinette sts on needle size 4 mm / US 6 = 10 x 10 cm / 4" x 4"
Rib: *K1, P1*, repeat from *-*.
Pattern: See diagram M.1. The entire pattern is knitted in stockinette sts.

Back and front piece:
Cast on 112-128-144-160 sts with blue on circular needle size 2.5 mm / US 1or 2 and work 3-3-4-4 cm / 1"-1"-1½"-1½" in Rib.
Change to needle size 4 mm / US 6 and continue in stockinette sts. REMEMBER THE GAUGE!
When piece measures 13-14-17-21 cm / 5"-5½"-6¾"-8¼" knit following chart M.1. After M.1 finish the piece in corn blue.
When piece measures 19-20-23-27 cm / 7½"-8"-9"-10⅝" bind off 6 sts each side for armhole = 50-58-66-74 sts left on front and back piece.
Now finish each piece separately.

Front piece: = 50-58-66-74 sts. Bind off for armholes in beginning of every row, each side: 2 sts 1-1-2-2 times and 1 st 3-4-3-4 times = 40-46-52-58 sts.
When piece measures 26-28-31-36 cm / 10¼"-11"-12¼"-14¼" bind off the middle 10-12-14-16 sts for neck and work each side separately.
Bind off in beg of every row from neck: 2 sts 1 time and 1 st 4 times = 9-11-13-15 sts left on shoulder.
Continue as follows:
Right shoulder: bind off when piece measures 30-32-36-41 cm / 11¾"-12½"-14¼"-16⅛".
Left shoulder: When piece measures 30-32-36-41 cm / 11¾"-12½"-14¼"-16⅛" change to needle size 2.5 mm / US 1or2 and work Rib over the remaining sts on shoulder. When Rib measures 0.5 cm / ¼" make 1 buttonhole on mid shoulder – bind off 1 st and cast on 1 new st in the same place on the return row.
Bind off the remaining sts in Rib on next row.

Back piece: 50-58-66-74 sts. Bind off for armholes as described for front piece = 40-46-52-58 sts.
When piece measures 28-30-34-39 cm / 11"-11¾"-13⅜"-15¼" bind off the middle 20-22-24-26 sts for neck and work each side separately. Bind off 1 st on neckline on next row = 9-11-13-15 sts left on shoulder.
Continue as follows:
Right shoulder: bind off when piece measures 30-32-36-41 cm / 11¾"-12½"-14¼"-16⅛".
Left shoulder: When piece measures 30-32-36-41 cm / 11¾"-12½"-14¼"-16⅛" change to needle size 2.5 mm / US 1or2 and work 2 cm / ¾" in Rib and then bind off.

Sleeve: Cast on 36-38-40-42 sts on double pointed needle size 2.5 mm / US 1or2 with blue and work 3-3-4-4 cm /1"-1"-1½"-1½" in Rib.
Change to needle size 4 mm / US 6 and continue in stockinette sts. AT THE SAME TIME after the Rib start inc 2 sts mid under arm, repeat on every 16-9-9-7 row a total of 3-5-5-7 times = 42-48-50-56 sts.
When sleeve measures 11-13-15-18 cm / 4⅜"-5⅛"-6"-7" knit following chart M.1 – make sure to get a berry mid upper arm.
After M.1 finish the sleeve in corn blue. AT THE SAME TIME when sleeve measures 17-19-20-23 cm / 6¾"-7½"-8"-9" bind off for sleeve cap in beg of every row, each side and finish the sleeve back and forth on needle: 3 sts 1 time, 2 sts 1-2-1-2 times, 1 st 4-3-6-4 times, 2 sts 1-2-1-2 times and 3 sts 1 time.
Bind off when sleeve measures 23-25-27-30 cm / 9"-9¾"-10⅝"-11¾".

Assembly: Sew right shoulder seam. Pick up approx 60-70 sts round the neck on needle size 2.5 mm / US 1or 2 with corn blue and work 2-2-3-3 cm / ¾"-¾"-3⅛"-3⅛" in Rib back and forth on needle – at the same time after 0.5 cm / ¼" make a buttonhole as described for left shoulder on front piece.
Bind off. Sew sleeve seams and sew on buttons.
-----------------------------------------------------------------------------

HAT:
Size: 0/6 months – 1 – 2/4 – 5/6 – 7/8 years
To fit head circumference: approx 42-45-48-50-52 cm / 16½"-17¾"-19"-19¾"-20½"

Materials: DROPS Karisma Superwash from Garnstudio
50 g for all sizes: color no 07 corn blue or color no 18 red
50 for all sizes: color no 47 dark olive

DROPS double pointed needles size 3.5 mm / US 4 + size 2 mm/US 0 (for the top)

Gauge: 22 sts x 30 rows on needle size 3.5 mm / US 4 in stockinette sts = 10 x 10 cm / 4" x 4"

Pattern: See diagrams M.2 and M.3. 1 diagram = 1 pattern repeat. The diagram showing all rows in pattern seen from the RS

Cast on 84-90-96-102-108 sts with blue or red on double pointed needle size 3.5 mm / US 4. P 1 round and continue in stockinette st. When piece measures 6 cm / 2½" insert a marker (= rolling edge) and measure piece from this point from now on.
Knit following chart M.2.
When piece measures 7-8-9-10-11 cm / 2¾"-3⅛"-3½"-4"-4⅜" on next round dec 3-0-6-3-0 sts evenly = 81-90-90-99-108 sts.
Then insert 9-10-10-11-12 markers in piece with 9 sts between each marker.
First st after the first marker = first st in chart M.3.
After M.3 finish the hat in olive green, at the same time dec 1 st to the right of all markers on every other round until there are 9-10-10-11-12 sts left on needle.
Change to needle size 2 mm/US 0 and knit 3 cm / 1⅛" over all sts.
Cut the yarn and pull through remaining sts. Sew tight.
-----------------------------------------------------------------------------

MITTENS:

Size: 2/4 – 5/6 – 7/8 years

Materials: DROPS Karisma Superwash from Garnstudio
50-100-100 g for all sizes, color no 18, red

DROPS double pointed needles size 2.5 mm/US 2 and 3 mm/US 3

Knitting gauge: 23 sts x 32 rows on needle size 3 mm / US 3 in stockinette sts = 10 x 10 cm / 4" x 4"

Rib: *K1/P1*, repeat from *-*.

Cast on 44-48-54 sts on needles size 2.5 mm / US 2 or and work 10-12-14 cm / 4"-4¾"-5½" in Rib. Change to needle size 3 mm / US 3 and continue in stockinette st, on first round dec 8 sts evenly = 36-40-46 sts.
Measure piece from this point from now on.
When piece measures 1 cm / ⅜" inc for thumb as follows: insert a marker, inc 1 st by knitting 2 sts in next st, K1, inc 1 st by knitting 2 sts in next st, insert a marker, finish the round.
Now inc 1 st on the inside of each marker on every other round a total of 3-4-5 times = 11-13-15 thumb sts.
When piece measures 3-4-5 cm / 1⅛"-1½"-2" put the 11-13-15 thumb sts on a holder. Cast on 3 new sts behind the thumb sts = 36-40-46 sts.
Continue in stockinette sts. When piece measures 5-7-9 cm / 2"-2¾"-3½" knit next round as follows: K14-15-18 sts (= upper hand), K 8-10-10 sts and then place these 8-10-10 sts on a holder for little finger, K 14-15-18 sts (= palm of hand).
Now work the fingers on needle size 2.5 mm / US 2.

Little finger: put the 8-10-10 sts from holder back on needle and cast on 3 new sts towards ring finger = 11-13-13 sts. Knit 3-3.5-4 cm / 1"-1¼"-1½" in stockinette st, K2 tog around, cut the yarn and pull through remaining sts.
Ring finger: Take 4-5-5 sts from upper hand sts and 4-4-6 sts from palm sts, pick up 3 new sts towards little finger and cast on 2 new sts towards middle finger = 13-14-16 sts. Knit 5-6-7 cm / 2"-2⅜"-2¾" in stockinette sts, K2 tog around, cut the yarn and pull through remaining sts.
Middle finger: Take 5-5-6 sts from upper hand sts and 4-5-6 sts from palm sts, pick up 3 new sts towards ring finger and cast on 2 new sts towards index finger = 14-15-17 sts. Knit 6-7-8 cm / 2⅜"-2¾"-3⅛" in stockinette sts, K2 tog around, cut the yarn and pull through remaining sts.
Index finger: Take remaining sts from upper hand and palm sts and pick up 3 new sts towards middle finger = 14-14-16 sts. Knit 5-6-7 cm / 2"-2⅜"-2¾" stockinette sts, K2 tog around, cut the yarn and pull through remaining sts.
Thumb: Put the 11-13-15 thumb sts from holder on needle and pick up 3 sts behind these = 14-16-18 sts. Knit 3-4-5 cm / 1⅛"-1½"-2" in stockinette sts, K2 tog around, cut the yarn and pull through remaining sts.

Diagram

All measurements in charts are in cm.

symbols = blue
symbols = corn blue or red
symbols = dark olive
symbols = K, corn blue or red
symbols = K, dark olive
symbols = P, corn blue or red
diagram
diagram

Each of our patterns has specific tutorial videos to help you.

Do you have a question? See a list of frequently asked questions (FAQ)

Knitting tension is what determines the final measurements of your work, and is usually measured per 10 x 10 cm. It is provided like so: number of stitches in width x number of rows in height - eg: 19 stitches x 26 rows = 10 x 10 cm.

The knitting tension is very individual; some people knit/crochet loosely while others work tightly. You adjust the knitting tension with the needle size, which is why the suggested needle size only serve as a guide! You need to adjust this (up or down) to ensure that YOUR knitting tension matches the knitting tension provided in the pattern. If you work with a different knitting tension than provided you will have a different yarn consumption, and your work will have different measurements than what the pattern suggests.

The knitting tension also determines which yarns can replace each other. As long as you achieve the same knitting tension you can replace one yarn with another.

See DROPS lesson: How to measure your tension/gauge

See DROPS video: How to make a gauge tension swatch

The required amount of yarn is provided in grams, eg: 450 g. To calculate how many balls you’ll need you first need to know how many grams are in 1 ball (25g, 50g or 100g). This information is available if you click on the individual yarn quality on our pages. Divide the amount required with the amount of each ball. For example, if each ball is 50g (the most common amount), the calculation will be as follows: 450 / 50 = 9 balls.

The important thing when changing from one yarn to another is that the knitting/crochet tension remains the same. This is so that the measurements of the finished piece will be the same as on the sketch provided. It is easier to achieve the same knitting tension using yarns from the same yarn group. It is also possible to work with multiple strands of a thinner yarn to achieve the knitting tension of a thicker one. Please try our yarn converter. We recommend you to always work a test swatch.

Please NOTE: when changing yarn the garment might have a different look and feel to the garment in the photo, due to individual properties and qualities of each yarn.

See DROPS lesson: Can I use a different yarn than the one mentioned in the pattern?

All our yarns are categorised into yarn groups (from A to F) according to thickness and knitting tension – group A contains the thinnest yarns and group F the thickest. This makes it easier for you to find alternative yarns to our patterns, should you wish to switch yarn. All yarns within the same group have a similar knitting tension and can easily replace each other. However, different yarn qualities have different structures and properties which will give the finished work a unique look and feel.

Click here for an overview of the yarns in each yarn group

At the top of all our patterns you’ll find a link to our yarn converter, which is a helpful tool should you wish to use a different yarn than suggested. By filling in the yarn quality you wish to replace, the amount (in your size) and number of strands, the converter will present good alternative yarns with the same knitting tension. Additionally it will tell you how much you’ll require in the new qualities and whether you’ll need to work with multiple strands. Most skeins are 50g (some are 25g or 100g).

If the pattern is worked with multiple colours, every colour will have to be converted separately. Similarly, if the pattern is worked with several strands of different yarns (for example 1 strand Alpaca and 1 strand Kid-Silk) you will have to find alternatives for each, individually.

Click here to see our yarn converter

Since different yarns have different qualities and textures we have chosen to keep the original yarn in our patterns. However, you can easily find options among our available qualities by using our yarn converter, or simply pick a yarn from the same yarn group.

It is possible that some retailers still have discontinued yarns in stock, or that someone has a few skeins at home that they would like to find patterns for.

The yarn converter will provide both alternative yarn as well as required amount in the new quality.

If you think it's hard to decide what size to make, it can be a good idea to measure a garment you own already and like the size of. Then you can pick the size by comparing those measures with the ones available in the pattern's size chart.

You'll find the size chart at the bottom of the pattern.

See DROPS lesson: How to read size chart

The needle size provided in the pattern serves only as a guide, the important thing is to follow the knitting tension. And since knitting tension is very individual, you will have to adjust the needle size to ensure that YOUR tension is the same as in the pattern – maybe you’ll have to adjust 1, or even 2 needle sizes, up or down to achieve the correct tension. For this, we recommend that you work test swatches.

Should you work with a different knitting tension than the one provided, the measurements of the finished garment might deviate from the measurement sketch.

See DROPS lesson: How to measure your tension/gauge

See DROPS video: How to make a gauge tension swatch

Working a garment top-down provides more flexibility and room for personal adjustment. For example it is easier to try the garment on while working, as well as making adjustments to length of yoke and shoulder caps.

The instructions are carefully explaining every step, in the correct order. Diagrams are adjusted to the knitting direction and are worked as usual.

The diagram depicts all rows/rounds, and every stitch seen from the right side. It is read from bottom to top, from right to left. 1 square = 1 stitch.

When working back and forth, every other row is worked from the right side and every other row is worked from the wrong side. When working from the wrong side, the diagram will have to be worked reversed: from left to right, knit stitches are purled, purl stitches are knit etc.

When working in the round every round is worked from the right side and the diagram are worked from right to left on all rounds.

See DROPS lesson: How to read knitting diagrams

The diagram depicts all rows/rounds, and every stitch seen from the right side. It is worked from bottom to top, from right to left.

When working back and forth every other row is worked from the right side: from right to left and every other row is worked from the wrong side: from left to right.

When working in the round, every row in the diagram are worked from the right side, from right to left.

When working a circular diagram you start in the middle and work your way outwards, counter clockwise, row by row.

The rows usually start with a given number of chain stitches (equivalent to the height of the following stitch), this will either be depicted in the diagram or explained in the pattern.

See DROPS lesson: How to read crochet diagrams

Instructions for working several diagrams after each other on the same row/round, will often be written like so: “work A.1, A.2, A.3 a total of 0-0-2-3-4 times". This means you work A.1 once, then A.2 is worked once, and A.3 is repeated (in width) the number of times provided for your size – in this case like so: S = 0 times, M = 0 times, L=2 times, XL= 3 times and XXL = 4 times.

The diagrams are worked as usual: begin with the first row in A.1, then work the first row in A.2 etc.

See DROPS lesson: How to read knitting diagrams

See DROPS lesson: How to read crochet diagrams

The total width of the garment (from wrist-to-wrist) will be larger in the larger sizes, despite the actual sleeves being shorter. The larger sizes have longer sleeve caps and wider shoulders, so there will be a good fit in all sizes.

The measurement sketch/schematic drawing provides information regarding the full length of the garment. If it’s a jumper or a jacket the length is measured from the highest point on the shoulder (usually closest to the neckline), and straight down to the bottom of the garment. It is NOT measured from the tip of shoulder. Similarly, the length of yoke is measured from the highest point on the shoulder and down to where yoke is split into body and sleeves.

See DROPS lesson: How to read a schematic drawing

Diagrams are often repeated on the round or in height. 1 repeat is the diagram the way it appears in the pattern. If it says to work 5 repeats of A.1 in the round, then you work A.1 a total of 5 times after/next to each other in the round. If it says to work 2 repeats of A.1 vertically/in height you work the entire diagram once, then begin again at the start and work the entire diagram one more time.

Chain stitches are slightly narrower than other stitches and to avoid working the cast-on edge too tight, we simply chain more stitches to begin with. The stitch count will be adjusted on the following row to fit the pattern and measurement sketch.

The rib edge is more elastic and will contract slightly compared to, for example, stocking stitch. By increasing before the rib edge, you avoid a visible difference in width between the rib edge and the rest of the body.

It’s very easy to cast off too tightly, and by making yarn overs while casting off (and simultaneously casting these off) you avoid a too tight cast off edge.

See DROPS video: How to bind off with yarn overs (yo)

To achieve an even increase (or decrease) you can increase on, for example: every 3rd and 4th row alternately, like so: work 2 rows and increase on the 3rd row, work 3 rows and increase on the 4th. Repeat this until the increase is complete.

See DROPS lesson: Increase or decrease 1 st on every 3rd and 4th row alternately

Should you prefer to work in the round instead of back and forth, you may of course adjust the pattern. You’ll need to add steeks mid-front (usually 5 stitches), and follow the instructions. When you would normally turn and work from the wrong side, simply work across the steek and continue in the round. At the end you’ll cut the piece open, pick up stitches to work bands, and cover the cut edges.

See DROPS video: How to knit steeks and cut open

Should you prefer to work back and forth instead of in the round, you may of course adjust the pattern so you work the pieces separately and then assemble them at the end. Divide the stitches for the body in 2, add 1 edge stitch in each side (for sewing) and work the front and back pieces separately.

See DROPS lesson: Can I adapt a pattern for circular needles into straight needles?

Pattern repeats can vary slightly in the different sizes, in order to get the correct proportions. If you’re not working the exact same size as the garment in the photo, yours might deviate slightly. This has been carefully developed and adjusted so that the complete impression of the garment is the same in all sizes.

Make sure to follow instructions and diagrams for your size!

If you have found a pattern you like which is available in women’s size it’s not very difficult to convert it to men’s size. The biggest difference will be the length of sleeves and body. Start working on the women size that you think would fit across the chest. The additional length will be worked right before you cast off for the armhole/sleeve cap. If the pattern is worked top-down you can add the length right after the armhole or before the first decrease on sleeve.

Regarding additional yarn amount, this will depend on how much length you add, but it is better with a skein too many than too few.

All yarns will have excess fibres (from production) that might come off as lint or shedding. Brushed yarns (ie hairier yarns) have more of these loose, excess fibres, causing more shedding.

Shedding also depends on what is worn under or over the garment, and whether this pulls at the yarn fibres. It’s therefore not possible to guarantee that there will be no shedding

Below are some tips on how to get the best result when working with hairier yarns:

1. When the garment is finished (before you wash it) shake it vigorously so the looser hairs come off. NOTE: do NOT use a lint roller, brush or any method that pulls at the yarn.

2. Place the garment in a plastic bag and put it in your freezer - the temperature will cause the fibres to become less attached to each other, and excess fibres will come off easier.

3. Leave in the freezer for a few hours before taking it out and shaking it again.

4. Wash the garment according to the instructions on the yarn label.

Pilling is a natural process that happens to even the most exclusive of fibers. It's a natural sign of wear and tear that is hard to avoid, and that is most visible in high friction areas of your garment like a sweater's arms and cuffs.

You can make your garment look as new by removing the pilling, using a fabric comb or a pill/lint remover.

Still can't find the answer you need? Then scroll down and leave your question so one of our experts can try to help you. This will be done normally within 5 to 10 working days.
In the meantime, you can read the questions and answers that others have left to this pattern or join the DROPS Workshop on Facebook to get help from fellow knitters/crocheters!

You might also like...

Post a comment to pattern DROPS Baby 10-1

We would love to hear what you have to say about this pattern!

If you want to leave a question, please make sure you select the correct category in the form below, to speed up the answering process. Required fields are marked *.

Comments / Questions (4)

country flag Lea wrote:

”Lägg upp 36… Samtidigt ökas det 2 m mitt under ärmen totalt 3 ggr vart 16:e v = 42m. När ärmen mäter 11cm stickas M.1. ” Om jag stickar m1 efter 11cm kommer jag inte hunnit öka på va 3ggr på 16:e varv och ökningen kommer hamn mitt i mönstret… Men det står inte hur jag skall anpassa mönstret utifrån att 42 inte är delbart med 8…. Ska ökningen verkligen ske mitt i m1, och isf. Hur löser jag att gå från 40 till 42 maskor mitt i?

06.03.2023 - 02:33

DROPS Design answered:

Hej Lea, du behøver ikke være klar med økningen og når du starter på M.1 bør du have 40 masker, det vil sige at de sidste 2 masker får du når du kommer højere op i diagrammet :)

08.03.2023 - 09:33

country flag Monica wrote:

Jag stickade denna tröja i storlek 6-9 månader det räckte inte med 100 gram av den ljusblå som är på nederdelen av tröjan köp 150 gram på en gång

04.04.2022 - 14:19

country flag Anne wrote:

Lue:... "Når arb måler 7-8-9-10-12 cm SETTES felles 3-0-6-3-0 m jevnt fordelt på p...." Har det lurt seg inn et ekstra ord her? (Settes?) gir ikke mening...

09.09.2014 - 22:18

Ghislaine Coutu wrote:

Bonjour,je veux tricoter le modèle 10-1 mais je n'arrive pas à comprendre le patron.Il est indiqué d'utiliser des aig.circulaires et de monter 128 m. et plus loin il est indiqué de monter 58m.et de tricoter le dos et le devant séparément. Merci de me fournir des explications

18.02.2014 - 23:39

DROPS Design answered:

Bonjour Mme Coutu, le dos et le devant se tricotent en rond jusqu'aux emmanchures. Quand vous avez rabattu 6 m sur les 2 côtés pour les emmanchures, vous terminez le dos et le devant séparément jusqu'aux épaules. Bon tricot!

19.02.2014 - 09:40