
Looking for a yarn?


Comments / Questions (59)
![]() Grace wrote:
Grace wrote:
Hi, I’ve read the questions and replies regarding the increase stitches every other row but I can’t understand what to do. Could you explain based on row 1: do XXXX, row2: do XXX etc and make it comprehensive as every other row would indicate every second row, so one row do nothing next row increase. It’s not clear and I would love to make this!! Thank you
26.01.2024 - 14:02DROPS Design answered:
Dear Grace, we say on each side every other row because we alternate sides on each row. So, for example, at the left side of the piece only cast on stitches on every other row (that is, whenever the left side of the piece is the end of the row). In short, cast on 2 sts at the end of the next 4 rows (2 rows in each side) and then 1 st at the end of the next 4-6-10 rows (2-3-5 rows in each side) = 23-29-37 sts. Happy knitting!
28.01.2024 - 23:40
![]() Issa wrote:
Issa wrote:
Hej jag undrar vilka mått ni utgår ifrån runt halsen varför det sk just stickas 9-10-12 cm från halsavmaskningen? har en större hund jag vill sticka till men förstår inte hur ni räknat på just den delen.
21.06.2022 - 19:00DROPS Design answered:
Hej Issa, hvis du vil ændre størrelsen, så er du nødt til at prøve hundeblusen efterhånden som du strikker. God fornøjelse!
22.06.2022 - 10:00
![]() Colleen Paul wrote:
Colleen Paul wrote:
I also found it difficult to read the pattern in regards to the increases.
04.09.2021 - 22:12
![]() Amanda Karlsson wrote:
Amanda Karlsson wrote:
Hello. I would love to do this pattern for my dads dog. She is an American Cocker And i dont know what size i shuld knit. I have measurments for her. Could you publish pattern sizes in a diagram as you have with your other human patterns? It would be much appriciated Thanks
03.06.2021 - 22:55DROPS Design answered:
Dear Mrs Karlsson, we don't have any diagram for this pattern, but you will find chest width and back length at the beginning of the pattern (between sizes and materials). Happy knitting!
04.06.2021 - 07:15
![]() Marica wrote:
Marica wrote:
Salve, voglio segnalare che nella versione in italiano si dice di lav a m rasata invece che a punto riso: Lavorato dal basso della schiena e su verso il collo. Avviare 11-15-19 m. con i ferri misura 7 mm con il filato rosso. Lavorare a m. rasata e a strisce –
15.02.2021 - 21:43DROPS Design answered:
Buonasera Marica, grazie per la segnalazione. Abbiamo corretto il testo. Buon lavoro!
16.02.2021 - 22:53
![]() Sara wrote:
Sara wrote:
Hallo, ich würde gerne diese Anleitung mit Filzwolle umsetzen wollen. Wie rechne ich die Maße um?
06.01.2021 - 10:19DROPS Design answered:
Liebe Sara, leider können wir nicht jede Anleitung nach jedem Wunsch umrechnen - gerne können Sie sich an dem Laden wenden, wo Sie die wolle gekauft haben. Danke im voraus für Ihr Verständnis. Viel Spaß beim stricken!
06.01.2021 - 13:13
![]() Anna Carin Hellman wrote:
Anna Carin Hellman wrote:
Hej! Jag undrar hur mycket garn som går åt om man väljer att sticka den enfärgad
04.06.2020 - 22:36DROPS Design answered:
Hej Anna, du behöver säkert alla 4 nystan i den stora storleken :)
05.06.2020 - 08:28
![]() Annemarie Grindel wrote:
Annemarie Grindel wrote:
Möchte "Suzi" stricken. Verstehe aber nicht, warum es in zwei (2) Teile gestrickt werden soll. Habe selber keinen Hund, werde es für einen Hundebasar stricken wollen. LG Annemarie Grindel
21.10.2019 - 13:20DROPS Design answered:
Liebe Frau Grindel, nach 21-28-36 cm ketten Sie die mittleren 5-7-9 Maschen für den Hals ab, dann stricken Sie jeder Seite separat bis zur Ende. Viel Spaß beim stricken!
21.10.2019 - 14:54
![]() Helene wrote:
Helene wrote:
Kan den strikkes i rillestrikk? Og når på ryggen skal man beggyne å øke?(. Legg opp 11-15-19 m på p 7 med rød. Strikk perlestrikk og striper – se forkl over – til ferdig mål – samtidig legges det opp nye m i hver side på hver 2.p (dvs på slutten av p): 2 m 2 ganger og 1 m 2-3-5 ganger = 23-29-37 m. Strikk til arb måler 21-28-36 cm, nå felles de midterste 5-7-9 m av til hals. Videre strikkes hver side ferdig for seg – herfra måles arb )
25.09.2019 - 21:53
![]() MAMYBEA wrote:
MAMYBEA wrote:
Bonjour combien de pelotes me faudrait il pour un manteau taille M? je souhaite le faire en une seule couleur drops mix. merci
28.01.2019 - 09:03DROPS Design answered:
Bonjour Mamybea, nous n'avons malheureusement plus ce modèle, nous ne pouvons donc pas vous donner la quantité nécessaire en uni - additionnez la quantité pour chaque couleur, il est probable qu'il vous en faudra moins. Votre magasin pourra vous conseiller,, même par mail ou téléphone. Bon tricot!
28.01.2019 - 12:16
|
|
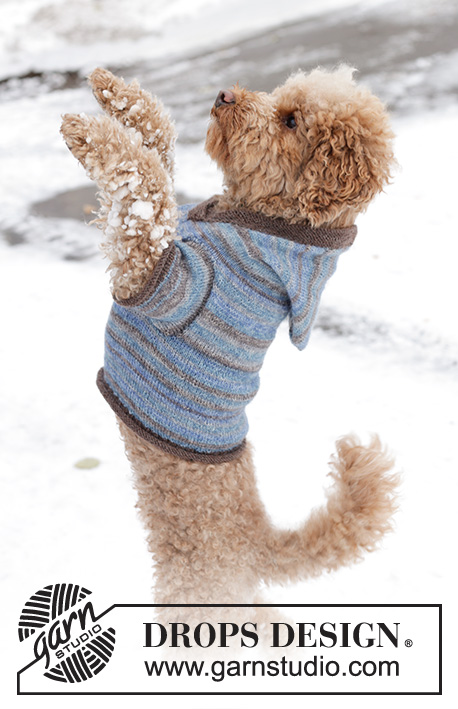
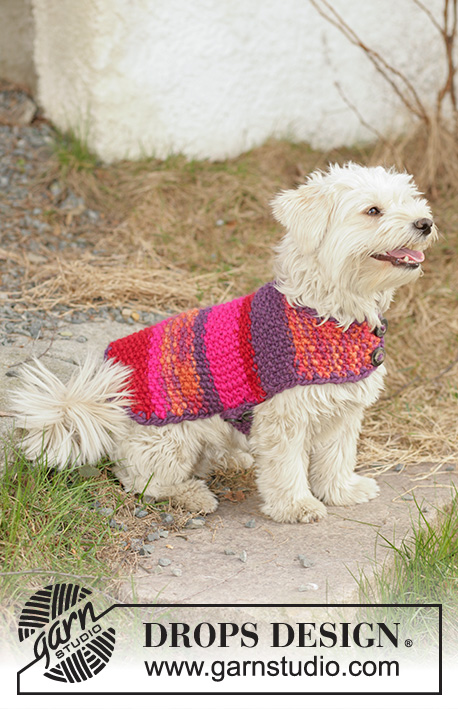
Suzi |
|
 |
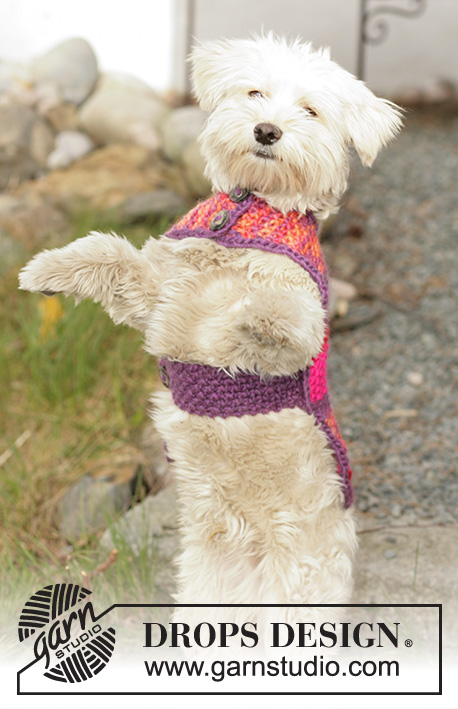 |
DROPS dog coat knitted in Seed stitch with ”Snow”.
DROPS 102-40 |
|
|
Knitting gauge: 12 sts x 20 rows in moss sts = 10 x 10 cm [4" x 4"] Seed sts: 1st row: *K1, P1*, repeat from *-* 2nd row: K over P and P over K, repeat the 2nd row. Stripes: Work as follows: 5-7-8 cm [2"-2 ¾"-3⅛"] of red, 1.5-2-3 cm [½"-¾"-1⅛"] of pink, 4-5-6 cm [1½"-2"-2⅜"] of orange mix, 1.5-2-3 cm [½"-¾"-1⅛"] of lilac mix, 3-5-6 cm [1⅛"-2"-2⅜"] of pink, 1.5-2-3 cm [½"-¾"-1⅛"] of red, 3-5-6 cm [1⅛"-2"-2⅜"] of lilac mix and then orange mix until finish. Coat: The piece is knitted from the bottom of the back and up towards the neck. Cast on 11-15-19 sts on needle size 7 mm [US 10 ½] with red. Work in seed sts and stripes – see above- until finish – at the same time cast on new sts each side on every other row (i.e. end of each row): 2 sts 2 times and 1 st 2-3-5 times = 23-29-37 sts. Continue until the piece measures 21-28-36 cm [8 ¼" – 11" – 14 ¼"]. Then bind off the mid 5-7-9 sts for the neck. Divide the work and finish each side separately – all measures are done from here from now on. Left side: = 9-11-14 sts. Cast off 1 sts towards the neck on every other row 2-2-4 times = 7-9-10 sts. When the piece measures 9-10-12 cm [3½"-4"-4 ¾"] bind off. Right side: Work as left side but reverse. Crochet edge: Crochet with lilac mix and hook size 7 mm [US K/10½] along the whole edge of the coat- begin at the top of one side of the neck as follows: 1 sc in the first st, 2 ch, *skip approx 1.5 cm [½"], 1 sc in the next st, 2 ch*, repeat from *-* and finish with a sl st at the beg. of round. Harness underneath the stomach: Pick up 7-9-10 sts on needle size 7 mm [US 10 ½] with lilac mix on the left edge of the coat beg. approx 6-8-10 cm [2⅜"-3⅛"-4"] below the neck (Pick up in the knitted sts so the crochet edge lay at the top). Knit in Moss sts for approx 10-15-20 cm [4"-6"-8"] – try the coat on the dog for exact length (the garment stretch a little when used so don’t make it too long), bind off. Sew 1-2-2 buttons onto the harness and 1-2-2 buttons onto the neck edge. Button up using the ch spaces. |
|
Have you finished this pattern?Tag your pictures with #dropspattern or submit them to the #dropsfan gallery. Do you need help with this pattern?You'll find 16 tutorial videos, a Comments/Questions area and more by visiting the pattern on garnstudio.com. © 1982-2025 DROPS Design A/S. We reserve all rights. This document, including all its sub-sections, has copyrights. Read more about what you can do with our patterns at the bottom of each pattern on our site. |
|


With over 40 years in knitting and crochet design, DROPS Design offers one of the most extensive collections of free patterns on the internet - translated to 17 languages. As of today we count 314 catalogs and 11821 patterns - 11811 of which are translated into English (US/in).
We work hard to bring you the best knitting and crochet have to offer, inspiration and advice as well as great quality yarns at incredible prices! Would you like to use our patterns for other than personal use? You can read what you are allowed to do in the Copyright text at the bottom of all our patterns. Happy crafting!
Post a comment to pattern DROPS 102-40
We would love to hear what you have to say about this pattern!
If you want to leave a question, please make sure you select the correct category in the form below, to speed up the answering process. Required fields are marked *.