
Looking for a yarn?


Comments / Questions (39)
![]() Ewa Waldman wrote:
Ewa Waldman wrote:
Enl. mönster är det ett sprund fram på tröjan. Det framgår inte av bilden. Finns det någon bild där man ser hur tröjan ser ut med knappslå?
07.10.2024 - 14:34DROPS Design answered:
Hej Ewa. Det är på bakstycket det stickas ett sprund, men vi har dessvärre ingen bild på det. Mvh DROPS Design
08.10.2024 - 14:18
![]() Birgit wrote:
Birgit wrote:
Diagram M1 passer ikke når der strikkes frem og tilbage efter aflukning til ærmer, på forstykke og rygstykke. Det går galt med vrangpinden - er der glemt noget i diagrammet.
11.06.2024 - 14:08DROPS Design answered:
Hei Birgit. Hva går galt med vrangpinnen / hvilken str. strikker du? Husk, dette er en gammel oppskrift og da ble det skrevet enklest mulig, så når du skal strikke etter avfellingen til ermhull fortsetter du bare med mønstret slik at det stemmer overens med det du tidligere har strikkes. mvh DROPS Design
17.06.2024 - 11:30
![]() Thomas wrote:
Thomas wrote:
Ich habe das Mützchen gestrickt. Aber ich habe Probleme mit zusammen nächen.
18.04.2024 - 14:21DROPS Design answered:
Lieber Thomas, in diese Lektion zeigen wir, wir man so eine Mütze strickt und ab Bild 15) wie man so eine Mütze zusammennäht. Viel Spaß beim Fertigstellen!
18.04.2024 - 15:55
![]() Erika Reinhold wrote:
Erika Reinhold wrote:
Bei der Hose steht folgendes: Nach 17-18-20 (25-28) cm auf der Innenseite teilen (= Schritt), auf beiden Seiten 1 M. aufnehmen... wo bitte ist die Innenseite... ist das nicht die Seite, die später zusammengenäht werden muss? wenn ja, wie teile ich die?
05.04.2024 - 23:47DROPS Design answered:
Liebe Frau Reinhold, die Beine werden zuerst in Runden gestrickt, die Zunahmen entstehen beidesitig vom Ende/Anfang der Runden, dann wird man die Arbeit weiter in Hin- und Rückreihen, dafür nimmt man 1 Masche beidseitig zu (für die Naht). Viel Spaß beim Stricken!
08.04.2024 - 07:44
![]() DW wrote:
DW wrote:
Having troubles understanding how to sew the crotch area of the pants. Do I sew the bound off stitches on the front to each other and then see the split seam back together? Any help is appreciated.
14.05.2022 - 04:28DROPS Design answered:
Dear DW, you sew together the cast off stitches on front piece and the cast off stitches on back pieces (at the end of each leg). Happy assembly!
16.05.2022 - 08:13
![]() Marianne Ehler wrote:
Marianne Ehler wrote:
Jeg strikker blusen i str. 3. Jeg forstår ikke forklaring til slidsen. Når jeg strikker venstre side, skal jeg så samle masker op på den højre side eller slå maskerne op? Hvis de ekstra masker bliver slået op. så skal de vel syes fast på højre stykke efterfølgende? Der skal vel også være et knaphul i halsribben? Altså en knap både i slidsen og en i halskanten? Med venlig hilsen Marianne
11.01.2022 - 17:57DROPS Design answered:
Hej Marianne, du slår 6 masker op og strikker dem sammen med venstre stykke, husk at strikke de 2 yderste m retstrik og husk at lukke af til knaphul som forklaret. God fornøjelse!
17.01.2022 - 13:15
![]() Inga-Maj wrote:
Inga-Maj wrote:
Förstår inte avmaskningen för halsen efter att man avmaskat de mittersta maskorna. Framstycke avmaska för halsen på va varv 3mx1,2mx2,1mx1.Tack för svar!
14.12.2021 - 19:47DROPS Design answered:
Hej Inga-Maj. Det betyder att du maskar av mot halsen på vartannat varv så här: 3 maskor 1 gång, 2 maskor 2 gånger, 1 maska 1 gång. Mvh DROPS Design
15.12.2021 - 08:50
![]() Agneta wrote:
Agneta wrote:
Förstår inte avmaskning för armen. Maska av 4 m under armen och sticka färdigt fram och tillbaka. Sedan 3 m avm i varje sida för axel på vartannat v 4 ggr. När gör man den avmaskningen? Maska av när arbetet mäter ca 17-20-22 (22-26) cm. Hur många maskor är det kvar att avmaska.
29.04.2021 - 11:09DROPS Design answered:
Hej Agneta. Du maskar av först 4 m under ärmen. Sedan 3 maskor på varje sida (dvs 6 m per varv) totalt 4 gånger. Så totalt avmaskar du 4 + (6x4)= 28 m. Mvh DROPS Design
29.04.2021 - 13:39
![]() Agneta Sjöberg wrote:
Agneta Sjöberg wrote:
Stickar tröjan Bakstyket Man delar bakstycket för sprund Höger sida ska det sitta en knapp Vänster sida knapphål, förstår inte. Ska inte knappen sitta på bakstycket och knapphålet på framstycketKan någon förklara
22.04.2021 - 21:48DROPS Design answered:
Hej Agneta, nej sprundet skal være midt bagpå ryggen, det er de øverste 3 cm inden halsen som kan lukkes med knapper. God fornøjelse!
28.04.2021 - 16:09
![]() Ana Cecilia Ramirez wrote:
Ana Cecilia Ramirez wrote:
Jeg strikker lue størrelse 6 mnd. Jeg lurer på om jeg leser riktig og man bør øke i høyre side hver 4p. Og feller hver 2 p i venstre side. Da blir at antall masker minsker. Stemmer det?
15.10.2020 - 13:17DROPS Design answered:
Hej. Ja det stämmer. Se gärna vår video på hur man stickar en lue sidelengs. Mvh DROPS Design
16.10.2020 - 09:44
|
|||||||
Rocking in Lavender#rockinginlavenderset |
|||||||
 |
 |
||||||
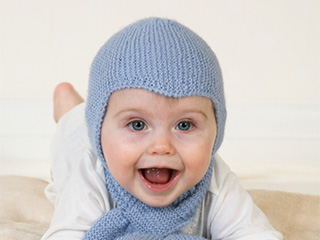
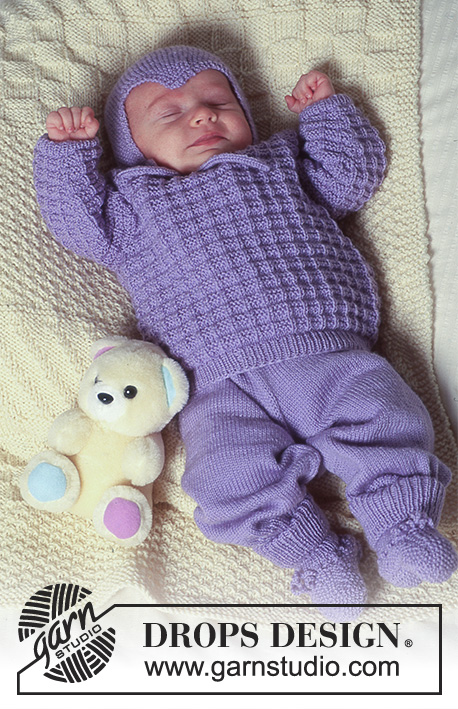
DROPS jumper with textured pattern, pants, hat and booties in “BabyMerino”. Theme: Baby blanket
DROPS Baby 4-19 |
|||||||
|
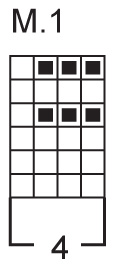
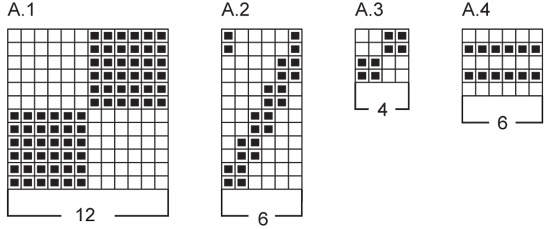
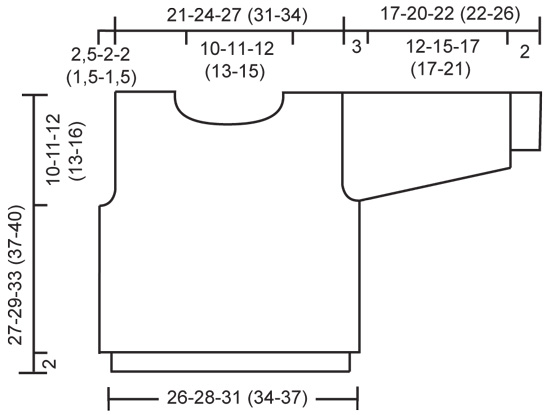
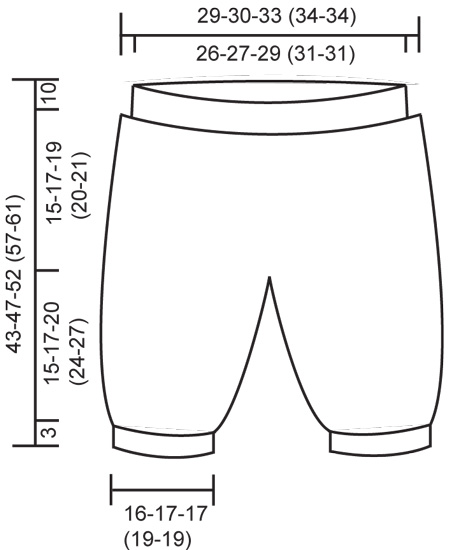
JUMPER: Knitting gauge: 26 sts x 35 rows on needles size 2.5 mm / US 1 in pattern = 10 x 10 cm / 4" x 4". Garter st, back and forth on needle: K all rows. Rib: *K1, P1*, repeat from *-*. Front and back piece: Knitted in the round on circular needle.. Cast on 136-144-160 (176-192) sts on circular needle size 2 mm/US 0 with purple and knit 2 cm / ¾" Rib. Change to needle size 2.5 mm / US 1or2 and continue in M.1. Remember the knitting gauge. When piece measures 17-18-21 (24-24) cm / 6¾"-7"-8¼" (9½"-9½") knit next row as follows: bind off 2 sts for armhole, 64-68-76 (84-92) sts = front piece, bind off 4 sts for armhole, 64-68-76 (84-92) sts = back piece, bind off 2 sts for armhole. Now complete front and back pieces separately. Front piece: = 64-68-76 (84-92) sts. Bind off to shape the armholes on every other row as follows: 2 sts 1-1-1 (0-0) times, 1 st 3-1-1 (2-2) times = 54-62-70 (80-88) sts. When piece measures 24-26-29 (33-35) cm / 9½"-10¼"-11⅜" (13"-13¾") bind off the middle 10-12-14 (18-24) sts for neck and dec to shape the neckline on every other row: 3 sts 1 time, 2 sts 2 times and 1 st 1 time. Bind off when piece measures 27-29-33 (37-40) cm / 10⅝"-11⅜"-13" (14½"-15¾"). Back piece: = 64-68-76 (84-92) sts. Bind off for armholes as described for front piece = 54-62-70 (80-88) sts. When piece measures 22-24-28 (32-35) cm / 8¾"-9½"-11" (12½"-13¾") divide piece for split as follows: Right side (with button): knit on the first 30-34-38 (43-47) sts with the 2 sts towards neckline in garter st. After 3 cm / 1⅛" bind off to shape the neckline on every other row as follows: 13-14-15 (17-20) sts 1 time, 2 sts 1 time and 1 st 1 time. Bind off when piece measures 27-29-33 (37-40) cm / 10⅝"-11⅜"-13" (14½"-15¾"). Left side (with buttonhole): Cast on 6 new sts towards the middle = 30-34-38 (43-47) sts and knit on all sts with the 2 sts towards neckline in garter st. After 2.5 cm / ⅞" make a buttonhole by binding off third and fourth st and casting on 2 new sts on return row. After 3 cm / 1⅛" bind off to shape the neckline on every other row as follows: 13-14-15 (17-20) sts 1 time, 2 sts 1 time and 1 st 1 time bind off when piece measures 27-29-33 (37-40) cm / 10⅝"-11⅜"-13" (14½"-15¾"). Sleeve: Cast on 44-46-48 (50-52) sts on double pointed needles size 2 mm/US 0 with purple and knit 2 cm / ¾" Rib. Change to needle size 2.5 mm / US 1or 2 and continue in M.1, at the same time inc 2 sts mid under arm a total of 4-6-7 (9-16) times as follows: Size 3 months: on every 8th round Size 6/9 months + 12/18 months: on every 7th round Size 2 years: on every 5th round Size 3/4 years: on every 4th round = 52-58-62 (68-84) sts. When piece measures 14-16-19 (19-23) cm / 5½"-6¼"-7½" (7½"-9") bind off 4 sts mid under arm and complete sleeve back and forth on needle. Bind off to shape the sleeve cap each side on every other row: 3 sts 4 times. Bind off, sleeve measures approx 17-20-22 (22-26) cm / 6¾"-8"-8¾" (8¾"-10¼"). Assembly: Sew shoulder seams. Pick up approx 80-85-90 (95-100) sts on needle size 2 mm/US 0 with purple and knit 1.5 cm / ½" Rib back and forth on needle, bind off. Set in sleeves and sew on button. ____________________________________________ PANTS: DROPS wooden button, no 503, 2 pcs DROPS circular needle size 2 mm / US 0 Knitting gauge: 28 sts x 38 rows on needles size 2 mm / US 0 in stockinette sts = 10 x 10 cm / 4" x 4". Rib: *K1, P1*, repeat from *-*. Pattern: see diagram. Left leg: Cast on 80-88-88 (96-96) sts on circular needle size 2 mm/US 0 with purple and knit 3 cm / 1⅛" Rib. Continue in stockinette st, at the same time inc on inside leg on every 2-3-3 (4-5) cm / ¾"-1⅛"-1⅛" (1½"-2"): 2 sts 4 times = 88-96-96 (104-104) sts. Remember the knitting gauge. When piece measures 17-18-20 (25-28) cm / 6¾"-7"-8" (9¾"-11") divide piece at inside leg (= split) and complete piece back and forth on needle. Inc 1 st each side for seam = 90-98-98 (106-106) sts. When piece measures 18-20-23 (27-30) cm / 7"-8"-9" (10½"-11¾") bind off 5-7-3 (5-5) sts each side = 80-84-92 (96-96) sts. Put piece aside and knit the other leg. Right leg: knit as left leg. Pants: Put left and right leg in on the same circular needle = 160-168-184 (192-192) sts. Knit 3 rounds and now inc mid back on both sides of the middle 2 sts on every other round: 1 st 8 times, at the same time dec mid front on every other round on both sides of the middle 2 sts: 1 st 8 times = 160-168-184 (192-192) sts. When piece measures 33-37-42 (47-51) cm / 13"-14½"-16½" (18½"-20") dec 24-28-34 (32-32) sts evenly distributed on round = 136-140-150 (160-160) sts. Continue in Rib and insert a marker mid front. When Rib measures 8 cm / 3⅛", make a buttonhole on both sides of marker, 5-5-6 (6-7) cm / 2"-2"-2⅜" (2⅜"-2¾") from marker. 1 buttonhole = bind off 3 sts and cast on 3 new sts on return row. Bind off when Rib measures 10 cm / 4", the whole piece now measures approx 43-47-52 (57-61) cm / 17"-18½"-20½" (22½"-24"). Sew tog split on inside of legs and sew tog the opening between legs from mid front to mid back. Braces: Cast on 11-11-11 (13-15) sts on needle size 2 mm with purple and knit approx 30 cm / 11¾" Rib, bind off. Fasten braces mid back with approx 5-8 cm / 2"-3" between them. Sew on buttons. ____________________________________________ HAT: Size: 3 – 6 (12 months – 2 years) DROPS STRAIGHT NEEDLES size 2.5 mm / US 1or2 Knitting gauge: 26 sts x 52 rows on needles size 2.5 mm / US 1 in garter st = 10 x 10 cm / 4" x 4". Garter st, back and forth on needle: Knit all rows. Hat: Cast on 33-38 (42-46) sts on needle size 2.5 mm / US 1or2 with purple and knit garter st, at the same time inc 1 st at right side and dec 1 st at left side as follows, first row = RS: K2, 1 yo (= 1 inc), continue until 4 sts left on needle, K2 tog, K2. Next row = WS: garter st up till yo, P yo into back of st, K2. Repeat these 2 rows until piece measures 5.5-6 (6.5-7) cm / 2¼"-2⅜" (2½"-2¾"). Now dec 1 st at right side and inc 1 st at left side as follows, next row RS: K1, slip 1 st as if to knit, K1, psso, knit until 2 sts left on needle, 1 yo, K2. Next row = WS: K2, K 1 into back of yo, complete row in garter st. Repeat these 2 rows for another 5.5-6 (6.5-7) cm / 2¼"-2⅜" (2½"-2¾"). Continue to inc 1 st at right side on every 4th row and dec 1 st at left side on every other row until piece measures 15.5-17 (17.5-18) cm / 6⅛"-6¾" (6⅞"-7") = middle of hat. Insert a marker each side. Continue as described above but in reverse order. Bind off when piece measures 31-34 (35-36) cm / 12¼"-13⅜" (13¾"-14¼"). Assembly: Front = the section with 3 whole points, back = section with 2 whole points and 2 half points. Now sew tog hat as follows: Sew tog at back by sewing tog the first half point and the first half of the first whole point. Sew tog the other half of the first whole point and the first half of the second whole point. Sew tog the other half of the second whole point with the last half point. Now sew tog hat mid back. Tie: Cast on 4 sts on a double pointed needle size 2.5 mm / US 1or2 with purple and knit these 4 sts in garter st, *do not turn the piece, but carry the thread behind the 4 sts and knit them again from RS*, repeat from *-* until ribbon measures 15 -15 (16-17) cm / 6"-6" (6¼"-6¾"). Knit another tie. Fasten ties on WS at the point each side. ____________________________________________ SOCKS: Size: 3 – 6/9 – 9/12 months (2 -3/4 years) DROPS double pointed needles size 2 mm and 2.5 mm / US 0 and 2 Knitting gauge: 26 sts x 35 rows on needles size 2.5 mm / US 2 in stockinette sts = 10 x 10 cm / 4" x 4". Rib: *K1, P1*, repeat from *-*. Seed st: Row 1: K1, P1. Row 2: P over K and K over P. Repeat row 2. The sock is knitted in the round. Cast on 58-60-62 (64-66) sts on needles size 2 mm/US 0 with purple and knit Rib. When Rib measures 4-5-5 (5-6) cm / 1½"-2"-2" (2"-2½") on next round K tog 3 sts mid back. Knit another 4 rounds and on next round K tog 3 sts mid back = 54-56-58 (60-62) sts. When piece measures 10-11-12 (13-14) cm / 4"-4⅜"-4¾" (5⅛"-5½") change to needle size 2.5 mm / US 2 and continue in stockinette st, at the same time dec no of sts to 46-50-50 (54-54). After 2 rounds work next round as follows: *K2 tog, yo*, repeat from *-*. Remember the knitting gauge. Knit 1 round and then work the middle 10-12-12 (14-14) sts (= mid upper piece) in seed st, put remaining sts on a holder. After 4-5-5.5 (7-7.5) cm / 1½"-2"-2¼" (2¾"-2⅞") pick up 10-12-14 (16-18) sts on both sides of upper piece = 66-74-78 (86-90) sts, incl sts on holder. Knit in the round on all sts as follows: 1.5-2-2.5 (3-3.5) cm / ½"-¾"-⅞" (1⅛"-1¼") seed st, P 1 round. Now bind off all sts except the front 10-12-12 (14-14) sts. Knit 9-10-11 (13-14) cm / 3½"-4"-4½" (5"-5½") on these for sole. Bind off and fasten sole to the sock. Crochet a chain measuring approx 30-35 cm / 11¾"-13¾" and pull through eyelet row. ____________________________________________ BLANKET: Material: DROPS KARISMA from Garnstudio 350 g color 01, off-white Material: DROPS circular needle size 3.5 mm = US 4 Knitting gauge: 21 stitches on needles size 3.5 mm = US 4 = width 10 cm = 4". Garter stitch (back and forth): Knit all rows. 1 ridge vertically = knit 2 rows. Pattern: See diagrams A.1 to A.4. NOTE! If a diagram is finished from right side, start first row on next diagram from wrong side. Pay extra attention that the diagrams show the pattern seen from right side. Blanket: To fit in all stitches work blanket back and forth on circular needle. Cast on 128 stitches with Karisma on circular needle size 3,5 mm = US 4. Work 3 ridges in garter stitch over all stitches. Continue with 4 stitches in garter stitch on each side and PATTERN – read explanation above, on the middle 120 stitches as follows: Work A.3 for approx. 8 cm = 3⅛" - adjust after a whole repeat or half a repeat. REMEMBER THE KNITTING GAUGE! Then work A.4 one time (= 5 rows) Work A.1 for approx. 11 cm = 4⅜" – adjust after a whole repeat or half a repeat. Then work A.4 one time (= 5 rows) Work A.2 for approx. 8 cm = 3⅛". Then work A.4 one time (= 5 rows) Work A.3 for approx. 16 cm = 6¼" - adjust after a whole repeat or half a repeat. Then work A.4 one time (= 5 rows) Work A.1 for approx. 11 cm = 4⅜" – adjust after a whole repeat or half a repeat. Then work A.4 one time (= 5 rows) Work A.2 for approx. 8 cm = 3⅛". Then work A.4 one time (= 5 rows) Work A.3 for approx. 8 cm = 3⅛" - adjust after a whole repeat or half a repeat. Then work 3 ridges in garter stitch over all stitches on row. Piece now measures approx. 82 cm = 32¼" – bind off. |
|||||||
Diagram explanations |
|||||||
|
|||||||
|
|||||||
|
|||||||
|
|||||||
|
|||||||
Have you finished this pattern?Tag your pictures with #dropspattern #rockinginlavenderset or submit them to the #dropsfan gallery. Do you need help with this pattern?You'll find 24 tutorial videos, a Comments/Questions area and more by visiting the pattern on garnstudio.com. © 1982-2025 DROPS Design A/S. We reserve all rights. This document, including all its sub-sections, has copyrights. Read more about what you can do with our patterns at the bottom of each pattern on our site. |
|||||||


With over 40 years in knitting and crochet design, DROPS Design offers one of the most extensive collections of free patterns on the internet - translated to 17 languages. As of today we count 314 catalogs and 11822 patterns - 11812 of which are translated into English (US/in).
We work hard to bring you the best knitting and crochet have to offer, inspiration and advice as well as great quality yarns at incredible prices! Would you like to use our patterns for other than personal use? You can read what you are allowed to do in the Copyright text at the bottom of all our patterns. Happy crafting!
Post a comment to pattern DROPS Baby 4-19
We would love to hear what you have to say about this pattern!
If you want to leave a question, please make sure you select the correct category in the form below, to speed up the answering process. Required fields are marked *.