DROPS Alpaca
DROPS Alpaca
100% Alpaca
from 4.85 $ /50g
DROPS Kid-Silk
DROPS Kid-Silk
75% Mohair, 25% Silk
from 6.75 $ /25g
Get the yarn to make this pattern from 102.50$.

The yarn cost is calculated from the pattern’s smallest size and the yarn’s cheapest product type. Looking for an even better price? You might find it on the DROPS Deals!

DROPS Super Sale

The Big Cozy

DROPS jumper with cables and false English rib in “Alpaca” and "Kid Silk". Long or short version. Size S – L.

DROPS 40-11
Size: S/M – M/L
Finished measurements:
Bust: 120 (132) cm/ 47 1/4" (52")
Full length: 74 (78) cm / 29" (30 3/4")

Materials: DROPS Alpaca from Garnstudio
500 (550) g no 607, light brown
and use: DROPS Kid Silk from Garnstudio
200 (225) g no 12, beige

DROPS STRAIGHT NEEDLES size 3.5 mm / US 4 and 6 mm/ US 10
DROPS CIRCULAR NEEDLE (80 cm / 32") size 6 mm / US 10
- or size needed to get 14 sts x 28 rows in false English rib with 1 strand of each yarn = 10 x 10 cm / 4'' x 4''.

-------------------------------------------------------

Alternative Yarn – See how to change yarns here
Yarn Groups A to F – Use the same pattern and change the yarn here
Yarn usage using an alternative yarn – Use our yarn converter here

-------------------------------------------------------

DROPS Alpaca
DROPS Alpaca
100% Alpaca
from 4.85 $ /50g
DROPS Kid-Silk
DROPS Kid-Silk
75% Mohair, 25% Silk
from 6.75 $ /25g
Get the yarn to make this pattern from 102.50$.

The yarn cost is calculated from the pattern’s smallest size and the yarn’s cheapest product type. Looking for an even better price? You might find it on the DROPS Deals!

DROPS Super Sale

SAVE 30% on 6 cotton favorites!
Valid until 04.12.2024

Pattern instructions

NOTE: This pattern is written in American English. All measurements in charts are in cm. For conversion from inches to cm - click here. There are different terms for crocheting in American and British English. If this pattern includes crochet, click for "crochet terms" here. For this pattern in British English, please click here.
False English rib:
Row 1, WS: * 1 YO, slip 1 st as if to P, P1 *, repeat from *-*.
Row 2, RS: * K1, work YO and slipped P st tog *, repeat from *-*.
Repeat row 1 and 2.

Rib: * K1, P1 *, repeat from *-*.

Cable pattern: See diagram. The diagram shows the pattern from the RS.

Short version: Cast on 6 less sts and inc 6 additional sts after the rib = 86-94 sts.
Dec measurements for armhole by 16-18 cm / 6 1/7"-7". Finished length = 58-60 cm / 22 3/4"-23½".
______________________________

Front piece:
With 1 strand of each yarn cast on 86-94 sts - for short version, see above – (includes 1 edge st each side for seam) on pointed needles size 3.5 mm / US 4 and work 4 cm / 1½'' Rib.
Change to needle size 6 mm / US 10 and continue in false English rib with 1 edge st each side – make sure to have the K st in false English rib over the K st in rib. REMEMBER THE GAUGE!
When piece measures 47-48 cm / 18½"-19" put piece aside and knit the back piece.

Back piece: Cast on and work like front piece.

Sleeve:
With 1 strand of each yarn cast on 36-38 sts (includes 1 edge st each side for seam) on pointed needles size 3.5 mm / US 4 and work 5 cm / 2'' Rib.
Change to needle size 6 mm / US 10 and continue in false English rib with 1 edge st each side – make sure to have the K st in false English rib over the K st in rib.
At the same time inc 1 st each side inside the edge st on every 5th row for size S/M and on * every 4th and 5th row * alternately for size M/L a total of 21-23 times = 78-84 sts.
When piece measures 46-45 cm / 18"-17 3/4" put it aside and knit the other sleeve.

Yoke:
Now slip all sts from body pieces and sleeves on the same circular needle size 6 mm / US 10 = 328-356 sts and complete jumper back and forth on needle from transition between right sleeve and back piece.
Work first row as follows: bind off 6 sts, work 74-82 sts in false English rib (= back piece), M.1, 66-72 sts in false English rib (= left sleeve), M.1, 74-82 sts in false English rib (= front piece), M.1, 66-72 sts in false English rib (= right sleeve), M.1, and cast on 6 new sts at the end of row.
Now dec 1 st on each side of each repeat of M.1 (= 8 dec per row) on every other row a total of 29-32 times on sleeves and 27-31 times on body pieces as follows:
Before M.1: K tog the st before M.1 and the first st in M.1 (this st replaces the first st in M.1).
After M.1: slip the last st in M.1 as if to K, K 1, psso (this st replaces the last st in M.1).
When all dec are complete there are 104-104 sts left on row.
Continue in pattern as before on all sts for 11 cm / 4½" and now continue in reverse false English rib and cable pattern (WS becomes RS!) as follows from RS: 20 sts in false English rib, M.1, 8 sts in false English rib, M., 4 sts in false English rib, M.1, 4 sts in false English rib, M.1, 8 sts in false English rib, M.1.
When the piece in reverse pattern measures 15 cm / 6'' bind off all sts.

Assembly: Sew tog M.1 and back piece. Sew sleeve seams.

Diagram

All measurements in charts are in cm.

symbols = K
symbols = P
symbols = Place 3 sts on a cable needle behind work, K3, K3 from cable needle
diagram
Do you have a question? See a list of frequently asked questions (FAQ)

Knitting tension is what determines the final measurements of your work, and is usually measured per 10 x 10 cm. It is provided like so: number of stitches in width x number of rows in height - eg: 19 stitches x 26 rows = 10 x 10 cm.

The knitting tension is very individual; some people knit/crochet loosely while others work tightly. You adjust the knitting tension with the needle size, which is why the suggested needle size only serve as a guide! You need to adjust this (up or down) to ensure that YOUR knitting tension matches the knitting tension provided in the pattern. If you work with a different knitting tension than provided you will have a different yarn consumption, and your work will have different measurements than what the pattern suggests.

The knitting tension also determines which yarns can replace each other. As long as you achieve the same knitting tension you can replace one yarn with another.

See DROPS lesson: How to measure your tension/gauge

See DROPS video: How to make a gauge tension swatch

The required amount of yarn is provided in grams, eg: 450 g. To calculate how many balls you’ll need you first need to know how many grams are in 1 ball (25g, 50g or 100g). This information is available if you click on the individual yarn quality on our pages. Divide the amount required with the amount of each ball. For example, if each ball is 50g (the most common amount), the calculation will be as follows: 450 / 50 = 9 balls.

The important thing when changing from one yarn to another is that the knitting/crochet tension remains the same. This is so that the measurements of the finished piece will be the same as on the sketch provided. It is easier to achieve the same knitting tension using yarns from the same yarn group. It is also possible to work with multiple strands of a thinner yarn to achieve the knitting tension of a thicker one. Please try our yarn converter. We recommend you to always work a test swatch.

Please NOTE: when changing yarn the garment might have a different look and feel to the garment in the photo, due to individual properties and qualities of each yarn.

See DROPS lesson: Can I use a different yarn than the one mentioned in the pattern?

All our yarns are categorised into yarn groups (from A to F) according to thickness and knitting tension – group A contains the thinnest yarns and group F the thickest. This makes it easier for you to find alternative yarns to our patterns, should you wish to switch yarn. All yarns within the same group have a similar knitting tension and can easily replace each other. However, different yarn qualities have different structures and properties which will give the finished work a unique look and feel.

Click here for an overview of the yarns in each yarn group

At the top of all our patterns you’ll find a link to our yarn converter, which is a helpful tool should you wish to use a different yarn than suggested. By filling in the yarn quality you wish to replace, the amount (in your size) and number of strands, the converter will present good alternative yarns with the same knitting tension. Additionally it will tell you how much you’ll require in the new qualities and whether you’ll need to work with multiple strands. Most skeins are 50g (some are 25g or 100g).

If the pattern is worked with multiple colours, every colour will have to be converted separately. Similarly, if the pattern is worked with several strands of different yarns (for example 1 strand Alpaca and 1 strand Kid-Silk) you will have to find alternatives for each, individually.

Click here to see our yarn converter

Since different yarns have different qualities and textures we have chosen to keep the original yarn in our patterns. However, you can easily find options among our available qualities by using our yarn converter, or simply pick a yarn from the same yarn group.

It is possible that some retailers still have discontinued yarns in stock, or that someone has a few skeins at home that they would like to find patterns for.

The yarn converter will provide both alternative yarn as well as required amount in the new quality.

If you think it's hard to decide what size to make, it can be a good idea to measure a garment you own already and like the size of. Then you can pick the size by comparing those measures with the ones available in the pattern's size chart.

You'll find the size chart at the bottom of the pattern.

See DROPS lesson: How to read size chart

The needle size provided in the pattern serves only as a guide, the important thing is to follow the knitting tension. And since knitting tension is very individual, you will have to adjust the needle size to ensure that YOUR tension is the same as in the pattern – maybe you’ll have to adjust 1, or even 2 needle sizes, up or down to achieve the correct tension. For this, we recommend that you work test swatches.

Should you work with a different knitting tension than the one provided, the measurements of the finished garment might deviate from the measurement sketch.

See DROPS lesson: How to measure your tension/gauge

See DROPS video: How to make a gauge tension swatch

Working a garment top-down provides more flexibility and room for personal adjustment. For example it is easier to try the garment on while working, as well as making adjustments to length of yoke and shoulder caps.

The instructions are carefully explaining every step, in the correct order. Diagrams are adjusted to the knitting direction and are worked as usual.

The diagram depicts all rows/rounds, and every stitch seen from the right side. It is read from bottom to top, from right to left. 1 square = 1 stitch.

When working back and forth, every other row is worked from the right side and every other row is worked from the wrong side. When working from the wrong side, the diagram will have to be worked reversed: from left to right, knit stitches are purled, purl stitches are knit etc.

When working in the round every round is worked from the right side and the diagram are worked from right to left on all rounds.

See DROPS lesson: How to read knitting diagrams

The diagram depicts all rows/rounds, and every stitch seen from the right side. It is worked from bottom to top, from right to left.

When working back and forth every other row is worked from the right side: from right to left and every other row is worked from the wrong side: from left to right.

When working in the round, every row in the diagram are worked from the right side, from right to left.

When working a circular diagram you start in the middle and work your way outwards, counter clockwise, row by row.

The rows usually start with a given number of chain stitches (equivalent to the height of the following stitch), this will either be depicted in the diagram or explained in the pattern.

See DROPS lesson: How to read crochet diagrams

Instructions for working several diagrams after each other on the same row/round, will often be written like so: “work A.1, A.2, A.3 a total of 0-0-2-3-4 times". This means you work A.1 once, then A.2 is worked once, and A.3 is repeated (in width) the number of times provided for your size – in this case like so: S = 0 times, M = 0 times, L=2 times, XL= 3 times and XXL = 4 times.

The diagrams are worked as usual: begin with the first row in A.1, then work the first row in A.2 etc.

See DROPS lesson: How to read knitting diagrams

See DROPS lesson: How to read crochet diagrams

The total width of the garment (from wrist-to-wrist) will be larger in the larger sizes, despite the actual sleeves being shorter. The larger sizes have longer sleeve caps and wider shoulders, so there will be a good fit in all sizes.

The measurement sketch/schematic drawing provides information regarding the full length of the garment. If it’s a jumper or a jacket the length is measured from the highest point on the shoulder (usually closest to the neckline), and straight down to the bottom of the garment. It is NOT measured from the tip of shoulder. Similarly, the length of yoke is measured from the highest point on the shoulder and down to where yoke is split into body and sleeves.

See DROPS lesson: How to read a schematic drawing

Diagrams are often repeated on the round or in height. 1 repeat is the diagram the way it appears in the pattern. If it says to work 5 repeats of A.1 in the round, then you work A.1 a total of 5 times after/next to each other in the round. If it says to work 2 repeats of A.1 vertically/in height you work the entire diagram once, then begin again at the start and work the entire diagram one more time.

Chain stitches are slightly narrower than other stitches and to avoid working the cast-on edge too tight, we simply chain more stitches to begin with. The stitch count will be adjusted on the following row to fit the pattern and measurement sketch.

The rib edge is more elastic and will contract slightly compared to, for example, stocking stitch. By increasing before the rib edge, you avoid a visible difference in width between the rib edge and the rest of the body.

It’s very easy to cast off too tightly, and by making yarn overs while casting off (and simultaneously casting these off) you avoid a too tight cast off edge.

See DROPS video: How to bind off with yarn overs (yo)

To achieve an even increase (or decrease) you can increase on, for example: every 3rd and 4th row alternately, like so: work 2 rows and increase on the 3rd row, work 3 rows and increase on the 4th. Repeat this until the increase is complete.

See DROPS lesson: Increase or decrease 1 st on every 3rd and 4th row alternately

Should you prefer to work in the round instead of back and forth, you may of course adjust the pattern. You’ll need to add steeks mid-front (usually 5 stitches), and follow the instructions. When you would normally turn and work from the wrong side, simply work across the steek and continue in the round. At the end you’ll cut the piece open, pick up stitches to work bands, and cover the cut edges.

See DROPS video: How to knit steeks and cut open

Should you prefer to work back and forth instead of in the round, you may of course adjust the pattern so you work the pieces separately and then assemble them at the end. Divide the stitches for the body in 2, add 1 edge stitch in each side (for sewing) and work the front and back pieces separately.

See DROPS lesson: Can I adapt a pattern for circular needles into straight needles?

Pattern repeats can vary slightly in the different sizes, in order to get the correct proportions. If you’re not working the exact same size as the garment in the photo, yours might deviate slightly. This has been carefully developed and adjusted so that the complete impression of the garment is the same in all sizes.

Make sure to follow instructions and diagrams for your size!

If you have found a pattern you like which is available in women’s size it’s not very difficult to convert it to men’s size. The biggest difference will be the length of sleeves and body. Start working on the women size that you think would fit across the chest. The additional length will be worked right before you cast off for the armhole/sleeve cap. If the pattern is worked top-down you can add the length right after the armhole or before the first decrease on sleeve.

Regarding additional yarn amount, this will depend on how much length you add, but it is better with a skein too many than too few.

All yarns will have excess fibres (from production) that might come off as lint or shedding. Brushed yarns (ie hairier yarns) have more of these loose, excess fibres, causing more shedding.

Shedding also depends on what is worn under or over the garment, and whether this pulls at the yarn fibres. It’s therefore not possible to guarantee that there will be no shedding

Below are some tips on how to get the best result when working with hairier yarns:

1. When the garment is finished (before you wash it) shake it vigorously so the looser hairs come off. NOTE: do NOT use a lint roller, brush or any method that pulls at the yarn.

2. Place the garment in a plastic bag and put it in your freezer - the temperature will cause the fibres to become less attached to each other, and excess fibres will come off easier.

3. Leave in the freezer for a few hours before taking it out and shaking it again.

4. Wash the garment according to the instructions on the yarn label.

Pilling is a natural process that happens to even the most exclusive of fibers. It's a natural sign of wear and tear that is hard to avoid, and that is most visible in high friction areas of your garment like a sweater's arms and cuffs.

You can make your garment look as new by removing the pilling, using a fabric comb or a pill/lint remover.

Still can't find the answer you need? Then scroll down and leave your question so one of our experts can try to help you. This will be done normally within 5 to 10 working days.
In the meantime, you can read the questions and answers that others have left to this pattern or join the DROPS Workshop on Facebook to get help from fellow knitters/crocheters!

You might also like...

Post a comment to pattern DROPS 40-11

We would love to hear what you have to say about this pattern!

If you want to leave a question, please make sure you select the correct category in the form below, to speed up the answering process. Required fields are marked *.

Comments / Questions (11)

country flag Claire Lafrance wrote:

Il me reste 104m. lorsque je tricote toutes les mailles sur 11cm je fais seulement des fausses côtes anglaises? je ne tiens plus compte des mailles endroits, mailles envers du modèle 1 sans faire de torsade sur le 1er 11cm?

13.12.2019 - 14:51

DROPS Design answered:

Bonjour Mme Lafrance, vous tricotez les 104 m comme avant pendant 11 cm, puis vous inversez le motif pour que les fausses côtes anglaises et les torsades soient visibles sur l'endroit quand on va replier le col. Bon tricot!

13.12.2019 - 15:56

country flag Claire Lafrance wrote:

Pour faire mes diminutions au début modèle 1: je prends la maille avant mod.1 et la 1ere maille de mod 1 et je les tricote ensemble. À la fin des 12mailles je ne comprends pas comment faire la diminution surtout que le rang se termine avec 12mailles de modèle 1 je ne sais pas où aller chercher la maille que je dois faire glisser Merci de me revenir

06.12.2019 - 02:40

DROPS Design answered:

Bonjour Mme Lafrance, pour diminuer avant le diagramme M.1, vous tricotez la mailles avant M.1 + la 1ère m de M.1 ensemble à l'endroit, vous tricotez les 10 mailles suivantes de M.1 (= 2 m env, 6 m end (ou torsade), 2 m env), glissez la dernière m de M.1 à l'end, tricotez la m suivante, passez la maille glissée par-dessus la maille tricotée = vous avez toujours bien 12 m pour M.1. Bon tricot!

06.12.2019 - 08:48

country flag Claire Lafrance wrote:

Je suis rendue à mettre toutes mes mailles sur la même broche. Si j'ai bien compris, sur la broche je retrouve dans cet ordre: 1 manche, le dos, le devant et l'autre manche. Avant de mettre toutes les mailles sur la même broche j'avais terminé par un rang sur l'endroit du travail. Je commence l'empiècement avec un rang endroit donc j'ai 2 rangs endroits d'affilée? Je termine le rang avec M.1 comment faire la diminution de la 12ième maille?

05.12.2019 - 13:32

DROPS Design answered:

Bonjour Mme Lafrance, l'empiècement commence après la manche droite (et non gauche, correction faite ), juste avant le dos = à la transition entre la manche droite et le dos, autrement dit: dos, manche gauche, devant, manche droite. Il vaut mieux que vous tricotiez un rang sur l'envers sur chacune des pièces, ansi le 1er rang de l'empiècement se fera sur l'endroit - en commençant par le dos - vous tricoterez ensuite en allers et retours, en commençant sur l'endroit. Bon tricot!

05.12.2019 - 14:18

country flag Johanne wrote:

Effectivement il y a une erreur dans l'explication, en danois et en français. les côtes anglaises se tricotent 1 jetée, 1 m glissée, 1 m endroit, donc jamais de maille envers. Si vous essayez de faire l'échantillon avec l'explication d'origine, vous allez vous apercevoir du problème. Je tricote en Alpaca bleu marin et KidSilk bleu cobalt. ça rend bien.

16.04.2019 - 15:01

country flag Catherine Charles wrote:

Merci pour votre réponse, encore juste une petite précision s’il vous plaît, une fois que j’ai mis toutes les mailles sur l’aiguille circulaire no 6, on est bien d’accord que je ne vais pas tricoter en rond mais arrivée au bout du rang je tourne le tricot et je tricote de l’autre côté ? Donc un côté endroit et un côté envers comme pour le dos, devant et manches ? Merci de votre réponse ! Meilleures salutations, Catherine Charles

13.07.2018 - 17:46

DROPS Design answered:

Bonjour Mme Charles, tout à fait, l'empiècement ne se tricote pas en rond mais bien en rangs (= en aller-retour), le 1er rang de M.1 se fait sur l'endroit pour que la torsade tombe également sur l'endroit. Bon tricot!

16.07.2018 - 08:10

country flag Catherine Charles wrote:

Bonjour, je ne comprends pas les instructions pour l’empiècement du modèle Drops 40-11, est-ce que vous pourriez m’aider ? Faut-il rabattre 6 mailles sous la manche, et pourquoi monter 6m en fin de rang ? Si on tricote en aller/retour sur l’aiguille no 6 et que M1 se trouve à la fin, comment ensuite diminuer une maille avant M1 ? Bref je suis un peu perdue et j’apprécierais beaucoup une aide. Merci d’avance Catherine

13.07.2018 - 09:58

DROPS Design answered:

Bonjour Mme Charles, au début de l'empiècement, on rabat les 6 premières m du dos (= il reste 74 m pour le dos, cette info manquait, la correction est faite) et on monte 6 m à la fin du rang pour pouvoir tricoter M.1 sur les 6 dernières m de la manche + les 6 nouvelles mailles. Bon tricot!

13.07.2018 - 12:40

country flag Catherine Charles wrote:

Bonjour, les explications des côtes anglaises pour ce modèle sont fausses, elles ont dûs être mal traduites, il n’y a pas de maille envers du tout dans les côtes anglaises: 1er tour : 1 jeté, maille glissée à l’envers et une maille à l’endroit. 2ème tour : tricoter ensemble le jeté et la maille glissée, un jeté et glisser une maille à l’envers, Etc...

11.07.2018 - 22:11

DROPS Design answered:

Bonjour Mme Charles, merci pour votre retour, la traduction française correspondant à la version originale, nos stylistes vont vérifier ces côtes. Bon tricot!

12.07.2018 - 09:28

country flag Kphli Therese wrote:

Besten Dank für die Antwort. Aber ich bin noch nicht weiter. In der Anleitung der Passe steht: 6 M abk., 82 M Patent (Rückenteil), M1, 72 M Patent (linker Aermel), 82 M Patent (Vorderteil), M1, 72 M Patent (rechter Aermel), M1, gleichzeitig am Schluss der R 6 Masche anschlagen, d.h. diese brauche ich um M1 mit 12 M. Bin also am Ende der Reihe. Da für den Raglan beidseitig abgenommen werden muss: wo nehme ich die M her für die Abnahme? Danke

13.03.2016 - 08:10

DROPS Design answered:

Guten Tag Therese, die Maschen für die Raglanabnahme nehmen Sie von Vorder- und Rückenteil und von den Ärmeln (nicht aus der Raglanlinie) - am Reihenanfang und -ende können Sie selbstverständlich nicht beidseitig abnehmen, aber Anfang und Ende zusammen ergeben auch wieder eine beidseitige Abnahme.

14.03.2016 - 08:32

country flag Kohli Therese wrote:

Zu Modell 40-11: Ich komme mit der Passé nicht vorwärts und meine Fragen an meinen Wollladen wurden auch nicht zu meiner Zufriedenheit beantwortet. Darf ich um die Überprüfung der Anleitung bitten. Mein Problem ist hauptsächlich wo werden die 4 x M1 (Raglan) gestrickt. Für eine Abklärung wäre ich sehr dankbar.

13.01.2016 - 14:19

DROPS Design answered:

Liebe Therese, ich bin nicht ganz sicher, ob ich Ihre Frage verstehe: M1 ist das Zopfmuster an der Raglanlinine und dort wird es auch gestrickt.

02.03.2016 - 10:00

country flag Traci Almash-smith wrote:

Where are the directions to include the cable??

27.10.2012 - 01:30

DROPS Design answered:

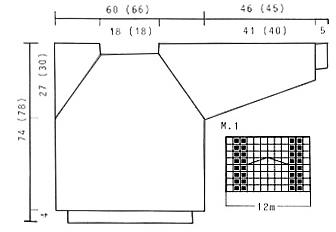
Dear Mrs Tracy Almash-smith, you will find at the very bottom of the pattern theh diagram M.1 for the cable and all instructions under yoke. Happy Knitting!

14.11.2012 - 09:51