
Looking for a yarn?


Comments / Questions (17)
![]() Nicole wrote:
Nicole wrote:
AUGMENTATIONS POUR LES MANCHES: Continuer en jersey avec 4 mailles de bordure devant au point mousse de chaque côté.?? Pourquoi 4 maille alors qu'il y en a cinq au départ. combien de maille doit avoir le devant et le dos du gilet après les augmentations des 4 maille je tricote le 6/9 mois merci car je n'arrive pas a visualiser la vidéo
01.07.2025 - 10:09DROPS Design answered:
Bonjour Nicole, vous devez avoir 4 mailles point mousse de chaque côté dès le début, même lorsque vous avez tricoté le col: vous avez tricoté en côtes 2/2 ainsi: 4 m point mousse, (2 m end, 2 m env) jusqu'à ce qu'il reste 6 m, 2 m end et 4 m point mousse. Après les augmentations des épaules vous avez: 30 m pour chaque demi-dos (26 m jersey + 4 m point mousse), 56 m pour le devant et 14 m pour chaque manche soit 144 m au total. Pour les vidéos, essayez directement sur YouTube si vous n'arrivez pas à les visualiser sur notre site. Bon tricot!
01.07.2025 - 13:27
![]() Petra wrote:
Petra wrote:
Dobrý den, pletu velikost na 12/18 měsíců, u sekce přidávání - sedlo kde mám mezi oky na rukávu 32 ok pak přidat 10, nesedí počet ok u rozdělení (trup, rukáv) celkem po přidání mám mít 48 ok ale výsledek je 42. Znamená to, že musím pak vzít po 2 okách ze zadního a předního dílu? Děkuji za odpověď Petra ?
19.02.2025 - 21:02
![]() Heidi wrote:
Heidi wrote:
Hello, I have some questions. Increases to sleeves. My measurements up to here are accurate but after the increase (24) rows knitted, mine is only 8cm from the marker in the neck( the pattern says it should be 11cm). I have the correct measurements after knitting the split back , which is 6cm from the cast on edge. I have re read the pattern numerous times but I cannot work out where the missing 3cm in length is. Thank you
12.01.2025 - 17:59DROPS Design answered:
Dear Heidi, if you calculate it, according to the gauge, the 24 rows in the sleeve increases should measure approx. 7.5cm (so almost 8 cm). Added to the 3 initial cm, and with some row in-between, you should have between 10 and 11cm. Check that your gauge is correct, specially after changing from working back and forth to working in the round when working the split mid-back; this sometimes causes the gauge to vary. Happy knitting!
12.01.2025 - 22:26
![]() Olivia wrote:
Olivia wrote:
Hallo, ich stricke zum ersten Mal einen Pullover. Nun habe ich gleich eine Frage zum Anfang. In der Anleitung steht "Anschlag: (70) 74-78-82-86 (94) Maschen auf Rundnadel Nr. 2,5 mit DROPS Baby Merino. 1 Rück-Reihe links stricken. Die Rückreihe soll also links gestrickt werden, aber was ist mit der Hinreihe? Wird die rechts gestrickt oder zählt die Aufnahme als Hinreihe? Über eine Antwort würde ich mich freuen. Danke und Grüße!
25.02.2024 - 04:09DROPS Design answered:
Liebe Olivia, bei diesem Pullover stricken Sie zuerst 1 Reihe links, diese Reihe ist eine Rückreihe; die nächste Reihe wird dann eine Hinreihe sein, und wird mit Bündchen gestrickt. Viel Spaß beim stricken!
26.02.2024 - 08:59
![]() Anne Christine wrote:
Anne Christine wrote:
Hei, får ikke antall masker på ermet til å stemme. Starter med 14 masker, (str 18 mndr) øker 9 ganger (nå til sammen 32 masker) Bærestykkeøkning 5 ganger. Vil det da ikke være 42 masker til ermet? I oppskriften skal man sette 48 masker til ermet på en tråd?
06.11.2023 - 15:12DROPS Design answered:
Hei Anne Christine. Det er bare å følge maskeantallet som er oppgitt i oppskriften. Noen ganger vil man ta masker fra forstykket/bakstykket og sette det til erme (etter man er ferdig økt) og det er gjort i denne oppskriften. mvh DROPS Design
13.11.2023 - 09:47
![]() Signe wrote:
Signe wrote:
Det ville være rart, hvis der havde været et foto af bagsiden også, da det jo er der en væsentlig del af blusens detaljer er.
02.09.2023 - 14:11
![]() Renee wrote:
Renee wrote:
Jag förstår inte riktigt hur jag ska lägga mina sista 4 och första 4 rätstickade maskor på varandra och sedan sticka ihop det. Jag är på delan vid ärmökning och sprund mitt bak och mitt arbete (1-3mån) mäter 7cm från upplggningskant. Det finns ingen video som visar hur man stickar ihop det och de första två varv efter det. Jag förstår inte hur man gör på en rundsticka.
20.08.2023 - 22:04DROPS Design answered:
Hei. Når arbeidet måler 7 cm fra skal kantmaskene strikkes sammen, samtidig skal det strikkes rundt. Fra retten, strikk 4 masker riller, deretter glattstrikk til det gjenstår 4 masker på slutten av pinnen. Legg de 4 rillemaskene fra begynnelsen av pinnen ved siden av 4 rille maskene på slutten av pinne.Nå skal du strikke 1. rillemaske fra begynnelsen av pinnen sammen med 4. siste maske på pinnen (2 masker sammen = 1 maske), så strikker du 2. maske sammen med 3. siste maske, deretter 3. maske sammen med nest siste maske og til slutt siste maske sammen med 4. maske. Du har nå strikket 2 og 2 masker sammen og samtidig felt 4 masker. De 8 rillemaskene = 4 masker.
21.08.2023 - 14:20
![]() Carmen Arteaga wrote:
Carmen Arteaga wrote:
Hola tengo la misma duda que Line.no entiendo como se cierra el borde de la abertura de espalda, no hay un video explicativo? muchas gracia , muy lindos patrones
20.05.2023 - 22:36DROPS Design answered:
Hola Carmen, no, no tenemos vídeos explicativos de esta parte. Para cerrar el borde de la apertura, colocar la cenefa de los ojales sobre la cenefa de los botones. Ahora, trabajar juntos el 1º punto de la cenefa de los ojales junto con el último punto de la cenefa de los botones, trabajar juntos el 2º punto de la cenefa de los ojales con el penúltimo punto de la cenefa de los botones. Continuar de esta manera hasta haber trabajado todos los puntos juntos.
21.05.2023 - 19:03
![]() Maria wrote:
Maria wrote:
Hi, tension mentions the dimension but not the needles. What needles does one knit 24stitchesx32rows to achieve 10x10?
19.11.2022 - 14:51DROPS Design answered:
Dear Maria, the smaller needles are only used for the rib. The gauge is worked with the needles for the main pattern, that is, the 3mm needles. Happy knitting!
21.11.2022 - 00:42
![]() Lynn wrote:
Lynn wrote:
Hallo zusammen, Bei den Ärmelzunahmen schreibt ihr (wenn ich es richtig verstehe), dass man nach dem 1. und 3. und vor dem 2. und 4. Makierer zunehmen soll, so wie es in Zunahmetipp 2 beschrieben ist. Zunahmetipp 2 bezieht sich aber auf links zugenommene Maschen und ich stricke hier ja rechts in Runden (ich habe bereits zur Runde geschlossen). Ist das richtig so? Oder muss ich mich an Zumahmetipp 1 halten? Vielleicht könnt ihr helfen! Danke im Voraus, Viele Grüße, Lynn
27.09.2022 - 15:28DROPS Design answered:
Liebe Lynn, Zunahmetipp-2 gilt nur wenn man in Reihen strickt = wie man bei den Rückreihen zunimmt, wenn Sie in Runden stricken, dann folgen Sie Zunahmetipp-1 bei jeder Runde (= immer bei den Hinreihen). Stimmt aber Ihre Maschenprobe? Die Arbeit wird nach 3-4 cm in Runden gearbeitet, dh nach Ärmelzunahmen. Viel Spaß beim stricken!
27.09.2022 - 16:05
|
|||||||||||||
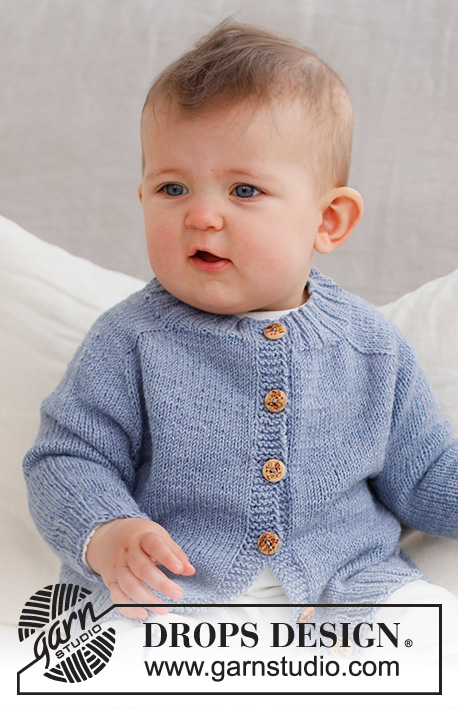
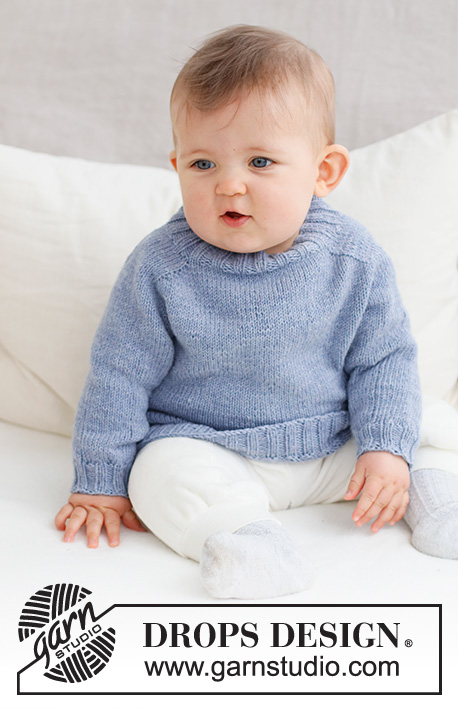
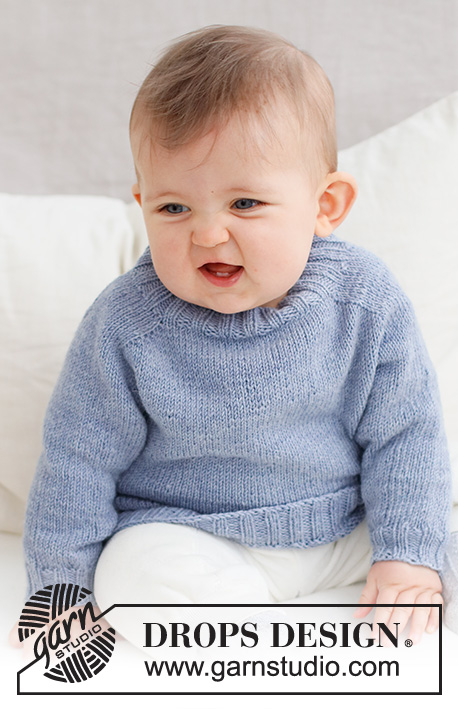
Blue Pebbles#bluepebblessweater |
|||||||||||||
 |
 |
||||||||||||
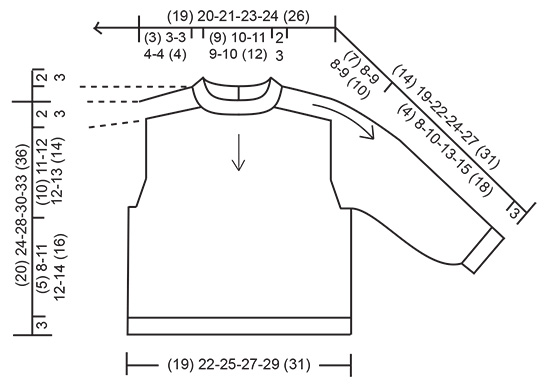
Knitted sweater for baby in DROPS BabyMerino. The piece is worked top down with saddle-shoulders. Sizes: Premature to 2 years.
DROPS Baby 43-4 |
|||||||||||||
|
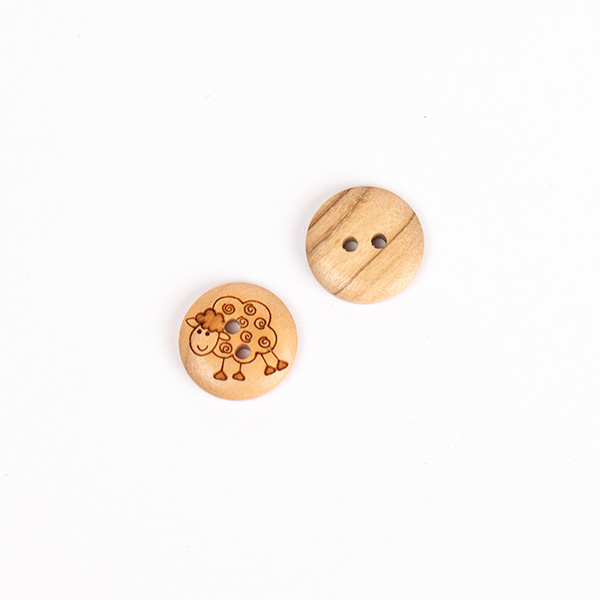
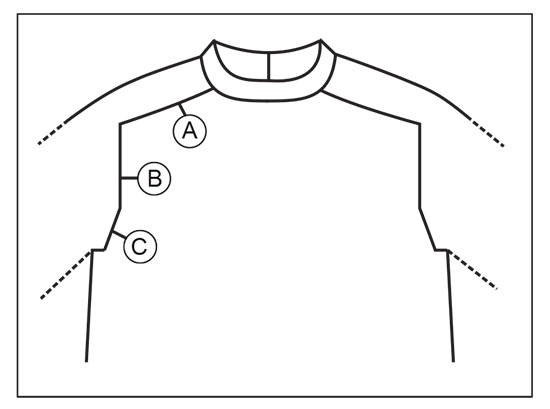
------------------------------------------------------- EXPLANATIONS FOR THE PATTERN: ------------------------------------------------------- RIDGE/GARTER STITCH (worked back and forth): Knit all rows. 1 ridge = knit 2 rows. INCREASE TIP-1 (saddle-shoulders, sleeves and yoke from the right side): BEFORE MARKER: The new stitch twists to the right. Use left needle to pick up thread between 2 stitches from row below, pick up thread from behind and knit stitch in front loop. AFTER MARKER: The new stitch twists to the left. Use left needle to pick up thread between 2 stitches from row below, pick up thread from front and knit stitch in back loop. INCREASE TIP-2 (for saddle-shoulders from the wrong side): BEFORE MARKER: The new stitch twists to the right (seen from the right side). Use left needle to pick up thread between 2 stitches from row below, pick up thread from front and purl stitch in back loop. AFTER MARKER: The new stitch twists to the left (seen from the right side). Use left needle to pick up thread between 2 stitches from row below, pick up thread from behind and purl stitch in front loop. DECREASE TIP (for sleeves): Start 3 stitches left before the marker, knit 2 together, knit 2 (marker sits between these 2 stitches), slip 1 stitch as if to knit, knit 1 and pass the slipped stitch over the knitted stitch (= 2 stitches decreased). BUTTONHOLES (for band mid-back): Work the buttonholes at the beginning of the row from the right side as follows: Knit 2, make 1 yarn over and knit 2 together On the next row (wrong side) knit the yarn over to leave a hole. The first buttonhole is worked when the neck measures 1½ cm = ½", the other 2 buttonholes are worked with (2) 2-2½-2½-3 (3) cm = (3/4") ¾"-1"-1"-1⅛" (1⅛") between each one. ------------------------------------------------------- START THE PIECE HERE: ------------------------------------------------------- SWEATER – SHORT OVERVIEW OF THE PIECE: The neck and yoke are worked back and forth with circular needle, from mid back and top down, until the split is finished. The piece is then joined and continued in the round. At the same time, stitches are increased for the shoulders, sleeves and yoke. The yoke is divided for body and sleeves and the body is continued in the round with circular needle. The sleeves are worked in the round with double pointed needles. SWEATER: Cast on (70) 74-78-82-86 (94) stitches with circular needle size 2.5 MM = US 1.5 and DROPS Baby Merino. Purl 1 row from the wrong side. The next row is worked as follows from the right side: 4 stitches in GARTER STITCH – read description above, * knit 2, purl 2 *, work from *-* until there are 6 stitches left, knit 2 and 4 stitches in garter stitch. Continue this rib for (2) 2-2-3-3 (3) cm = (3/4") ¾"-¾"-1⅛"-1⅛" (1⅛") – remember the BUTTONHOLE at the beginning of the row from the right side – read description above. When the rib is done, knit 1 row from the right side where you increase (6) 10-10-14-14 (14) stitches evenly spaced (do not increase over the bands on each side) = (76) 84-88-96-100 (108) stitches. Purl 1 row from the wrong side (bands knitted). YOKE: Change to circular needle size 3 MM = US 2.5. Insert 1 marker after the band mid-back; the yoke is measured from this marker! In addition, insert 4 other markers without working the stitches and insert each marker between 2 stitches; these markers are used when increasing for the shoulders and should have a different color to the marker on the neck. Marker 1: Start mid-back and count (15) 17-18-18-19-21 stitches (½ back piece), insert the marker before the next stitch. Marker 2: Count (10) 10-10-14-14 (14) stitches from marker 1 (shoulder), insert the marker before the next stitch. Marker 3: Count (26) 30-32-32-34 (38) stitches from marker 2 (front piece), insert the marker before the next stitch. Marker 4: Count (10) 10-10-14-14 (14) stitches from marker 3 (shoulder), insert the marker before the next stitch. There are (15) 17-18-18-19 (21) stitches left after marker 4 (½ back piece). Allow these markers to follow your work onwards. INCREASES FOR SADDLE-SHOULDERS: Read the next section before continuing – on the first row from the right side, increase 4 stitches for the saddle-shoulders as follows: Work stockinette stitch and 4 band stitches in garter stitch on each side. Increase BEFORE markers 1 and 3 and AFTER markers 2 and 4 – read INCREASE TIP-1. You are only increasing on the front and back pieces. The number of shoulder stitches remains the same. On the next row from wrong side, increase 4 stitches as follows: Increase BEFORE markers 4 and 2 and AFTER markers 3 and 1 – read INCREASE TIP-2. You are increasing on EACH row but differently from the right and wrong side so the stitches lie neatly. Continue like this, increasing a total of (10) 10-10-12-12 (12) times on every row (both from right side and wrong side) = (116) 124-128-144-148 (156) stitches. REMEMBER THE KNITTING GAUGE! After the last increase, the piece measures approx. (3) 3-3-4-4 (4) cm = (1⅛") 1⅛"-1⅛"-1½"-1½" (1½") from the marker on the neck. Now increase for the sleeves as follows – at the same time, the piece is joined mid-back as described below. Read INCREASES TO SLEEVES and SPLIT MID-BACK before continuing! INCREASES TO SLEEVES: Continue with stockinette stitch and 4 band stitches in garter stitch on each side. AT THE SAME TIME, on the next row from the right side increase 4 stitches for the sleeves as follows: Increase AFTER markers 1 and 3 and BEFORE markers 2 and 4 – remember INCREASE TIP-1. You are only increasing on the sleeves and the number of stitches on the front and back pieces remains the same. Increase like this every 2nd row (each row from the right side) a total of (10) 12-11-9-9 (10) times. The piece measures approx. (9) 11-10-9-9 (10) cm = (3½") 4⅜"-4"-3½"-3½" (4") from the marker on the neck. Now increase for the yoke as follows. After these increases are finished and the piece has been joined mid-back (as described below), there are (152) 168-168-176-180 (192) stitches. Then continue with increases to yoke. SPLIT MID-BACK: AT THE SAME TIME when the piece measures (6) 6-7-7-8 (8) cm = (2⅜") 2⅜"-2¾"-2¾"-3⅛" (3⅛") from the cast-on edge, the split is finished. Work from the right side as far as the 4 band-stitches at the end of the row. Lay the 4 band stitches at the beginning of the row on top of these last 4 stitches, with the buttonholes on top. Knit the stitches from both bands together 2 and 2 (4 stitches decreased). Continue working in the round (after the join the sleeve increases continue every 2nd round instead of each row from the right side). On the first round after the join, purl the 4 stitches from the bands. Then continue with stockinette stitch over all stitches. NOTE: The beginning of the round is moved to the middle of these 4 stitches. INCREASES TO YOKE: SIZE (<0): = (152) stitches. Continue with stockinette stitch but without increasing until the piece measures 10 cm = 4" from the marker on the neck. Go to ‘Divide for the body and sleeves’ below. SIZES 0/1 - 1/3 - 6/9 - 12/18 months (2 years): Move the 4 markers so each marker sits in the outermost stitch on each side of the back and front pieces, with 34-32-32-32 (34) stitches between the marker-stitches on the sleeves. On the next round increase 8 stitches by increasing both before and after each marker-stitch – remember INCREASE TIP-1. You are now increasing on the front and back pieces as well as the sleeves. Increase like this every 2nd round a total of 1-3-4-5 (5) times = 176-192-208-220 (232) stitches. After the last increase, the piece measures approx. 11-12-12-13 (13) cm = 4⅜"-4¾"-4¾"-5⅛" (5⅛") from the marker on the neck. Continue working until the piece measures 11-12-12-13 (14) cm = 4⅜"-4¾"-4¾"-5⅛" (5½") from the marker. DIVIDE FOR THE BODY AND SLEEVES: Work the first (21) 24-27-29-31 (33) stitches (½ back piece), place the next (34) 40-42-46-48 (50) stitches on a thread for the sleeve, cast on (4) 4-6-6-8 (8) stitches (in side under sleeve), work (42) 48-54-58-62 (66) stitches (front piece), place the next (34) 40-42-46-48 (50) stitches on a thread for the sleeve, cast on (4) 4-6-6-8 (8) stitches (in side under sleeve), work the last (21) 24-27-29-31 (33) stitches (½ back piece). The body and sleeves are finished separately. THE PIECE IS NOW MEASURED FROM HERE. BODY: = (92) 104-120-128-140 (148) stitches. Insert 1 marker in the middle of the cast-on stitches under 1 sleeve. Work stockinette stitch as far as the marker – the round now starts here. Continue with stockinette stitch until the piece measures (5) 8-11-12-14 (16) cm = (2") 3⅛"-4⅜"-4¾"-5½" (6¼") from the division. Knit 1 round where you increase (12) 16-16-20-20 (20) stitches evenly spaced = (104) 120-136-148-160 (168) stitches. Change to circular needle size 2.5 MM = US 1.5 and work rib (knit 2, purl 2) for 3 cm = 1⅛". Bind off a little loosely. The sweater measures approx. (20) 24-28-30-33 (36) cm = (8") 9½"-11"-11¾"-13" (14¼") from the shoulder down. SLEEVES: Place the (34) 40-42-46-48 (50) stitches from the thread on the one side of the piece on double pointed needles size 3 MM = US 2.5 and knit up 1 stitch in each of the (4) 4-6-6-8 (8) stitches cast on under the sleeve = (38) 44-48-52-56 (58) stitches. Insert a marker in the middle of the (4) 4-6-6-8 (8) stitches under the sleeve. Start at the marker and work stockinette stitch in the round for 1 cm = ⅜". Now decrease 2 stitches under the sleeve (does not apply to sizes <0 and 0/1 month) – read DECREASE TIP. Decrease like this every 3rd round a total of (0) 2-2-3-4 (4) times = (38) 40-44-46-48 (50) stitches. Continue working until the sleeve measures (4) 8-10-13-15 (18) cm = (1½") 3⅛"-4"-5⅛"-6" (7") from the division. There is approx. 3 cm = 1⅛" to finished length; try the sweater on and work to desired length. Knit 1 round where you decrease (2) 0-0-2-0 (2) stitches evenly spaced = (36) 40-44-44-48 (48) stitches. Change to double pointed needles size 2.5 MM = US 1.5 and work rib (knit 2, purl 2) for 3 cm = 1⅛". Bind off a little loosely The sleeve measures approx. (7) 11-13-16-18 (21) cm = (2¾") 4⅜"-5⅛"-6¼"-7" (8¼") from the division. Work the other sleeve in the same way. ASSEMBLY: Sew the buttons onto the band mid-back. |
|||||||||||||
Diagram explanations |
|||||||||||||
|
|||||||||||||
|
|||||||||||||
|
|||||||||||||
Have you finished this pattern?Tag your pictures with #dropspattern #bluepebblessweater or submit them to the #dropsfan gallery. Do you need help with this pattern?You'll find 33 tutorial videos, a Comments/Questions area and more by visiting the pattern on garnstudio.com. © 1982-2025 DROPS Design A/S. We reserve all rights. This document, including all its sub-sections, has copyrights. Read more about what you can do with our patterns at the bottom of each pattern on our site. |
|||||||||||||


With over 40 years in knitting and crochet design, DROPS Design offers one of the most extensive collections of free patterns on the internet - translated to 17 languages. As of today we count 314 catalogs and 11822 patterns - 11812 of which are translated into English (US/in).
We work hard to bring you the best knitting and crochet have to offer, inspiration and advice as well as great quality yarns at incredible prices! Would you like to use our patterns for other than personal use? You can read what you are allowed to do in the Copyright text at the bottom of all our patterns. Happy crafting!
Post a comment to pattern DROPS Baby 43-4
We would love to hear what you have to say about this pattern!
If you want to leave a question, please make sure you select the correct category in the form below, to speed up the answering process. Required fields are marked *.