
Looking for a yarn?


Comments / Questions (87)
![]() María José Ayala wrote:
María José Ayala wrote:
Hola! Estoy tejiendo patrón de 5/6 años, ya tejí 1 vez diagrama en vertical de A3 y A4 ( termina con 5 puntos), pero ahora debo seguir con A3a y A4a pero estos tienen un 6 puntos, ósea 1 punto más que no sé de dónde sacarlo, porfavor si me ayudan Gracias
25.06.2025 - 04:42DROPS Design answered:
Hola María José, se trataba de un error en la versión española del patrón; ya está corregida. Tejes el diagrama solo hasta el final de A.3a/A.4a y después repites solo la sección de A.3a/ A.4a en vertical.
29.06.2025 - 18:08
![]() Annabel wrote:
Annabel wrote:
Thank you very much. That's really helpful.
02.06.2025 - 11:53
![]() Annabel wrote:
Annabel wrote:
Hello, good evening. Like Celine, I am knitting 6-9 months and confused by the increasing after the rib, but don't fully understand your answer. I have done the increase from 52 to 72 stitches for the 1st row. Should subsequent increases be 4+4 knitting on the sleeves (=8) , plus 2xyo round each A3/A4, making a further 8, giving a total of 16?. Somehow I need a total of 8 every row to make 72 over 9 rows, but it's coming out at 16. Please help! Annabel
31.05.2025 - 21:05DROPS Design answered:
Dear Annabel, you will only repeat the increases on each side of A.3 and A.4 (the yarn overs on each side of the charts); the sleeve increases are worked only once and not repeated. So you increase 8 stitches on each increase round. You work these increases 10 times in total (or 9 times more) on alternate/every 2nd rounds. So you increase 80 stitches in total (or 72 stitches more). 72+72 = 144 sts. Happy knitting!
01.06.2025 - 23:45
![]() MS REBECCA ROBINSON wrote:
MS REBECCA ROBINSON wrote:
Is this pattern available written out rather than using diagrams?
18.05.2025 - 21:33DROPS Design answered:
Dear Ms Robinson, there are only diagrams to this pattern - this lesson should help you understanding how to read diagrams. Happy knitting!
19.05.2025 - 08:49
![]() Chantal wrote:
Chantal wrote:
Hello, when do I use A.3b & A.4b? Do I use at the end of the body just before staring the ribs. Thank yoi
16.05.2025 - 16:02DROPS Design answered:
Dear Chantal, A.3b and A.4b will be worked at the bottom of the body, see description for the ribbing at the bottom of body, then you continue the stitches A.3b/A.4b with rib with K over K and P over P Happy knitting!
16.05.2025 - 17:39
![]() MS REBECCA ROBINSON wrote:
MS REBECCA ROBINSON wrote:
Very confusing pattern. How do I know which stitches are A3 and which are A4? I am a skilled knitter but this pattern is difficult to follow.
24.04.2025 - 23:22DROPS Design answered:
Dear Mrs Robinson, A.3 is worked over the stitches you worked previously with A.1: at the end of half back piece + between front piece and 2nd sleeve and A.4 is worked over the stitches you worked previously with A.2: at the beg of front piece and at the beg of 2nd half back piece (after right sleeve). Happy knitting!
25.04.2025 - 07:45
![]() Isabelle M wrote:
Isabelle M wrote:
Bonjour, j'ai utilisé plusieurs fois des modèles chez drops et je n'ai jamais eu de problème de compréhension. Mais là... J'ai voulu réaliser le modèle en 12/18 mois mais rien ne tombe juste au niveau des nombres... Il me semble que ça marche mieux en 2 ans.J'ai cherché longtemps, j'ai fait des schémas, rien à faire 🥺. Êtes vous sûrs de vos chiffres ?
16.04.2025 - 15:05DROPS Design answered:
Bonjour Isabelle, quelle taille souhaitez-vous tricoter et à quel niveau coincez-vous exactement? Nous pourrons ainsi vous guider plus facilement à l'aide de ces infos. Merci d'avance.
22.04.2025 - 10:19
![]() Judith wrote:
Judith wrote:
Guten Tag, ich habe eine Frage zur ersten Runde der Passe. Für die Grössen 6-9 und 12-18 Monate heisst die Zeile für den Rechten Ärmel: \"1 Umschlag, 4 Maschen rechts und dabei 4 Maschen gleichmäßig verteilt zunehmen, 1 Umschlag.\" Verstehe ich es richtig, dass man an einer Stelle dadurch 2 Umschläge hintereinander machen muss? An welcher Stelle mache ich das am besten sodass es nur Löcher am Raglan gibt, und kein zu grosses Loch? Vielen Dank!
26.03.2025 - 23:41DROPS Design answered:
Liebe Judith, man soll diese 4 Maschen verdoppeln, so können Sie anders als mit 1 Umschlag zunehmen, z.b. die Maschen 2 Mal stricken so haben Sie die 8 Maschen von den 4 Maschen aber nicht 2 Umschläge hintereinander. Viel Spaß beim Stricken!
27.03.2025 - 09:00
![]() Krista Van Lancker wrote:
Krista Van Lancker wrote:
Baby Leaf sweater 6/9 mos. Per these instructions- Then work rib as follows: Half back piece: * Knit 2, purl 2 *, work from *-* over 4-4 (4-4-8-8) stitches, A.1 (= 5 stitches). How does K2p2 over 4 stitches equal 5 stitches? Chart A.1 shows k2p1k2 which is 5 stitches. Which is correct? Also it is not clear where to place the stitch markers for the raglan increases. The math does not work out.
25.02.2025 - 04:09
![]() Ulla wrote:
Ulla wrote:
Wieso soll ich bei dem Rumpfteil eine Reihe vor dem Bündchen zunehmen? Speziell die Maschenzahl zwischen A3 und A4 von 6 auf 8 erhöhen, wenn ich nachher 2re2li 2re stricken soll. Und bei den Ärmeln steht zunehmen, wobei man doch sicherlich abnehmen soll . Liebe Grüße
31.01.2025 - 20:28DROPS Design answered:
Liebe Ulla, die Zunahmen werden regelmäßig verteilt nur zwischen den Zöpfe gestrickt dazu je 1 Masche in jedem Zopf, da man mehr Maschen für Bündchen mit kleineren Nadeln als für Glattrechts/Zöpfe mit grösseren Nadeln. Viel Spaß beim Stricken!
03.02.2025 - 07:48
|
|||||||||||||||||||
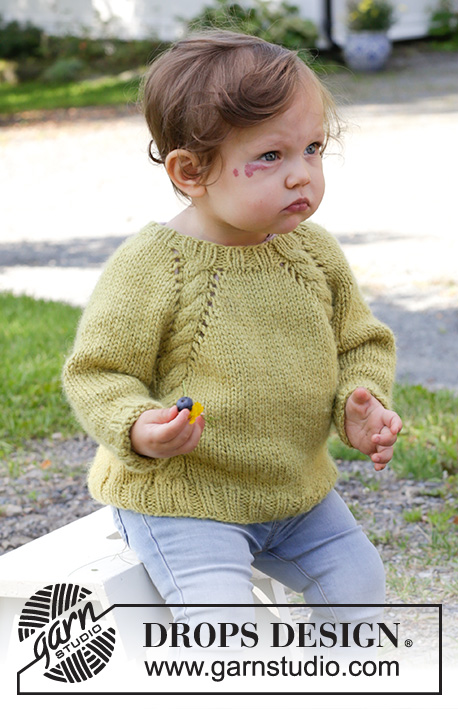
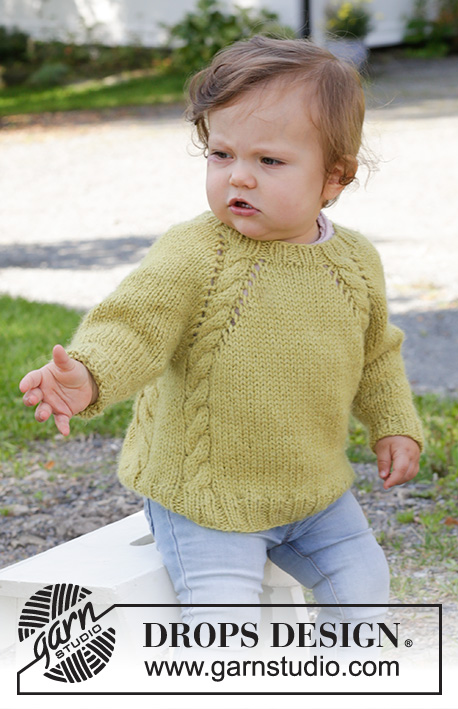
Baby Leaf Sweater#babyleafsweater |
|||||||||||||||||||
 |
 |
||||||||||||||||||
Knitted sweater for baby and kids in DROPS Alaska. Piece is knitted with raglan and cables, top down. Size 6 month - 8 years
DROPS Baby & Children 38-9 |
|||||||||||||||||||
|
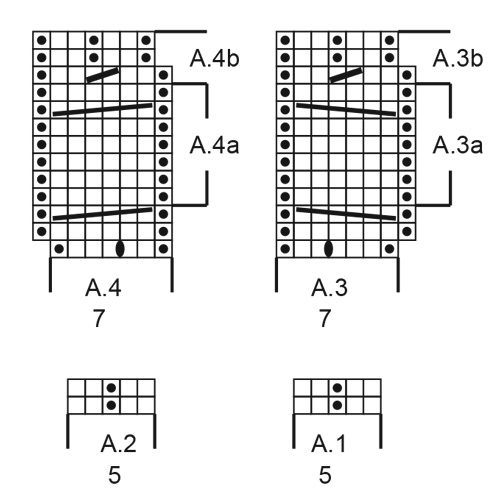
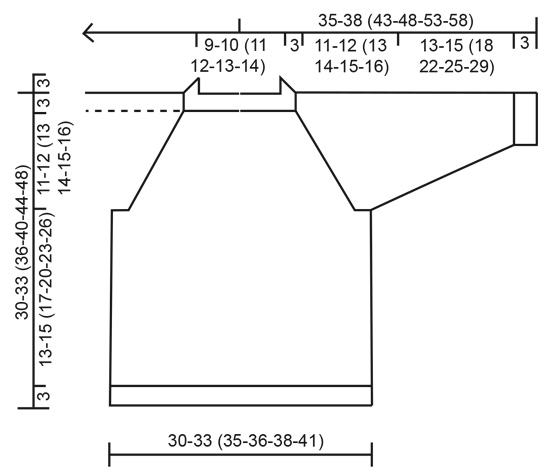
------------------------------------------------------- EXPLANATION FOR THE PATTERN: ------------------------------------------------------- PATTERN: See diagrams A.1 to A.4. DECREASE TIP (applies to sleeves): Decrease 1 stitch on each side of marker as follows: Work until 3 stitches remain before marker, knit 2 together, knit 2 (marker is between these stitches), slip 1 stitch knitwise, knit 1, pass slipped stitch over stitch worked. BIND-OFF TIP: To avoid a tight bind-off edge you may use a larger needle size. If this also is too tight, work a 1 yarn over after approx. every 4th stitch while binding off (bind off yarn overs as regular stitches). ------------------------------------------------------- START THE PIECE HERE: ------------------------------------------------------- SWEATER - SHORT OVERVIEW OF THE PIECE: Worked top down. Work neck edge in the round on double pointed needles/a short circular needle. Work yoke with cables and raglan increase on circular needle. Divide piece for body and sleeves. Continue body in the round on circular needle with cables. Work sleeves in the round on double pointed needles. NECK EDGE: Cast on 52-52 (60-60-68-68) stitches on double pointed needles/circular needle size 4.5 MM = US 7 with Alaska. Knit 1 round. Round starts approx. mid back. Then work rib as follows: Half back piece: * Knit 2, purl 2 *, work from *-* over 4-4 (4-4-8-8) stitches, A.1 (= 5 stitches). Right sleeve: * Purl 2, knit 2 *, work from *-* over the next 6-6 (10-10-10-10) stitches (i.e. begin and end with purl 2). Front piece: A.2 (= 5 stitches), * purl 2, knit 2 *, work from *-* over the next 10-10 (10-10-14-14) stitches (i.e. begin and end with purl 2), A.1 over 5 stitches. Left sleeve: * Purl 2, knit 2 *, work from *-* over the next 6-6 (10-10-10-10) stitches (i.e. begin and end with purl 2). Half back piece: A.2 over 5 stitches, * purl 2, knit 2 *, over the last 6 stitches (i.e. begin and end with purl 2). Continue with knit over knit and purl over purl until piece measures 3 cm = 1⅛". Insert 1 marker at the beginning of round, measure from this marker! Switch to circular needle size 5.5 MM = US 9 and work yoke as follows: YOKE: Work next round as follows: Half back piece: Knit 3-3 (3-3-7-7) while increasing 0-1 (2-3-1-3) stitches evenly, 1 yarn over, A.3 (= 7 stitches). Right sleeve: 1 yarn over, knit 4-4 (8-8-8-8) while increasing 4-4 (0-2-2-2) stitches evenly, 1 yarn over. Front piece: A.4 (= 7 stitches), 1 yarn over, knit 8-8 (8-8-12-12) while increasing 0-2 (4-6-2-6) stitches evenly, 1 yarn over, A.3 over 7 stitches. Left sleeve: 1 yarn over, knit 4-4 (8-8-8-8) while increasing 4-4 (0-2-2-2) stitches evenly, 1 yarn over. Half back piece: A.4 over 7 stitches, 1 yarn over, knit 5 while increasing 0-1 (2-3-1-3) stitches evenly. 8-12 (8-16-8-16) stitches have been increased evenly in total, 1 yarn over on each side of A.3/A.4 (= 8 stitches increased in total for raglan) and 1 stitch in every A.3/A.4 (= 4 stitches) = 72-76 (80-88-88-96) stitches in total on row. Knit yarn overs on each side of A.3/A.4 on next round to make holes. Do work the other yarn overs twisted to avoid holes. Continue with A.3 and A.4 and stockinette stitch over the remaining stitches and increase every other round 10-11 (12-12-13-14) times in total (including the first increase explained above)= 144-156 (168-176-184-200 ) stitches. When A.3a and A.4a have been worked 1 time vertically, repeat A.3a and A.4a vertically.REMEMBER THE KNITTING GAUGE! After all increases piece measures approx. 10-11 (12-12-13-14) cm = 4"-4⅜" (4¾"-4¾"-5⅛"-5½") from marker. Then work as before without increases until piece measures 11-12 (13-14-15-16) cm = 4⅜"-4¾" (5⅛"-5½"-6"-6¼"). Now divide the piece for body and sleeves on next round as follows: Work over the first 21-23 (25-26-29-32) stitches as before, slip the next 28-30 (32-34-36-38) stitches on a stitch holder for sleeve and cast on 6 stitches under sleeve, work as before over the next 44-48 (52-54-56-62) stitches, slip the next 28-30 (32-34-36-38) stitches on a stitch holder for sleeve and cast on 6 stitches under sleeve and work the last 23-25 (27-28-27-30) stitches as before. BODY: = 100-108 (116-120-124-136) stitches. Continue in the round with stockinette stitch and A.3/A.4 as before. Work stitches cast on under sleeve in in stockinette stitch. When piece measures 13-15 (17-20-23-26) cm = 5⅛"-6" (6¾"-8"-9"-10¼") from division (approx. 3 cm = 1⅛" remain), work next round as follows: Knit 13-15 (17-18-21-24) while increasing 0-2 (4-3-4-1) stitches evenly, A.3a as before, knit 6 while increasing 2 stitches evenly, A.4a as before, knit 28-32 (36-38-40-46) while increasing 4-4 (4-6-4-6) evenly, A.3a as before, knit 6 while increasing 2 stitches evenly, A.4a as before, knit 15-17 (19-20-19-22) while increasing 4-2 (0-3-0-5) stitches evenly = 112-120 (128-136-136-152) stitches. Switch to circular needle size 4.5 MM = US 7. Then work rib as follows: * Purl 2, knit 2 *, work from *-* over the first 12-16 (20-20-24-24) stitches, purl 1, A.3b over A.3a, purl 1, * knit 2, purl 2 *, work from *-* over 6 stitches, purl 1, A.4b over A.4a, purl 1, * knit 2, purl 2 *, work from *-* over 30-34 (38-42-42-50) stitches, purl 1, A.3b over A.3a, purl 1, * knit 2, purl 2 *, work from *-* over 6 stitches, purl 1, A.4b over A.4a, purl 1, * knit 2, purl 2 *, work from *-* over 18-18 (18-22-18-26) stitches (i.e. begin and end with knit 2). Continue with knit over knit and purl over purl until piece measures 16-18 (20-23-26-29) cm = 6¼"-7" (8"-9"-10¼"-11⅜") from division. Bind off with knit over knit and purl over purl - read BIND-OFF TIP. Sweater measures approx. 30-33 (36-40-44-48) cm = 11¾"-13" (14¼"-15¾"-17¼"-19") from shoulder and down. SLEEVES: Slip the 28-30 (32-34-36-38) stitches from stitch holder in one side of piece on double pointed needles size 5.5 MM = US 9 and pick up 1 stitch in each of the 6 stitches cast on under sleeve = 34-36 (38-40-42-44) stitches. Insert 1 marker in the middle of the 6 new stitches under the sleeve. Decrease on each side of this marker later. Work in stockinette stitch in the round. When sleeve measures 3 cm = 1⅛" from division, decrease 1 stitch on each side of marker - read DECREASE TIP (= 2 stitches decreased). Decrease like this every 3-2½ (3½-5-5½-6) cm = 1⅛"-1" (1¼"-2"-2⅛"-2⅜") 3-4 (4-4-4-4) times in total = 28-28 (30-32-34-36) stitches. When piece measures 13-15 (18-22-25-29) cm = 5⅛"-6" (7"-8¾"-9¾"-11⅜") from division, increase 0-0 (2-0-2-0) stitches evenly = 28-28 (32-32-36-36) stitches. Switch to double pointed needles size 4.5 MM = US 7. Work rib (= knit 2/purl 2). Bind off with knit over knit and purl over purl when sleeve measures 16-18 (21-25-28-32) cm = 6¼"-7" (8¼"-9¾"-11"-12½") from division. Work the other sleeve the same way. |
|||||||||||||||||||
Diagram explanations |
|||||||||||||||||||
|
|||||||||||||||||||
|
|||||||||||||||||||
|
|||||||||||||||||||
Have you finished this pattern?Tag your pictures with #dropspattern #babyleafsweater or submit them to the #dropsfan gallery. Do you need help with this pattern?You'll find 20 tutorial videos, a Comments/Questions area and more by visiting the pattern on garnstudio.com. © 1982-2025 DROPS Design A/S. We reserve all rights. This document, including all its sub-sections, has copyrights. Read more about what you can do with our patterns at the bottom of each pattern on our site. |
|||||||||||||||||||


With over 40 years in knitting and crochet design, DROPS Design offers one of the most extensive collections of free patterns on the internet - translated to 17 languages. As of today we count 314 catalogs and 11822 patterns - 11812 of which are translated into English (US/in).
We work hard to bring you the best knitting and crochet have to offer, inspiration and advice as well as great quality yarns at incredible prices! Would you like to use our patterns for other than personal use? You can read what you are allowed to do in the Copyright text at the bottom of all our patterns. Happy crafting!
Post a comment to pattern DROPS Baby & Children 38-9
We would love to hear what you have to say about this pattern!
If you want to leave a question, please make sure you select the correct category in the form below, to speed up the answering process. Required fields are marked *.