DROPS Alaska
DROPS Alaska
100% Wool
from 2.60 $ /50g
Get the yarn to make this pattern from 10.40$.

The yarn cost is calculated from the pattern’s smallest size and the yarn’s cheapest product type. Looking for an even better price? You might find it on the DROPS Deals!

DROPS SS24

Baby Leaf Sweater

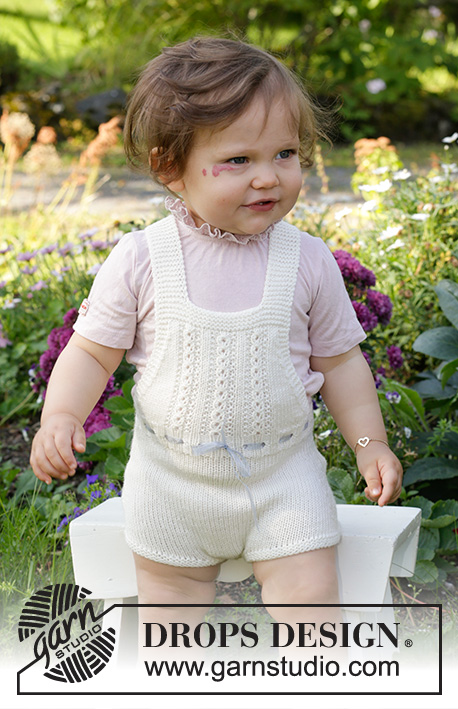
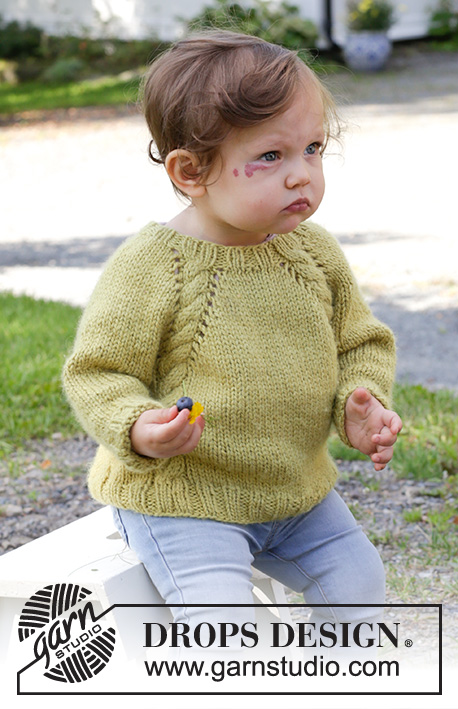
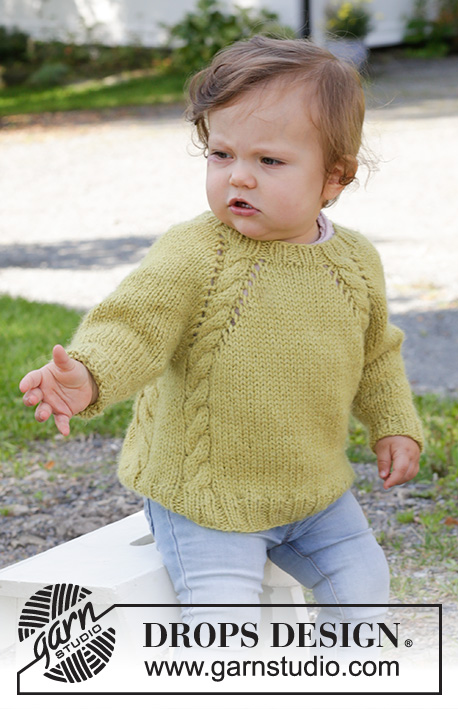
Knitted sweater for baby and kids in DROPS Alaska. Piece is knitted with raglan and cables, top down. Size 6 month - 8 years

DROPS Baby & Children 38-9
DROPS design: Pattern x-004-by
Yarn group C or A + A
----------------------------------------------------------

SIZE:
6/9 - 12/18 months (2 - 3/4 - 5/6 - 7/8) years
Size equals approx. kid’s height in cm:
68/74 - 80/86 (92 - 98/104 - 110/116 - 122/128)
Size equals approx. kid’s height in feet:
2ft3/2ft5 - 2ft7/2ft9 (3ft - 3ft3/3ft5 - 3ft3/3ft5 – 3ft7/3ft9)

Finished measurements:
Chest measurements: 60-66 (70-72-76-82) cm = 23⅝"-26" (27½"-28⅜"-29½"-32¼")
Full length: 30-33 ( 36-40-44-48) cm = 11¾"-13" ( 14¼"-15¾"-17¼"-19")
All measurements in charts are in cm.

MATERIALS:
DROPS ALASKA from Garnstudio (belongs to yarn group C)
200-250 (250-300-300) g color 59, lemon

KNITTING GAUGE:
16 stitches in width and 20 rows vertically in stockinette stitch = 10 x 10 cm = 4" x 4".

NEEDLES:
DROPS DOUBLE POINTED NEEDLES SIZE 5.5 MM = US 9
DROPS CIRCULAR NEEDLE SIZE 5.5 MM = US 9: Length 40 = 16" and 60 = 24" or 80 cm = 32" for stockinette stitch.
DROPS DOUBLE POINTED NEEDLES SIZE 4.5 MM = US 7
DROPS CIRCULAR NEEDLE SIZE 4.5 MM = US 7: Length 40 = 16" or 60 cm = 24" for rib.
DROPS CABLE NEEDLE - for cables.
Needle size is only a suggestion! If you have too many stitches on 10 cm = 4" switch to a larger needle size. If you have too few stitches on 10 cm = 4" switch to a smaller needle size.

-------------------------------------------------------

Alternative Yarn – See how to change yarns here
Yarn Groups A to F – Use the same pattern and change the yarn here
Yarn usage using an alternative yarn – Use our yarn converter here

-------------------------------------------------------

DROPS Alaska
DROPS Alaska
100% Wool
from 2.60 $ /50g
Get the yarn to make this pattern from 10.40$.

The yarn cost is calculated from the pattern’s smallest size and the yarn’s cheapest product type. Looking for an even better price? You might find it on the DROPS Deals!

Pattern instructions

NOTE: This pattern is written in American English. All measurements in charts are in cm. For conversion from inches to cm - click here. There are different terms for crocheting in American and British English. If this pattern includes crochet, click for "crochet terms" here. For this pattern in British English, please click here.
-------------------------------------------------------

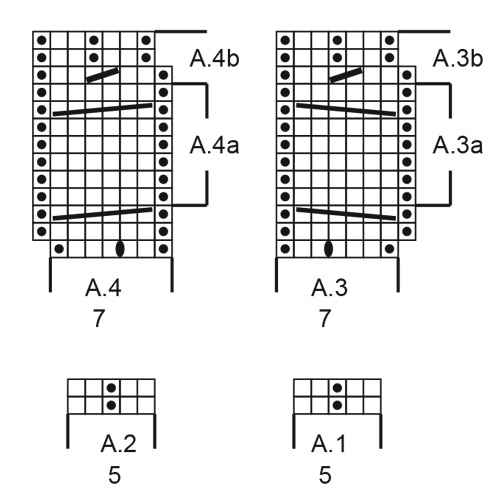
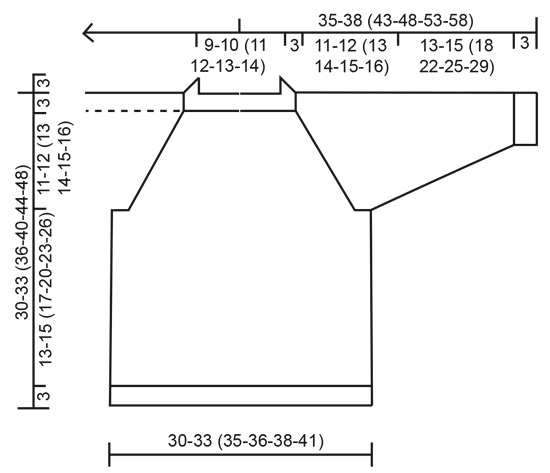
EXPLANATION FOR THE PATTERN:

-------------------------------------------------------

PATTERN:
See diagrams A.1 to A.4.

DECREASE TIP (applies to sleeves):
Decrease 1 stitch on each side of marker as follows: Work until 3 stitches remain before marker, knit 2 together, knit 2 (marker is between these stitches), slip 1 stitch knitwise, knit 1, pass slipped stitch over stitch worked.

BIND-OFF TIP:
To avoid a tight bind-off edge you may use a larger needle size. If this also is too tight, work a 1 yarn over after approx. every 4th stitch while binding off (bind off yarn overs as regular stitches).

-------------------------------------------------------

START THE PIECE HERE:

-------------------------------------------------------

SWEATER - SHORT OVERVIEW OF THE PIECE:
Worked top down. Work neck edge in the round on double pointed needles/a short circular needle. Work yoke with cables and raglan increase on circular needle. Divide piece for body and sleeves. Continue body in the round on circular needle with cables. Work sleeves in the round on double pointed needles.

NECK EDGE:
Cast on 52-52 (60-60-68-68) stitches on double pointed needles/circular needle size 4.5 MM = US 7 with Alaska.
Knit 1 round. Round starts approx. mid back.
Then work rib as follows:
Half back piece: * Knit 2, purl 2 *, work from *-* over 4-4 (4-4-8-8) stitches, A.1 (= 5 stitches).
Right sleeve: * Purl 2, knit 2 *, work from *-* over the next 6-6 (10-10-10-10) stitches (i.e. begin and end with purl 2).
Front piece: A.2 (= 5 stitches), * purl 2, knit 2 *, work from *-* over the next 10-10 (10-10-14-14) stitches (i.e. begin and end with purl 2), A.1 over 5 stitches.
Left sleeve: * Purl 2, knit 2 *, work from *-* over the next 6-6 (10-10-10-10) stitches (i.e. begin and end with purl 2).
Half back piece: A.2 over 5 stitches, * purl 2, knit 2 *, over the last 6 stitches (i.e. begin and end with purl 2).
Continue with knit over knit and purl over purl until piece measures 3 cm = 1⅛". Insert 1 marker at the beginning of round, measure from this marker!
Switch to circular needle size 5.5 MM = US 9 and work yoke as follows:

YOKE:
Work next round as follows:
Half back piece: Knit 3-3 (3-3-7-7) while increasing 0-1 (2-3-1-3) stitches evenly, 1 yarn over, A.3 (= 7 stitches).
Right sleeve: 1 yarn over, knit 4-4 (8-8-8-8) while increasing 4-4 (0-2-2-2) stitches evenly, 1 yarn over.
Front piece: A.4 (= 7 stitches), 1 yarn over, knit 8-8 (8-8-12-12) while increasing 0-2 (4-6-2-6) stitches evenly, 1 yarn over, A.3 over 7 stitches.
Left sleeve: 1 yarn over, knit 4-4 (8-8-8-8) while increasing 4-4 (0-2-2-2) stitches evenly, 1 yarn over.
Half back piece: A.4 over 7 stitches, 1 yarn over, knit 5 while increasing 0-1 (2-3-1-3) stitches evenly.
8-12 (8-16-8-16) stitches have been increased evenly in total, 1 yarn over on each side of A.3/A.4 (= 8 stitches increased in total for raglan) and 1 stitch in every A.3/A.4 (= 4 stitches) = 72-76 (80-88-88-96) stitches in total on row.
Knit yarn overs on each side of A.3/A.4 on next round to make holes.
Do work the other yarn overs twisted to avoid holes.
Continue with A.3 and A.4 and stockinette stitch over the remaining stitches and increase every other round 10-11 (12-12-13-14) times in total (including the first increase explained above)= 144-156 (168-176-184-200 ) stitches.
When A.3a and A.4a have been worked 1 time vertically, repeat A.3a and A.4a vertically.REMEMBER THE KNITTING GAUGE!
After all increases piece measures approx. 10-11 (12-12-13-14) cm = 4"-4⅜" (4¾"-4¾"-5⅛"-5½") from marker.
Then work as before without increases until piece measures 11-12 (13-14-15-16) cm = 4⅜"-4¾" (5⅛"-5½"-6"-6¼"). Now divide the piece for body and sleeves on next round as follows:
Work over the first 21-23 (25-26-29-32) stitches as before, slip the next 28-30 (32-34-36-38) stitches on a stitch holder for sleeve and cast on 6 stitches under sleeve, work as before over the next 44-48 (52-54-56-62) stitches, slip the next 28-30 (32-34-36-38) stitches on a stitch holder for sleeve and cast on 6 stitches under sleeve and work the last 23-25 (27-28-27-30) stitches as before.

BODY:
= 100-108 (116-120-124-136) stitches. Continue in the round with stockinette stitch and A.3/A.4 as before. Work stitches cast on under sleeve in in stockinette stitch.
When piece measures 13-15 (17-20-23-26) cm = 5⅛"-6" (6¾"-8"-9"-10¼") from division (approx. 3 cm = 1⅛" remain), work next round as follows:
Knit 13-15 (17-18-21-24) while increasing 0-2 (4-3-4-1) stitches evenly, A.3a as before, knit 6 while increasing 2 stitches evenly, A.4a as before, knit 28-32 (36-38-40-46) while increasing 4-4 (4-6-4-6) evenly, A.3a as before, knit 6 while increasing 2 stitches evenly, A.4a as before, knit 15-17 (19-20-19-22) while increasing 4-2 (0-3-0-5) stitches evenly = 112-120 (128-136-136-152) stitches.
Switch to circular needle size 4.5 MM = US 7.
Then work rib as follows:
* Purl 2, knit 2 *, work from *-* over the first 12-16 (20-20-24-24) stitches, purl 1, A.3b over A.3a, purl 1, * knit 2, purl 2 *, work from *-* over 6 stitches, purl 1, A.4b over A.4a, purl 1, * knit 2, purl 2 *, work from *-* over 30-34 (38-42-42-50) stitches, purl 1, A.3b over A.3a, purl 1, * knit 2, purl 2 *, work from *-* over 6 stitches, purl 1, A.4b over A.4a, purl 1, * knit 2, purl 2 *, work from *-* over 18-18 (18-22-18-26) stitches (i.e. begin and end with knit 2). Continue with knit over knit and purl over purl until piece measures 16-18 (20-23-26-29) cm = 6¼"-7" (8"-9"-10¼"-11⅜") from division. Bind off with knit over knit and purl over purl - read BIND-OFF TIP.
Sweater measures approx. 30-33 (36-40-44-48) cm = 11¾"-13" (14¼"-15¾"-17¼"-19") from shoulder and down.

SLEEVES:
Slip the 28-30 (32-34-36-38) stitches from stitch holder in one side of piece on double pointed needles size 5.5 MM = US 9 and pick up 1 stitch in each of the 6 stitches cast on under sleeve = 34-36 (38-40-42-44) stitches.
Insert 1 marker in the middle of the 6 new stitches under the sleeve. Decrease on each side of this marker later.
Work in stockinette stitch in the round.
When sleeve measures 3 cm = 1⅛" from division, decrease 1 stitch on each side of marker - read DECREASE TIP (= 2 stitches decreased). Decrease like this every 3-2½ (3½-5-5½-6) cm = 1⅛"-1" (1¼"-2"-2⅛"-2⅜") 3-4 (4-4-4-4) times in total = 28-28 (30-32-34-36) stitches.
When piece measures 13-15 (18-22-25-29) cm = 5⅛"-6" (7"-8¾"-9¾"-11⅜") from division, increase 0-0 (2-0-2-0) stitches evenly = 28-28 (32-32-36-36) stitches.
Switch to double pointed needles size 4.5 MM = US 7.
Work rib (= knit 2/purl 2). Bind off with knit over knit and purl over purl when sleeve measures 16-18 (21-25-28-32) cm = 6¼"-7" (8¼"-9¾"-11"-12½") from division.
Work the other sleeve the same way.

This pattern has been corrected.

Updated online: 21.04.2023
YOKE: ... When A.3a and A.4a have been worked 1 time vertically, repeat A.3a and A.4a vertically.

Diagram

All measurements in charts are in cm.

symbols = knit
symbols = purl
symbols = between 2 stitches make 1 yarn over, work yarn over twisted on next round
symbols = slip 3 stitches on cable needle in front of piece, knit 3, knit 3 from cable needle
symbols = slip 3 stitches on cable needle behind piece, knit 3, knit 3 from cable needle
symbols = knit 2 together
diagram
diagram
Do you have a question? See a list of frequently asked questions (FAQ)

Knitting tension is what determines the final measurements of your work, and is usually measured per 10 x 10 cm. It is provided like so: number of stitches in width x number of rows in height - eg: 19 stitches x 26 rows = 10 x 10 cm.

The knitting tension is very individual; some people knit/crochet loosely while others work tightly. You adjust the knitting tension with the needle size, which is why the suggested needle size only serve as a guide! You need to adjust this (up or down) to ensure that YOUR knitting tension matches the knitting tension provided in the pattern. If you work with a different knitting tension than provided you will have a different yarn consumption, and your work will have different measurements than what the pattern suggests.

The knitting tension also determines which yarns can replace each other. As long as you achieve the same knitting tension you can replace one yarn with another.

See DROPS lesson: How to measure your tension/gauge

See DROPS video: How to make a gauge tension swatch

The required amount of yarn is provided in grams, eg: 450 g. To calculate how many balls you’ll need you first need to know how many grams are in 1 ball (25g, 50g or 100g). This information is available if you click on the individual yarn quality on our pages. Divide the amount required with the amount of each ball. For example, if each ball is 50g (the most common amount), the calculation will be as follows: 450 / 50 = 9 balls.

The important thing when changing from one yarn to another is that the knitting/crochet tension remains the same. This is so that the measurements of the finished piece will be the same as on the sketch provided. It is easier to achieve the same knitting tension using yarns from the same yarn group. It is also possible to work with multiple strands of a thinner yarn to achieve the knitting tension of a thicker one. Please try our yarn converter. We recommend you to always work a test swatch.

Please NOTE: when changing yarn the garment might have a different look and feel to the garment in the photo, due to individual properties and qualities of each yarn.

See DROPS lesson: Can I use a different yarn than the one mentioned in the pattern?

All our yarns are categorised into yarn groups (from A to F) according to thickness and knitting tension – group A contains the thinnest yarns and group F the thickest. This makes it easier for you to find alternative yarns to our patterns, should you wish to switch yarn. All yarns within the same group have a similar knitting tension and can easily replace each other. However, different yarn qualities have different structures and properties which will give the finished work a unique look and feel.

Click here for an overview of the yarns in each yarn group

At the top of all our patterns you’ll find a link to our yarn converter, which is a helpful tool should you wish to use a different yarn than suggested. By filling in the yarn quality you wish to replace, the amount (in your size) and number of strands, the converter will present good alternative yarns with the same knitting tension. Additionally it will tell you how much you’ll require in the new qualities and whether you’ll need to work with multiple strands. Most skeins are 50g (some are 25g or 100g).

If the pattern is worked with multiple colours, every colour will have to be converted separately. Similarly, if the pattern is worked with several strands of different yarns (for example 1 strand Alpaca and 1 strand Kid-Silk) you will have to find alternatives for each, individually.

Click here to see our yarn converter

Since different yarns have different qualities and textures we have chosen to keep the original yarn in our patterns. However, you can easily find options among our available qualities by using our yarn converter, or simply pick a yarn from the same yarn group.

It is possible that some retailers still have discontinued yarns in stock, or that someone has a few skeins at home that they would like to find patterns for.

The yarn converter will provide both alternative yarn as well as required amount in the new quality.

If you think it's hard to decide what size to make, it can be a good idea to measure a garment you own already and like the size of. Then you can pick the size by comparing those measures with the ones available in the pattern's size chart.

You'll find the size chart at the bottom of the pattern.

See DROPS lesson: How to read size chart

The needle size provided in the pattern serves only as a guide, the important thing is to follow the knitting tension. And since knitting tension is very individual, you will have to adjust the needle size to ensure that YOUR tension is the same as in the pattern – maybe you’ll have to adjust 1, or even 2 needle sizes, up or down to achieve the correct tension. For this, we recommend that you work test swatches.

Should you work with a different knitting tension than the one provided, the measurements of the finished garment might deviate from the measurement sketch.

See DROPS lesson: How to measure your tension/gauge

See DROPS video: How to make a gauge tension swatch

Working a garment top-down provides more flexibility and room for personal adjustment. For example it is easier to try the garment on while working, as well as making adjustments to length of yoke and shoulder caps.

The instructions are carefully explaining every step, in the correct order. Diagrams are adjusted to the knitting direction and are worked as usual.

The diagram depicts all rows/rounds, and every stitch seen from the right side. It is read from bottom to top, from right to left. 1 square = 1 stitch.

When working back and forth, every other row is worked from the right side and every other row is worked from the wrong side. When working from the wrong side, the diagram will have to be worked reversed: from left to right, knit stitches are purled, purl stitches are knit etc.

When working in the round every round is worked from the right side and the diagram are worked from right to left on all rounds.

See DROPS lesson: How to read knitting diagrams

The diagram depicts all rows/rounds, and every stitch seen from the right side. It is worked from bottom to top, from right to left.

When working back and forth every other row is worked from the right side: from right to left and every other row is worked from the wrong side: from left to right.

When working in the round, every row in the diagram are worked from the right side, from right to left.

When working a circular diagram you start in the middle and work your way outwards, counter clockwise, row by row.

The rows usually start with a given number of chain stitches (equivalent to the height of the following stitch), this will either be depicted in the diagram or explained in the pattern.

See DROPS lesson: How to read crochet diagrams

Instructions for working several diagrams after each other on the same row/round, will often be written like so: “work A.1, A.2, A.3 a total of 0-0-2-3-4 times". This means you work A.1 once, then A.2 is worked once, and A.3 is repeated (in width) the number of times provided for your size – in this case like so: S = 0 times, M = 0 times, L=2 times, XL= 3 times and XXL = 4 times.

The diagrams are worked as usual: begin with the first row in A.1, then work the first row in A.2 etc.

See DROPS lesson: How to read knitting diagrams

See DROPS lesson: How to read crochet diagrams

The total width of the garment (from wrist-to-wrist) will be larger in the larger sizes, despite the actual sleeves being shorter. The larger sizes have longer sleeve caps and wider shoulders, so there will be a good fit in all sizes.

The measurement sketch/schematic drawing provides information regarding the full length of the garment. If it’s a jumper or a jacket the length is measured from the highest point on the shoulder (usually closest to the neckline), and straight down to the bottom of the garment. It is NOT measured from the tip of shoulder. Similarly, the length of yoke is measured from the highest point on the shoulder and down to where yoke is split into body and sleeves.

See DROPS lesson: How to read a schematic drawing

Diagrams are often repeated on the round or in height. 1 repeat is the diagram the way it appears in the pattern. If it says to work 5 repeats of A.1 in the round, then you work A.1 a total of 5 times after/next to each other in the round. If it says to work 2 repeats of A.1 vertically/in height you work the entire diagram once, then begin again at the start and work the entire diagram one more time.

Chain stitches are slightly narrower than other stitches and to avoid working the cast-on edge too tight, we simply chain more stitches to begin with. The stitch count will be adjusted on the following row to fit the pattern and measurement sketch.

The rib edge is more elastic and will contract slightly compared to, for example, stocking stitch. By increasing before the rib edge, you avoid a visible difference in width between the rib edge and the rest of the body.

It’s very easy to cast off too tightly, and by making yarn overs while casting off (and simultaneously casting these off) you avoid a too tight cast off edge.

See DROPS video: How to bind off with yarn overs (yo)

To achieve an even increase (or decrease) you can increase on, for example: every 3rd and 4th row alternately, like so: work 2 rows and increase on the 3rd row, work 3 rows and increase on the 4th. Repeat this until the increase is complete.

See DROPS lesson: Increase or decrease 1 st on every 3rd and 4th row alternately

Should you prefer to work in the round instead of back and forth, you may of course adjust the pattern. You’ll need to add steeks mid-front (usually 5 stitches), and follow the instructions. When you would normally turn and work from the wrong side, simply work across the steek and continue in the round. At the end you’ll cut the piece open, pick up stitches to work bands, and cover the cut edges.

See DROPS video: How to knit steeks and cut open

Should you prefer to work back and forth instead of in the round, you may of course adjust the pattern so you work the pieces separately and then assemble them at the end. Divide the stitches for the body in 2, add 1 edge stitch in each side (for sewing) and work the front and back pieces separately.

See DROPS lesson: Can I adapt a pattern for circular needles into straight needles?

Pattern repeats can vary slightly in the different sizes, in order to get the correct proportions. If you’re not working the exact same size as the garment in the photo, yours might deviate slightly. This has been carefully developed and adjusted so that the complete impression of the garment is the same in all sizes.

Make sure to follow instructions and diagrams for your size!

If you have found a pattern you like which is available in women’s size it’s not very difficult to convert it to men’s size. The biggest difference will be the length of sleeves and body. Start working on the women size that you think would fit across the chest. The additional length will be worked right before you cast off for the armhole/sleeve cap. If the pattern is worked top-down you can add the length right after the armhole or before the first decrease on sleeve.

Regarding additional yarn amount, this will depend on how much length you add, but it is better with a skein too many than too few.

All yarns will have excess fibres (from production) that might come off as lint or shedding. Brushed yarns (ie hairier yarns) have more of these loose, excess fibres, causing more shedding.

Shedding also depends on what is worn under or over the garment, and whether this pulls at the yarn fibres. It’s therefore not possible to guarantee that there will be no shedding

Below are some tips on how to get the best result when working with hairier yarns:

1. When the garment is finished (before you wash it) shake it vigorously so the looser hairs come off. NOTE: do NOT use a lint roller, brush or any method that pulls at the yarn.

2. Place the garment in a plastic bag and put it in your freezer - the temperature will cause the fibres to become less attached to each other, and excess fibres will come off easier.

3. Leave in the freezer for a few hours before taking it out and shaking it again.

4. Wash the garment according to the instructions on the yarn label.

Pilling is a natural process that happens to even the most exclusive of fibers. It's a natural sign of wear and tear that is hard to avoid, and that is most visible in high friction areas of your garment like a sweater's arms and cuffs.

You can make your garment look as new by removing the pilling, using a fabric comb or a pill/lint remover.

Still can't find the answer you need? Then scroll down and leave your question so one of our experts can try to help you. This will be done normally within 5 to 10 working days.
In the meantime, you can read the questions and answers that others have left to this pattern or join the DROPS Workshop on Facebook to get help from fellow knitters/crocheters!

You might also like...

Baby Leaf Sweater

Giada Simonetti, United Kingdom

Baby Leaf Sweater

Pauline Bouteiller, United States

Baby Leaf Sweater

Mary-Kay, Germany

Post a comment to pattern DROPS Baby & Children 38-9

We would love to hear what you have to say about this pattern!

If you want to leave a question, please make sure you select the correct category in the form below, to speed up the answering process. Required fields are marked *.

Comments / Questions (70)

country flag Sonja wrote:

Hallo liebes Drops Team, ich stricke die Größe 92-98 und verstehe bei der Passe nicht, wo die 4 zugenommenenen Maschen herkommen? Und wo/wie werden diese gestrickt? (....und 1 Masche in jedem A.3/A.4 zugenommen (= 4 Maschen zugenommen)) Für mich geht aus der Beschreibung hervor, dass ich 8 Umschläge und 8 Zunahmen habe = 16. Da würde ich auf 76 Maschen kommen und nicht auf 80.

15.12.2022 - 10:45

DROPS Design answered:

Liebe Sonja, bei der Größe 92 (= 3. Größe; Größe 98/104 ist die 4. Größe) nehmen Sie einige Maschen regelmäßig verteilt bei der 1. Reihe der Passe zu, und zwar: 2 M über die ersten 3 M vom Rückenteil, 4 maschen über die 8 Maschen vom Vorderteil und 2 Maschen über die 5 Maschen von 2. Halb-Rücktenteil. Zusätlich nehmen Sie 8 Maschen für den Raglan zu - diese Zunahmen entstehen beidseitig von A.3 und A.4 (= 8 Zunahmen). Bei der 1. Reihe A.3 und A.4 nehmen Sie jeweils 1 Masche (4 zusätlichen Maschen bei dieser 1. Reihe zugenommen). Viel Spaß beim stricken!

15.12.2022 - 14:09

country flag Marie wrote:

Lurer på om diagragrammene til 3a og 4a er riktig, da blir det 6 rader med glattstrikk mellom flettene istedenfor 5 som det er i diagram 3 og 4

02.12.2022 - 10:08

DROPS Design answered:

Hei Marie. Første gang når A.3a og A.4a strikkes det det 5 rader mellom flettene, men resten av flettene på genseren (når 3.A og 4.A strikkes) strikkes med 6 rader glattstrikk. mvh DROPS Design

05.12.2022 - 12:09

country flag Lisa D wrote:

Guten Tag, nochmals meine Frage: Ich stricke das Stück in der Größe 6/9. Nun eine Frage zu den Raglanzunahmen: Es ist angegeben, man soll A3 und A4 in der ganzen Höhe stricken und anschließend A3a und A4a wiederholen. So wird der Abstand zwischen 2. und 3. Zopf aber viel zu groß und die Maschenzahl stimmt auch nicht. Kann es sein, dass man von Anfang an nur bis zum Ende von A3a und A4a stricken soll, bevor man wiederholt? Vielen Dank.

19.11.2022 - 21:22

DROPS Design answered:

Liebe Lisa, also bei A.3 und A.4 stricken Sie zuerst die 2 ersten Reihen (mit der Zunahme bei der 1. Reihe), dann stricken Sie und wiederholen Sie A.3a/A.4a, A.3b/A.4b stricken Sie erst später. Viel Spaß beim stricken!

21.11.2022 - 10:59

country flag Juju wrote:

Merci j'ai compris mon erreur de lecture du diagramme par le bas. :) J'ai bien mes 80 mailles, mais maintenant j'ai un nouveau problème. Il faut augmenter de 8 mailles tous les 2 rangs, il s'agit uniquement des jetés ? Car 80 + (11 x 8 jetés) = 168 mailles. On ne rajoute pas en plus 4 mailles pour le dos et 4 mailles pour le devant ? Sinon ça serait trop : 80 + (11 x 8 jetés) + (11 x (4m + 4m))

10.11.2022 - 11:21

DROPS Design answered:

Bonjour Juju, effectivement les 4 augmentations des A.3 et A.4 ne se fait qu'une seule fois, vous augmentez ensuite seulement 8 mailles pour le raglan. soit 80 m + encore 11 fois 8 m = 80+88=168 mailles quand toutes les augmentations sont faites. Répétez les rangs des diagrammes A.3a et A.4a (la partie -b sera tricotée seulement en bas du pull, juste avant les côtes. Bon tricot!

10.11.2022 - 16:51

country flag Juju wrote:

Sur le premier tour de l\'empiecement, il n\'est pas écrit d\'augmenter dans A3 A4. Si je respecte ce qui est écrit, cela donne : 3 mailles +2 Aug +1 jeté +7 mailles A3 +1 jeté +8 mailles +1 jeté +7 mailles A4 +1 jeté +8 mailles +4 Aug +1 jeté +7 mailles A3 +1 jeté +8 mailles +1 jeté +7 mailles A3 +1 jeté +5 mailles +2 Aug = 76 mailles.

09.11.2022 - 17:15

DROPS Design answered:

Bonjour Juju, les augmentations de A.3 et A.4 figurent dans les diagrammes - cf ovale noir = 3ème symbole de la légende, soit, je cite: faire 1 jeté entre 2 mailles, tricoter le jeté torse au tour suivant ainsi, vous avez 8 mailes pour tricoter A.3/A.3a et A.4/A.4a. Ce sont les 4 mailles qui vous manquaient. Bon tricot!

10.11.2022 - 10:52

country flag Juju wrote:

Bonjour, il y a un problème pour la taille 2 ans. Pour l'empiecement, lorsque l'on tricotéme les manches, ils disent d'augmenter de 0 mailles... Bizarre.. On devrait augmenter de 2 mailles pour chaque manche non ? Si on ne le fait pas, il manque 4 mailles. J'ai recalculé avec une calculatrice, on arrive bien à 76 si on augmente de 0, et pas 80.

09.11.2022 - 15:05

DROPS Design answered:

Bonjour Juju, vérifiez bien votre nombre de mailles, tout doit tomber juste: vous aviez 60 mailles, vous augmentez 8 m à intervalles réguliers dos/devant + 4 m dans les diagrammes (1 dans chaque A.3/A.4) + 8 m pour le raglan, soit 60+8+4+8=80 mailles. Bon tricot!

09.11.2022 - 16:32

country flag Agata wrote:

Cześć, czytając wzór nie wiedziałam, o co chodzi z przerabianiem "ponad" oczkami - to błąd w tłumaczeniu, chodzi o "przez" daną ilość oczek. Może oszczędzę komuś kilka minut zastanawiania się :)

30.08.2022 - 21:36

country flag Jennifer wrote:

I am starting the yoke. I am confused about the instructions. there are 2 YO which would be two stitches increased but there is a note about increasing 2 stitches evenly. Are the YO's the stitches that are increased or am I to increase 2 more on top of those?

12.07.2022 - 03:09

DROPS Design answered:

Hi Jennifer, The 2 YOs are increased evenly over the first 3 stitches and are the first increases for raglan. Then the other YOs are on each side of the sleeves or increased evenly over the knitted stitches on the front and back pieces. So no additional YOs. Happy knitting!

12.07.2022 - 06:57

country flag Rachel wrote:

Sorry I'm none the wiser! My question was: Do I work all 13 rows of A.4 and then go back and keep repeating A.4a? My guess is that I just do the first 10 rows of A.4 before keep repeating A.4a. Please can you answer this question.

13.04.2022 - 19:53

DROPS Design answered:

Dear Rachel, yes, you work the first 10 rows of A.4 and then keep repeating A.4a (you have worked A.4 1 time vertically and 1 repeat of A.4a). Happy knitting!

14.04.2022 - 17:23

country flag Rachel Dowding wrote:

I am knitting the baby leaf sweater and am a bit puzzled as to A4 and A3. Do I do all 13 rows of the pattern of A.4 (including A.4b) at the beginning of the yoke and then go back and do A.4a.? Do I then keep repeating the A.4a section? Continental patterns are just so different from our English ones!!

12.04.2022 - 09:53

DROPS Design answered:

Dear Rachel, A.3 and A.4 are the charts for the cables in the raglan lines. YOu work A.3 in the first raglan line (= back) and A.4 in the second one (= front). You work A.3 again in the 3rd raglan line (= front) and A.4 in the 4th raglan line, in the back. When you have repeated A.3/ A.4 once vertically, that is, you have worked all 4 rows of A.3/ A.4, start working A.3a over A.3 and A.4a over A.4. Happy knitting!

12.04.2022 - 18:13