
Looking for a yarn?


Comments / Questions (11)
![]() TBD wrote:
TBD wrote:
Is there a mistake in the pattern ? Right side you decrease 1*3, 1*2, 1*1 stitch after 6 cm (I’m making the biggest size) Left side you increase 1*1, 1*2, 1*3 stitches only 1,5cm after the back opening There is no symmetry !
12.06.2025 - 23:54DROPS Design answered:
Dear Tbd, after you have cast off the last 3 sts for neck, continue until piece measures 12 cm (mid back), cast off the 10 sts for split, finish row, turn and cast on 10 sts at the end of next row (don't forget lace row), then work the 2nd shoulder reversed after approx. 1,5 cm you will cast on new stitches for shoulder. You can adjust to get the same number of rows so that width will be correct. Happy knitting!
13.06.2025 - 07:57
![]() Minaxi Sikotra wrote:
Minaxi Sikotra wrote:
How to start this dress? I have started 105 stitchis. ( I want to make this dress for 4-5 years. Please help me to workout this dress.
05.01.2025 - 13:26DROPS Design answered:
Dear Minaxi, for size 3/4 years (the size with 105 stitches) you start working as indicated in SHORT ROWS: work picot edge over the first 4 stitches, then work 70 stitches in garter stitch, turn and work back by knitting over 70 stitches and working row 2 of the picot edge over the 4 stitches in picot edge (increase 2 stitches as indicated). Now work over the 6 picot stitches and work over the 101 stitches in garter stitch, work back in garter stitch over all stitches and the picot edge as before over the last stitches. Work these 4 rows once more and continue as stated in neckline. Happy knitting!
05.01.2025 - 20:16
![]() Teunie wrote:
Teunie wrote:
Ik brei dit patroon in maat 80/86. Er staat aangegeven: 200 gram wol poederroze. Daar kom ik beslist niet mee toe. Jammer, want mooi dat het verfbad op is, nu ik nog een extra wolletje nodig heb. Zo jammer, dit!
04.06.2024 - 13:21
![]() Mariagrazia wrote:
Mariagrazia wrote:
Nelle istruzioni per la scollatura dietro dopo lo spacco è scritto di avviare 5 nuove maglie (in realtà dovrebbero essere 6) dopo cm 1 e 1/2 dopo le 10 maglie avviate, secondo me c'è un errore, dovrebbe essere dopo 6 cm come sull'altro lato dello spacco, viceversa il motivo centrale sarebbe spostato su in lato. Grazie
02.05.2024 - 10:11DROPS Design answered:
Buonasera Mariagrazia, grazie per la segnalazione, abbiamo corretto il testo: sono 6 le maglie da avviare. Buon lavoro!
16.06.2024 - 21:52
![]() Mariagrazia wrote:
Mariagrazia wrote:
Le istruzioni al punto Scollatura Dietro dopo lo spacco indicano di aumentare le maglie, ma poi spiegano di intrecciarle. Non so come procedere. Grazie
27.04.2024 - 18:54DROPS Design answered:
Buonasera Mariagrazia, grazie per la segnalazione, abbiamo corretto il testo: le maglie devono essere avviate, non intrecciate. Buon lavoro!
01.05.2024 - 21:43
![]() Mariagrazia wrote:
Mariagrazia wrote:
Le istruzioni al punto Scollatura Dietro dopo lo spacco indicano di aumentare le maglie, ma poi spiegano di intrecciarle. Il numero finale delle maglie è indicato come più alto ma le istruzioni per aumentarle non ci sono. Grazie
27.04.2024 - 18:52DROPS Design answered:
Buonasera Mariagrazia, grazie per la segnalazione, abbiamo corretto il testo: le maglie devono essere avviate, non intrecciate. Buon lavoro!
01.05.2024 - 21:43
![]() Thea Stormorken wrote:
Thea Stormorken wrote:
Som Lena har nevnt over, virker det som mønsteret er feil mtp at økning av masker etter splittet på bakstykke kommer på 1,5cm. Jeg strikket dette først, men andre siden er det ca 4cm fra splittet til halsavrunning. Så dette ble helt feil
31.08.2022 - 22:07
![]() Stefania wrote:
Stefania wrote:
Ho già lavorato tantissimi dei vostri schemi ai ferri, anche di tecnicamente più complessi di questo. Ma la spiegazione di questo vestito non è comprensibile, non si capisce l'esatta sequenza delle azioni da svolgere. Credo che la spiegazione corretta è *lavorare il bordo a picot, posizionare il segnapunti-1, lavorare x-x-x-x-x maglie, posizionare il segnapunti-2, girare il lavoro eccetera eccetera * . Datemi conferma se è corretto.
25.11.2021 - 19:27DROPS Design answered:
Buonasera Stefania, il segnapunti va posizionato prima perchè il bordo a picot si lavora durante la lavorazione a ferri accorciati. Buon lavoro!
28.11.2021 - 19:38
![]() Nieves Espallargas-Sanz wrote:
Nieves Espallargas-Sanz wrote:
Hola, me pierdo un poco al hacer las lavores, vivo wn Alemania. Hay posibilidad de tener los patrones en papel?
04.11.2021 - 22:04DROPS Design answered:
Hola Nieves, ya no se publican las revistas pero puedes imprimir los patrones, pulsando el botón de imprimir bajo la foto. También puedes ver los patrones en otros idiomas, incluyendo alemán, si te sientes más cómoda en otro idioma; puedes seleccionar el idioma bajo la foto.
07.11.2021 - 13:55
![]() Marcela wrote:
Marcela wrote:
Hello, I am working on the Enchanted time pattern. I have knit the dress and am wondering how to do the crochet around the neck. The pattern reads …” 3 chain stitches, 1 treble crochet in double crochet”. I am really confused as what to do after I do the 3 chain stitches. Am I going into one of those chain stitches for the next stitch. Also, I don’t understand what 1 treble crochet in double crochet means. Thank you for your help.
23.09.2021 - 21:34DROPS Design answered:
Dear Marcela, this video shows how to crochet such a crocheted edge, but for this edge you will insert the crochet hook in the double crochet (UK-English)/single crochet (US-English) to make the treble crochet (UK-English)/double crochet (US-English) . Happy crocheting!
24.09.2021 - 07:39
|
||||
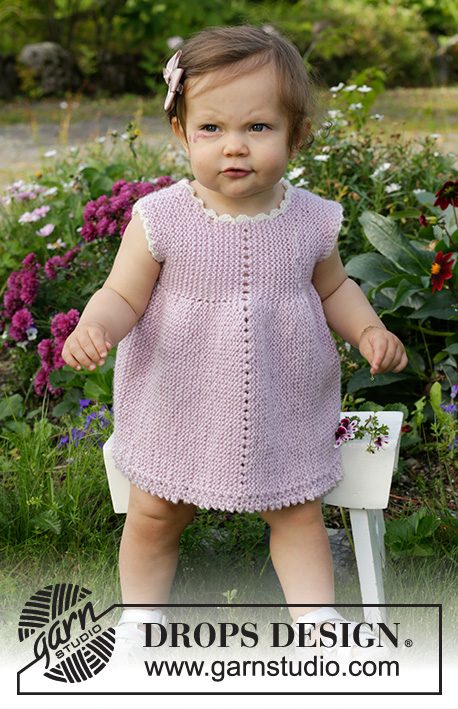
Enchanted Time Dress#enchantedtimedress |
||||
 |
 |
|||
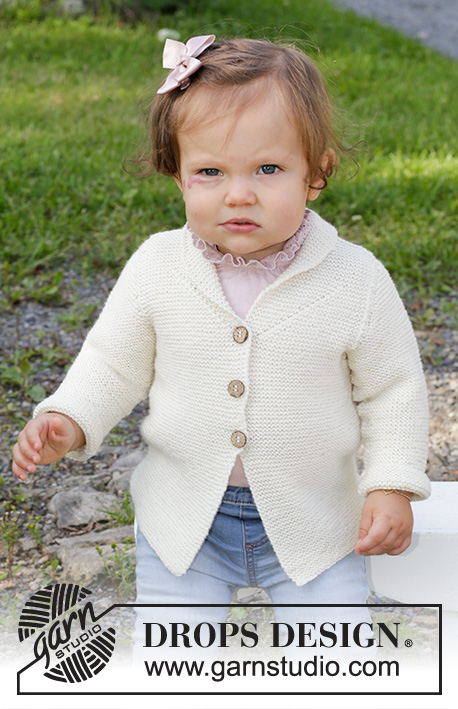
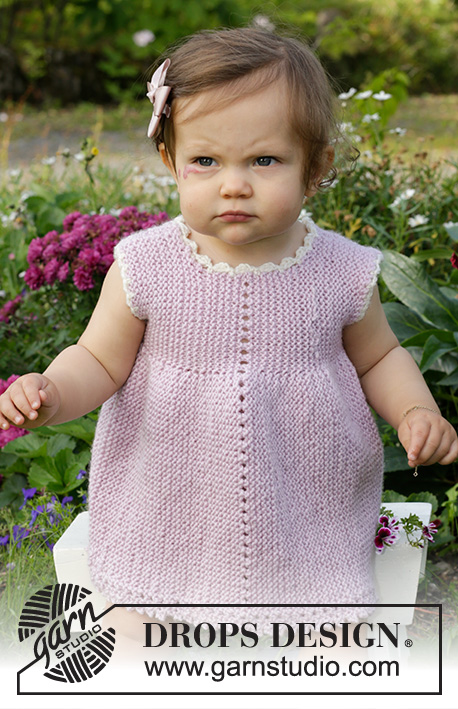
Knitted dress for baby and kids in DROPS Cotton Merino. Piece is knitted sideways in garter stitch with lace edge. Size 0 - 4 years
DROPS Baby & Children 38-3 |
||||
|
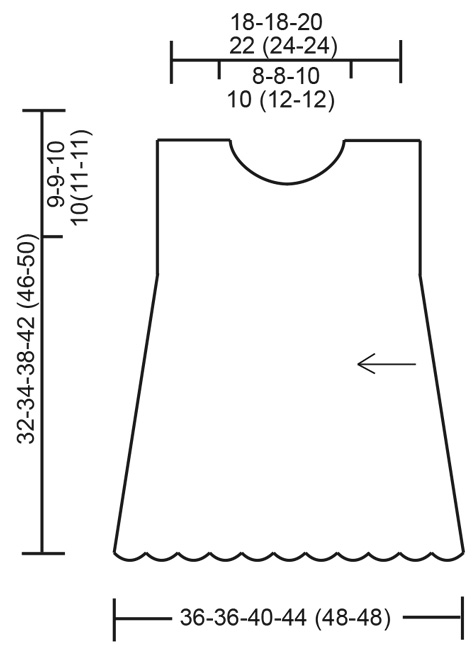
------------------------------------------------------- EXPLANATION FOR THE PATTERN: ------------------------------------------------------- GARTER STITCH (back and forth): 1 ridge = knit 2 rows. PICOT EDGE (back and forth on needle): ROW 1 (= right side): Knit all stitches. ROW 2 (= wrong side): Knit until 4 stitches remain, work these stitches as follows: Knit 2 together, 1 yarn over, then work 2 stitches in each of the last 2 stitches = 2 new stitches on needle. ROW 3 (= right side): Slip first stitch knitwise, knit 1, pass slipped stitch over stitch worked, knit 1, pass slipped stitch over stitch worked, knit 1, and pass the back stitch on right needle over the front stitch, 2 stitches have been decreased - then knit the rest of row. ROW 4 (= wrong side): Knit all stitches. Repeat rows 1 to 4. BIND-OFF TIP: To avoid a tight bind-off edge you may use a larger needle size. If this also is too tight, work a 1 yarn over after approx. every 4th stitch while binding off (bind off yarn overs as regular stitches). ------------------------------------------------------- START THE PIECE HERE: ------------------------------------------------------- DRESS - SHORT OVERVIEW OF THE PIECE: Work front and back piece separately. Piece is knitted sideways with short rows in garter stitch with lace edge. BACK PIECE: Cast on 68-72-80-89 (97-105) stitches on circular needle size 4 MM = US 6 with powder pink. SHORT ROWS: Insert 1 marker inside the first 4 stitches at beginning of row seen from right side (= marker-1). Then work PICOT EDGE - read explanation above, over these stitches AT THE SAME TIME as working short rows in GARTER STITCH - read explanation above, as follows: * Work 46-50-56-62 (68-74) stitches (work picot edge until marker 1 - (picot edge varies from 4 to 6 stitches), insert 1 new marker (= marker 2), turn piece, tighten yarn and work back. Work over all stitches, turn piece and work back *, work from *-* (i.e. 1 repetition = 2 ridges/4 rows over the bottom stitches and picot edge and 1 ridge/2 rows over the top stitches). REMEMBER THE KNITTING GAUGE! NECK LINE: When piece measures 5-5-5-6 (6-6) cm = 2"-2"-2"-2⅜" (2⅜"-2⅜") on the most narrow part, bind off stitches for neck line at the beginning of every row from wrong side when working back over all stitches as follows (continue short rows as before): Bind off 3 stitches 1 time, 2 stitches 1 time and 1 stitch 1 time = 62-66-74-83 (91-99) stitches. Continue short rows as before. LACE PATTERN AND VENT MID BACK: When piece measures approx. 9-9-10-11-12-12 cm = 3½"-3½"-4"-4⅜"-4¾"-4¾" in total on the most narrow part (= mid back) – adjust so that next row is from right side over all stitches, work as follows: Work picot edge until marker-1, * knit 2 together, 1 yarn over *, work from *-* until 12-12-12-13 (13-13) stitches remain, knit the rest of row, turn piece, bind off the first 10 stitches at beginning of row and knit the rest of row. Continue short rows as before, but at the end of row worked over all stitches, cast on 10 new stitches = 62-66-74-83 (91-99) stitches. Continue short rows as before. NECK LINE: When piece measures approx. 1½ cm = ½" from where new stitches were cast on for vent, cast on new stitches at the end of every row from right side when working over all stitches (continue short rows as before): Cast on 1 stitch 1 time, 2 stitches 1 time and then 3 stitches 1 time = 68-72-80-89 (97-105) stitches. Continue short rows as before. Work as before until piece measures 9-9-10-11 (12-12) cm = 3½"-3½"-4"-4⅜" (4¾"-4¾") on the most narrow part, insert 1 marker after 18-18-20-23 (25-27) stitches from wrong side - this marker shows end of side seam. Bind off - read BIND-OFF TIP. Piece measures 18-18-20-22 (24-24) cm = 7"-7"-8"-8¾" (9½"-9½") on the most narrow part and 36-36-40-44 (48-48) cm = 14¼"-14¼"-15¾"-17¼" (19"-19") on the widest part. FRONT PIECE: Cast on and work as back piece but do not decrease for neck vent, i.e. bind off for neckline as on back piece when piece measures 5-5-5-6 (6-6) cm = 2"-2"-2"-2⅜" (2⅜"-2⅜"). When piece measures approx. 9-9-10-11 (12-12) cm = 3½"-3½"-4"-4⅜" (4¾"-4¾") – adjust so that next row is from right side over all stitches, work as follows: Work picot edge until marker-1, * knit 2 together, 1 yarn over *, work from *-* until 2-2-2-3 (3-3) stitches remain on row, knit the rest of row, turn piece, tighten yarn and work over all stitches. When piece measures 11½-11½-13½-14½ (16½-16½) cm = 4⅝"-4⅝"-5⅜"-5¾"(6½"-6½") in total, cast on new stitches for neckline as on back piece at the end of every row from right side over all stitches. Continue short rows as before. Work until piece measures 18-18-20-22 (24-24) cm = 7"-7"-8"-8¾" (9½"-9½") in total on the most narrow part and 36-36-40-44 (48-48) cm = 14¼"-14¼"-15¾"-17¼" (19"-19") on the widest part. Insert 1 marker after 18-18-20-23 (25-27) stitches from wrong side - this marker shows end of side seam. Bind off. ASSEMBLY: Sew shoulder seams in outer loops of edge stitches. Sew side seams in front loop of outermost stitch, sew up to markers. ARM HOLE: Crochet an edge around the armhole on hook size 3.5 MM = US E/4 with off white as follows: Begin mid under sleeve, work 1 slip stitch in first stitch, work 1 chain stitch, * 1 single crochet in next stitch, 1 chain stitch, skip approx. 1 cm = ⅜" *, work from *-* and finish 1 slip stitch in first chain stitch. Make sure that crochet edge is not tight around the armhole, work if needed more chain stitches between single crochets. AROUND THE NECK: Begin at the bottom of vent and work around the neck and down along the other side of vent. Work with off white on hook size 3.5 MM = US E/4 as follows: Work 1 slip stitch at the bottom of vent, 1 chain stitch, * 1 single crochet in next stitch/row, 3 chain stitches, 1 double crochet in single crochet, skip approx. 1 cm = ⅜" *, work from *-* and finish with 1 single crochet at the bottom of vent. Sew on a button at the top of vent, button through crochet edge. |
||||
Diagram explanations |
||||
|
||||
|
||||
Have you finished this pattern?Tag your pictures with #dropspattern #enchantedtimedress or submit them to the #dropsfan gallery. Do you need help with this pattern?You'll find 21 tutorial videos, a Comments/Questions area and more by visiting the pattern on garnstudio.com. © 1982-2025 DROPS Design A/S. We reserve all rights. This document, including all its sub-sections, has copyrights. Read more about what you can do with our patterns at the bottom of each pattern on our site. |
||||


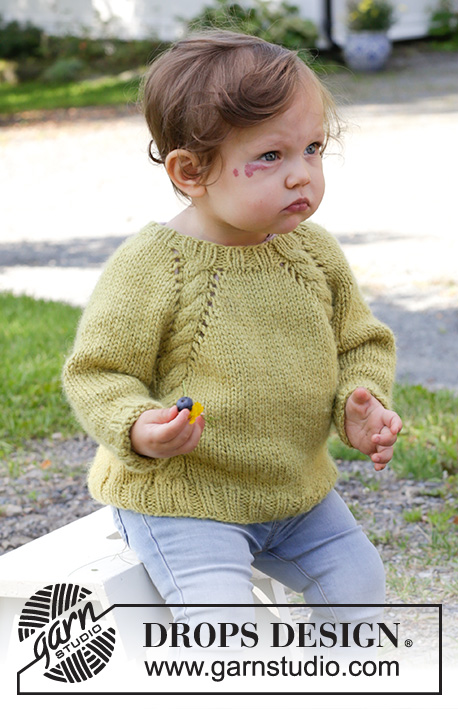
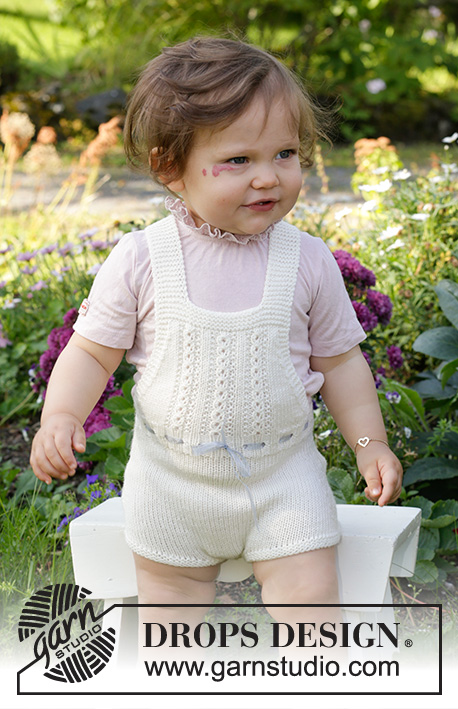
With over 40 years in knitting and crochet design, DROPS Design offers one of the most extensive collections of free patterns on the internet - translated to 17 languages. As of today we count 314 catalogs and 11822 patterns - 11812 of which are translated into English (US/in).
We work hard to bring you the best knitting and crochet have to offer, inspiration and advice as well as great quality yarns at incredible prices! Would you like to use our patterns for other than personal use? You can read what you are allowed to do in the Copyright text at the bottom of all our patterns. Happy crafting!
Post a comment to pattern DROPS Baby & Children 38-3
We would love to hear what you have to say about this pattern!
If you want to leave a question, please make sure you select the correct category in the form below, to speed up the answering process. Required fields are marked *.