
Popular categories
Looking for a yarn?


Comments / Questions (58)
![]() Toni wrote:
Toni wrote:
Hello, I am knitting the 5/6 and come around a problem, I got to 155 stitch and been told to increase 19 stitches to get 164? but it works out 174 stitches. do I increase 19 stitches or 9 stitches? Thank you
21.07.2022 - 20:04DROPS Design answered:
Hi Toni, for size 5/6 - when the piece measure 19 cm from where body and sleeves were divided, increase 9 stitches evenly on the next round = 164 stitches. So you should increase 9 stitches: 155+9=164. Happy knitting!
22.07.2022 - 21:38
![]() Elisabet wrote:
Elisabet wrote:
Hej Vad är finessen med att öka 9 maskor sista varvet före resåren? Jag förstår att man måste nå delbarhet med 4, men varför så många maskor (4cm!)
20.02.2022 - 09:39DROPS Design answered:
Hei Elisabet På 80 tallet skulle gjerne vrangborden være mye smalere enn selve genseren, men nå ønsker man seg en penere overgang mellom bol og vrangbord og bortsdett fra å bytte pinne str. øker man også med noen masker. mvh DROPS Design
21.02.2022 - 13:11
![]() Magdalena Asteberg wrote:
Magdalena Asteberg wrote:
Hej! Jag har precis stickat färdigt A1 i storlek 12/18 och när jag mätte så fick jag 16 cm i stället för 13 cm , vad gjorde jag för fel?
27.01.2022 - 02:14DROPS Design answered:
Hej Magdalena, så har du strikket lidt løsere end hvad vi har gjort ifølge strikkefastheden som står i opskriften. Strikker du i DROPS Merino Extra Fine?
28.01.2022 - 10:53
![]() Sonca Lengoc wrote:
Sonca Lengoc wrote:
Do you have an adult version of this pattern?
26.01.2022 - 18:35DROPS Design answered:
Dear Sonca, you can find an adult version here Happy knitting!
26.01.2022 - 19:48
![]() Stefanie wrote:
Stefanie wrote:
Könntet ihr das bitte auch für Erwachsene machen? Ich möchte bitte diesen Pullover in XL. Vielen lieben Dank
15.12.2021 - 13:24DROPS Design answered:
Liebe Stefanie, hier finden Sie einen ähnlichen Pullover für Erwachsene XS/S bis XXXL). Viel Spaß beim stricken!
15.12.2021 - 16:12
![]() CATI Corbalan wrote:
CATI Corbalan wrote:
Gracias por sus explicaciones tan claras. Saludos desde España
09.10.2021 - 09:36
![]() Silje wrote:
Silje wrote:
Hei. Jeg strikker 9/10 år. Og er helt på slutten av A1 men får ikke sikk-sakk til å stemme når det er en økning der. (øking er på linje 4 når du ser på diagrammet og problemet blir på linje 3). Det er 3 røde masker mellom hver bortsett fra den ene der blir det 4. Og da stemmer ikke det med brun trå, det blir en rød glippe... Stemmer dette eller er det noe jeg gjør galt?
08.10.2021 - 17:48DROPS Design answered:
Hei Silje. Ja, det blir 3 røde masker 2 ganger og 4 røde masker 1 gang (i 1 rapport av A.1) for å få maskeantallet / økningene til å stemme. Dette skal jevne seg ut når alle økninger er gjort i diagrammet. mvh DROPS design
11.10.2021 - 10:17
![]() Jukka Ketola wrote:
Jukka Ketola wrote:
Hello, on this pattern elevation description different , little boy hard to understand . Do you have video of exaple description for this elevation?
16.09.2021 - 08:44DROPS Design answered:
Dear Jukka, if you scroll down to the bottom of the pattern, below the shcematic drawing you can find all the relevant videos for this pattern, including THIS about hpw to knit an elevation to the back of a sweater. Happy Knitting!
17.09.2021 - 02:24
![]() Andrea wrote:
Andrea wrote:
Bezieht sich die Länge der Nadeln, 40 und 60 , auf die Gesamtlänge inklusive Spitzen oder auf die Seillänge? Vielen Dank schon mal für die Antwort! Viele Grüße Andrea
17.03.2021 - 18:22DROPS Design answered:
Liebe Andrea, die Länge ist von einer Spitze zu den anderen gemessen. Viel Spaß beim stricken!
18.03.2021 - 08:55
![]() Heidi Kristoffersen wrote:
Heidi Kristoffersen wrote:
Hei. Strikker 3/4 år og skal nå dele til armer. Men A1 er ikke ferdig. Skal mønsteret fortsette under armen?
16.01.2021 - 12:38DROPS Design answered:
Hei Heidi. Om strikkefastheten i høyden stemmer skal A.1 være akkurat ferdig før det deles til ermene. A.1 = 42 pinner. Iflg strikkefastheten er 28 pinner 10 cm, 42 pinner(A.1) = 15 cm + 3 cm vrangbord = 18 cm. Om du har mye igjen av A.1 kan bærestykket bli for lang når det tas på. mvh DROPS design
25.01.2021 - 14:55
|
|||||||||||||
Little Red Nose#littlerednosesweater |
|||||||||||||
 |
 |
||||||||||||
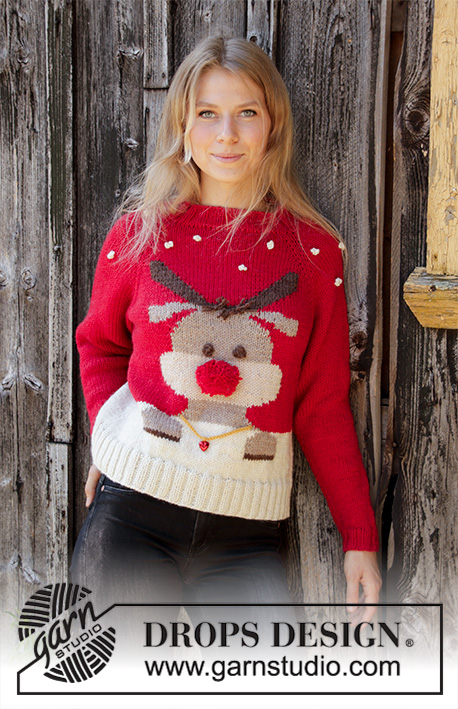
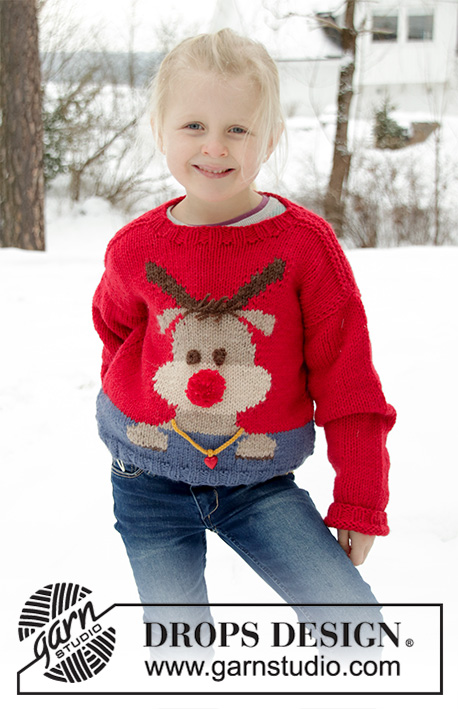
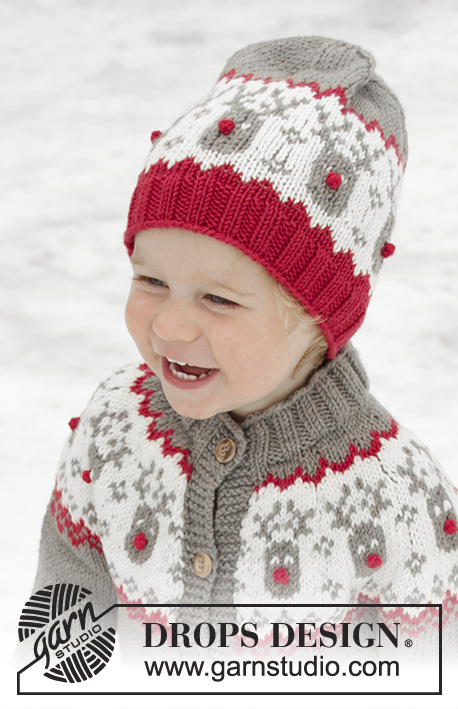
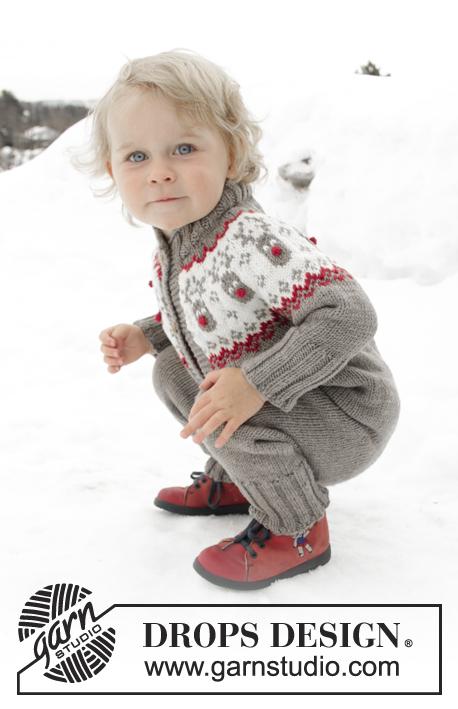
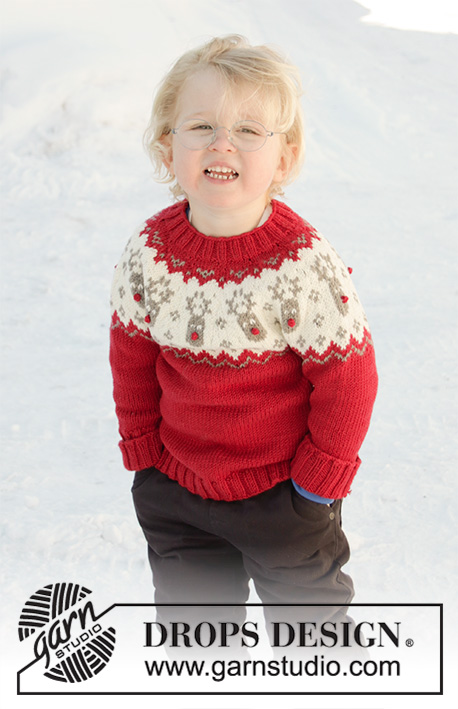
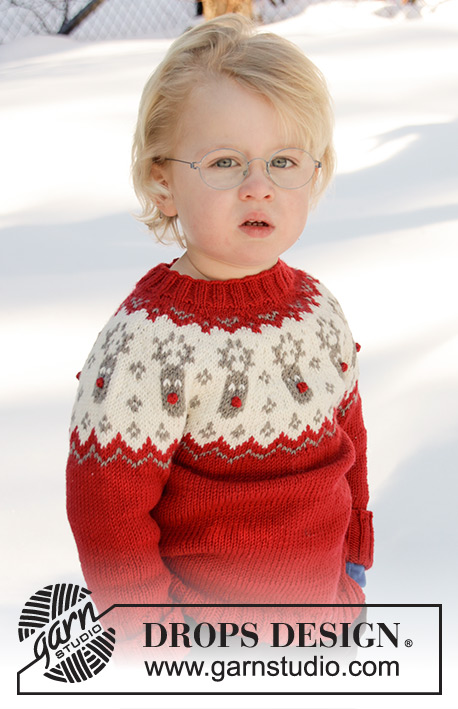
Knitted Christmas jumper for babies and children with round yoke in DROPS Merino Extra Fine. The piece is worked top down with Nordic pattern. Sizes 12 months – 12 years.
DROPS Children 32-10 |
|||||||||||||
|
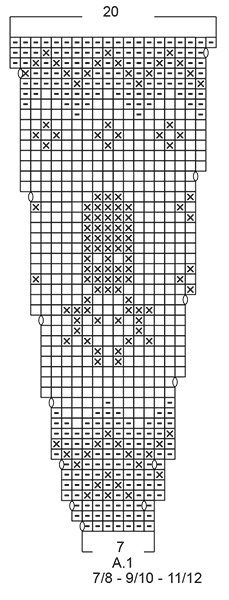
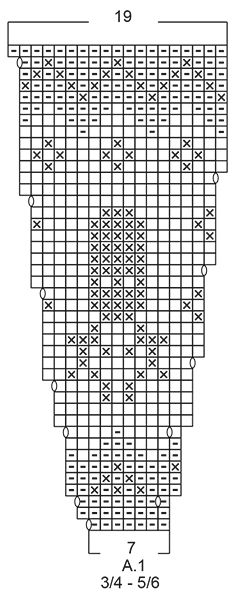
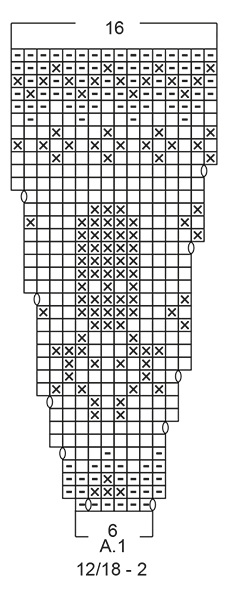
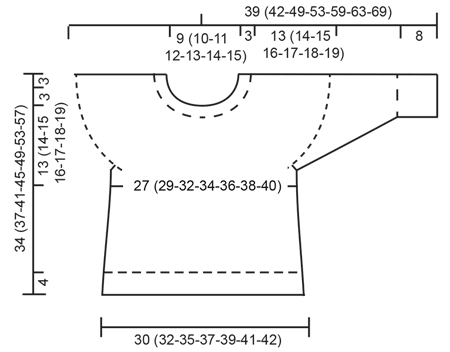
EXPLANATIONS FOR THE PATTERN: ------------------------------------------------------- PATTERN: See diagram A.1. Choose diagram for your size. The whole pattern is worked in stocking stitch. DECREASE/INCREASE TIP: To work out when to decrease/increase on the round, count the total number of stitches on the needle (e.g. 72 stitches) and divide by the number of decreases/increases to be made (e.g. 6) = 12. In this example, decrease by working together each 11th and 12th stitch, or increase after each 12th stitch by making 1 yarn over (the yarn overs are worked twisted on the next row to avoid holes). INCREASE TIP (for sides of body): Increase 1 stitch on each side of marker thread as follows: Start 2 stitches before marker thread, make 1 yarn over, work 4 stitches (marker thread sits in the middle of these 4 stitches), make 1 yarn over (= 2 stitches increased). On the next round work the yarn overs twisted to avoid holes. DECREASE TIP (for mid under sleeves): Decrease 1 stitch on each side of the marker thread as follows: Start 3 stitches before the marker thread, knit 2 together, knit 2 (marker thread sits between these 2 stitches), slip 1 stitch as if to knit, knit 1 and pass the slipped stitch over the knitted stitch (= 2 stitches decreased). ELEVATION (back of neck): Skip this section if you do not want an elevation. SIZE 12/18 MONTHS (2-5/6-7/8) YEARS: place 1 marker between 2 stitches mid-front (after 33 (36-42-42) stitches). SIZE (3/4-9/10-11/12) YEARS: place 1 marker in the stitch mid-front (in stitch 39-46-46) Knit until there are 8 (8-8-10-10-12-12) stitches left before the marker, turn, tighten strand and purl until there are 8 (8-8-10-10-12-12) stitches left on the other side, turn, tighten strand and knit until there are 16 (16-16-18-18-20-20) stitches left, turn, tighten strand and purl until there are 16 (16-16-18-18-20-20) stitches left on other side. Continue by working 8 stitches less each time you turn, 2 more times in each side, turn, tighten strand and knit to mid-back. ------------------------------------------------------- START THE PIECE HERE : ------------------------------------------------------- JUMPER - SHORT OVERVIEW OF THE PIECE: The piece is worked in the round, top down. A yoke is worked first, then divided for body and sleeves. The round starts approx. mid back. Body is worked in the round with circular needle. Sleeves are worked in the round with double pointed needles. NECK: Cast on 72 (76-80-84-88-96-100) stitches with red and double pointed needles/short circular needle size 3 mm (in the 2 smallest sizes you need to cast on and work with double pointed needles until you have enough stitches to use a circular needle; the other sizes can be cast on and worked with circular needle). Knit 1 round. Then work rib (= knit 2 / purl 2). Continue this rib for 3 cm. YOKE: Change to double pointed needles/short circular needle size 4 mm. Knit 1 round and decrease 6 (4-3-0-4-5-9) stitches evenly on round – read DECREASE/INCREASE TIP = 66 (72-77-84-84-91-91) stitches. You can now work an elevation in back of neck so that the yoke is slightly higher at the back. This elevation can be left out; the neck will then be the same front and back – work ELEVATION – read description above or continue working. Work pattern A.1 - NOTE: Choose diagram for your size (= 11 (12-11-12-12-13-13) repeats of 6 (6-7-7-7-7-7) stitches). Continue this pattern and increase as shown in diagram. REMEMBER THE KNITTING TENSION! When A.1 has been completed there are 176 (192-209-228-240-260-260) stitches on the needle. Continue with stocking stitch and red. On the next round increase 7 (7-10-7-3-0-11) stitches evenly on round = 183 (199-219-235-243-260-271) stitches. When the piece measures 13 (14-15-16-17-18-19) cm mid front (measured without neck), divide the piece as follows: Work 25 (27-30-32-34-36-38) stitches, place the next 42 (46-50-54-54-58-60) stitches on 1 thread for sleeve (without working them), cast on 8 stitches on the needle, work 49 (53-59-63-67-72-75) stitches, place the next 42 (46-50-54-54-58-60) stitches on 1 thread for sleeve (without working them), cast on 8 stitches on the needle and work the remaining 25 (27-30-32-34-36-38) stitches as before = 115 (123-135-143-151-160-167) stitches. BODY: Insert 1 marker thread in the middle of the 8 stitches cast on under each of the sleeves (= 57 (61-67-71-75-80-83) stitches between marker threads on the front piece). THE PIECE IS NOW MEASURED FROM HERE! When the piece measures 3 cm from where body and sleeves were divided, increase on each side of both marker threads – read INCREASE TIP. Repeat this increase when the piece measures 6 and 9 cm from where body and sleeves were divided = 127 (135-147-155-163-172-179) stitches. When the piece measures 11 (13-16-19-22-25-28) cm from where body and sleeves were divided, increase 9 (9-9-9-9-8-9) stitches evenly on the next round = 136 (144-156-164-172-180-188) stitches. Change to needles size 3 mm and work rib (= knit 2 / purl 2) for 4 cm. Then cast off with knit over knit and purl over purl. The whole jumper measures approx. 34 (37-41-45-49-53-57) cm, measured from shoulder. SLEEVE: Place the stitches from the one thread on double pointed needles size 4 mm and knit up 1 stitch in each of the 8 stitches cast on under the sleeve = 50 (54-58-62-62-66-68) stitches. Insert 1 marker thread in the middle of these 8 stitches (= mid under sleeve). THE PIECE IS NOW MEASURED FROM HERE! Work stocking stitch in the round with red. When the sleeve measures 1 cm from where body and sleeve were divided, decrease 2 stitches mid under sleeve – read DECREASE TIP. Decrease like this every 1½ (2-2-2½-3-3½-3½) cm a total of 6 (6-8-8-8-8-9) times = 38 (42-42-46-46-50-50) stitches. When the sleeve measures 10 (12-17-20-24-27-31) cm from where body and sleeve were divided, decrease 2 stitches evenly on round = 36 (40-40-44-44-48-48) stitches. Change to double pointed needles size 3 mm and work rib in the round (= knit 2 / purl 2) for 8 cm or to desired length. On the next round increase all purl 2 to purl 3 = 45 (50-50-55-55-60-60) stitches. Then cast off with knit over knit and purl over purl.. The sleeve measures a total of approx. 18 (20-25-28-32-35-39) cm from where body and sleeve were divided. Work the other sleeve in the same way. NOSES: Crochet with red and hook size 3 mm as follows: Work 4 chain stitches and 1 treble crochet in the 4th chain stitch from the hook, cut and fasten the strand. Work 1 nose for each reindeer (= 11 (12-11-12-12-13-13) noses). Tie the noses to each reindeer and fasten the strands. |
|||||||||||||
Diagram explanations |
|||||||||||||
|
|||||||||||||
 |
|||||||||||||
 |
|||||||||||||
 |
|||||||||||||
 |
|||||||||||||
Have you finished this pattern?Tag your pictures with #dropspattern #littlerednosesweater or submit them to the #dropsfan gallery. Do you need help with this pattern?You'll find 30 tutorial videos, a Comments/Questions area and more by visiting the pattern on garnstudio.com. © 1982-2026 DROPS Design A/S. We reserve all rights. This document, including all its sub-sections, has copyrights. Read more about what you can do with our patterns at the bottom of each pattern on our site. |
|||||||||||||


With over 40 years in knitting and crochet design, DROPS Design offers one of the most extensive collections of free patterns on the internet - translated to 17 languages. As of today we count 324 catalogues and 12245 patterns translated into English (UK/cm). 12245
We work hard to bring you the best knitting and crochet have to offer, inspiration and advice as well as great quality yarns at incredible prices! Would you like to use our patterns for other than personal use? You can read what you are allowed to do in the Copyright text at the bottom of all our patterns. Happy crafting!
Post a comment to pattern DROPS Children 32-10
We would love to hear what you have to say about this pattern!
If you want to leave a question, please make sure you select the correct category in the form below, to speed up the answering process. Required fields are marked *.