
Popular categories
Looking for a yarn?


Comments / Questions (19)
![]() PATRICIA SMITH wrote:
PATRICIA SMITH wrote:
In this grouping and on the main screen for children it shows a pullover sweater design. I cannot locate the pattern. Is it available?
04.12.2019 - 17:12DROPS Design answered:
Hi Patricia, The jumper is pattern 32-10. Happy knitting!
05.12.2019 - 07:20
![]() Nancy wrote:
Nancy wrote:
Can we use Drops Baby Merino instead?
05.09.2019 - 22:25DROPS Design answered:
Dear Nancy, BabyMerino is yarn group A while this jacket is worked with Merino Extra Fine, a yarn group B - try our yarn converter to check all possible alternatives. Happy knitting!
06.09.2019 - 08:04
![]() Carolyn wrote:
Carolyn wrote:
Are you able to do this pattern for 3-6months
12.08.2019 - 19:22DROPS Design answered:
Dear Carolyn, unfortunstely, we're unabel to re-write the pattern for each customer, but for any personal assistance you can ask to your favourite DROPS store, even by email. Happy knitting!
12.08.2019 - 20:00
![]() BROUSSARD Chantal wrote:
BROUSSARD Chantal wrote:
Bonjour, sur ce modèle, est-ce que le diagramme s'applique sur l'envers, ou est-ce uniquement sur les rangs à l'endroit ? merci cordialement
21.03.2019 - 08:34DROPS Design answered:
Bonjour Mme Broussard, les diagrammes montrent tous les rangs, c'est-à-dire ceux sur l'endroit aussi bien que ceux sur l'envers - voir ici comment lire un diagramme tricot. Bon tricot!
21.03.2019 - 09:59
![]() Ina Vreeman wrote:
Ina Vreeman wrote:
Ik kom niet uit met het tel patroon 1e naald moet ik van telpatroon meederen en dan de 2e naald kom ik uit.
18.02.2019 - 15:56DROPS Design answered:
Dag Ina,
Afhankelijk van de maat die je breit heeft het patroon een herhaling van 6 a 7 steken. Nadat je de boord hebt gebreid heb je 77 (83-88-95-95-102-102) op de naald. Dit aantal steken is inclusief 2 keer 5 biessteken en inclusief A.2 over de stee vlak voor de bies (zie beschrijving in het patroon.) De patronen zijn over een breedte van 6 of 7 steken (ook afhankelijk van je maat; kies telpatroon voor de maat die je breit. Volgens mijn berekening zou je dan goed uit moeten komen. Misschien nog even goed doorlezen en kijken of je het juiste telpatroon hebt.
22.02.2019 - 14:46
![]() Marina Kleve wrote:
Marina Kleve wrote:
Can you tell me how many increases are made in total in the first row of the pattern 12/18 -2. Thx
23.01.2019 - 20:55DROPS Design answered:
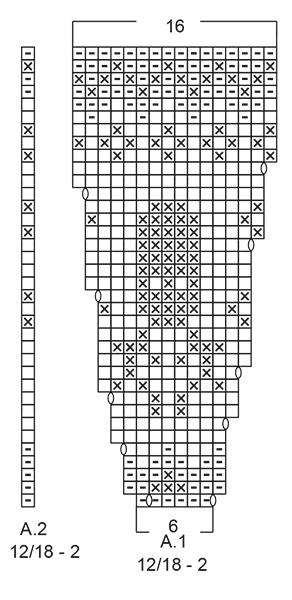
Dear Mrs Kleve, you repeat A.1 a total of 11 times in size 12/18months and 12 times in size 2 years. After first row in A.1 you have increased 2 sts (= 2 Yarn overs) in each A.1, ie 22 sts inc in size 12/18 months and 24 sts inc in size 2 years. Happy knitting!
24.01.2019 - 09:51
![]() Lieselotte Hahn wrote:
Lieselotte Hahn wrote:
1. Beim Probestricken habe ich bemerkt, dass folgendermassen gestrickt werden muesste. :A1- xmal A2 - A1 fuer das Elchmuster. STIMMT das? 2. Zeigt jede Zeile des Strickdiagramms nur die rechten Maschen? Oder 1. ZEILE - rechts, 2. ZEIle links zurueck etc Danke
10.01.2019 - 11:49DROPS Design answered:
Liebe Frau Hahn, das Diagram A.1 wird mehrmals gestrickt (in der Breite wiederholt) und dann stricken Sie A.2 (= 1 Masche) so daß das Muster gleich auf beiden Seiten wird. Die Hinreihen rechts nach links stricken, die Rückreihen werden links nach rechts gestrickt (= mit A.2 anfangen, dann A.1 links nach rechts lesen/wiederholen). Viel Spaß beim stricken!
10.01.2019 - 13:10
![]() Marilisa wrote:
Marilisa wrote:
Sto lavorando a questo bellissimo modello. Al termine dello sprone, quando si devono dividere le maglie, credo ci sia un errore. Anziché “lavorare 29-31-33-35-37-41 “per il primo davanti come indicato, direi di operare come nel secondo davanti “lavorare le 29 (31-34-36-38-40-42) maglie” . Grazie
26.10.2018 - 18:57DROPS Design answered:
Buonasera Marilisa. Abbiamo corretto il testo. La ringraziamo per la segnalazione. Buon lavoro!
26.10.2018 - 19:43
![]() Marilisa wrote:
Marilisa wrote:
Vorrei aggiungere un commento per un errore che ho riscontrato,ma mi compare questa scritta: “Sorry! You are either a spammer or have made too many comments in a short period of time. Please try again later! “ È già la seconda volta e non capisco perché. Come mai?
26.10.2018 - 15:38DROPS Design answered:
Buongiorno Marilisa, provi ad aspettare un attimo e a riprovare tra un pochino. Probabilmente ha scritto troppi commenti ravvicinati.
26.10.2018 - 16:53
|
|||||||||||||
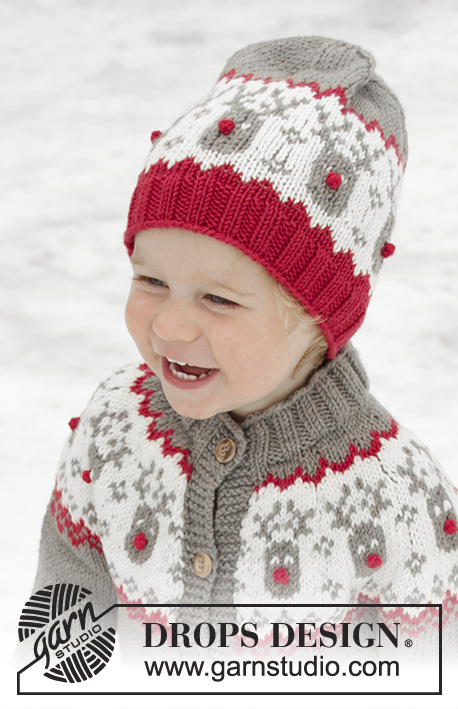
Little Red Nose Jacket#littlerednosejacket |
|||||||||||||
 |
 |
||||||||||||
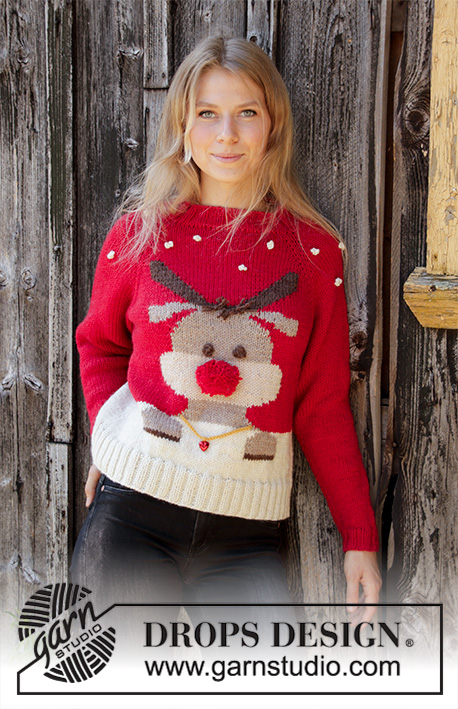
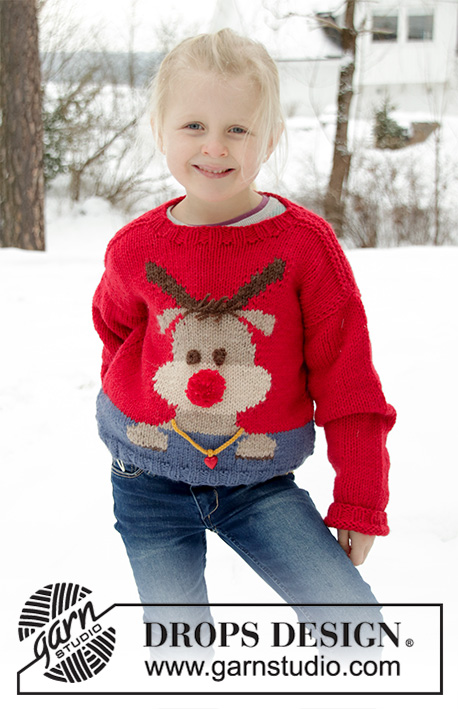
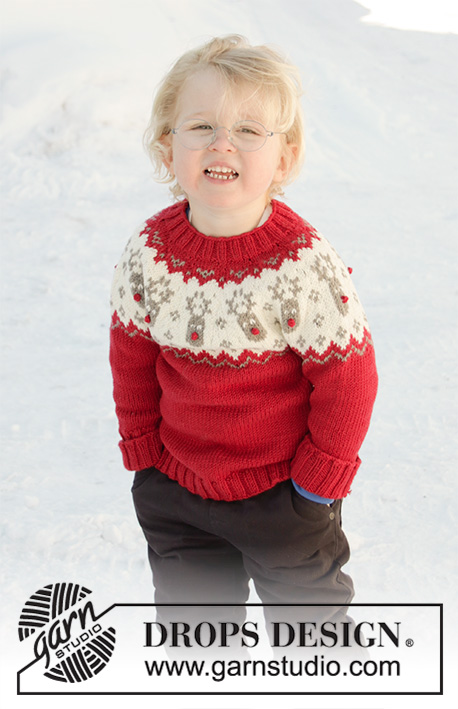
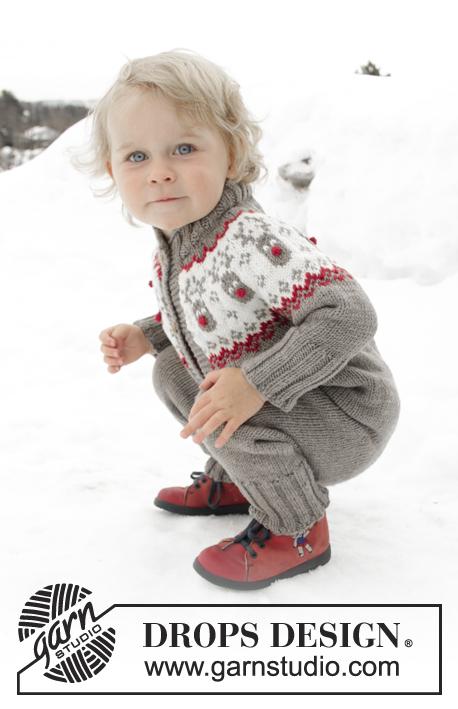
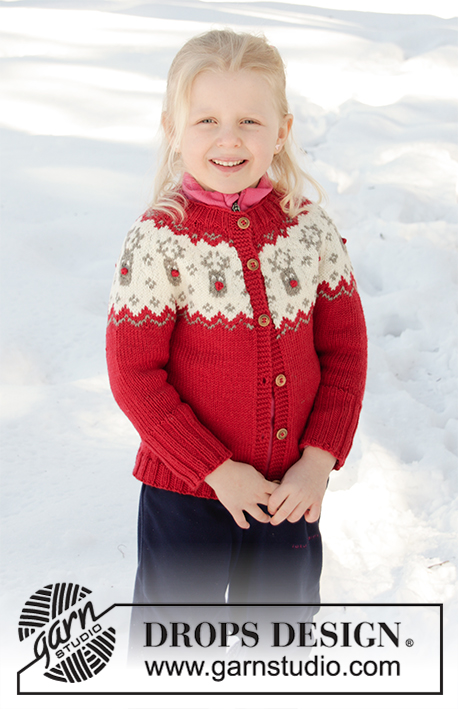
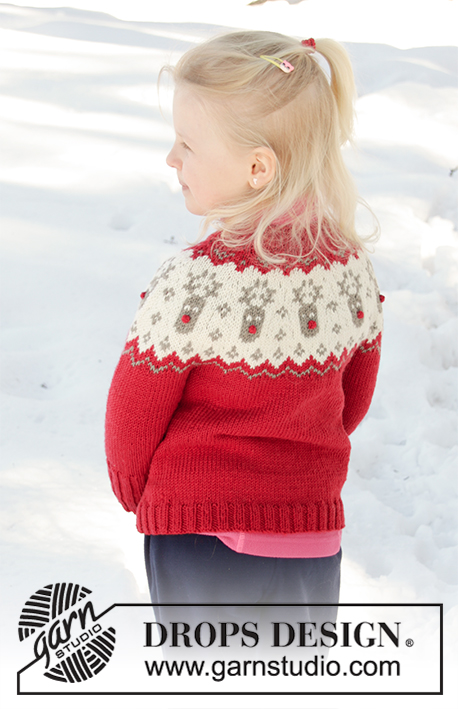
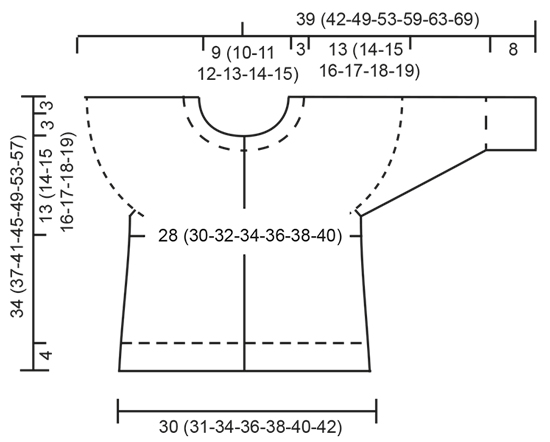
Knitted Christmas jacket for babies and children with round yoke in DROPS Merino Extra Fine. The piece is worked top down, with Nordic pattern. Sizes 12 months – 12 years.
DROPS Children 32-9 |
|||||||||||||
|
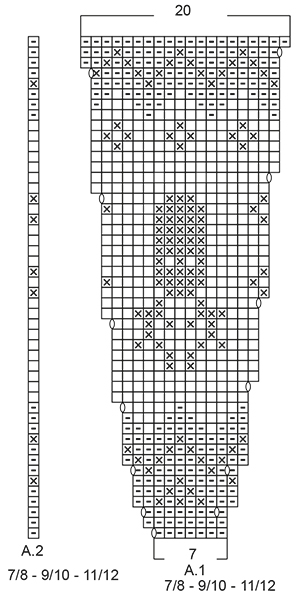
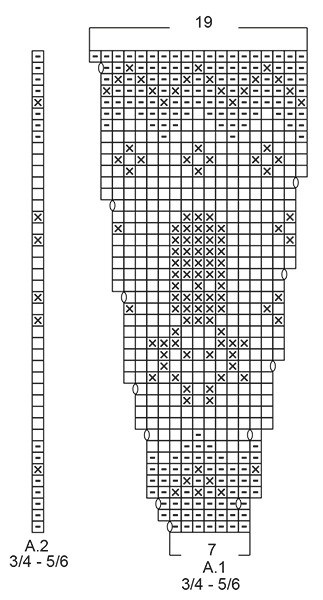
EXPLANATIONS FOR THE PATTERN: ------------------------------------------------------- RIDGE/GARTER STITCH (worked back and forth): 1 ridge = Knit 2 rows. PATTERN: See diagrams A.1 and A.2. Choose diagram for your size. The whole pattern is worked in stocking stitch. KNITTING TIP (for bands): The whole band is worked in red. In other words use 1 ball of red for each band where needed (i.e. on the rows where red is not part of the pattern). Change strand between band and yoke (so you do not get a change of strands outermost on band). When changing strands, twist the strands together so that the stitches stay together. DECREASE/INCREASE TIP: To work out when to decrease/increase on the row, count the total number of stitches on the needle (e.g. 84 stitches), minus the bands (= 74 stitches) and divide by the number of decreases/increases to be made (e.g. 7) = 10.6. In this example, decrease by alternately working together each 9th and 10th stitch and each 10th and 11th stitch (approx.), or increase alternately after each 10th and 11th stitch (approx.) by making 1 yarn over (the yarn overs are worked twisted on the next row to avoid holes – NOTE: Do not decrease/increase over bands). INCREASE TIP (for sides of body): Increase 1 stitch on each side of marker thread as follows: Start 2 stitches before marker thread, make 1 yarn over, work 4 stitches (marker thread sits in the middle of these 4 stitches), make 1 yarn over (= 2 stitches increased). Increase like this at both marker threads (= 4 stitches increased). On the next row work the yarn overs twisted to avoid holes. DECREASE TIP (for mid under sleeve): Decrease 1 stitch on each side of the marker thread as follows: Start 3 stitches before the marker thread, knit 2 together, knit 2 (marker thread sits between these 2 stitches), slip 1 stitch as if to knit, knit 1 and pass the slipped stitch over the knitted stitch (= 2 stitches decreased). ELEVATION (back of neck): Skip this section if you do not want an elevation. First row is worked from the right side Knit until there are 8 (8-8-10-10-12-12) stitches left on row, turn, tighten strand and purl until there are 8 (8-8-10-10-12-12) stitches left on the other side, turn, tighten strand and knit until there are 16 (16-16-18-18-20-20) stitches left, turn, tighten strand and purl until there are 16 (16-16-18-18-20-20) stitches left on other side. Continue by working 8 stitches less each time you turn, 2 more times in each side, turn, tighten strand and knit to end of row, then purl 1 row from the wrong side (bands worked in garter stitch). BUTTONHOLES: Work buttonholes on right band (when the garment is worn). 1 buttonhole = start from the wrong side and knit together stitches 2 and 3 from the edge, make 1 yarn over. On the next row knit the yarn over to leave a hole. The first buttonhole is worked after approx. 1½-2 cm on the neck, then work the next 4 (5-5-5-6-6-7) buttonholes with approx. 6 (6-6½-7-6½-7-7) cm between each one. ------------------------------------------------------- START THE PIECE HERE: ------------------------------------------------------- JACKET - SHORT OVERVIEW OF THE PIECE: The piece is worked top down. The yoke is worked first and then divided for sleeves and body. The body is continued back and forth with circular needle. The sleeves are worked in the round with double pointed needles. NECK: Cast on 84 (88-92-96-100-108-112) stitches (including 5 band stitches in each side towards mid front) with circular needle size 3 mm and red. Purl 1 row from the wrong side with 5 band stitches in GARTER STITCH – read description above, in each side. The next row is worked as follows from the right side: 5 band stitches in garter stitch, * knit 2, purl 2 *, work from *-* until there are 7 stitches left and finish with knit 2 and 5 band stitches in garter stitch. Continue this rib for 3 cm – remember BUTTONHOLE on right band – read description above and finish after a row from the right side. YOKE: Change to circular needle size 4 mm. Purl 1 row from the wrong side with 5 band stitches in garter stitch in each side and decrease 7 (5-4-1-5-6-10) stitches evenly on row – read DECREASE/INCREASE TIP (purl 2 stitches together = 1 stitch decreased) = 77 (83-88-95-95-102-102) stitches. You can now work an elevation in back of neck so that the yoke is slightly higher at the back. This elevation can be left out; the neck will then be the same front and back – work ELEVATION – read description above or continue working. The next row is worked as follows from the right side: 5 band stitches in garter stitch, work pattern according to diagram A.1 until there are 6 stitches left on the row – NOTE: Choose diagram for your size (= 11 (12-11-12-12-13-13) repeats of 6 (6-7-7-7-7-7) stitches), work A.2 over the next stitch and finish with 5 band stitches in garter stitch. Continue this pattern and increase as shown in the diagram – read KNITTING TIP and REMEMBER THE KNITTING TENSION! When A.1 and A.2 have been completed there are 187 (203-220-239-251-271-271) stitches on the needle. Continue with stocking stitch, red and 5 band stitches in garter stitch in each side. On the next row from the right side increase 7 (7-10-7-3-0-11) stitches evenly on row (do not increase over bands) = 194 (210-230-246-254-271-282) stitches. When the piece measures 13 (14-15-16-17-18-19) cm mid front (measured without the neck), divide the piece as follows: Work 29 (31-34-36-38-40-42) stitches as before (= front piece), place the next 42 (46-50-54-54-58-60) stitches on 1 thread for sleeve (without working them), cast on 6 new stitches, work 52 (56-62-66-70-75-78) stitches (= back piece), place the next 42 (46-50-54-54-58-60) stitches on 1 thread for sleeve (without working them), cast on 6 new stitches and work the remaining 29 (31-34-36-38-40-42) stitches as before (= front piece) = 122 (130-142-150-158-167-174) stitches. BODY: Insert 1 marker thread 32 (34-37-39-41-43-45) stitches in from each side (= 58 (62-68-72-76-81-84) stitches between marker threads on the back piece). THE PIECE IS NOW MEASURED FROM HERE! Continue back and forth with stocking stitch and 5 band stitches in each side towards mid front - remember BUTTONHOLES on right band. When the piece measures 3 cm from where body and sleeves were divided, increase on each side of both marker threads – read INCREASE TIP. Repeat this increase when the piece measures 8 cm from where body and sleeves were divided = 130 (138-150-158-166-175-182) stitches. When the piece measures 11 (13-16-19-22-25-28) cm from where body and sleeves were divided, increase 14 (14-14-14-14-13-14) stitches evenly on the next row from the right side (do not increase over bands) = 144 (152-164-172-180-188-196) stitches. Switch to circular needle size 3 mm. The next row is worked as follows from the right side: 5 band stitches in garter stitch, * knit 2 / purl 2* work from *-* until there are 7 stitches left on the row, knit 2 and finish with 5 band stitches in garter stitch. Continue this rib for 4 cm. Then cast off with garter stitch over garter stitch, knit over knit and purl over purl. The whole jacket measures approx. 34 (37-41-45-49-53-57) cm, measured from shoulder. SLEEVE: Place the stitches from the one thread on double pointed needles size 4 mm and knit up 1 stitch in each of the 6 stitches cast on under the sleeve = 48 (52-56-60-60-64-66) stitches. Insert 1 marker thread in the middle of these 6 stitches (= mid under sleeve). THE PIECE IS NOW MEASURED FROM HERE! Work stocking stitch in the round with red. When the sleeve measures 1 cm from where body and sleeve were divided, decrease 2 stitches mid under sleeve – read DECREASE TIP. Decrease like this every 1½ (2-2-2½-3-3½-3½) cm a total of 6 (6-8-8-8-8-9) times = 36 (40-40-44-44-48-48) stitches. When the sleeve measures 10 (12-17-20-24-27-31) cm from where body and sleeve were divided, change to double pointed needles size 3 mm and work rib in the round (= knit 2 / purl 2) for 8 cm or to desired length. On the next round increase all purl 2 to purl 3 = 45 (50-50-55-55-60-60) stitches. Then cast off with knit over knit and purl over purl.. The sleeve measures a total of approx. 18 (20-25-28-32-35-39) cm from where body and sleeve were divided. Work the other sleeve in the same way. NOSES: Crochet with red and hook size 3 mm as follows: Work 4 chain stitches and 1 treble crochet in the 4th chain stitch from the hook, cut and fasten the strand. Work 1 nose for each reindeer (= 11 (12-11-12-12-13-13) noses). Tie the noses to each reindeer and fasten the strands. ASSEMBLY: Sew buttons onto left band. |
|||||||||||||
Diagram explanations |
|||||||||||||
|
|||||||||||||
 |
|||||||||||||
 |
|||||||||||||
 |
|||||||||||||
 |
|||||||||||||
Have you finished this pattern?Tag your pictures with #dropspattern #littlerednosejacket or submit them to the #dropsfan gallery. Do you need help with this pattern?You'll find 34 tutorial videos, a Comments/Questions area and more by visiting the pattern on garnstudio.com. © 1982-2026 DROPS Design A/S. We reserve all rights. This document, including all its sub-sections, has copyrights. Read more about what you can do with our patterns at the bottom of each pattern on our site. |
|||||||||||||


With over 40 years in knitting and crochet design, DROPS Design offers one of the most extensive collections of free patterns on the internet - translated to 17 languages. As of today we count 324 catalogues and 12245 patterns translated into English (UK/cm). 12245
We work hard to bring you the best knitting and crochet have to offer, inspiration and advice as well as great quality yarns at incredible prices! Would you like to use our patterns for other than personal use? You can read what you are allowed to do in the Copyright text at the bottom of all our patterns. Happy crafting!
Post a comment to pattern DROPS Children 32-9
We would love to hear what you have to say about this pattern!
If you want to leave a question, please make sure you select the correct category in the form below, to speed up the answering process. Required fields are marked *.