
Popular categories
Looking for a yarn?


Comments / Questions (58)
![]() Gro Hustad wrote:
Gro Hustad wrote:
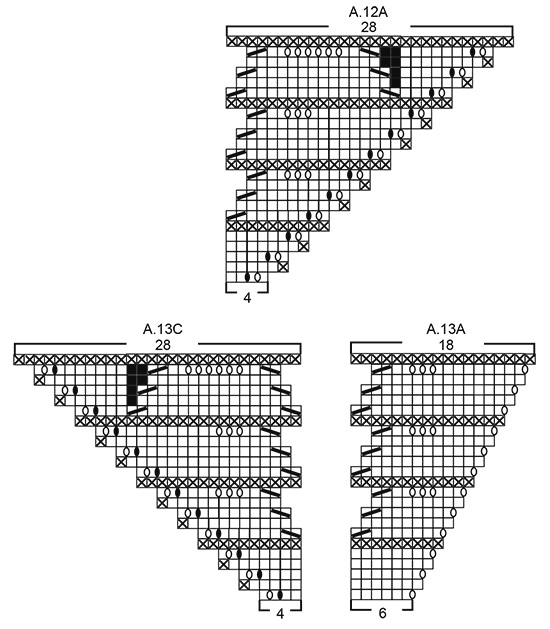
Hei. Strikker nordic romance sjal. Er det slik at rettomgangene i mønster A. 13A skal starte m. 2 kast, og ikke en rett, dobbeltkast, en rett, enkeltkast som tidligere omg og slutten av omg.?
01.12.2020 - 21:54DROPS Design answered:
Hei Gro. A.13a strikkes nesten i midten av oppskriften og starter med et dobbeltkast. Slik er forklaringen til ikonet (stående oval sirkel): Mellom 2 masker lages det 2 kast om pinnen, på neste pinne strikkes det første kastet rett eller vrang slik diagrammet viser og det siste kastet slippes ned. mvh DROPS design
09.12.2020 - 13:07
![]() RoseMarie wrote:
RoseMarie wrote:
Kanten där jag byter färgerna blir väldigt ful, kan någon ge mig tips om hur jag bäst räddar/döljer detta.
23.09.2020 - 22:56DROPS Design answered:
Hej RoseMarie, se her hvordan du strikker kanterne i mønster: stickat - ränder - diagram
24.09.2020 - 15:50
![]() Mariann wrote:
Mariann wrote:
Stemmer det at det på retten hele veien økes tilsammen 6 masker? To på midten og to i hver ende? Jeg ender opp m altfor mange masker på denne måten
26.08.2020 - 15:17DROPS Design answered:
Hei Mariann. Usikker på hvorfor du får for mange masker, men ja, det skal økes 6 masker på hver rad fra retten. Om du ser på diagram A.1 og A.2 starter du med 9 masker (A.1/4 masker + 3 kast + 1 midtmasken + A.2/4 masker + 3 kast = 15 masker), økt med 6 masker. Teller du 3. rad i diagrammene har du 7 masker + 3 kast + 1 midtmaske + 7 masker + 3 kast = 21 masker. I 5. rad er det 10 masker + 3 kast + 1 midtmaske + 10 masker + 3 kast = 27 masker osv. God Fornøyelse!
31.08.2020 - 14:14
![]() Nina Almeland wrote:
Nina Almeland wrote:
I oppskrift 195-5 så er det veldig dårlig forklart og uoversiktlige diagrammer. I A3, 4 og 5 omg 6 skal en strikke de mørke grå, og løfte av de i oker. Fra rettsiden skal det økes og ikke fra vrangen. På denne omgangen fra retten starter det med oker, hva skal en da strikke de økningene med? Løfte de av, eller strikkes med mørk grå? Dette burde vært forklart bedre under A. X. Sitter og har mest lyst å gi opp hele sjalet, men har lovet min mor dette.....
12.06.2020 - 11:36DROPS Design answered:
Hei Nina. Har du sett videoen om mosaikkmønster? Husk at når du strikker mosaikkmønster etter diagram viser en rad i diagrammet 2 pinner. Slik at du skal strikker 2 pinner av 4. pinne i A.3 - fra retten med grå og økninger, fra vrangen strikker du fremdeles med grått og økningen strikkes. På.5. pinne strikkes det med oker og økninger fra retten og fra vrangen fremdeles med øker og økningen strikkes. Økningene / kastene strikkes vridd rett slik at det ikke blir hull. God Fornøyelse!
22.06.2020 - 08:36
![]() Erik Andersen wrote:
Erik Andersen wrote:
Mønster A.X ,3. pind skal der løftes 3 grå masker løst af men der er kun en grå fra sidste pind. Hvad gør jeg?
01.04.2020 - 18:48DROPS Design answered:
Hej Erik, har du set videoen med mosaikmønster Hvordan strikkes et mosaikmønster
16.04.2020 - 16:09
![]() Bodil Nordjore wrote:
Bodil Nordjore wrote:
Rapport A7 - A8
19.03.2020 - 13:52
![]() Bodil Nordjore wrote:
Bodil Nordjore wrote:
I sjal som heiter nordic, er det vrongt å forstå samanhengen i framdrifta med so mykje bokstavar og mønsterrapportar - litt klønete forklara. so undrar eg på korleis de meiner eg skal strikke mønsterrapp, med laus tråd framfor og likeeins rette og vrange. er det slik at tråden lyt fylgje laus på vronga med den seiste borden? veldig små og uoversiktelege mønster.mønster
16.03.2020 - 14:06DROPS Design answered:
Hej Bodil. Hvilken mønster rapport er det du ikke forstår, så skal vi prøve at forklare. God fornøjelse!
19.03.2020 - 13:48
![]() Jacqueline wrote:
Jacqueline wrote:
Bonsoir, lorsque j’ai terminé les 43 côtes de mousse, j’ai un total de 271 mailles et non de 261 mailles..... Je l’ai refait et je suis encore arrivée au même nombre de mailles..... Merci de votre aide. Jacqueline
13.01.2020 - 20:04DROPS Design answered:
Bonjour Jacqueline, avant de commencer les diagrammes vous avez 9 mailles, vous augmentez ensuite 42 fois (= 42 côtes mousse) 6 mailles soit 252 mailles au total + les 9 mailles du début = 261 mailles. Bon tricot!
14.01.2020 - 07:47
![]() Hava Gülmez wrote:
Hava Gülmez wrote:
Hallo, ich wollte mal fragen wie man die Zunahmen im Mosaikmuster strickt?Mit welcher Farbe in der jeweiligen Reihe.Am Rand passt es bei mir mit dem Mosaikmuster nicht.Wenn ich z.B. mit Natur anfange,und alle Naturfarben rechts stricken muss und die grauen abhebe,mit welcher Farbe nehme ich zu bzw.stricke ich dann in der Rückreihe.Ich hoffe ich konnte meine Frage verdeutlichen.
18.12.2019 - 22:09DROPS Design answered:
Liebe Frau Gülmez, die Zunahmen stricken Sie mit der Farben von der Randmaschen (= A.3, A.6, A.9), bei Hinreihen sowie Rückreihen stricken Sie nur die Quadraten mit der Farben von 1. Masche - siehe MOSAIKMUSTER. Haben Sie dieses Video geschaut? Das gestrickte Diagram ist für ein anderes Modell aber Technik ist dieselbe. Viel Spaß beim stricken!
19.12.2019 - 07:55
![]() Patricia THIOT wrote:
Patricia THIOT wrote:
Bonjour et merci pour votre réponse rapide mais cependant je rencontre encore un point d'interrogation... Si la 1ere maille est grise j'ai bien compris que les mailles jaunes seront glissées mais comment je dois faire lorsqu'il y a des jetées dans les jaunes sur ce même rang pareil sur le milieu et à la fin du rang ? Puisque je dois normalement ne prendre que le fils gris pour tricoter les mailles grises...
18.10.2019 - 07:56DROPS Design answered:
Bonjour Mme Thiot, chacun des rangs du diagramme correspond à 2 rangs tricotés (= 1 côte mousse), sur l'endroit vous tricotez les mailles + les jetés avec la couleur de A.3, sur l'envers, vous tricotez les mailles + les jetés avec la même couleur (le rang sur l'envers se fait de la même façon, en glissant les mêmes mailles que sur l'endroit). Avez-vous regardé la vidéo proposée dans la réponse précédente? N'hésitez pas à vous entraîner sur un échantillon avant de commencer le diagramme sur le châle. Bon tricot!
18.10.2019 - 09:10
|
|||||||||||||||||||||||||||||||||||||
Nordic Romance#nordicromanceshawl |
|||||||||||||||||||||||||||||||||||||
 |
 |
||||||||||||||||||||||||||||||||||||
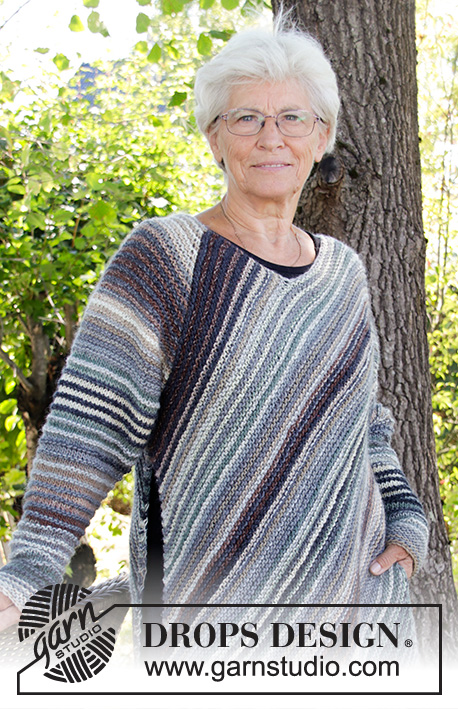
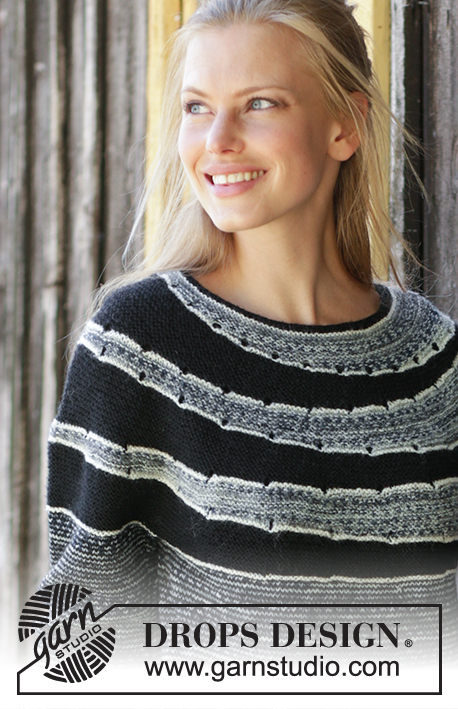
Knitted shawl in DROPS Nord. The piece is worked top down with garter stitch, mosaic pattern and wave pattern.
DROPS 195-5 |
|||||||||||||||||||||||||||||||||||||
|
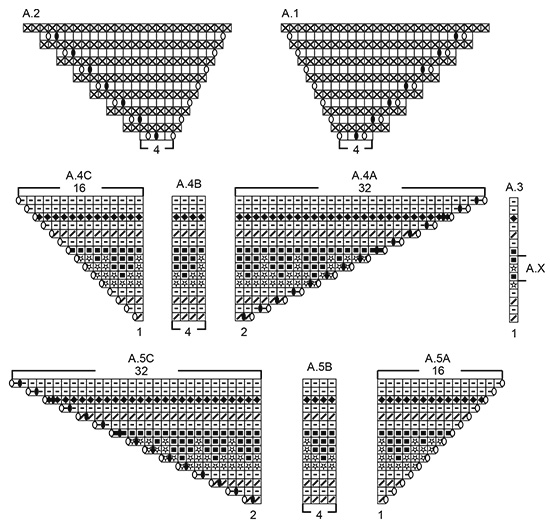
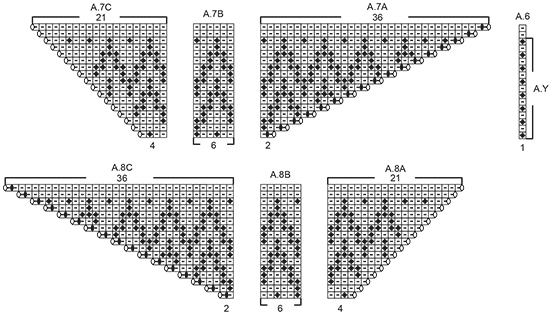
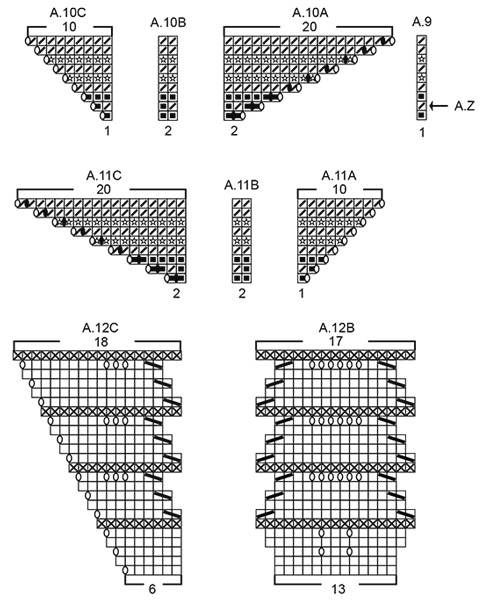
EXPLANATIONS FOR THE PATTERN: ------------------------------------------------------- RIDGE/GARTER STITCH (worked back and forth): 1 ridge = Knit 2 rows. INCREASE IN ONE-COLOURED GARTER STITCH SECTION: See diagrams A.1 and A.2. Each row in the diagrams is equivalent to one row worked. The diagrams show all the rows in the pattern seen from the right side. INCREASE TIP (evenly spaced): To work out how to increase evenly, count the total number of stitches on the needle (e.g. 261 stitches), minus the mid-stitch (= 1 stitch) and divide the remaining stitches by 2 = 130 stitches on each side of the mid-stitch. Then divide 130 stitches by the number of increases to be made before/after the mid-stitch (e.g. 3) = 43.3. In this example, increase by making 1 yarn over after approx. each 43rd stitch before the mid-stitch. Increase in the same way after the mid-stitch. On the next row knit the yarn overs twisted to avoid holes. CASTING-OFF TIP: So that the cast-off edge is not tight you can make 1 yarn over AT THE SAME TIME as casting off. Make 1 yarn over above all the yarn overs from the previous row, the yarn overs are then cast off as normal stitches. Make sure that you do not tighten the strand while casting off. If the cast-off edge is still tight, you can cast off with a size larger needle. MOSAIC PATTERN: See diagrams A.3 to A.11 and read description of the technique below. Each row in these diagrams is equivalent to 2 rows worked. I.e. from the right side the diagram is worked from right to left with increases as shown in the diagrams and from the wrong side you work the same row from left to right, but without the increases (i.e. increases are only done from the right side). On all rows from the right side, keep the strand at the back of the piece (i.e. on the wrong side) when a stitch is slipped. On all rows from the wrong side, keep the strand in front of the piece (i.e. towards you and still on the wrong side) when a stitch is slipped. Make sure the strands are not tight at the back of the piece! To keep track of the pattern, you can insert a marker between each pattern-repeat on A.4B/A.5B. A.3, A.6 and A.9 = start-stitch and end-stitch. This stitch is worked in the colour shown by the symbol, AT THE SAME TIME the symbol tells you how the pattern row is worked in A.X, A.Y and A.Z. A.X, A.Y and A.Z are sections which show the rows the mosaic pattern is worked on. On the other rows in A.4/A.5, A.7/A.8 and A.10/A.11 (i.e. the one-coloured rows) you work 1 ridge back and forth over all stitches without slipping stitches (mid-stitch always worked in stocking stitch). SECTION A.X: On each row of the pattern in A.3 which has a square with a small, black square inside (i.e. colour A), all stitches with colour A in A.4 and A.5 are knitted and all stitches with colour B are slipped. On each row of pattern in A.3 which has a square with an empty star inside (colour B), all stitches with colour B in A.4 and A.5 are knitted and all stitches with colour A are slipped. SECTION A.Y: On each row of pattern in A.6 which has a square with a small, black diamond inside (i.e. colour C), all stitches with colour C in A.7 and A.8 are knitted and all stitches with colour D are slipped. On each row of pattern in A.6 which has a square with a small, horizontal line inside (colour D), all stitches with colour D in A.7 and A.8 are knitted and all stitches with colour C are slipped. SECTION A.Z: On this row of pattern in A.9 which starts with a square with a diagonal line inside (i.e. colour E), all stitches with colour E in A.10 and A.11 are knitted and all stitches with colour A are slipped. WAVE PATTERN: See diagrams A.12 and A.13. Each row is equivalent to 1 row worked. The diagrams show all the rows in the pattern seen from the right side. ------------------------------------------------------- START THE PIECE HERE: ------------------------------------------------------- SHAWL - SHORT OVERVIEW OF THE PIECE: The piece is worked back and forth with circular needle (so that you have room for all stitches) and worked top down. Always increase 1 stitch on each side of the mid-stitch and 2 stitches in each side of each row from the right side as described in the text (= 6 stitches increased on each increase row). At the beginning of the shawl a section is worked in one-colour garter stitch. Then you work mosaic pattern. To finish an edge is worked in wave pattern. It is important to follow the diagrams carefully. The mosaic pattern itself is worked in garter stitch, but the pattern is not worked in normal garter stitch - it is made by by slipping stitches. Read description for Mosaic pattern before working it. Be aware that each row in the diagrams for the mosaic pattern (A.3 to A.11) is equivalent to 1 ridge (i.e. 2 rows). In the other diagrams (A.1, A.2, A.12 and A.13) 1 row in the diagram = 1 row worked. SHAWL: Cast on 5 stitches with circular needle size 3.5 mm and grey. The first 2 rows are worked as follows: ROW 1 (= right side): Work 1 edge stitch in GARTER STITCH – read description above, 1 yarn over, 1 stitch in stocking stitch, 1 yarn over, 1 stitch in stocking stitch, 1 yarn over, 1 stitch in stocking stitch, 1 yarn over and 1 edge stitch in garter stitch. ROW 2 (= wrong side): 2 edge stitches in garter stitch, purl until there are 2 stitches left on the row and finish with 2 edge stitches in garter stitch = 9 stitches on needle. Then work A.1 and A.2 as follows: Work A.1 over the first 4 stitches, work 1 stitch in stocking stitch (= mid-stitch – this stitch is worked in stocking stitch to finished length, irrespective of how the other stitches are worked), work A.2 over the last 4 stitches. REMEMBER THE KNITTING TENSION! Continue working and increasing as shown in A.1 and A.2 until you have worked a total of 43 ridges after the cast-on edge = 261 stitches on the needle. Work 1 more ridge with grey and increases in each side and in the middle as before, in addition increase 6 stitches evenly on row, i.e. increase 3 stitches before and 3 stitches after the mid-stitch - read INCREASE TIP. You have now worked a total of 44 ridges and there are 273 stitches on the needle. The piece measures approx. 19 cm from the middle out – measured in the knitting direction. Continue with MOSAIC PATTERN – read description above, i.e. the first row is from the right side as follows: Work A.3 (= 1 stitch), A.4A over 2 stitches, A.4B over the next 132 stitches (= 33 repeats of 4 stitches), work A.4C over 1 stitch, 1 stitch in stocking stitch (= mid-stitch – this stitch is worked in the background colour of the pattern stripe), work A.5A over 1 stitch, A.5B over the next 132 stitches (= 33 repeats of 4 stitches), work A.5C over 2 stitches and finish with A.3 (= 1 stitch). Continue this pattern, but remember that 1 row in each of these diagrams is equivalent to 1 ridge (2 rows). Make sure the strands at the back are not tight. When A.3, A.4 and A.5 have been completed in height there are 363 stitches on the needle. The next row is worked as follows from the right side: Work A.6 (= 1 stitch), A.7A over 2 stitches, A.7B over the next 174 stitches (= 29 repeats of 6 stitches), work A.7C over 4 stitches, 1 stitch in stocking stitch (= mid-stitch – this stitch is worked in the background colour of the pattern stripe), work A.8A over 4 stitches, A.8B over the next 174 stitches (= 29 repeats of 6 stitches), work A.8C over 2 stitches and finish with A.6 (= 1 stitch). When A.6, A.7 and A.8 have been completed in height there are 465 stitches on the needle. The next row is worked as follows from the right side: Work A.9 (= 1 stitch), A.10A over 2 stitches, A.10B over the next 228 stitches (= 114 repeats of 2 stitches), work A.10C over 1 stitch, 1 stitch in stocking stitch (= mid-stitch – this stitch is worked in the background colour of the pattern stripe), work A.11A over 1 stitch, A.11B over the next 228 stitches (= 114 repeats of 2 stitches), work A.11C over 2 stitches and finish with A.9 (= 1 stitch). When A.9, A.10 and A.11 have been completed in height there are 519 stitches on the needle. Continue with pearl grey and knit 2 rows where you increase 16 stitches evenly on the first row, i.e. the increases in sides and middle continue as before, in addition increase 8 stitches evenly both before and after the mid-stitch = 541 stitches on needle. Change to off white and work WAVE PATTERN – read description above, i.e. the first row is worked as follows from the right side: Work A.12A over 4 stitches, A.12B over the next 260 stitches (= 20 repeats of 13 stitches), work A.12C over 6 stitches, 1 stitch in stocking stitch (= mid-stitch), work A.13A over 6 stitches, A.12B over the next 260 stitches (= 20 repeats of 13 stitches) and finish with A.13C over the last 4 stitches. When the wave pattern is finished there are 773 stitches on the needle. Work 2 ridges back and forth over all stitches with increases in the sides and on each side of the mid-stitch as before = 785 stitches on the needle. Read CASTING-OFF TIP and cast off with knit from the right side. Cut and fasten the strands. SHAPING: Dampen the piece and carefully lay out in the right shape. Allow to dry. Repeat the process each time the shawl is washed. |
|||||||||||||||||||||||||||||||||||||
Diagram explanations |
|||||||||||||||||||||||||||||||||||||
|
|||||||||||||||||||||||||||||||||||||
 |
|||||||||||||||||||||||||||||||||||||
 |
|||||||||||||||||||||||||||||||||||||
 |
|||||||||||||||||||||||||||||||||||||
 |
|||||||||||||||||||||||||||||||||||||
Have you finished this pattern?Tag your pictures with #dropspattern #nordicromanceshawl or submit them to the #dropsfan gallery. Do you need help with this pattern?You'll find 18 tutorial videos, a Comments/Questions area and more by visiting the pattern on garnstudio.com. © 1982-2026 DROPS Design A/S. We reserve all rights. This document, including all its sub-sections, has copyrights. Read more about what you can do with our patterns at the bottom of each pattern on our site. |
|||||||||||||||||||||||||||||||||||||


With over 40 years in knitting and crochet design, DROPS Design offers one of the most extensive collections of free patterns on the internet - translated to 17 languages. As of today we count 325 catalogues and 12298 patterns translated into English (UK/cm). 12298
We work hard to bring you the best knitting and crochet have to offer, inspiration and advice as well as great quality yarns at incredible prices! Would you like to use our patterns for other than personal use? You can read what you are allowed to do in the Copyright text at the bottom of all our patterns. Happy crafting!
Post a comment to pattern DROPS 195-5
We would love to hear what you have to say about this pattern!
If you want to leave a question, please make sure you select the correct category in the form below, to speed up the answering process. Required fields are marked *.