
Popular categories
Looking for a yarn?


Comments / Questions (15)
![]() Janet Flinn wrote:
Janet Flinn wrote:
I'm struggling to understand the sizing - the numbers on the size diagram don't change between cm and inches - which are they?
19.09.2025 - 13:24DROPS Design answered:
Dear Janet, the size charts indicate the final measurements of the garment in cm always. You can use this converter to calculate the measurements in inches, if needed. Happy knitting!
22.09.2025 - 00:46
![]() Anna wrote:
Anna wrote:
Buongiorno mi trovo in difficoltà per gli aumenti della scollatura. Non capisco come fare gli aumenti per undici volte. Mi potreste aiutare? Grazie mille. Anna
07.05.2025 - 20:58DROPS Design answered:
Buonasera Anna, deve seguire le indicazioni riportate: quale parte le crea difficoltà? Buon lavoro!
27.05.2025 - 21:37
![]() Vicky Wills wrote:
Vicky Wills wrote:
Hi, Is it possible to knit the sleeves using circular needles instead of DPN's? I'm still learning and don't know how to use DPN's but okay on circular Do you then follow A1 from the start of the chart for the sleeves?
26.08.2021 - 13:49DROPS Design answered:
Dear Mrs Wills, sure you can, you will then divide the sts on sleeve from mid under sleeve in 2 parts and knit with the magic loop technique, beg of rounds are mid under sleeve, and follow A.1 starting from the mid under sleeve, as for dpn. Happy knitting!
26.08.2021 - 16:25
![]() Tiina wrote:
Tiina wrote:
How do the sizes go?? What are measures in centimeters for example in XL, XXL ?
14.09.2020 - 14:08DROPS Design answered:
Dear Tiina, you will find measurements for each size in the measurement chart - read more about the shematic drawing here. Happy knitting!
14.09.2020 - 15:48
![]() Isabelle Vavasour wrote:
Isabelle Vavasour wrote:
I have just picked up the stitches to knit the sleeve, having finished the body of the jumper. I have 74 stitches as instructed in the pattern BUT the pattern requires a repeat of 4... and 74 is not a multiple of 4... what should i do?
17.01.2020 - 18:41DROPS Design answered:
Dear Isabelle, for those stitches you cannot fit into the patter, knit with the color of the stripe's base(background color). Happy Knitting!
19.01.2020 - 00:53
![]() Birgitte wrote:
Birgitte wrote:
Hej Jeg skal til at strikke Drops 183-25 i str. M Jeg kan dog ikke få maskeantal til at gå op ved udtagninger i halskant. Der står flg. i opskriften Strik 14 m., tag 2 masker ud 11 gang. Strik 28 masker, tag4 masker ud 11 gange, strik 14 masker, tag 2 masker ud. Der står i opskriften at maskeantal nu er 108, jeg får maskeantal til 124. Hvad gør jeg forkert? Mvh Birgitte Juul
07.10.2019 - 09:57DROPS Design answered:
Hei Birgitte. Du har 78 masker og strikkes slik: Strikk 14 masker, øk 2 masker jevnt fordelt, deretter strikkes det slik 11 ganger: *1 kast, 1 rett* (= 22 masker), strikk 28 masker, øk 4 masker, deretter strikkes det slik 11 ganger igjen: *1 kast, 1 rett (= 22 masker), strikk 14 masker, øk 2 masker (= 14+2+22+28+4+22+14+2) = 108 masker. God Fornøyelse!
07.10.2019 - 14:01
![]() Laurence wrote:
Laurence wrote:
Bonjour, je ne comprends les explications pour les augmentations à faire après les 2 cotes mousse ? pouvez vous me donner des explications plus simples pour la taille M ? merci beaucoup
02.05.2019 - 21:48DROPS Design answered:
Bonjour Laurence, cette leçon vous explique comment augmenter à intervalles réguliers. Bon tricot!
03.05.2019 - 08:58
![]() Susan wrote:
Susan wrote:
Die Nackenerhöhung ist unvollständig - wenn man es sich aufzeichnet, wie es beschrieben ist, hat man am Ende auf der einen Seite der Mitte 6 verkürzte Reihen und auf der anderen Seite der Mitte nur 4 verkürzte Reihen, so dass am Ende nochmal bis über die Mitte hinaus zum anderen Wendepunkt (66-66... Maschen) gestrickt werden muss, damit man am Ende auf beiden Seiten gleich viele verkürzte Reihen hat.
25.04.2019 - 08:19DROPS Design answered:
Liebe Susan, Sie sind ja recht, eine Korrektur erflogt gleich. Viel Spaß beim stricken!
29.04.2019 - 13:57
![]() Eva Cisneros wrote:
Eva Cisneros wrote:
Estoy haciendo el jersey en la talla S. En la parte de poner los marcadores no me cuadran los puntos. Tengo 96 puntos. Si tengo que hacer 5 puntos y marcar 7 veces cada 11 puntos y me quedan 6. Suman 88 puntos. Me sobran 8 puntos.
09.03.2019 - 00:58DROPS Design answered:
Hola Eva. Los 8 puntos no sobran - son los puntos con los marcapuntos
10.03.2019 - 20:33
![]() Selva AKINCI wrote:
Selva AKINCI wrote:
My question is about inserting 8 markets before the yoke. The pattern tells me to knit 8 stitches (for size XL) insert a marker and knit 13 stitches and insert a marker and repeat this 6 more times, after which I am supposed to knit 9 more stitches. But this falls short of the total of 116 stiches for 116 stitches of size XL by 8 stiches. Are those extra 8 stiches in the back? (8+(13×7)+9=108. 116-108=8.
20.07.2018 - 18:55DROPS Design answered:
Dear Mrs Akinci, the 8 missing sts looks to be the sts with markers, ie you insert here markers in the next st and not between sts, so that your number of stitches will then match. Happy knitting!
23.07.2018 - 09:00
|
|||||||||||||||||||||||||||||||
Rainbow Hugs#rainbowhugssweater |
|||||||||||||||||||||||||||||||
 |
 |
||||||||||||||||||||||||||||||
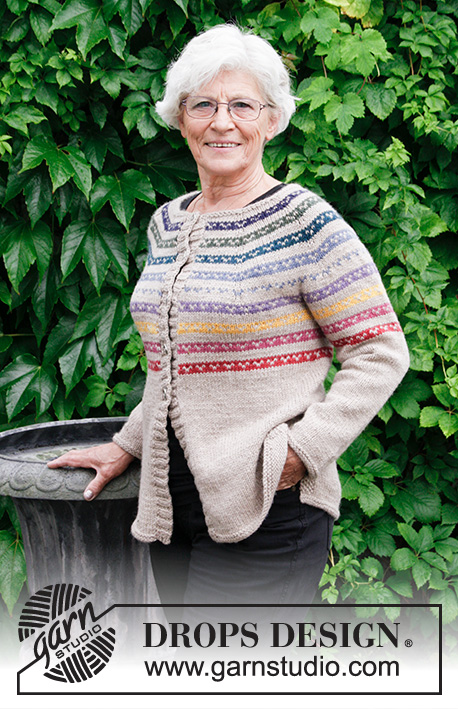
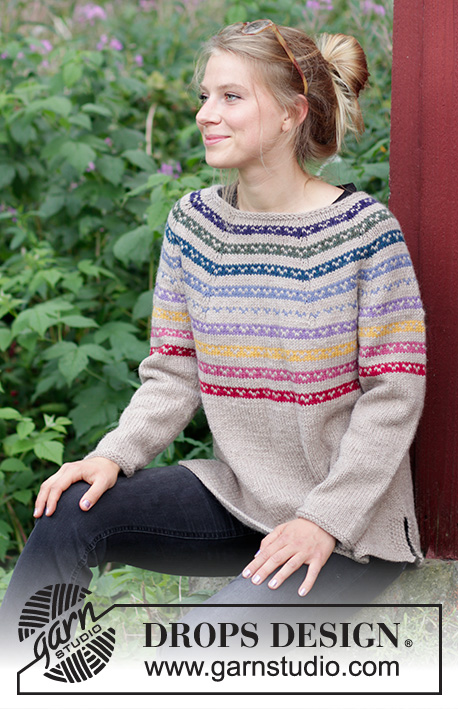
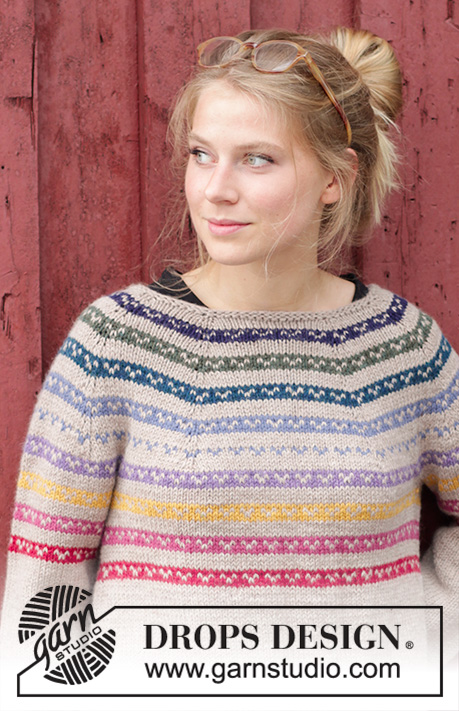
Knitted jumper with Nordic Fana pattern, round yoke, stripes, worked top down with split in sides. Sizes S - XXXL. The piece is worked in DROPS Nepal.
DROPS 183-25 |
|||||||||||||||||||||||||||||||
|
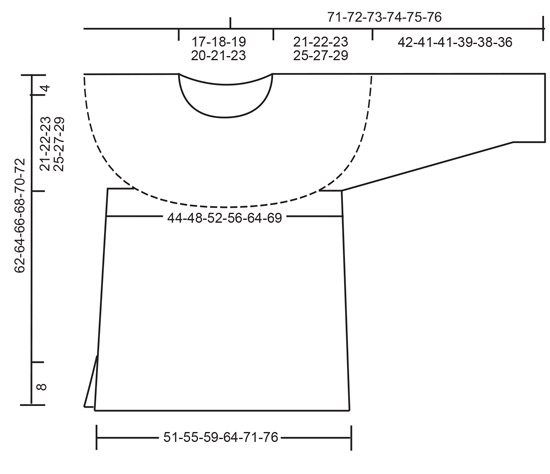
INFORMATION FOR THE PATTERN: RIDGE/GARTER STITCH (worked back and forth - for the front and back pieces): 1 ridge = Knit 2 rows. RIDGE/GARTER STITCH (worked in the round – for yoke and sleeves): 1 ridge = 2 rounds. Knit 1 round and purl 1 round. MOSS STITCH: ROW 1: * Knit 1, purl 1 *, work from *-*. ROW 2: Knit over purl and purl over knit. Repeat row 2. PATTERN: See diagram A.1. The whole pattern is worked in stocking stitch. ROUND YOKE: Increase on yoke on each side of the stitches with markers (= 16 increased stitches per row – see arrows in A.1) as follows: Make 1 yarn over on each side of stitch with marker. On next row purl yarn overs twisted to avoid holes. INCREASE TIP (for body): Work until there are 2 stitches left before marker thread, make 1 yarn over (= 1 stitch increased), knit 4 stitches (marker thread sits in middle of these 4 stitches), make 1 yarn over (= 1 stitch increased). Increase in this way at both marker threads (= a total of 4 stitches increased). Knit the yarn overs twisted on next row to avoid holes. DECREASE TIP (for sleeves): Decrease 1 stitch on each side of marker thread as follows: Work until there are 3 stitches left before marker thread, slip 1 stitch as if to knit, knit 1, pass slipped stitch over, knit 2 (marker thread sits in middle of these 2 stitches), knit the next 2 stitches together. The stitches which do not fit into the pattern are worked in background colour. ---------------------------------------------------------- JUMPER: The piece is worked in the round with circular needle from mid back, top down. You can work an elevation in back of neck for a better fit, so that the neck is a little higher at back. You can skip this elevation if you wish; the neck will then be the same front and back – see description of elevation further down in text. After the yoke, the body is worked in the round with circular needle. The sleeves are worked in the round with double pointed needles, top down. NECKLINE: Cast on 74-78-82-86-90-96 stitches with circular needle size 4 mm and beige. Work 2 RIDGES – see description above. Change to circular needle size 5 mm. Work as follows from mid back: Work 13-14-15-16-17-18 stitches stocking stitch and increase 0-2-2-2-3-5 stitches evenly over these stitches, * 1 yarn over, knit 1 *, work from *-* a total of 11 times, 26-28-30-32-34-37 stitches stocking stitch and increase 0-4-4-4-6-9 stitches evenly over these stitches, * 1 yarn over, knit 1 *, work from *-* a total of 11 times, 13-14-15-16-17-19 stitches stocking stitch and increase 0-2-2-2-3-4 stitches evenly = 96-108-112-116-124-136 stitches. Work the yarn overs twisted, there should be no holes. Now you can work an elevation in back of neck or go straight to yoke if you do not want an elevation. ELEVATION IN BACK OF NECK: Skip this section if you do not want an elevation. Insert 1 marker at the beginning of round (= mid back). Start from the right side with beige and knit until you have reached 11-11-12-13-13-14 stitches past the marker, turn, tighten strand and purl 22-22-24-26-26-28 stitches. Turn, tighten strand and knit 33-33-36-39-39-42 stitches, turn, tighten strand and purl 44-44-48-52-52-56 stitches. Turn, tighten strand and knit 55-55-60-65-65-70 stitches, turn, tighten strand and purl 66-66-72-78-78-84 stitches. Turn, tighten strand and knit to mid back. YOKE: Insert 8 marker threads in the piece as follows: Work 5-7-6-8-9-8 stitches stocking stitch, insert 1 marker in next stitch, * 11-12-13-13-14-16 stitches stocking stitch, insert 1 marker in next stitch *, work from *-* a total of 7 times, finish with 6-9-7-9-9-8 stitches stocking stitch. On the next round work A.1 (= 24-27-28-29-31-34 repeats of 4 stitches) AT THE SAME TIME as you increase 1 stitch on each side of each marker – read ROUND YOKE, on the rounds marked with an arrow in A.1. REMEMBER THE KNITTING TENSION! Increase a total of 9-10-11-12-13-14 times (when you have increased this number of times, you no longer increase on the rounds marked with arrows in the diagram) = 240-268-288-308-332-360 stitches. Continue with pattern without increases until the piece measures 21-22-23-25-27-29 cm from the cast-on edge mid front. The next round is worked as follows – adjust so that it is a round worked with beige: Work 34-38-40-44-49-54 stitches (= half back piece), place the next 52-58-64-66-68-72 stitches on 1 thread (= sleeve), cast on 6-6-8-8-10-10 new stitches on needle (= under sleeve), work 68-76-80-88-98-108 stitches (= front piece), place the next 52-58-64-66-68-72 stitches on 1 thread (= sleeve), cast on 6-6-8-8-10-10 new stitches on needle (= under sleeve) and work the remaining 34-38-40-44-49-54 stitches (= half back piece). BODY: = 148-164-176-192-216-236 stitches. Insert 1 marker in piece, THE PIECE IS NOW MEASURED FROM HERE! Insert 1 marker thread in each side, in the middle of the new 6-6-8-8-10-10 stitches that where cast on. Let the marker thread follow piece from now on. Continue with A.1. When A.1 has been completed in height, continue working with beige. When the piece measures 3 cm from where sleeves were placed on 1 thread, increase 1 stitch on each side of each marker thread (= 4 stitches increased) – read INCREASE TIP! Increase in this way every 5 cm a total of 6 times = 172-188-200-216-240-260 stitches. When the piece measures 29-30-31-31-31-31 cm from where the piece was separated, divide the piece at the marker threads and front and back pieces are finished separately (= 8 cm split). BACK PIECE: = 86-94-100-108-120-130 stitches. The piece is continued back and forth. Work stocking stitch with 5 stitches MOSS STITCH – see description above, in each side of piece. When piece measures 36-37-38-38-38-38 cm from the marker, change to circular needle size 4 mm and work 2 ridges – see description above, over all stitches. Then cast off with circular needle size 5 mm (this is so the cast-off edge will not be tight). The piece measures a total of approx. 62-64-66-68-70-72 cm measured from the shoulder. FRONT PIECE: Work as for back piece. SLEEVE: The piece is worked in the round with double pointed needles. Place the 52-58-64-66-68-72 stitches from the thread in one side of the piece on double pointed needles size 5 mm and, in addition, knit up 1 stitch in each of the 6-6-8-8-10-10 new stitches cast on under sleeve = 58-64-72-74-78-82 stitches. THE PIECE IS NOW MEASURED FROM HERE! Insert a marker thread in the middle of the new stitches. Continue with stocking stitch and A.1. When A.1 has been completed in height, continue with beige. When the piece measures 3 cm decrease 2 stitches mid under sleeve – read DECREASE TIP. Decrease in this way every 3-3-2-2-1½-1½ cm a total of 10-12-16-16-17-18 times = 38-40-40-42-44-46 stitches. When piece measures 41-40-40-38-37-35 cm, change to double pointed needles size 4 mm and work 2 RIDGES – see description above, over all stitches. Cast off with double pointed needles size 5 mm (this is so the cast-off edge will not be tight). The sleeve measures approx. 42-41-41-39-38-36 cm from where it was separated from body. Work the other sleeve in the same way. |
|||||||||||||||||||||||||||||||
Diagram explanations |
|||||||||||||||||||||||||||||||
|
|||||||||||||||||||||||||||||||
 |
|||||||||||||||||||||||||||||||
 |
|||||||||||||||||||||||||||||||
Have you finished this pattern?Tag your pictures with #dropspattern #rainbowhugssweater or submit them to the #dropsfan gallery. Do you need help with this pattern?You'll find 35 tutorial videos, a Comments/Questions area and more by visiting the pattern on garnstudio.com. © 1982-2026 DROPS Design A/S. We reserve all rights. This document, including all its sub-sections, has copyrights. Read more about what you can do with our patterns at the bottom of each pattern on our site. |
|||||||||||||||||||||||||||||||


With over 40 years in knitting and crochet design, DROPS Design offers one of the most extensive collections of free patterns on the internet - translated to 17 languages. As of today we count 324 catalogues and 12272 patterns translated into English (UK/cm). 12272
We work hard to bring you the best knitting and crochet have to offer, inspiration and advice as well as great quality yarns at incredible prices! Would you like to use our patterns for other than personal use? You can read what you are allowed to do in the Copyright text at the bottom of all our patterns. Happy crafting!
Post a comment to pattern DROPS 183-25
We would love to hear what you have to say about this pattern!
If you want to leave a question, please make sure you select the correct category in the form below, to speed up the answering process. Required fields are marked *.