
Popular categories
Looking for a yarn?


Comments / Questions (89)
![]() Sue wrote:
Sue wrote:
Raglan instructions : increase to raglan on each side of the stitch with the marker thread..please help me understand what this means. If I do a YO before the marker ( to make the increase), then do I do another YO right away? Or do you knit a stitch in between the YO? Thank you
05.09.2017 - 16:27DROPS Design answered:
Dear Sue, the marker should be in one stitch: on each side of marker 1 and 4, make a YO before the st with marker, work the st with marker and make a YO. Before 3rd and 6th marker, make a YO before the st with marker and work the st with marker. After the 2nd and 5th marker, work the st with marker then make a YO after this st. Happy knitting!
06.09.2017 - 08:41
![]() Birthe Bjerg wrote:
Birthe Bjerg wrote:
Den er flot. Den er dog noget udringet. Tænker jeg kan begynde med 12 masker mindre og begynde med mønstret med hulrækkerne der går i zigzag. Tror I det lader sig gøre. Jeg skal så strikke 10 pinde mere end der står inden mønsteret i opskriften.
29.08.2017 - 17:35
![]() Lisbeth Nielsen wrote:
Lisbeth Nielsen wrote:
Er det muligt at denne opskrift kan laves i garn p 4,5 eller 5,0 Den har en virkelig god pasform. Har strikket 4 stk. på p 2,5 og 3 Håber at høre fra jer. Med venlig hilsen Lisbeth Nielsen
25.08.2017 - 11:19DROPS Design answered:
Hei Lisbeth. Man kan ikke følge denne oppskriften og bruke pinne 4,5 eller pinne 5,0. Du kan ta en titt på oppskrift 176-15 og 175-6. Det er noen lignende oppskrifter, men med tykkere garn. God Fornøyelse!
05.09.2017 - 10:04
![]() Petra wrote:
Petra wrote:
Liebes Drops Team, ich möchte diesen Pullover mit einem dünneren Garn stricken (Maschenprobe 37 Maschen und 50 Reihen) und bin mir nicht sicher, wie ich umrechnen soll. Alle Angaben mit Faktor 1,5 multiplizieren? Habt ihr eine Anleitung passend für dies Maschenprobe oder für Nadelstärke 2? Vielen Dank
16.07.2017 - 13:53DROPS Design answered:
Liebe Petra, wir können leider nicht jede Anleitung nach jedem Geschmack anpassen. Gerne bekommen Sie Hilfe von dem Laden wo Sie Ihre Wolle gekauft haben. Viel Spaß beim stricken!
17.07.2017 - 09:24
![]() Elwira wrote:
Elwira wrote:
Jestem na początku wzoru i już mam wątpliwość, dekolt to ściągacz francuski a potem już zaczyna się schemat. Ja nie widzę różnicy między tymi elementami skoro w schemacie pisze, prawa strona to oczka prawe, lewa oczka lewe. Dokładnie tak jest w ściągaczu. Czy tak ma być?
14.06.2017 - 05:54DROPS Design answered:
Witaj Elwiro, przerabiając na okrągło, tak naprawdę przerabiamy cały czas na prawej stronie robótki. Schemat przedstawia zawsze wzór na prawej stronie robótki. Tak więc 5 pierwszych rzędów schematu A.1 to są cały czas oczka prawe. Rezultat to dżersej prawy, a nie ściągacz francuski. Kolejne okrążenie (6-ty rząd schematu A.1) jest na lewo, i dalej przerabiać wg schematu. Jak czytać schematy znajdziesz tutaj. Powodzenia!
14.06.2017 - 18:59
![]() Gitta wrote:
Gitta wrote:
Hallo, werden die ersten Runden wirklich als Runden gestrickt? Nicht als Reihen? Ich habe hier die ersten 6 Runden nach Anleitung gemacht und es ist ein kleiner Rundhalsausschnitt geworden. Auf dem Bild und der Schnittzeichnung ist aber ein schöner V-Ausschnitt zu sehen. Wie geht das, wenn von Beginn an mit so kleiner Maschenzahl gleich die Runde geschlossen wird? Danke!
22.05.2017 - 17:47DROPS Design answered:
Liebe Gitta, beachten Sie die Maschenprobe (= 24 M x 32 R Glatt re = 10 x 10 cm). Der Halsausschnitt bekommen Sie mit der Raglanzunahmen (beidseitig der Masche mit dem Markierungsfaden an der vorderen/hinteren Mitte). Viel Spaß beim stricken!
23.05.2017 - 08:38
![]() Lise Brox wrote:
Lise Brox wrote:
Hej, Jag tyckeratt det är ett fel i mönstret. Jag har stickat storl XXL. I sidan så stämmer inte mönstret med storleksskissen. Enligt skissen ska den cylindriska delen i sidan vara 12cm, men med mönstrets text blev den 33cm, med ca 12 cm på den utställda delen längst ner. Mönstret borde ändras till att säga minska is sidan vart 4:e varv efter12cm istället för ingen ändring innan mitt fram är 58cm?
04.05.2017 - 07:53
![]() Lise Brox wrote:
Lise Brox wrote:
Hej, Jag tyckeratt det är ett fel i mönstret. Jag har stickat storl XXL. I sidan så stämmer inte mönstret med storleksskissen. Enligt skissen ska den cylindriska delen i sidan vara 12cm, men med mönstrets text blev den 33cm, med ca 12 cm på den utställda delen längst ner. Mönstret borde ändras till att säga minska is sidan vart 4:e varv efter12cm istället för ingen ändring innan mitt fram är 58cm?
03.05.2017 - 06:09
![]() Gacsalné Szabó Kata wrote:
Gacsalné Szabó Kata wrote:
A mintaleírás elején, ahol fel van sorolva, hogy mik kellenek a felső elkészítéséhez, el van írva az egyik kötőtű mérete. Az angol mintánál 3,0 és 2,5 mm tű van írva, a magyar mintánál 5 és 2,5mm. Valamint az ábránál a szemmagyarázatnál a következő van írva: 2 ráhajtás (rh) 1 szem között. Nem: 1 ráhajtás (rh) két szem között lenne a helyes? Nagyon tetszik a minta, most kezdtem el, remélem be is tudom fejezni valamikor. Köszönöm.
28.02.2017 - 09:30DROPS Design answered:
Kedves Kata! Köszönjük észrevételeit, a kötőtű mérete 3 mm és 2,5 mm. A szimbólumoknál igaza van, 2 szem között 1 rh-t készítünk. Bízunk benne, hogy el tudja készíteni a felsőt, ha elakad a Facebook "Magyar DROPS csoport"-jában közvetlen segítséget is kaphat. Eredményes kézimunkázást!
25.09.2017 - 00:39
![]() Siri Segalstad wrote:
Siri Segalstad wrote:
Denne oppskriften skjønner jeg ikke: 1: Når man starter på VENSTRE erme bak og strikker, kommer man ikke til Midt bak, men til venstre erme foran. 2: Skjønner ikke om det skal økes på hver side av merketrådene eller bare på en som det står. Normalt ville jeg øke på hver side, annenhver omgang. Hver side blir for tett, tror jeg. Har strikket i mange år, men denne oppskriften er den første jeg ikke skjønner. Mulig å få litt hjelp?
09.02.2017 - 17:52DROPS Design answered:
Hej Siri. Jo, det kan du godt, for du strikker jo oppefra og ned. Saa du starter ved venster erme bak og strikker mod venstre = mod midt bag og her kommer din förste merketraad, og saa strikker du videre mod höjre erme osv. Du öker forskelligt om du öker paa BOL eller paa ERME. Dvs, efter 2. og för 3. merketraad er dit erme og för 2. merketraad og efter 3. merketraad er din bol osv. Du öker f.eks. i S saa 6 gange i hver p og 28 gange i hver 2. p paa bolen og 29 gange i hver anden p og 1 gang i hver p paa ermet. Saa det er forskelligt og en rigtig god ide at skrive op hvor langt du er for at faa det korrekt her.
13.02.2017 - 14:35
|
||||||||||||||||||||||
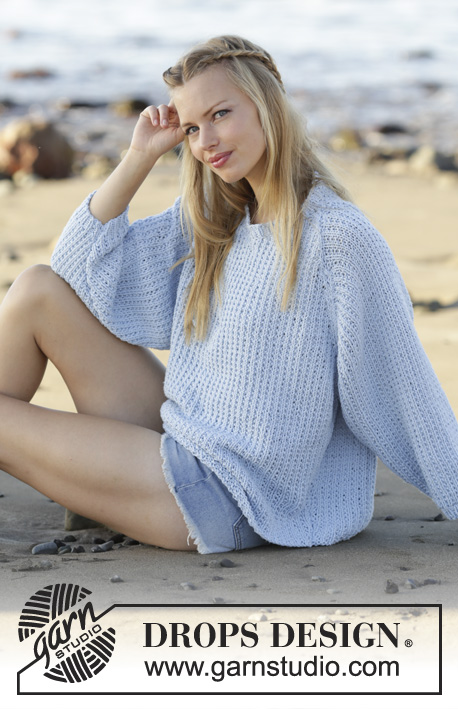
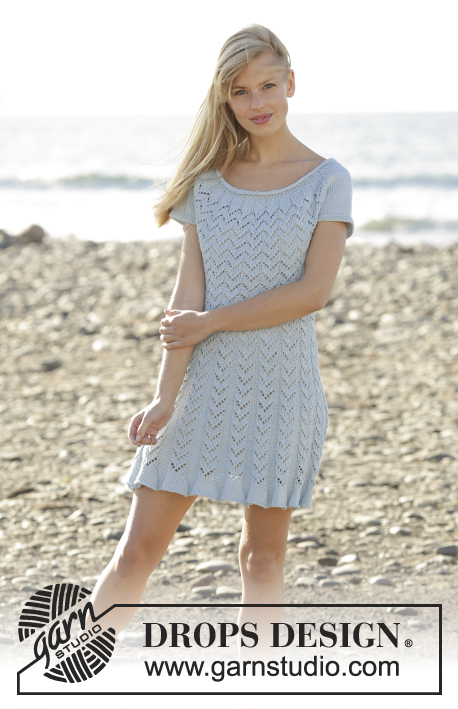
Chevron Delight#chevrondelightsweater |
||||||||||||||||||||||
|
|
||||||||||||||||||||||
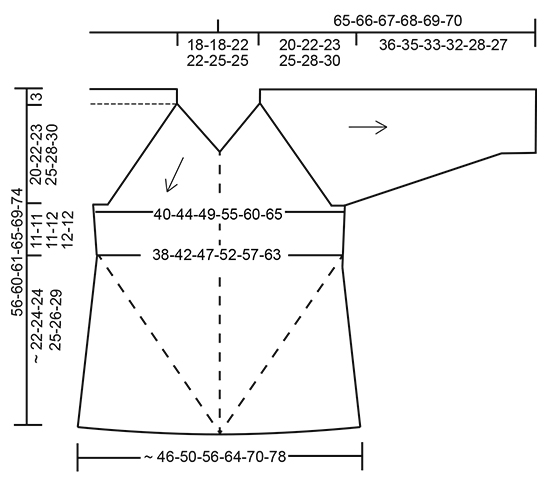
Jumper worked top down with raglan and lace pattern in DROPS BabyAlpaca Silk. Sizes S - XXXL.
DROPS 177-6 |
||||||||||||||||||||||
|
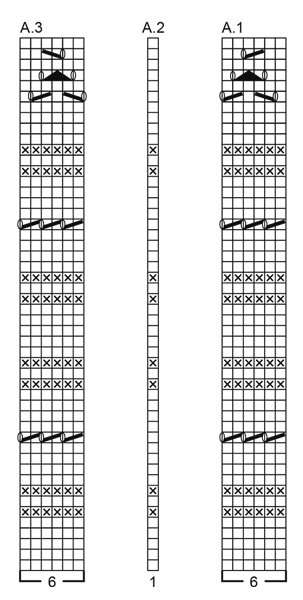
RIDGE/GARTER STITCH (worked in the round): 1 ridge = 2 rounds. Knit 1 round and purl 1 round. PATTERN: See diagrams A.1 to A.3. The diagrams show all the rows in the pattern from the right side. INCREASE TIP: To work out how to increase evenly, count the total number of stitches on the needle (e.g. 124 stitches) and divide by the number of increases to be made (e.g. 12) = 10.3. In this example, increase after approx. every 10th stitch. Increase 1 stitch by making 1 yarn over, on the next round work the yarn overs twisted knit to prevent holes. RAGLAN: Increase to raglan on each side of the stitch with the marker thread mid front/mid back and in each of side of the sleeves (i.e. on each side of the 1st and 4th marker thread, before the 3rd and 6th marker thread and after the 2nd and 5th marker thread). Increase 1 stitch by making 1 yarn over, on the next round the yarn overs are worked twisted knit to prevent holes. The increased stitches are worked into the pattern as you go. NOTE: The increases are different on the body and sleeves as explained in the text. DECREASE TIP-1 (for the sides of the body and mid underarm): Decrease 1 stitch on each side of each marker thread as follows: Work until there are 3 stitches left before the marker, knit 2 together, knit 2 (the marker sits in the middle of these 2 stitches), slip 1 stitch as if to knit, knit 1, pass the slipped stitch over the knitted stitch (= 2 stitches decreased). DECREASE TIP-2 (for the sides of the body): Decrease 2 stitches on each side of each marker as follows: Work until there are 5 stitches left before the marker, * knit 2 together *, repeat from *-* in total 2 times (= 2 stitches decreased), knit 2 (the marker sits in the middle of these 2 stitches), * slip 1 stitch as if to knit, knit 1, pass the slipped stitch over the knitted stitch *, repeat from *-* in total 2 times (= 4 stitches decreased). ---------------------------------------------------------- JUMPER: The piece is worked with circular needle and from the top down. The sleeves are worked with a short circular needle/double pointed needles. YOKE: Cast on 124-124-132-132-148-148 stitches with circular needle size 2.5 mm and BabyAlpaca Silk. Work 3 RIDGES – see description above, AT THE SAME TIME on the 4th round increase 12-12-20-20-24-24 stitches evenly along the round – READ INCREASE TIP = 136-136-152-152-172-172 stitches. Repeat the increase on the 6th round = 148-148-172-172-196-196 stitches on the needle. Change to circular needle size 3 mm and work the next round as follows from the left shoulder back: Work A.1 across the first 30-30-36-36-42-42 stitches (= 5-5-6-6-7-7 repeats of 6 stitches), insert the 1st marker thread in the next stitch and work the stitch A.2 (= mid back), work A.3 across the next 30-30-36-36-42-42 stitches (= 5-5-6-6-7-7 repeats of 6 stitches), insert the 2nd marker thread before the next stitch, work A.1 across the next 12 stitches (= 2 repeats of 6 stitches), work A.2 (= 1 stitch), insert the 3rd marker thread before the next stitch (= 13 stitches on the right sleeve between the 2nd and 3rd marker thread), work A.1 across the next 30-30-36-36-42-42 stitches, insert the 4th marker thread in the next stitch and work this stitch A.2 (= mid front), work A.3 across the next 30-30-36-36-42-42 stitches, insert the 5th marker thread before the next stitch, work A.2 (= 1 stitch), work A.3 across the next 12 stitches, insert the 6th marker thread before the next stitch (= 13 stitches on the left sleeve between the 5th and 6th marker thread). There are now 6 marker threads in the piece. Continue the pattern as follows (A.1-A.3 repeated to finished length). AT THE SAME TIME on the first round after the marker threads have been inserted begin the increases to RAGLAN – see description above. Increase as follows: BODY: Increase every round in total 6-12-10-22-18-30 times, then every 2nd round in total 28-28-30-28-34-32 times (= in total 34-40-40-50-52-62 times). SLEEVE: Increase every round in total 0-3-4-2-0-0 times, every 2nd round in total 29-32-33-37-40-41 times and then every 4th round in total 1-0-0-0-2-3 times (= in total 30-35-37-39-42-44 times). REMEMBER THE KNITTING TENSION! When the increases to raglan are finished the piece measures approx. 20-22-23-25-28-30 cm from the cast-on edge (measured mid front). There are 64-70-76-86-94-104 stitches on each side of the 1st and 4th marker thread (= 129-141-153-173-189-209 stitches on the front and back pieces including the stitches with marker threads) and 73-83-87-91-97-101 stitches on each sleeve = in total 404-448-480-528-572-620 stitches on the needle. The next round is worked as follows: Twisted knit together the first 2 stitches (= 1 stitch decreased), work as before to the 1st marker thread, make 1 yarn over, work the stitch as before (= mid back), make 1 yarn over (= 2 stitches increased), work as before until there are 2 stitches left before the 2nd marker, knit 2 together (= 1 stitch decreased), place the next 73-83-87-91-97-101 stitches (i.e. the stitches between the 2nd and 3rd marker threads) on a thread for the sleeve, cast on 6-6-12-12-12-12 new stitches under the sleeve, insert 1 marker in the middle of the new stitches, twisted knit 2 stitches together (= 1 stitch decreased), work the pattern as before to the 4th marker thread, make 1 yarn over, work the stitch as before (= mid front), make 1 yarn over (= 2 stitches increased), work the pattern as before until there are 2 stitches left before the 5th marker thread, knit 2 together (= 1 stitch decreased), place the next 73-83-87-91-97-101 stitches (i.e. the stitches between the 5th and 6th marker threads) on 1 thread for the sleeve, cast on 6-6-12-12-12-12 new stitches under the sleeve and insert 1 marker in the middle of these new stitches = 270-294-330-370-402-442 stitches on the needle. Cut the strand. THE PIECE IS NOW MEASURED FROM HERE! BODY: Displace the round so that it starts mid-under the sleeve in the right side of the piece when the garment is worn (i.e. move the next stitches across to the right needle without working them first). The markers follow as you work the piece. Continue the pattern as before – NOTE: The new stitches under the sleeve in each side are worked in to the pattern, adjust so that the pattern is symmetrical under the sleeve (i.e. on each side of the marker). AT THE SAME TIME every 2nd round increase 1 stitch on each side of the stitch with the 1st and 4th marker thread in the same way as before and decrease 1 stitch on each side of the marker under the sleeve in each side – READ DECREASE TIP-1 = 4 stitches increased and 4 stitches decreased. When you increase and decrease in this way the number of stitches remains the same. When the piece measures 3 cm from the separation under each sleeve – adjust so that the next round is an increase/decrease round and now decrease 2 stitches on each side of the marker under each sleeve (the increases front and back continue as before) – READ DECREASE TIP-2 = 4 stitches increased and 8 stitches decreased. Decrease and increase like this every 4-4-4-3-3-3 cm in total 3-3-3-4-4-4 times = 258-282-318-354-386-426 stitches. Then work as before with 4 decreases and 4 increases every 2nd round. Continue in this way until the piece measures approx. 46-50-51-55-58-63 cm measured along the middle stitch (i.e. by the 1st and 4th marker thread), but finish so that the next round is an increase/decrease round. The piece now measures approx. 56-60-61-65-69-74 cm measured from the shoulder and down at the longest part. Cut the strand. Place the first 65-71-80-89-97-107 stitches (= half the front piece including the mid-stitch) on 1 thread and the last 64-70-79-88-96-106 stitches (= half the back piece) on the same thread. Now work as follows across the remaining 129-141-159-177-193-213 stitches on the needle (i.e. from after the 4th marker thread up to and including the stitch with the 1st marker thread = left side of the jumper, from mid front to mid back): ROW 1 (= right side): Cast off the first 2 stitches, work the pattern as before until there are 3 stitches left before the marker under the sleeve, decrease 1 stitch on each side of the marker as before (= 2 stitches decreased), work the pattern as before for the rest of the row = 2 stitches decreased at the beginning of the row towards mid front and 2 stitches decreased in the side of the jumper (= in total 4 stitches decreased). ROW 2 (= wrong side): Cast off the first 2 stitches, Work the pattern to the end of the row as before = 2 stitches decreased at the start of the row towards mid back. ROW 3: Cast off the first 2 stitches, work the pattern for the rest of the row as before = 2 stitches decreased at the start of the row towards mid front. ROW 4: Work as for row 2 = 2 stitches decreased at the beginning of the row towards mid back. ROW 5: Work as for row 3 = 2 stitches decreased at the beginning of the row towards mid front. ROW 6: Work as for row 2 = 2 stitches decreased at the beginning of the row towards mid back. ROW 7: Work as for row 1 = 2 stitches decreased at the beginning of the row towards mid front and 2 stitches decreased in the side of the jumper (= in total 4 stitches decreased). ROW 8: Work as for row 2 = 2 stitches decreased at the beginning of the row towards mid back. ROW 9: Work as for row 3 = 2 stitches decreased at the beginning of the row towards mid front. ROW 10: Work as for row 2 = 2 stitches decreased at the beginning of the row towards mid back. Repeat rows 1-10 until there are 5 stitches left on the needle and cast off. Place the stitches from the thread back on the needle and work in the same way (= right side of the jumper, from mid back to mid front). SLEEVE: Place the stitches from the thread in the right side of the piece (when the garment is worn) on a short circular needle size 3 mm, in addition knit up 1 stitch in each of the 6-6-12-12-12-12 stitches cast on under the sleeve = 79-89-99-103-109-113 stitches on the needle. Insert 1 marker in the middle of these new stitches. The marker follows the piece. Continue A.1/A.2 as before, but the stitches which do not fit the pattern under the sleeve are knitted in rounds of knit and purled in rounds of purl. When the piece measures 3 cm decrease 1 stitch on each side of the marker – READ DECREASE TIP-1 (= 2 stitches decreased). Decrease in this way a total of 15-20-25-24-27-26 times in S: Every 6th round, in M: Every 5th round, in L + XL: Every 3rd round and in XXL + XXXL: Alternately every 2nd and 3rd round = 49-49-49-55-55-61 stitches. When the piece measures 34-33-31-30-26-25 cm from the separation (or try the garment on and work to desired length), change to double pointed needles size 2.5 mm. Work 4 RIDGES. Change back to double pointed needles size 3 mm and cast off. The sleeve measures approx. 36-35-33-32-28-27 cm from the separation. Work the other sleeve in the same way, but continue A.2/A.3 as before. RIDGE EDGE AT BOTTOM OF BODY: Knit up stitches for an edge inside 1 stitch along the whole of the bottom edge of the jumper. Knit up approx. 240-260-290-332-364-406 stitches evenly spaced from the right side with circular needle size 2.5 mm. Make sure the edge does not tighten the body! If it does, then knit up more stitches. Work 3 ridges. Change to circular needle size 3 mm and cast off. |
||||||||||||||||||||||
Diagram explanations |
||||||||||||||||||||||
|
||||||||||||||||||||||
 |
||||||||||||||||||||||
 |
||||||||||||||||||||||
Have you finished this pattern?Tag your pictures with #dropspattern #chevrondelightsweater or submit them to the #dropsfan gallery. Do you need help with this pattern?You'll find 26 tutorial videos, a Comments/Questions area and more by visiting the pattern on garnstudio.com. © 1982-2026 DROPS Design A/S. We reserve all rights. This document, including all its sub-sections, has copyrights. Read more about what you can do with our patterns at the bottom of each pattern on our site. |
||||||||||||||||||||||


With over 40 years in knitting and crochet design, DROPS Design offers one of the most extensive collections of free patterns on the internet - translated to 17 languages. As of today we count 324 catalogues and 12245 patterns translated into English (UK/cm). 12245
We work hard to bring you the best knitting and crochet have to offer, inspiration and advice as well as great quality yarns at incredible prices! Would you like to use our patterns for other than personal use? You can read what you are allowed to do in the Copyright text at the bottom of all our patterns. Happy crafting!
Post a comment to pattern DROPS 177-6
We would love to hear what you have to say about this pattern!
If you want to leave a question, please make sure you select the correct category in the form below, to speed up the answering process. Required fields are marked *.