
Popularne kategorie
Szukasz włóczki?


Komentarze / Pytania (146)
Heather napisała::
After heel decreases, I ve picked up 9 sts each side, Ive gone in pattern across upper foot to get to other side to pu other 9 sts, Im backwards (working on wrong side, after heel decreases should i do another row to make sure in on right side?? also once that is done and I proceed where it says continue in stockinette and M! and decrease at same time (again right now I'm one wrong side)
25.01.2017 - 15:16Odpowiedź DROPS Design :
See answer above.
25.01.2017 - 15:54
![]() Terhi napisała::
Terhi napisała::
En ihan ymmärrä tuota mallineuletta.. Ensin pitää kutoa 6 oikein, sitten 3 nurin, nostaa 3 apupuikolle ja kutoa 1 oikein, jonka jälkeen apupuikolta ne 3. Siinähän tulee 13 silmukkaa? Jos per puikko on 12 silmukkaa? Mitä kohtaa en ymmärrä? Help! :-)
16.01.2017 - 07:55Odpowiedź DROPS Design :
Hei! Palmikkoneuleen mallikertaa toistetaan vain kerran kerroksella, eli palmikkokuvio tulee ainoastaan sukan etuosaan.
13.02.2017 - 17:16
![]() Debbie napisała::
Debbie napisała::
After knitting 18 cm from marker on heel the comment " adjust to after a full repeat of M1 (= approx 4 cm remain). What does that mean?
08.11.2016 - 22:05Odpowiedź DROPS Design :
Dear Debbie, make sure you have worked a full repeat of M.1 (work to the last row in M.1) when your piece measures 18 cm from marker on heel, work more/less row if necessary so that the last row is last row in M.1. Happy knitting!
09.11.2016 - 09:49
![]() Debbie A Davis napisała::
Debbie A Davis napisała::
2nd last paragraph - adjust to after a full repeat of m1
08.11.2016 - 22:03
![]() Vennie napisała::
Vennie napisała::
Where do I get the 27 stitches to put on stitch holder? I only havee 11 that are on the flap, I just knit
01.11.2016 - 19:35Odpowiedź DROPS Design :
Dear Vennie, after ribbing you are working as follows over the 48 sts: K3/P3 over the first 24 sts, K6, M.1 (= 15 sts), K3 = 24+6+15+3= 48 sts. When piece measures 4 cm / 1½'' from cast on row, keep the first 27 sts on needle (= the first 24 sts worked in rib + next 3 sts) and slip the last 21 sts on a st holder (= K3, M.1, K3). Happy knitting!
02.11.2016 - 09:16
![]() Vennie napisała::
Vennie napisała::
I am thoroughly confused.... I cast on 48 stitches, worked the 5 rounds in k3/p3. I then I ribbed for 24 stitches, K 6 then did pattern with 15 sts worked on that until there was 11 stitches remaining, and piece measured 1 1/2 " so now I have a flap of 11 sts on 1 needle measuring 1 1/2 " long and 29 stitches left over at original length. Am I doing something wrong? I don't understand how i have 27 to work heel and 21 for st holder. Please help me Thank you
30.10.2016 - 01:48Odpowiedź DROPS Design :
Dear Vennie, after ribbing, you work K3/P3 over the 24 sts as before, then K6, M1 and K3 over the remaining sts on round = 48 sts until piece measures 1½''. Then keep the first 27 sts on needle (for heel) and slip the last 21 sts on a st holder (mid upper foot, sts will be worked again later). Work heel back and forth over the 27 sts dec sts as explained for your size. Happy knitting!
31.10.2016 - 10:37Valda Stryde napisała::
Had a little trouble doing first sock. but was watching TV at the same time. So I started to pay attention to what I was doing .When I got the first sock completed I had no trouble. I have completed four pairs now and I can watch TV while doing them now. Beautiful pattern and quite easy to follow. Just have to pay attention doing the first one then everything is quite easy after that. thank you for this pattern.
12.10.2016 - 17:04
![]() Shirley Myles napisała::
Shirley Myles napisała::
I wish someone would rewrite this pattern .... I needed help every step of the way !
10.10.2016 - 03:34Odpowiedź DROPS Design :
Dear Mrs Myles, you are welcome to ask you question here, for any individual assistance, remember you will get help from your DROPS store, even per mail or telefon. Happy knnitting!
10.10.2016 - 10:20
![]() Joanne napisała::
Joanne napisała::
I understand reading the pattern but don't know where the 23 stitches are coming from ?? is it the stitches that came off of stitch holder because I only have 21 ???? totally confused along with several people I have asked for assistance.
03.10.2016 - 20:42Odpowiedź DROPS Design :
Dear Joanne, when you've finished with heel decreases and pick up sts, you'll end up with 52 sts. Now you've to put a marker as follows: keep M.1 (= 15 sts) as central, leave 4 sts each side of M.1 and place 1 marker each side of the 4 sts, so you'll have: marker, 4 sts, M.1, 4 sts, marker. Happy knitting!
04.10.2016 - 08:46
![]() Joanne napisała::
Joanne napisała::
I am very confused .. I'm working on middle size .. I have one needle with 21 stitches from stitch holder, one needle with 10 stitches picked up side of heel, other needle with 11 from heel decrease, and 4th needle with 10 stitches for heel pickup .. total of 52 as pattern says .. I'm not sure where it says insert markers each side of 23 stitches .. which 23 stitches ..pls help trying to make these as a gift..
02.10.2016 - 03:58Odpowiedź DROPS Design :
Dear Joanne, markers should be inserted as follows: 1st marker, 4 sts, M.1 (= 15 sts), 4 sts, 2nd marker (= 23 sts between markers = top of foot). Happy knitting!
03.10.2016 - 09:28
|
|||||||||||||||||||||||||
Alaskan Cables |
|||||||||||||||||||||||||
 |
 |
||||||||||||||||||||||||
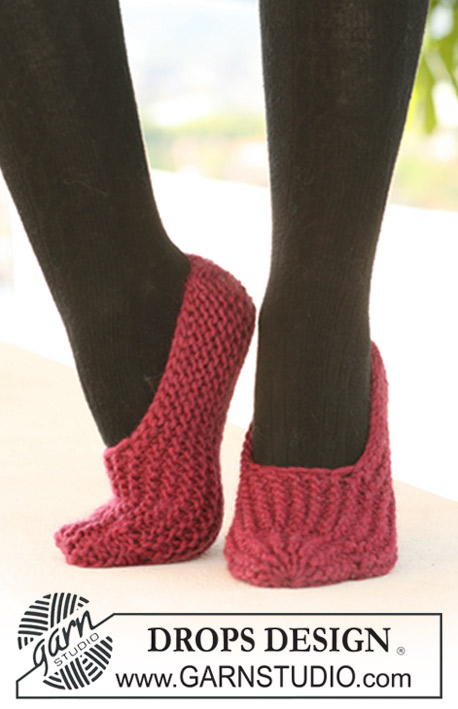
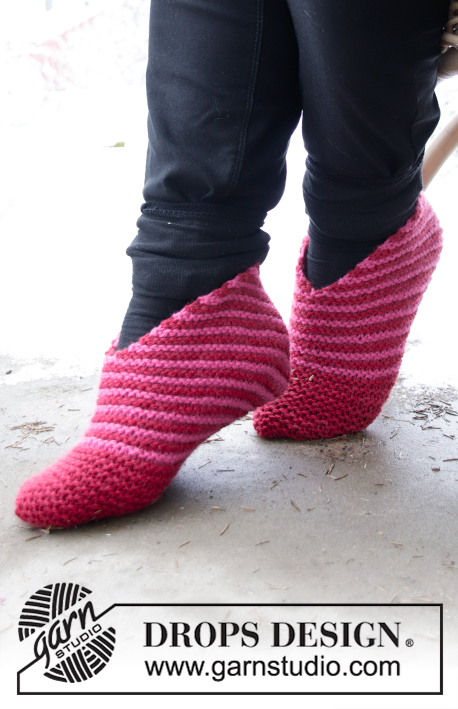
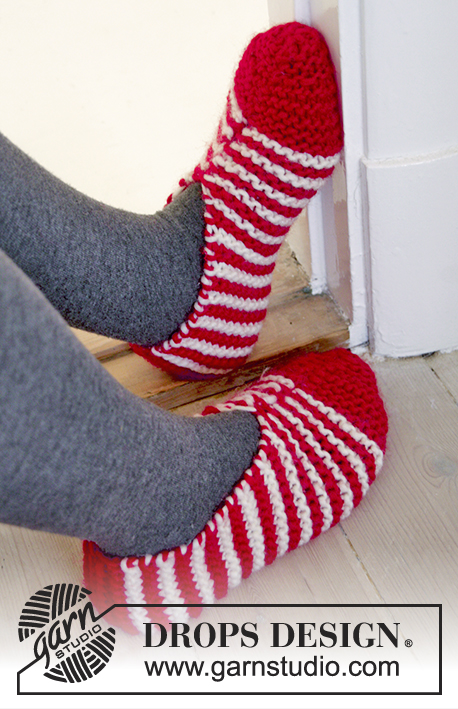
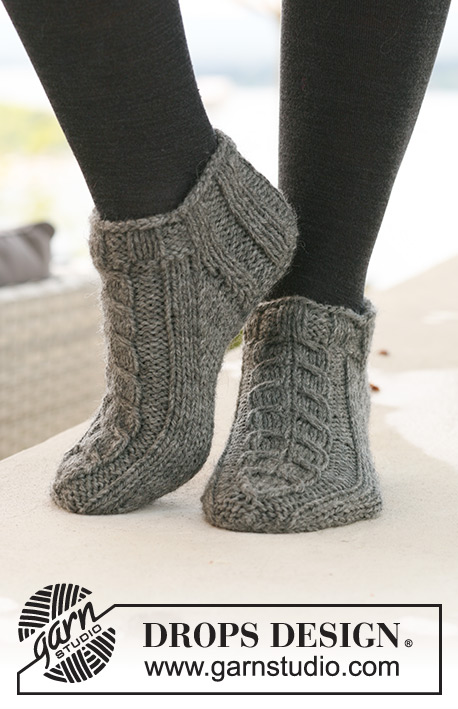
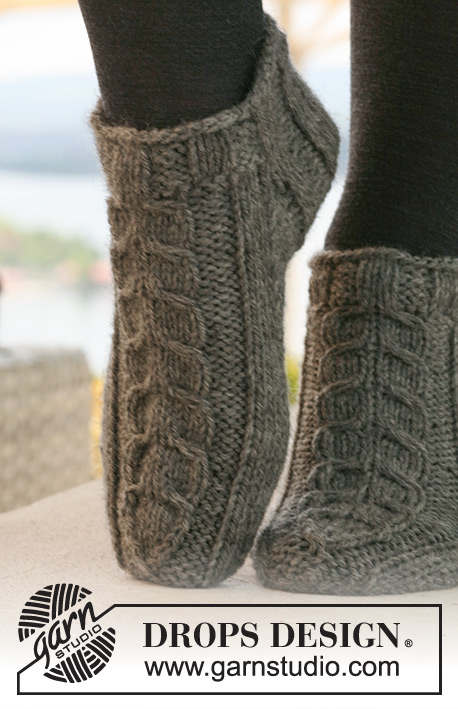
Krótkie skarpetki DROPS z warkoczami z włóczki „Alaska”.
DROPS 125-15 |
|||||||||||||||||||||||||
|
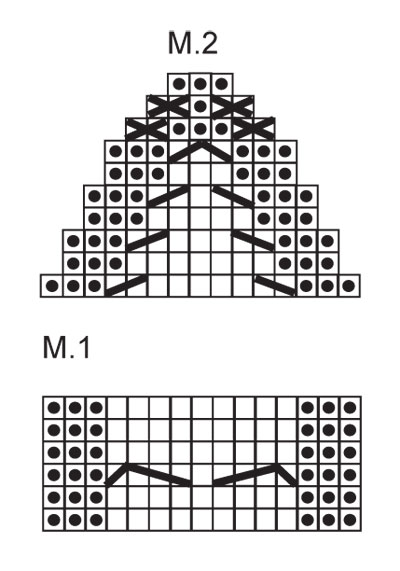
ŚCIEG FANTAZYJNY: Patrz schematy M.1 (= 15 o.) i M.2 (= 15 o.). Schematy przedstawiają motywy na prawej stronie robótki. ZAMYKANIE OCZEK NA PIĘTĘ (przer. dżersejem): Rz. 1 (na prawej stronie robótki): przer. aż zostaje 6-7-7 o., zdjąć nast. oczko jak do przerobienia na prawo, 1 o.p., przełożyć oczko zdjęte nad przerobionym oczkiem, obrócić. Rz. 2 (na lewej stronie robótki): przer. aż zostaje 6-7-7 o., zdjąć nast. oczko jak do przerobienia na lewo, 1 o.l., przełożyć oczko zdjęte nad przerobionym oczkiem, obrócić. Rz. 3 (na prawej stronie robótki): przer. aż zostaje 5-6-6 o., zdjąć nast. oczko jak do przerobienia na prawo, 1 o.p., przełożyć oczko zdjęte nad przerobionym oczkiem, obrócić. Rz. 4 (na lewej stronie robótki): przer. aż zostaje 5-6-6 o., zdjąć nast. oczko jak do przerobienia na lewo, 1 o.l., przełożyć oczko zdjęte nad przerobionym oczkiem, obrócić. Dalej zamykać oczka tak samo, o 1 o. mniej miedzy każdym zamykanym o., aż będzie 9-11-11 o. na drucie. -------------------------------------------------------- SKARPETKI: Przerabiane na okrągło. Na druty pończosznicze nr 4,5 nabrać 42-48-48 o. włóczką Alaska. Przer. 2 okr. na prawo i 5 okr. ściągaczem, 3 o.p./3 o.l. W nast. okrążeniu przer. ściegiem fantazyjnym - patrz powyżej – następująco: dalej przer. ściągaczem 3 o.p./3 o.l. przez 18-24-24 pierwszych o., 6-6-6 o.p., M.1 (= 15 o.), 3-3-3 o.p. ZACHOWAĆ TAKIE SAME NAPRĘŻENIE NICI JAK W PRZYPADKU PRÓBKI! Dalej przer. tak samo do wys. 4 cm od dołu robótki dla każdego rozmiaru. Następnie zostawić na drutach 21-27-27 pierwszych o. na piętę i zdjąć na drut pomocniczy 21-21-21 pozostałych o. (= wierzch stopy). Przer. ściągaczem w tę i z powrotem przez oczka pięty przez 5-5,5-6 cm. UWAGA! W ost. rzędzie na lewej stronie robótki zamknąć o. następująco: rozmiar 35/37: 1 o. w 1-szą i ostatnią grupę oczek prawych przerabiając 2 o. razem na prawo; rozmiary 38/40 i 41/43: 1 o. w każdą z 4 grup oczek prawych przerabiając 2 o. razem na prawo. Wszystkie rozmiary = 19-23-23 o. Umieścić marker. Dalej wykonać ZAMYKANIE OCZEK NA PIĘTĘ – patrz powyżej! Po ZAMKNIĘCIU OCZEK NA PIĘTĘ, nabrać 9-10-12 o. z każdej strony pięty i wziąć z powrotem 21-21-21 o. z drutu pomocniczego = 48-52-56 o. Umieścić marker z każdej strony 21-23-25 m o. wierzchu stopy (= 3-4-5 o. z każdej strony schematu M.1). Dalej przer. dżersejem i wg schematu M.1 - W TYM SAMYM CZASIE zamknąć z każdej strony następująco: przer. razem na prawo przekręcone 2 ost. o. przed 1-szym markerem wierzchu stopy i przer. razem na prawo 2 pierwsze o. za 2-gim markerem wierzchu stopy. Powt. zamykanie o. w sumie 6-7-7 razy co 2 okr. = 36-38-42 o. Dalej przer., aż zostanie przerobione 18-20-22 cm od markera na pięcie – dopasować za jednym całym motywem schematu M.1 (= zostaje ok. 4-4-5 cm). Umieścić marker z każdej strony, tak aby było odpowiednio 19-19-21 o. na spód i 17-19-21 o. na wierzch stopy (= 1-2-3 o. z każdej strony schematu M.1). Następnie zamykać o. na palce. PRZED DALSZĄ PRACĄ NAD ROBÓTKĄ UWAŻNIE PRZECZYTAĆ DALSZĄ CZĘŚĆ OPISU: (UWAGA! Zamykamy w różny sposób o. na spód i na wierzch stopy, ale oczka są zamykane w tych samych okrążeniach). Zamknąć o. na spód stopy następująco: przer. razem na prawo przekręcone 2 o. za markerem i przer. razem na prawo 2 o. przed markerem. Powt. zamykanie o. w sumie 4-4-4 razy co 2 okr., dalej w sumie 3-3-4 razy w każdym okrążeniu. W TYM SAMYM CZASIE zamknąć o. na wierzch stopy następująco: przer. M2 ponad M1 (1-2-3 o. z każdej strony schematu M.1 przerabiane dżersejem jak wcześniej). Zakończyć przerabiając 3 ost. okr. na lewo w rozmiarze 41/43 = zostaje 10-12-14 o. Odciąć nitkę, przeciągnąć ją przez pozostałe o., zacisnąć, zakończyć. |
|||||||||||||||||||||||||
Objaśnienia do schematu |
|||||||||||||||||||||||||
|
|||||||||||||||||||||||||
 |
|||||||||||||||||||||||||
Skończyłaś ten wzór?Otaguj swoje zdjęcia #dropspattern lub prześlij je do #dropsfan gallery. Potrzebujesz pomocy w związku z tym wzorem?Zobacz 17 instrukcje video, sekcję Komentarze/Pytania i jeszcze więcej, wchodząc na stronę wzoru na garnstudio.com © 1982-2026 DROPS Design A/S. Wszelkie prawa zastrzeżone. Ten dokument, w całości, jest chroniony prawem. Zobacz co możesz robić z naszymi wzorami na dole każdego wzoru na naszej stronie. |
|||||||||||||||||||||||||


Posiadając 40 lat doświadczenia w projektowaniu wzorów na druty i szydełko, DROPS Design oferuje jedną z największych kolekcji bezpłatnych wzorów w internecie – przetłumaczonych na 17 języków. Obecnie jest dostępnych 324 katalogów i 12290 wzorów w języku polskim.
Dokładamy wszelkich starań, aby oferować Wam druty i szydełka, inspiracje, fachowe porady oraz doskonałej jakości włóczki w najlepszych cenach! Zamierzasz wykorzystać nasze wzory inaczej niż tylko do osobistego użytku? Przeczytaj jakie masz prawa w Copyright, który znajdziesz na końcu każdego wzoru. Miłej pracy!
Dodaj komentarz do modelu DROPS 125-15
Chcielibyśmy się dowiedzieć co masz do powiedzenia o tym wzorze!
Jeśli chcesz zadać pytanie i szybko uzyskać odpowiedź, upewnij się, że została wybrana właściwa kategoria w formularzu poniżej. Pola obowiązkowe są oznaczone *.