
Popularne kategorie
Szukasz włóczki?


Komentarze / Pytania (146)
![]() Paula Hynes napisała::
Paula Hynes napisała::
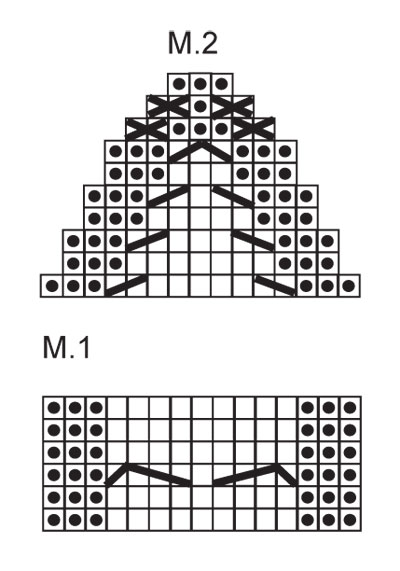
In Drops !25-15, when do you use M2 in this please . I only see where to use M1. Thanks Paula
10.02.2019 - 18:54Odpowiedź DROPS Design :
Dear Paula, you'll work M.2 at the end of the pattern, when you'll decrase on upper foot as follows: Work M.2 over M.1 (1-2-3 sts each side of M.1 worked in stocking st as before). Happy knitting!
10.02.2019 - 19:36
![]() Paula Hynes napisała::
Paula Hynes napisała::
When do you use M2 in the pattern for the Alaska socks? I only see M1 used in this pattern.
10.02.2019 - 18:50Odpowiedź DROPS Design :
Dear Paula, you'll work M.2 at the end of the pattern, when you'll decrase on upper foot as follows: Work M.2 over M.1 (1-2-3 sts each side of M.1 worked in stocking st as before). Happy knitting!
10.02.2019 - 19:36
![]() Sue McKay napisała::
Sue McKay napisała::
When u r ribbing the 21 stitches on the mid size and it says knit 21/4" is that from the top of the sock or from where u start the ribbing...if its from the top I cant pick up 10 stitches theres not enough knitted
10.02.2019 - 18:12Odpowiedź DROPS Design :
Dear Sue, after the ribbing you divide teh stitches for the foot and th eheel, and knit only on the heel stitches for 5-5.5-6 cm, and do teh decreases. The stitches for the gusset should be picked up on the two sides of this heel flap. Happy Knitting!
11.02.2019 - 03:54
![]() Dora napisała::
Dora napisała::
I'm doing the larger size after the heel is knit having some problem with the decrease for the heel .
04.02.2019 - 02:40Odpowiedź DROPS Design :
Dear Dora, can you please explain the kind of problem you have with the decrease for the heel?
04.02.2019 - 14:29
![]() Nathalie34 napisała::
Nathalie34 napisała::
Bonjour, Je ne comprends pas ou doit se mettre le marqueur au niveau du talon.
24.01.2019 - 08:31Odpowiedź DROPS Design :
Bonjour Nathalie34, le marqueur se met au niveau des mailles sur l'aiguilles, on va mesurer la longueur du pied à partir de ce marqueur, juste avant les diminutions du talon. Bon tricot!
24.01.2019 - 10:29
![]() Ida napisała::
Ida napisała::
Vad menas med "Sticka M.2 över M.1 (1-2-3 m på varje sida av M.1 slätstickas som innan)"? Ska jag sticka bara m2 på ovansidan när jag tar ihop för tå? Vad menas i så fall det i parentesen.
04.12.2018 - 08:21Odpowiedź DROPS Design :
Hei Ida. Det betyr at du skal strikke M.2 over de samme maskene som du har strikket M.1 over tidligere. Altså du strikker ikke lenger M.1, men M.2 isteden. Og du har 1-2-3 masker på hver side som strikkes i glattstrikk som før. M.2 strikkes kun på oversiden av foten, på undersiden av fotne feller du som forklart: Strikk de 2 m etter merketråden vridd rett sm og de 2 m før merketråden rett sm. Dette gjøres samtidig som du strikker M.2 og feller som anvist i diagrammet. God fornøyelse
06.12.2018 - 11:46
![]() Rose napisała::
Rose napisała::
I have just completed the decrease for the heel and I’m finding myself on the wrong side with 9 stitches. Should I turn and knit across before picking up the 9? Also can you tell me how many stitches per needle for3 needles as 9 heel stitches does not split evenly?
15.11.2018 - 20:59Odpowiedź DROPS Design :
Dear Rose, turn work so that you are from RS again to pick up the sts: work the sts from heel, pick up 9 sts on the left side of the heel sts, knit the 21 sts from upper foot back on needle, pick up 9 sts on the right side of heel. You can divide the sts with all sts from upper foot on one needle and the new sts + the sts from heel divided onto 2 needles. Happy knitting!
16.11.2018 - 09:27
![]() Rosemary napisała::
Rosemary napisała::
Hi there I’m about to decrease the heel, and it says to insert a marker. Can not figure out where or why
15.11.2018 - 18:49Odpowiedź DROPS Design :
Dear Rosemary, the marker is inserted in the sts on the row, it will be used to measure the length of the foot and when to start the decreases for toe. Happy knitting!
16.11.2018 - 09:15
![]() Ellen napisała::
Ellen napisała::
Following up on your answer to my "K4-section" question yesterday: I find no K4-section in the pattern. The places where I believe the decreases are to happen are K3-sections. Please point out where you are saying the correct K4-sections are in the pattern instructions. If they are actually K3-sections, I hope you will clarify this for everyone. Thank you.
30.08.2018 - 17:49Odpowiedź DROPS Design :
Dear Ellen, We looked again your first question and we believe that you should check again the instructions as there are no k-4 sections in the UK instructions. For decreasing, it says: NOTE! On last row from WS dec as follows: Size 35/37: 1 st in the first and last K-section by K2 tog, Size 38/40 and 41/43: . We hope this will help you out. Happy Knitting
31.08.2018 - 12:02
![]() Ellen napisała::
Ellen napisała::
I believe that the "NOTE! On last row from WS dec as follows: ... 1 st in each of the K4-section by K2 tog" is an error. I think it should be "... 1 st in each of the four K3-sections by K2 tog". By your usage (and common usage), K4 means KNIT 4, and there are no K4-sections in any part of the pattern. Is my interpretation correct? If so, I hope you will clarify the pattern for others.
29.08.2018 - 21:00Odpowiedź DROPS Design :
Dear Ellen Thank you so much for your feedback. There are many ways of phrasing pattern instructions. We will take your way into consideration but we are referring to "K4 sections" (which means sections with 4 knit stitches). Actually, we have changed our explanations for the newest patterns thanks to all the input we get from knitters. Thank you again for your feedback. Happy Knitting!
30.08.2018 - 14:26
|
|||||||||||||||||||||||||
Alaskan Cables |
|||||||||||||||||||||||||
 |
 |
||||||||||||||||||||||||
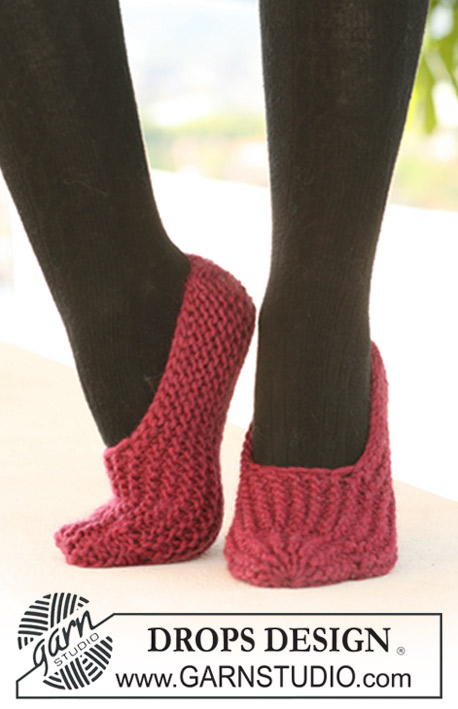
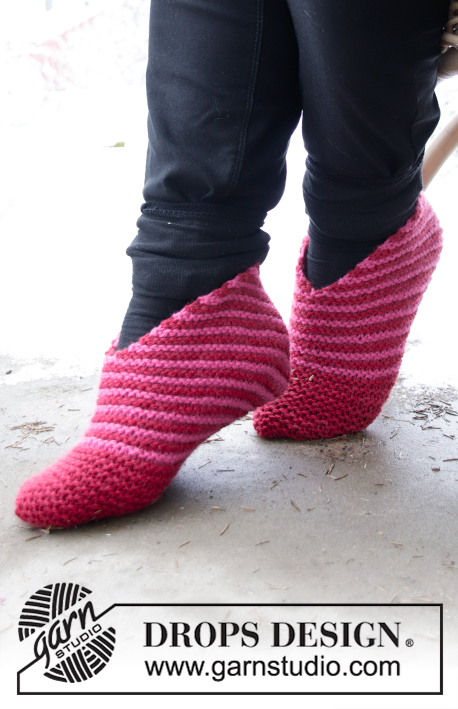
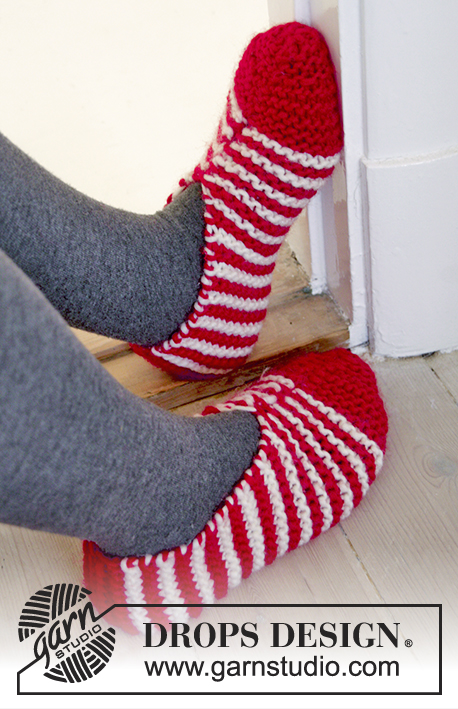
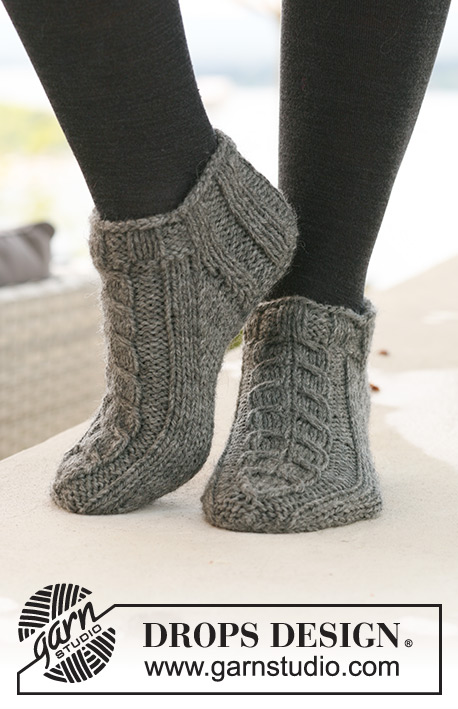
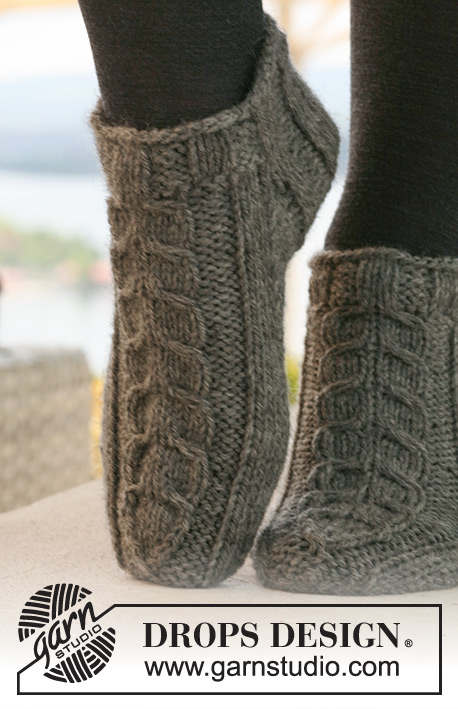
Krótkie skarpetki DROPS z warkoczami z włóczki „Alaska”.
DROPS 125-15 |
|||||||||||||||||||||||||
|
ŚCIEG FANTAZYJNY: Patrz schematy M.1 (= 15 o.) i M.2 (= 15 o.). Schematy przedstawiają motywy na prawej stronie robótki. ZAMYKANIE OCZEK NA PIĘTĘ (przer. dżersejem): Rz. 1 (na prawej stronie robótki): przer. aż zostaje 6-7-7 o., zdjąć nast. oczko jak do przerobienia na prawo, 1 o.p., przełożyć oczko zdjęte nad przerobionym oczkiem, obrócić. Rz. 2 (na lewej stronie robótki): przer. aż zostaje 6-7-7 o., zdjąć nast. oczko jak do przerobienia na lewo, 1 o.l., przełożyć oczko zdjęte nad przerobionym oczkiem, obrócić. Rz. 3 (na prawej stronie robótki): przer. aż zostaje 5-6-6 o., zdjąć nast. oczko jak do przerobienia na prawo, 1 o.p., przełożyć oczko zdjęte nad przerobionym oczkiem, obrócić. Rz. 4 (na lewej stronie robótki): przer. aż zostaje 5-6-6 o., zdjąć nast. oczko jak do przerobienia na lewo, 1 o.l., przełożyć oczko zdjęte nad przerobionym oczkiem, obrócić. Dalej zamykać oczka tak samo, o 1 o. mniej miedzy każdym zamykanym o., aż będzie 9-11-11 o. na drucie. -------------------------------------------------------- SKARPETKI: Przerabiane na okrągło. Na druty pończosznicze nr 4,5 nabrać 42-48-48 o. włóczką Alaska. Przer. 2 okr. na prawo i 5 okr. ściągaczem, 3 o.p./3 o.l. W nast. okrążeniu przer. ściegiem fantazyjnym - patrz powyżej – następująco: dalej przer. ściągaczem 3 o.p./3 o.l. przez 18-24-24 pierwszych o., 6-6-6 o.p., M.1 (= 15 o.), 3-3-3 o.p. ZACHOWAĆ TAKIE SAME NAPRĘŻENIE NICI JAK W PRZYPADKU PRÓBKI! Dalej przer. tak samo do wys. 4 cm od dołu robótki dla każdego rozmiaru. Następnie zostawić na drutach 21-27-27 pierwszych o. na piętę i zdjąć na drut pomocniczy 21-21-21 pozostałych o. (= wierzch stopy). Przer. ściągaczem w tę i z powrotem przez oczka pięty przez 5-5,5-6 cm. UWAGA! W ost. rzędzie na lewej stronie robótki zamknąć o. następująco: rozmiar 35/37: 1 o. w 1-szą i ostatnią grupę oczek prawych przerabiając 2 o. razem na prawo; rozmiary 38/40 i 41/43: 1 o. w każdą z 4 grup oczek prawych przerabiając 2 o. razem na prawo. Wszystkie rozmiary = 19-23-23 o. Umieścić marker. Dalej wykonać ZAMYKANIE OCZEK NA PIĘTĘ – patrz powyżej! Po ZAMKNIĘCIU OCZEK NA PIĘTĘ, nabrać 9-10-12 o. z każdej strony pięty i wziąć z powrotem 21-21-21 o. z drutu pomocniczego = 48-52-56 o. Umieścić marker z każdej strony 21-23-25 m o. wierzchu stopy (= 3-4-5 o. z każdej strony schematu M.1). Dalej przer. dżersejem i wg schematu M.1 - W TYM SAMYM CZASIE zamknąć z każdej strony następująco: przer. razem na prawo przekręcone 2 ost. o. przed 1-szym markerem wierzchu stopy i przer. razem na prawo 2 pierwsze o. za 2-gim markerem wierzchu stopy. Powt. zamykanie o. w sumie 6-7-7 razy co 2 okr. = 36-38-42 o. Dalej przer., aż zostanie przerobione 18-20-22 cm od markera na pięcie – dopasować za jednym całym motywem schematu M.1 (= zostaje ok. 4-4-5 cm). Umieścić marker z każdej strony, tak aby było odpowiednio 19-19-21 o. na spód i 17-19-21 o. na wierzch stopy (= 1-2-3 o. z każdej strony schematu M.1). Następnie zamykać o. na palce. PRZED DALSZĄ PRACĄ NAD ROBÓTKĄ UWAŻNIE PRZECZYTAĆ DALSZĄ CZĘŚĆ OPISU: (UWAGA! Zamykamy w różny sposób o. na spód i na wierzch stopy, ale oczka są zamykane w tych samych okrążeniach). Zamknąć o. na spód stopy następująco: przer. razem na prawo przekręcone 2 o. za markerem i przer. razem na prawo 2 o. przed markerem. Powt. zamykanie o. w sumie 4-4-4 razy co 2 okr., dalej w sumie 3-3-4 razy w każdym okrążeniu. W TYM SAMYM CZASIE zamknąć o. na wierzch stopy następująco: przer. M2 ponad M1 (1-2-3 o. z każdej strony schematu M.1 przerabiane dżersejem jak wcześniej). Zakończyć przerabiając 3 ost. okr. na lewo w rozmiarze 41/43 = zostaje 10-12-14 o. Odciąć nitkę, przeciągnąć ją przez pozostałe o., zacisnąć, zakończyć. |
|||||||||||||||||||||||||
Objaśnienia do schematu |
|||||||||||||||||||||||||
|
|||||||||||||||||||||||||
 |
|||||||||||||||||||||||||
Skończyłaś ten wzór?Otaguj swoje zdjęcia #dropspattern lub prześlij je do #dropsfan gallery. Potrzebujesz pomocy w związku z tym wzorem?Zobacz 17 instrukcje video, sekcję Komentarze/Pytania i jeszcze więcej, wchodząc na stronę wzoru na garnstudio.com © 1982-2026 DROPS Design A/S. Wszelkie prawa zastrzeżone. Ten dokument, w całości, jest chroniony prawem. Zobacz co możesz robić z naszymi wzorami na dole każdego wzoru na naszej stronie. |
|||||||||||||||||||||||||


Posiadając 40 lat doświadczenia w projektowaniu wzorów na druty i szydełko, DROPS Design oferuje jedną z największych kolekcji bezpłatnych wzorów w internecie – przetłumaczonych na 17 języków. Obecnie jest dostępnych 324 katalogów i 12290 wzorów w języku polskim.
Dokładamy wszelkich starań, aby oferować Wam druty i szydełka, inspiracje, fachowe porady oraz doskonałej jakości włóczki w najlepszych cenach! Zamierzasz wykorzystać nasze wzory inaczej niż tylko do osobistego użytku? Przeczytaj jakie masz prawa w Copyright, który znajdziesz na końcu każdego wzoru. Miłej pracy!
Dodaj komentarz do modelu DROPS 125-15
Chcielibyśmy się dowiedzieć co masz do powiedzenia o tym wzorze!
Jeśli chcesz zadać pytanie i szybko uzyskać odpowiedź, upewnij się, że została wybrana właściwa kategoria w formularzu poniżej. Pola obowiązkowe są oznaczone *.