
Popular categories
Looking for a yarn?


Comments / Questions (33)
![]() Angelika Söntgen Bei Agnetha Schnell-Stenzel wrote:
Angelika Söntgen Bei Agnetha Schnell-Stenzel wrote:
Sind die Rückreihen im A1-A6 angegeben oder sind das nur die Hinreihen und die Rückseiten werden gestrickt, wie sir erscheinen. Diese Info fehlt mir
22.01.2022 - 13:11DROPS Design answered:
Liebe Frau Söntgen Bei Agnetha Schnell-Stenzel, in die Diagramme sind alle Reihen gezeigt, die Hin- sowie die Rückeihen. Hier lesen Sie mehr über Diagramme. Viel Spaß beim stricken!
24.01.2022 - 08:44
![]() Hennie wrote:
Hennie wrote:
Er staat:minder verdeeld over 18 steken 4-5-5-8-8 steken 2regels verder staat nog een keer Minder 4-4-4-8-8--8 over hoeveel steken, Zijn dat 2 minderingen in 1 naald?
25.12.2021 - 16:33
![]() Christine Cantecorp wrote:
Christine Cantecorp wrote:
Bonjour, Je ne comprends pas pourquoi après avoir diminué 5 mailles de chaque côté des diagrammes pour la taille L donc 10 mailles en tout, il reste encore 109 mailles sur les115 mailles du début du tricot . Merci de votre réponse
12.11.2021 - 13:33DROPS Design answered:
Bonjour Mme Cantecorp, vous allez augmenter 4 mailles dans A.2 , autrement dit, lorsque A.2 est terminé, vous avez 109 m (soit 115 m du début - les 10 m diminuées dans le jersey + les 4 m augmentées dans A.2). Bon tricot!
12.11.2021 - 14:15
![]() Marie Gulla wrote:
Marie Gulla wrote:
Jeg strikker i str S og har begynt på bakstykket, har lagt opp 99 masker. Jeg har sjekket at strikkefastheten stemmer i bredden med 16 masker per 10 cm, men når jeg legger strikketøyet flatt måler det 60 cm i bredden. Størrelsesdiagrammet viser at bredden burde være 50 cm. Burde jeg da begynne på nytt forfra og sørge for at bredden av strikketøyet mens det er på pinnen overholder bredden bakstykket skal ha, eller vil det bli riktig bredde så lenge strikkefastheten er riktig? Takk!
23.04.2021 - 14:45
![]() Rossella wrote:
Rossella wrote:
Nel modello che sto eseguendo, il 216-10, quando si devono ripetere i diagrammi in verticale, si ricomincia da A1,2 e A3? Oppure da quelli successivi? Grazie
16.12.2020 - 14:46DROPS Design answered:
Buonasera Rossella, deve continuare a lavorare su A.4, A.5 e A.6. Buon lavoro!
16.12.2020 - 21:52
![]() Ana Maria Moreno Sanchez wrote:
Ana Maria Moreno Sanchez wrote:
Por que Hay que cambiar a una aguja circular y para que sirve ? Nunca he trabajado con agujas circulares
06.12.2020 - 17:12DROPS Design answered:
Hola Ana, algunos de los patrones para agujas circulares (p. ej. chaquetas y chales) son tejidos de ida y vuelta en ellas – esto se hace frecuentemente si hay demasiados puntos en las agujas, ya que las agujas circulares son más largas que las agujas rectas. En muchos casos, podrás tejer estos patrones en una aguja recta – solo asegúrate de que todos los puntos quepan en la aguja. Aqui puedes trabajar la espalda y el delantero con dos agujas rectas. Para mas informacion mira AQUI. Buen trabajo!
07.12.2020 - 08:39
![]() Martina wrote:
Martina wrote:
Wie kann es sein, das bei einer Maschenprobe von 16 Maschen auf 10 cm und einer Aufnahme von 99 Maschen 50 cm Gesamtlänge herauskommen?Das kann nicht stimmen. Nach meiner Rechnung dürften nur 80 Maschen aufgenommen werden. Das kommt mit dem Muster nicht hin.
05.12.2020 - 21:15DROPS Design answered:
Liebe Martina, die Maschenprobe wird glatt rechts gestrickt, Rückenteil wird mit Rippenmuster über 99 Maschen dann mit Zöpfe über 95 Maschen und größeren Nadeln - Rippenmuster und Zöpfe brauchen mehr Maschen für 10 cm als glatt rechts. Sollte Ihre Maschenprobe stimmen, dann bekommen Sie die angegebene Maße wie in der Skizze. Viel Spaß beim stricken!
07.12.2020 - 08:16
![]() Rossella wrote:
Rossella wrote:
Lo schema alla fine l’ho capito, volevo sapere soltanto se nel ferro di ritorno si deve seguire lo schema da sx a dx oppure no!6
28.11.2020 - 10:35DROPS Design answered:
Buonasera Rossella, il maglione è lavorato in piano, per cui nei ferri di ritorno deve leggere il motivo da sinistra a destra. Buon lavoro!
28.11.2020 - 21:18
![]() Rossella wrote:
Rossella wrote:
Non capisco nel diagramma A1 e A3, nella riga dopo la stellina, a che corrisponde quella riga nera obliqua di 10 quadratini che sullo schema A1, va dal basso verso l’alto verso sx, mentre in A3 al contrario
27.11.2020 - 16:23DROPS Design answered:
Buonasera Rossella, trova la spiegazione delle righe oblique di 10 quadratini nella legenda degli ultimi 2 simboli. Buon lavoro!
28.11.2020 - 21:16
![]() Rossella wrote:
Rossella wrote:
Non capisco perché si debbano diminuire le maglie subito dopo la riga con la stella, quando si cambiano i ferri. Io voglio usare lo stesso numero di Ferri per fare una maglia più dritta. Che succederà se non faccio le diminuzioni sul davanti e sul dietro? Grazie
25.11.2020 - 19:35DROPS Design answered:
Buonasera Rossella, le diminuzioni servono a modellare il lavoro, ma può apportare le modifiche che desidera. Buon lavoro!
25.11.2020 - 22:35
|
||||||||||||||||||||||||||||||||||||||||
Seafarers Heart#seafarersheartsweater |
||||||||||||||||||||||||||||||||||||||||
 |
 |
|||||||||||||||||||||||||||||||||||||||
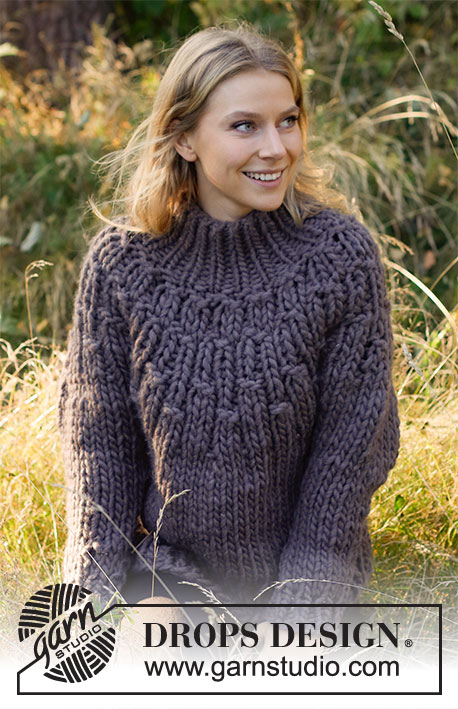
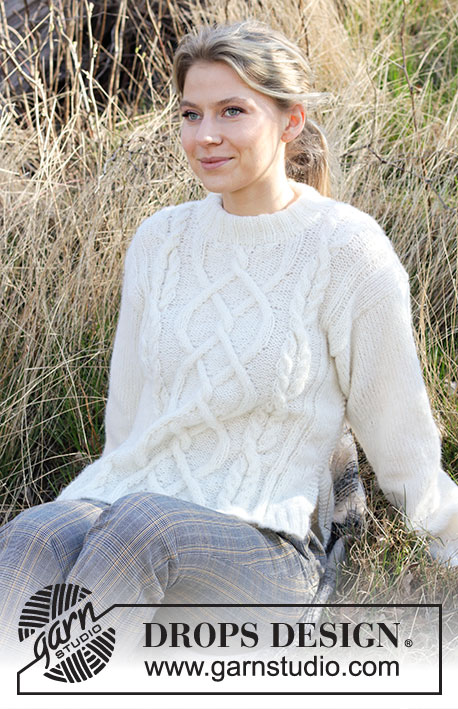
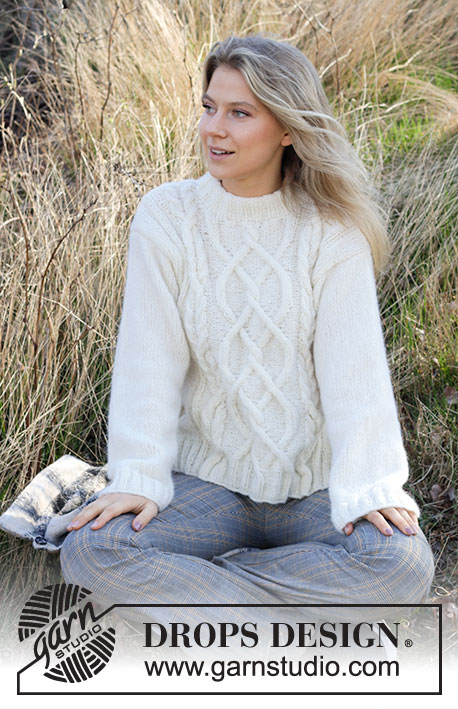
Knitted jumper in DROPS Air. The piece is worked with cables. Sizes S - XXXL.
DROPS 216-10 |
||||||||||||||||||||||||||||||||||||||||
|
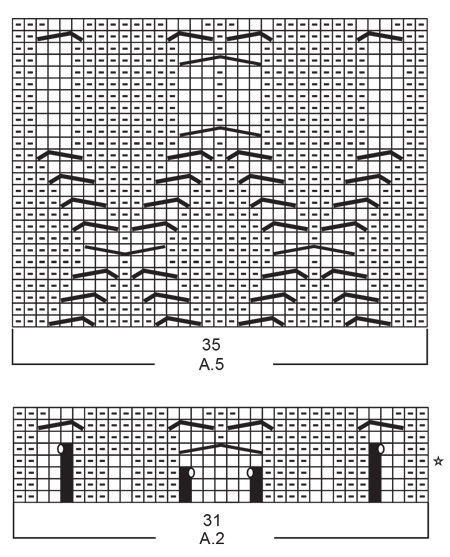
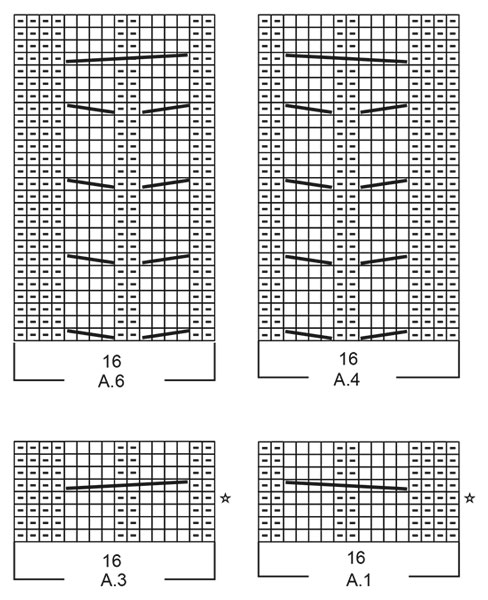
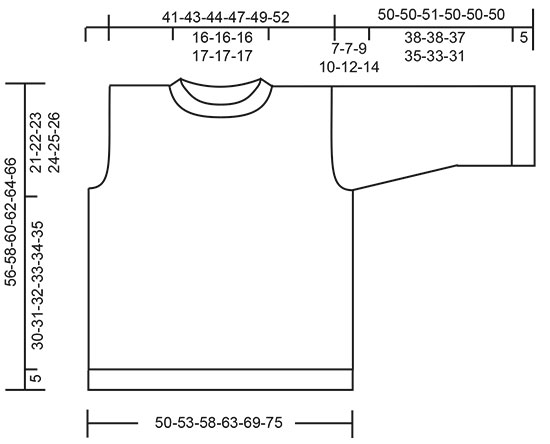
------------------------------------------------------- EXPLANATIONS FOR THE PATTERN: ------------------------------------------------------- RIDGE/GARTER STITCH (worked back and forth): Knit all rows. 1 ridge in height = Knit 2 rows. PATTERN: See diagrams A.1 to A.6. DECREASE TIP-1 (evenly spaced): To work out how to decrease evenly, count the total number of stitches on needle (e.g. 10 stitches) and divide by number of decreases to be made (e.g. 4) = 2.5. In this example decrease by alternately knitting together each 1st and 2nd stitch and each 2nd and 3rd stitch. DECREASE TIP-2: Decrease evenly – read DECREASE TIP-1 by purling 2 stitches together where you have purled or knitting 2 stitches together where you have knitted. INCREASE TIP: Work until there are 2 stitches left before the marker thread, 1 yarn over, knit 4 (marker thread sits between these 4 stitches), 1 yarn over. On the next round knit the yarn overs twisted to avoid holes. Then work the new stitches in stocking stitch. ------------------------------------------------------- START THE PIECE HERE: ------------------------------------------------------- JUMPER – SHORT OVERVIEW OF THE PIECE: The front and back pieces are worked separately, back and forth on the needle. The sleeves are worked with double pointed needles/short circular needle as far as the armholes. The sleeve cap is then finished back and forth. The neck is worked back and forth from top of shoulder. BACK PIECE: Cast on 99-107-115-123-139-147 stitches (including 4 edge stitches on each side) with circular needle size 4.5 mm and Air. Purl 1 row (= wrong side). Now work rib as follows: 4 stitches in GARTER STITCH – read description above, rib (= knit 2, purl 2) over the next 12-16-20-24-32-36 stitches, knit 2, work A.1 over the next 16 stitches, A.2 over the next 31 stitches, A.3 over the next 16 stitches, rib (= knit 2, purl 2) over the next 12-16-20-24-32-36 stitches, knit 2 and 4 stitches in garter stitch. Continue back and forth like this and repeat the first 2 rows in the diagrams until the rib measures 5 cm – adjust so the next row is from the right side. Now continue with the next 2 rows in A.1, A.2 and A.3, working as before over the other stitches. When you have finished the row with the star, change to circular needle size 5.5 mm and work pattern as follows from the right side: 4 stitches in garter stitch, stocking stitch over the next 10-14-18-18-26-30 stitches, decreasing at the same time 4-5-5-5-8-8 stitches evenly spaced – read DECREASE TIP-1 (= 6-9-13-13-18-22 stitches in stocking stitch), purl over purl and knit over knit over the next 4-4-4-8-8-8 stitches, continue with A.1, A.2 and A.3, knit over knit and purl over purl over the next 4-4-4-8-8-8 stitches, stocking stitch over the next 10-14-18-18-26-30 stitches, decreasing at the same time 4-5-5-5-8-8 stitches evenly spaced (= 6-9-13-13-18-22 stitches in stocking stitch) and 4 stitches in garter stitch. Continue this pattern. When the diagrams have been completed in height there are 95-101-109-117-127-135 stitches on the needle. Now work A.4 over A.1, A.5 over A.2 and A.6 over A.3. The other stitches are worked as before. REMEMBER THE KNITTING TENSION! When the diagrams have been completed, repeat the pattern in height. When the piece measures 35-36-37-38-39-40 cm, cast off stitches for the armholes on each side as follows: Cast off 3-4-5-6-6-7 stitches 1 time, 2 stitches 1-1-2-2-3-3 times and 1 stitch 1-1-1-2-3-4 times = 83-87-89-93-97-101 stitches. Continue the pattern with 1 edge stitch in garter stitch on each side. When the piece measures 52-54-56-58-60-62 cm, work the next row from the right side as follows: Work as before over the first 26-28-29-30-32-34 stitches, knit over knit and purl over purl over the next 31-31-31-33-33-33 stitches, AT THE SAME TIME as you decrease to 23-23-23-25-25-25 stitches – read DECREASE TIP-2 (= 8 stitches decreased), work as before over the next 26-28-29-30-32-34 stitches = 75-79-81-85-89-93 stitches. On the next row cast off the middle 23-23-23-25-25-25 stitches for the neck and each shoulder is finished separately. On the next row from the neck cast off 1 stitch for neck = 25-27-28-29-31-33 stitches. Continue working until the whole piece measures 56-58-60-62-64-66 cm (the armhole measures 21-22-23-24-25-26 cm). Knit 1 row from the right side where you decrease 4 stitches evenly spaced = 21-23-24-25-27-29 stitches. Cast off. Work the other shoulder in the same way. FRONT PIECE: Cast on and work in the same way as the back piece. When the piece measures 35-36-37-38-39-40 cm, cast off stitches for the armholes on each side in the same way as the back piece. Continue with pattern as before and 1 edge stitch in garter stitch on each side. When the piece measures 48-50-51-53-54-56 cm, work the next row from the right side as follows: Work the first 31-33-34-35-37-39 stitches as before, work the next 21-21-21-23-23-23 stitches as before AT THE SAME TIME as these stitches are decreased evenly to 13-13-13-15-15-15 stitches – remember DECREASE TIP-2 (= 8 stitches decreased), place these 13-13-13-15-15-15 stitches on a thread for the neck and work the last 31-33-34-35-37-39 stitches as before. Each shoulder is finished separately. Continue the pattern and cast off stitches as follows on each row from the neck: Cast off 2 stitches 2 times and 1 stitch 2 times = 25-27-28-29-31-33 stitches. Continue working until the whole piece measures 56-58-60-62-64-66 cm (the armhole measures approx. 21-22-23-24-25-26 cm). Knit 1 row from the right side where you decrease 4 stitches evenly spaced = 21-23-24-25-27-29 stitches. Cast off. Work the other shoulder in the same way. SLEEVE: Cast on 60-60-64-64-68-72 stitches with double pointed needles/short circular needle size 4.5 mm and Air. Knit 1 round, then work rib (= knit 2, purl 2) in the round for 5 cm. Knit 1 round where you decrease 10-9-11-10-12-14 stitches evenly spaced = 50-51-53-54-56-58 stitches. Change to double pointed needles/short circular needle size 5.5 mm. Insert 1 marker at the beginning of the round and work stocking stitch. When the piece measures 9-9-9-9-8-8 cm, increase 2 stitches under the sleeve – read INCREASE TIP. Increase like this every 5-4½-3½3-3-2½ cm a total of 7-8-9-10-10-11 times = 64-67-71-74-76-80 stitches. Continue working until the sleeve measures 43-43-42-40-38-36 cm. Now continue back and forth with stocking stitch and 1 edge stitch in garter stitch on each side, AT THE SAME TIME as you cast off stitches for the sleeve cap on each side as follows: Cast off 4-4-5-6-6-7 stitches 1 time, 2 stitches 2-2-2-2-1-1 times, 1 stitch 0-0-3-4-7-9 times, 2 stitches 3-3-2-2-2-2 times and 4-4-4-3-3-2 stitches 1 time = 28-31-31-32-32-32 stitches. Cast off the remaining stitches. The sleeve measures approx. 50-50-51-50-50-50 cm. Work the other sleeve in the same way. ASSEMBLY: Sew the shoulder seams inside the cast-off edge. Sew the sleeves to the body inside the 1 edge stitch on the body and the cast-off edge on the sleeves. Sew the side seams in the outermost loop of the outermost stitch so the seams are flat – start under the sleeve and work downwards until there is approx. 17 cm left (= split). NECK: Start mid-top of the shoulder with short circular needle size 4.5 mm and Air and knit up 72-80 stitches from the right side around the neck (the number of stitches must be divisible by 4). Work rib (= knit 2, purl 2) in the round for 11 cm. Cast off with knit over knit and purl over purl. Fold the rib at the top of the neck to the wrong side and sew down to give a folded edge. To avoid the neck-edge being tight and rolling down, the seam must be elastic. |
||||||||||||||||||||||||||||||||||||||||
Diagram explanations |
||||||||||||||||||||||||||||||||||||||||
|
||||||||||||||||||||||||||||||||||||||||
 |
||||||||||||||||||||||||||||||||||||||||
 |
||||||||||||||||||||||||||||||||||||||||
 |
||||||||||||||||||||||||||||||||||||||||
Have you finished this pattern?Tag your pictures with #dropspattern #seafarersheartsweater or submit them to the #dropsfan gallery. Do you need help with this pattern?You'll find 31 tutorial videos, a Comments/Questions area and more by visiting the pattern on garnstudio.com. © 1982-2026 DROPS Design A/S. We reserve all rights. This document, including all its sub-sections, has copyrights. Read more about what you can do with our patterns at the bottom of each pattern on our site. |
||||||||||||||||||||||||||||||||||||||||


With over 40 years in knitting and crochet design, DROPS Design offers one of the most extensive collections of free patterns on the internet - translated to 17 languages. As of today we count 324 catalogues and 12290 patterns translated into English (UK/cm). 12290
We work hard to bring you the best knitting and crochet have to offer, inspiration and advice as well as great quality yarns at incredible prices! Would you like to use our patterns for other than personal use? You can read what you are allowed to do in the Copyright text at the bottom of all our patterns. Happy crafting!
Post a comment to pattern DROPS 216-10
We would love to hear what you have to say about this pattern!
If you want to leave a question, please make sure you select the correct category in the form below, to speed up the answering process. Required fields are marked *.