
Popular categories
Looking for a yarn?


Comments / Questions (36)
![]() Draye wrote:
Draye wrote:
Bonjour excusez-moi je ne comprends pas le rang 5 du diagramme A4 le carré avec La Croix au milieu existe t’il une vidéo merci bcp pour le modèle 216-8
10.12.2021 - 09:36DROPS Design answered:
Bonjour Mme Draye, tout à fait, cette vidéo montre comment tricoter 5 fois la même maille pour augmenter 4 mailles dans des côtes anglaises bicolores. Bon tricot!
10.12.2021 - 11:32
![]() Robyn wrote:
Robyn wrote:
I am knitting another Drops cardigan at the moment (La Belle) and am hoping to make this one as well. I was wondering if the wool requirements on this pattern are correct as the other cardigan with the same dimensions is listed as needing a lot more wool than this one.
28.11.2021 - 05:51DROPS Design answered:
Dear Robyn, you need to take into account that the yarns have different yardage. DROPS Karisma has almost half the yardage of DROPS Sky so, even though they belong to the same yarn group, you will need less balls of Sky to make the cardigan. Happy knitting!
28.11.2021 - 19:15
![]() Julia Draye wrote:
Julia Draye wrote:
Bonjour je réalise le modèle 216.8 J’ai terminé les deux rangs en bleue jeans foncés je suis arrivée au début du diagramme quelle est la couleur employée je vous remercie bcp Julia
10.11.2021 - 13:29DROPS Design answered:
Bonjour Mme Draye, les couleurs à tricoter dans A.3 et A.4 sont indiquées par les losanges blancs/noir à droite et les étoiles blanches/noires à gauche de A.3 (selon que le rang se tricote sur l'endroit ou sur l'envers), autrement dit, le 1er rang se tricote sur l'endroit en bleu jeans clair, le 2ème rang sur l'endroit en curry etc.. bon tricot!
11.11.2021 - 08:49
![]() Graillot Nicole wrote:
Graillot Nicole wrote:
Bonjour. Je m appelle Nicole. Je réalise le très beau modèle drops 216-8. Je ne comprends pas le diagramme notamment au rang 3 qui parle de rang envers alors que l on se trouve sur l endroit ? Je suis désolée. Je n arrive pas ! Merci beaucoup pour votre réponse. Cordialement
15.08.2021 - 18:40DROPS Design answered:
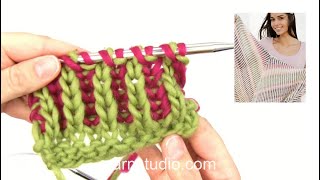
Bonjour Nicole, pour tricoter des côtes anglaises bicolores en rangs (aller-retour), on doit tricoter alternativement 2 rangs sur l'endroit, l'un avec une couleur l'autre avec la 2ème couleur (= rangs 1 et 2 des diagrammes) puis 2 rangs sur l'envers avec alternativement l'une et l'autre couleur (rangs 3 et 4 des diagrammes). Cette vidéo montre comment tricoter des côtes anglaises et pourra vous aider à comprendre comment tricoter (sans augmentations dans la vidéo, n'oubliez pas de les faire comme dans le diagramme). Bon tricot!
16.08.2021 - 07:57
![]() Rose-Marie Danielsson wrote:
Rose-Marie Danielsson wrote:
I mönstret anges en beskrivning på lettisk fläta men i instruktionsvideon en helt annan. Jag får inte till det. Vilken gäller ?
05.07.2021 - 11:44DROPS Design answered:
Hei Rose-Marie. Videoen viser en generell video på Latvisk flette. For å få det riktig må du følge oppskriften. Om du fremdeles har problemer, skriv gjerne tekstakt hva du har problemer med, så skal vi svare deg så godt vi kan. mvh DROPS design
05.07.2021 - 13:01
![]() Rose-Marie Danielsson wrote:
Rose-Marie Danielsson wrote:
Tack. Bytte till Google Chrom och där var symbolerna översatta. Nu kan jag läsa mönstret
23.06.2021 - 22:21
![]() Rose-Marie Danielsson wrote:
Rose-Marie Danielsson wrote:
Hej. Symbols 3 st på diagrammet. Hur vet jag vad dessa ”symbols” har för tecken? Står endast symbols och hur dessa stickas men inget tecken. Mvh Rose-Marie
22.06.2021 - 18:50DROPS Design answered:
Hej Rose-Marie. Jag är inte helt säker på vad du menar, men över diagrammet finns förklaringar till alla diagramikoner. Kanske du kan testa en annan webläsare om du inte ser de. Mvh DROPS Design
23.06.2021 - 07:54
![]() Ineke Peerdeman wrote:
Ineke Peerdeman wrote:
Ik heb een probleem met de twee-kleurige engelse patentsteek in de pas van patroon 216-8, een prachtig vestje. Ik lees de telpatronen A3 en A4 van onder naar boven, twee pennen van rechts naar links (goede kant) en daarna twee pennen van links naar rechts (verkeerde kant). Ik heb een oneven aantal steken, maar komma de 1e twee pennen niet uit met het telpatroon. Is er iemand die mij kan helpen?
11.03.2021 - 20:59DROPS Design answered:
Dag Ineke,
De eerste 2 naalden brei je recht, daarna brei je A.3 en A.4 volgens de beschrijving (Naald 3), waarbij je op het einde 3 steken van A.3 breit (in plaats van 2 steken). Op die manier kom je op een oneven aantal steken. In het patroon staat iedere naald aangegeven en je breit afwisselend aan de goede en de verkeerde kant. Dus 1 naald aan de goede kant. 1 naald aan de verkeerde kant, dan weer 1 naald aan de goede kant, enzovoorts.
27.03.2021 - 15:04
![]() Silke wrote:
Silke wrote:
Ich würde die Jacke gerne mit der Wolle Merino Extra Fine in der Größe M stricken. Genügt mir von den drei Farben des Musters 50g je Farbe oder benötige ich mehr? Die Lauflänge unterscheidet sich ja deutlich, daher wäre es gut zu wissen, wieviele Meter ich ca. für die Muster benötige, vielen Dank!
17.01.2021 - 22:54DROPS Design answered:
Liebe Silke, 50 g Merino Extra Fine könnte vielleicht passen (Jacke habe wir nicht mehr, so prüfen kann man nicht), im Zweifesfall lieber 2 bestellen - Viel Spaß beim stricken!
18.01.2021 - 15:19
![]() Gunvor Bergström wrote:
Gunvor Bergström wrote:
Om de maskor som "ökas" i patentstickningen inte räknas in hur räknas de då? De finns ju där. När jag har gjort första varvet enligt diagrammet har jag ökat maskantalet med 1/3, över 2 maskor har det blivit 3 maskor, omslagen inräknade. I fortsättningen ska jag sticka omslag och maska ihop men också göra nya omslag, så resultatet blir varken ökning eller minskning, utom vid x. Det är något jag inte förstår med detta. Var snäll ge mig beskrivning på patentstickning!
16.12.2020 - 17:21
|
||||||||||||||||||||||||||||||||||||||||||||||
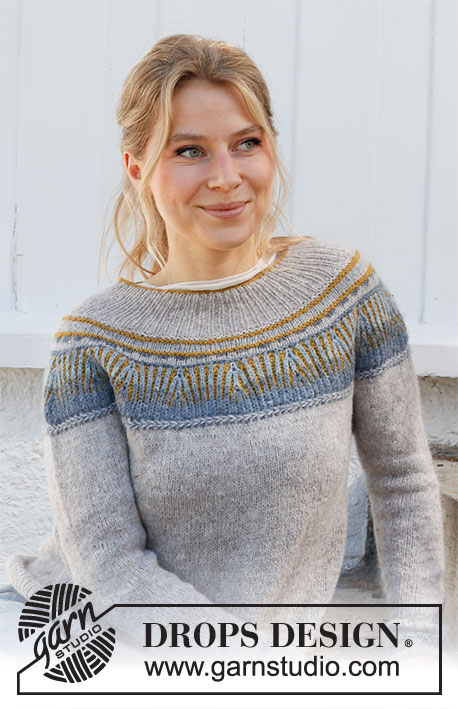
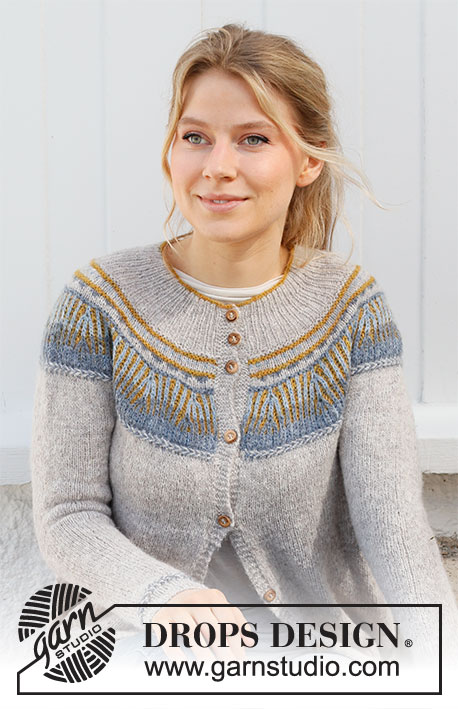
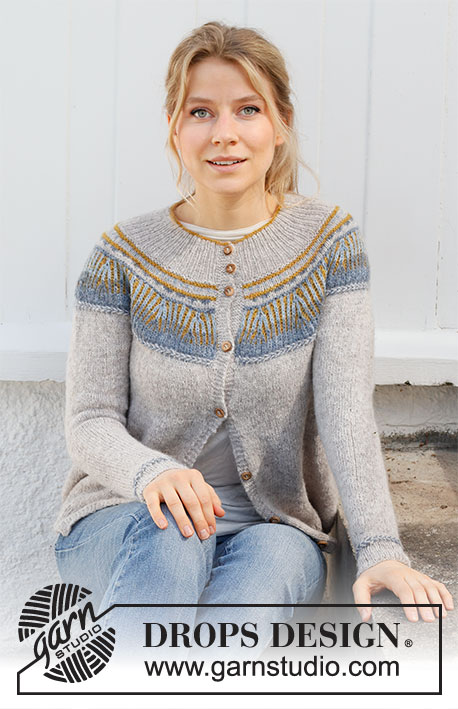
Mikado Jacket#mikadojacket |
||||||||||||||||||||||||||||||||||||||||||||||
 |
 |
|||||||||||||||||||||||||||||||||||||||||||||
Knitted jacket with round yoke in DROPS Sky. The piece is worked top down with 2-coloured English rib and Latvian cables . Sizes S - XXXL.
DROPS 216-8 |
||||||||||||||||||||||||||||||||||||||||||||||
|
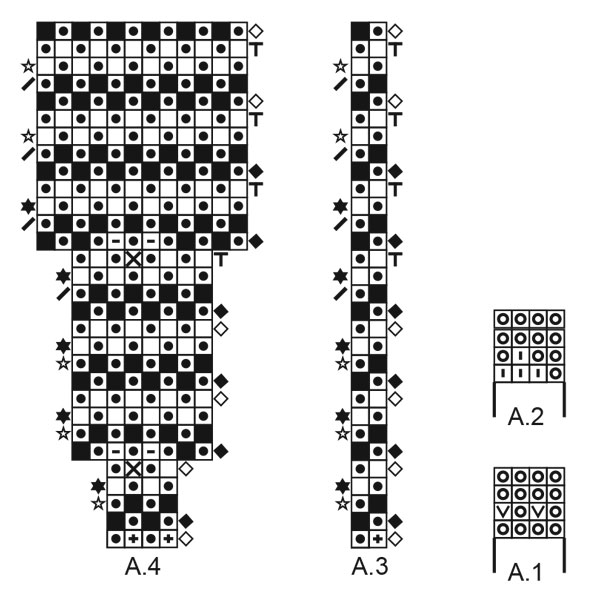
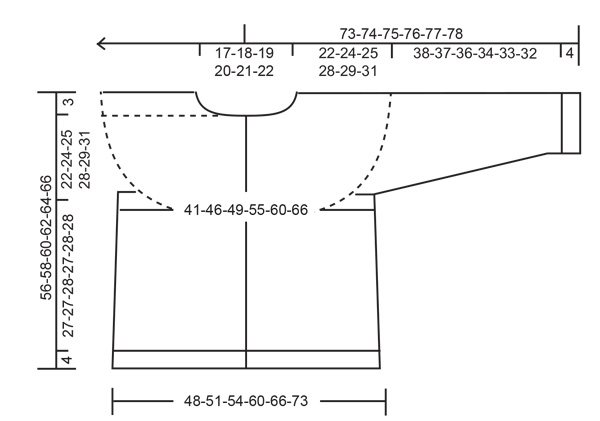
------------------------------------------------------- EXPLANATIONS FOR THE PATTERN: ------------------------------------------------------- RIDGE/GARTER STITCH (worked back and forth): Knit all rows. 1 ridge in height = Knit 2 rows. PATTERN: See diagrams A.1 to A.4. Diagrams A.1 and A.2 are worked in stocking stitch with 2-coloured pattern Diagrams A.3 and A.4 are worked in 2-coloured English rib. The diagrams show all rows in the pattern from the right side. INCREASE TIP-1 (evenly spaced): To work out how to increase evenly, count the total number of stitches on the needle (e.g. 133 stitches), minus the bands (e.g. 10 stitches) and divide the remaining stitches by the number of increases to be made (e.g. 14) = 8.78. In this example, increase by making 1 yarn over after approx. each 9th stitch. Do not increase on the bands. On the next row work the yarn overs twisted to avoid holes. INCREASE TIP-2 (for sides of body): All increases are worked from the right side! Work until there are 2 stitches left before the marker thread, make 1 yarn over, knit 4 (marker thread sits between these 4 stitches) make 1 yarn over (= 2 stitches increased at each marker thread; 4 stitches increased on round). On the next row purl the yarn overs twisted to avoid holes. Then work the new stitches in stocking stitch. DECREASE TIP (for mid under sleeve): Decrease 1 stitch on either side of the marker thread as follows: Work until there are 3 stitches left before the marker thread, knit 2 together, knit 2 (marker thread sits between these 2 stitches), slip 1 stitch as if to knit, knit 1 and pass the slipped stitch over the knitted stitch. BUTTONHOLE: Work buttonholes on the right band (when the garment is worn). Work from the right side when there are 3 stitches left on the row as follows: Make 1 yarn over, knit 2 together and knit 1. On the next row (wrong side), knit the yarn over to leave a hole. The first buttonhole is worked when the rib on the neck measures approx. 1½-2 cm. Then work the 2 next with 3 cm between them. The other 5-5-6-6-6-6 buttonholes are worked with approx. 8½-9-7½-8-8½-8½ cm between each one. CASTING-OFF TIP: To avoid the cast-off edge being tight you can cast off with a larger size needle. If the edge is still tight, make 1 yarn over after approx. each 4th stitch at the same time as casting off; the yarn overs are cast off as normal stitches. ------------------------------------------------------- START THE PIECE HERE: ------------------------------------------------------- JACKET – SHORT OVERVIEW OF THE PIECE: The neck and yoke are worked back and forth with circular needle from mid front and top down. The yoke is divided for body and sleeves and the body continued back and forth. The sleeves are worked in the round with short circular needle/double pointed needles, top down. NECK: Cast on 129-133-137-145-151-157 stitches (including 5 band stitches on each side towards mid front) with circular needle size 3 mm and curry. Purl 1 row (= wrong side). Change to light beige (cut the curry strand). Now work rib from the right side as follows: 5 band stitches in GARTER STITCH – read description above, * knit 1, purl 1 *, work from *-* until there are 6 stitches left on the row, knit 1 and finish with 5 band stitches in garter stitch. When the neck measures 1½-2 cm work BUTTONHOLE – read description above. Continue the rib for 7-8-8-9-9-10 cm from cast on edge. Change to circular needle size 4 mm. YOKE: ROW 1 (= right side): Knit and increase 14-14-18-18-22-26 stitches evenly spaced – read INCREASE TIP-1 = 143-147-155-163-173-183 stitches. ROW 2 (= wrong side): Knit. Place the 5 band stitches on threads on each side of the piece, without working them; pattern is now worked on the yoke and the bands finished separately afterwards = 133-137-145-153-163-173 stitches. Change to curry, cut the light beige strand. ROW 3: Knit and increase 20-20-20-20-26-28 stitches evenly spaced, cast on 1 stitch at the end of the row = 154-158-166-174-190-202 stitches. ROW 4: Knit and cast on 1 stitch at the end of the row = 155-159-167-175-191-203 stitches. When working pattern, the stitches which are not in the pattern are worked in the same colour as the first stitch in the pattern. ROW 5: Work 1 edge stitch in garter stitch, A.1 (= 4 stitches) until there are 2 stitches left on the row (= 38-39-41-43-47-50 times in width), work the next stitch in the same way as the first in A.1 and finish with 1 edge stitch in garter stitch. REMEMBER THE KNITTING TENSION! When A.1 has been worked 1 time in height, continue as follows: Change to curry (the light beige strand is not cut as it will soon be used again). ROW 1 (= right side): Knit and increase 12-12-14-16-20-28 stitches evenly spaced = 167-171-181-191-211-231 stitches. ROW 2 (= wrong side): Knit. ROW 3: Work 1 edge stitch in garter stitch, 0-0-1-0-0-0 stitches in stocking stitch, A.2 (= 4 stitches) until there are 2-2-3-2-2-2 stitches left (= 41-42-44-47-52-57 times in width), work the next stitch in the same way as the first stitch in A.2, 0-0-1-0-0-0 stitches in stocking stitch and finish with 1 edge stitch in garter stitch. When A.2 has been worked 1 time in height, the piece measures approx. 12-13-13-14-14-15 cm. Work stocking stitch with 1 edge stitch in garter stitch on each side and with light beige until the piece measures 12-13-13-14-15-17 cm. Continue as follows: Change to jeans blue (cut the light beige strand) and continue with circular needle size 3 mm. ROW 1 (= right side): Knit. ROW 2 (= wrong side): Knit. When working pattern, the stitches which are not in the pattern are worked in the same colour as the first stitch in the pattern. ROW 3: Work 1 edge stitch in garter stitch, A.3 (= 2 stitches), * A.4 (= 4 stitches), A.3 over 8-6-6-6-6-6 stitches (= 4-3-3-3-3-3 times in width) *, work from *-* until there are 8 stitches left (= 13-16-17-18-20-22 times in width), A.4 over 4 stitches, A.3 over 3 stitches and finish with 1 edge stitch in garter stitch. When A.3 and A.4 have been completed in height there are 279-307-325-343-379-415 stitches on the needle. Change to circular needle size 4 mm and continue with Latvian cables as follows: ROW 1 (= wrong side): Purl 1 row with 1 edge stitch in garter stitch on each side, using jeans blue. ROW 2 (= right side): Work 1 edge stitch in garter stitch using light beige, * knit 1 with light beige, knit 1 with jeans blue *, work from *-* until there are 2 stitches left, knit 1 with light beige and finish with 1 edge stitch in garter stitch with light beige. ROW 3 (= wrong side): Work 1 edge stitch in garter stitch with light beige, take both strands to the back, knit 1 with light beige. Take the jeans blue strand under the light beige strand and knit 1 with jeans blue. Continue to knit like this, in alternately light beige and jeans blue (always take the strand UNDER the strand from the last stitch worked) until there is 1 stitch left and finish with 1 edge stitch in garter stitch with light beige. ROW 4 (= right side): Work 1 edge stitch in garter stitch with light beige, take both strands to the front (towards you), purl 1 and keep the strands at the front. Take the jeans blue strand under the light beige strand and purl 1 with jeans blue and keep the strands at the front. Continue to purl like this, in alternately light beige and jeans blue (always take the strand UNDER the strand from the last stitch worked) until there is 1 stitch left and finish with 1 edge stitch in garter stitch in light beige. The piece measures approx. 21-22-22-23-24-26 cm. Continue the piece in stocking stitch and light beige. Cast off both edge stitches at the beginning of the next 2 rows = 277-305-323-341-377-413 stitches. Now work the bands as follows: RIGHT BAND: Place the stitches on circular needle size 4 mm and work with light beige as follows: Work back and forth in garter stitch but cast on 1 edge stitch at the end of the first row from the wrong side (towards the front piece). When the band is the same length as the yoke, cast off the edge stitch on the next row from the right side and place the stitches on the same needle as the yoke. LEFT BAND: Place the stitches on circular needle size 4 mm and work with light beige as follows: Work back and forth in garter stitch but cast on 1 edge stitch at the end of the first row from the right side (towards the front piece). When the band is the same length as the yoke, cast off the edge stitch on the next row from the wrong side, work 1 row from the right side and place the stitches on the same needle as the yoke. YOKE: = 287-315-333-351-387-423 stitches. Continue with light beige. Work stocking stitch with 5 band stitches in garter stitch on each side. The increases are finished in sizes S-M-L, but are continued in sizes XL-XXL-XXXL. SIZES XL-XXL-XXXL: On the next row from the right side increase 12-14-12 stitches evenly spaced = 363-401-435 stitches. Repeat the increase after 2 cm = 375-415-447 stitches. ALL SIZES: = 287-315-333-375-415-447 stitches. Work stocking stitch with 5 band stitches in garter stitch on each side. When the piece measures 22-24-25-28-29-31 cm from the cast-on edge, divide the piece for body and sleeves on the next row as follows: Work 5 band stitches in garter stitch, 39-44-46-53-59-65 stitches in stocking stitch (= front piece), place the next 60-64-68-76-84-88 stitches on for the sleeve and cast on 8 stitches under the sleeve, work 79-89-95-107-119-131 stitches in stocking stitch (= back piece), place the next 60-64-68-76-84-88 stitches on for the sleeve and cast on 8 stitches under the sleeve, work 39-44-46-53-59-65 stitches in stocking stitch and finish with 5 band stitches in garter stitch (= front piece). BODY: = 183-203-213-239-263-287 stitches. Insert 1 marker thread 48-53-55-62-68-74 stitches in from each side (= sides of body). There are 87-97-103-115-127-139 stitches between the threads on the back piece. Allow the marker threads to follow your work onwards; they will be used when increasing in the sides. Continue with stocking stitch and 5 band stitches in garter stitch on each side. When the piece measures 3 cm from the division, increase 1 stitch on each side of both marker threads (= 4 stitches increased) – read INCREASE TIP-2. Increase like this every 3-5-4-4-4-3 cm a total of 7-5-6-6-6-7 times= 211-223-237-263-287-315 stitches. When the piece measures 27-27-28-27-28-28 cm from the division, change to circular needle size 3 mm and work rib from the right side as follows: Work 5 band stitches in garter stitch, * knit 1, purl 1 *, work from *-* until there are 6 stitches left, knit 1 and 5 band stitches in garter stitch. Cast off with knit from the right side when the rib measures 4 cm – read CASTING-OFF TIP. The jacket measures approx. 56-58-60-62-64-66 cm from the shoulder down. SLEEVE: The sleeve is worked in the round with stocking stitch and light beige. Place the 60-64-68-76-84-88 stitches from the thread on the one side of the piece on double pointed needles size 4 mm and knit up 1 stitch in each of the 8 stitches cast on under the sleeve = 68-72-76-84-92-96 stitches. Insert a marker thread in the middle of the 8 stitches under the sleeve; it will be used when decreasing under the sleeve. Work stocking stitch in the round. When the piece measures 2 cm from the division, decrease 1 stitch on each side of the marker thread (= 2 stitches decreased) – read DECREASE TIP! Decrease like this every 2½-2½-2-1½-1½-1 cm a total of 12-13-14-17-20-21 times = 44-46-48-50-52-54 stitches. When the piece measures 37-36-35-33-32-31 cm from the division, work Latvian cables with light beige and jeans blue as follows: ROUND 1: * Knit 1 with jeans blue, knit 1 with light beige *, work from *-* to the end of the round. ROUND 2: Take both strands to the front of the piece (towards you). Take the jeans blue strand to the back, purl 1 and take the strand back to the front. Take the light beige strand under the jeans blue strand and then to the back, purl 1 and take the strand back to the front. Continue to purl like this with alternately jeans blue and light beige (always take the strand UNDER the strand from the last stitch worked). ROUND 3: Work in the same way as round 2 but always take the strand OVER the strand from the last stitch worked. Work 2 rounds of stocking stitch. Change to circular needle size 3 mm and work rib (= knit 1, purl 1) over all stitches. Cast off with knit when the rib measures 4 cm. The sleeve measures approx. 42-41-40-38-37-36 cm from the division. Work the other sleeve in the same way. ASSEMBLY: Sew the bands to the yoke, inside the 1 edge stitch. Sew the buttons onto the left band. |
||||||||||||||||||||||||||||||||||||||||||||||
Diagram explanations |
||||||||||||||||||||||||||||||||||||||||||||||
|
||||||||||||||||||||||||||||||||||||||||||||||
 |
||||||||||||||||||||||||||||||||||||||||||||||
 |
||||||||||||||||||||||||||||||||||||||||||||||
Have you finished this pattern?Tag your pictures with #dropspattern #mikadojacket or submit them to the #dropsfan gallery. Do you need help with this pattern?You'll find 33 tutorial videos, a Comments/Questions area and more by visiting the pattern on garnstudio.com. © 1982-2026 DROPS Design A/S. We reserve all rights. This document, including all its sub-sections, has copyrights. Read more about what you can do with our patterns at the bottom of each pattern on our site. |
||||||||||||||||||||||||||||||||||||||||||||||


With over 40 years in knitting and crochet design, DROPS Design offers one of the most extensive collections of free patterns on the internet - translated to 17 languages. As of today we count 324 catalogues and 12290 patterns translated into English (UK/cm). 12290
We work hard to bring you the best knitting and crochet have to offer, inspiration and advice as well as great quality yarns at incredible prices! Would you like to use our patterns for other than personal use? You can read what you are allowed to do in the Copyright text at the bottom of all our patterns. Happy crafting!
Post a comment to pattern DROPS 216-8
We would love to hear what you have to say about this pattern!
If you want to leave a question, please make sure you select the correct category in the form below, to speed up the answering process. Required fields are marked *.