
Popular categories
Looking for a yarn?


Comments / Questions (31)
![]() Bente Solskinn Vollstad wrote:
Bente Solskinn Vollstad wrote:
Det står at mønster skal strikkes slik - fra retten. (så er det ramset opp rekkefølge). Men det står ikke hvordan det skal gjøres fra vrangen. Vil jo tru at det starter med A9 , og fra venstre, men spør for sikkerhets skyld.
19.01.2021 - 12:30DROPS Design answered:
Hei Bente, Ja, diagrammet leses fra venstre til høyre på vrangen, so rad 2 begynner med 1 maske rille, 1 maske glattstrikk og A.9. God fornøyelse!
20.01.2021 - 08:14
![]() Anna wrote:
Anna wrote:
Is het ook mogelijk om deze trui rond te breien, dus zonder naden? En zo ja, waar moet ik dan op letten?
15.12.2020 - 17:13DROPS Design answered:
Dag Anna,
Ja, je zou bijv. het achter- en voorpand samen op een rondbreinaald kunnen zetten nadat je tot de splitten in de zijnaden hebt gebreid. Je hoeft dan geen kantsteken op te zetten, omdat de kantsteken gebruikt worden om de zijnaden in elkaar te naaien. Hetzelfde geldt voor de armsgaten, dus geen kantsteken opzetten.
17.12.2020 - 22:48
![]() Deras wrote:
Deras wrote:
Bonjour j \'aimerais tricoter ce pull superbe, mais avec des auguilles 3,5 et non avec des aiguilles du 5, comment je dois faire, quelle laine choisir merci a vous de ce que vous pourrez me dire afin de vite le tricoter marie danièle
01.09.2020 - 17:29DROPS Design answered:
Bonjour Mme Deras, nous ne sommes malheureusement pas en mesure de pouvoir adapter chacun de nos modèles à chaque demande, vous trouverez ici tous nos modèles de pulls du groupe A - n'hésitez pas à ajouter un filtre supplémentaire pour ajuster le nombre de mailles pour 10 cm. Bon tricot!
02.09.2020 - 08:24
![]() Marina Verhaeghe wrote:
Marina Verhaeghe wrote:
Betreft de mouwen. Volgens de beschrijving moeten die in ribbels gebreid worden, Maar op de foto ziet dat er precies als tricot uit. Moet dat in ribbels of tricot? Want als je het werk plat legt om te meten dan zie je dat het deel met het motief langer is dan deel in ribbels gebreid.
24.06.2020 - 18:34DROPS Design answered:
Dag Marina,
Je breit eerst 3 cm boordsteek (met aan elke kant een kantsteek in ribbelsteek), dan brei je de telpatronen A.4, A.10 en A.6. (en boven A.10 brei je A.5. Op een gegeven moment ga je meerderen midden onder de mouw en je breit de gemeerderde steken in tricotsteek. Dit is wat je op de foto ziet.
30.06.2020 - 16:14
![]() Michèle wrote:
Michèle wrote:
Bonjour, est ce que je peux tricoter ce pull en drop Paris svp? Aura t'il une belle tenue ? Merci pour vos super modèles
28.12.2019 - 22:53DROPS Design answered:
Bonjour Michele! Bien sur, le metrage est similaire, le meme pour le groupe de fils, mais n'oubliez pas que des fils à tricoter de textures différentes, donneront des effets différents. Regardez la lecon sur ce sujet ICI. Bon travail!
30.12.2019 - 14:37
![]() Eva wrote:
Eva wrote:
Hallo, sind im Diagramm nur Hinreihen oder Hin- und Rückreihen dargestellt? Vielen Dank im voraus.
04.12.2019 - 21:08DROPS Design answered:
Liebe Eva, Diagramme zeigen alle Reihen dh die Hin- sowie die Rückreihen - hier lesen Sie mehr über Diagramme. Viel Spaß beim stricken!
05.12.2019 - 10:00
![]() Christiane Supplie wrote:
Christiane Supplie wrote:
Bei A5 gibt es in der Strickschrift in der 18. Reihe einen Fehler.
04.12.2019 - 18:17
![]() DOVERGNE wrote:
DOVERGNE wrote:
Les diagrammes décrivent-ils les rangs endroits et envers ou uniquement les points sur l'endroit du travail(soit un rang sur 2)?
24.11.2019 - 18:03DROPS Design answered:
Bonjour Mme Dovergne, les diagrammes montrent tous les rangs, vus sur l'endroit - vous trouverez ici, comment lire des diagrammes. Bon tricot!
25.11.2019 - 10:01
![]() Ria Agterberg wrote:
Ria Agterberg wrote:
Ik heb al eerder deze vraag gesteld maar nog geen antwoord ontvangen. Waarom heb je voor het patroon DROPS Design: Patroon nr. x-442 rondbreinaalden nodig als je heen en weer moet breien. Voor de hals kan ik het wel begrijpen omdat je deze in het rond breit maar waarom ook voor bijv. het voor- en achterpand. Wilt u a.u.b. spoedig antwoord geven omdat ik deze trui wil gaan breien maar niet iets overbodigs wil kopen omdat rondbreinaalden toch wel prijzig zijn.
16.11.2019 - 08:04
![]() Ria Agterberg wrote:
Ria Agterberg wrote:
Waarom moeten de mouwen en voor- en achterpand op rondbreinaalden worden gebreid als er heen en weer gebreid moet worden. Dit kan dan toch op gewone naalden worden gedaan. Voor de hals begrijp ik het wel want die moet in het rond gebreid worden. Ik wil dit graag weten want veel geld heb ik niet en de aanschaf van rondbreinaalden is volgens mij overbodig.
13.11.2019 - 10:06DROPS Design answered:
Dag Ria,
Het is in Noorwegen gebruikelijk om met rondbreinaalden te breien en met name als er veel steken op de naald staan wordt dit aangeraden. Maar je kunt deze trui inderdaad ook prima met rechte naalden breien.
15.11.2019 - 12:29
|
||||||||||||||||||||||||||||||||||
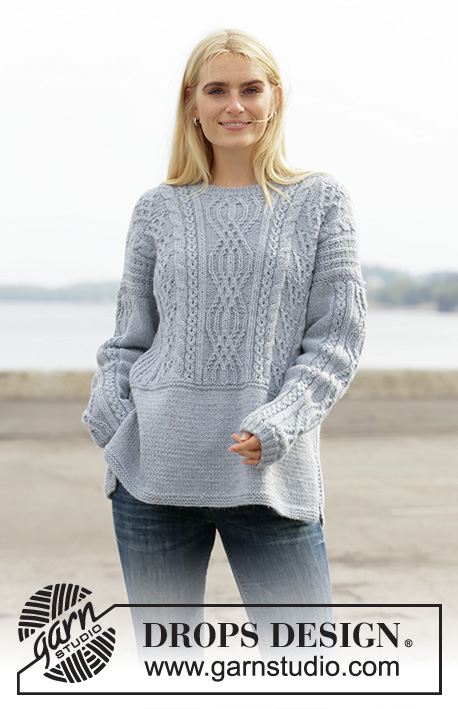
Mists of Time#mistsoftimesweater |
||||||||||||||||||||||||||||||||||
 |
 |
|||||||||||||||||||||||||||||||||
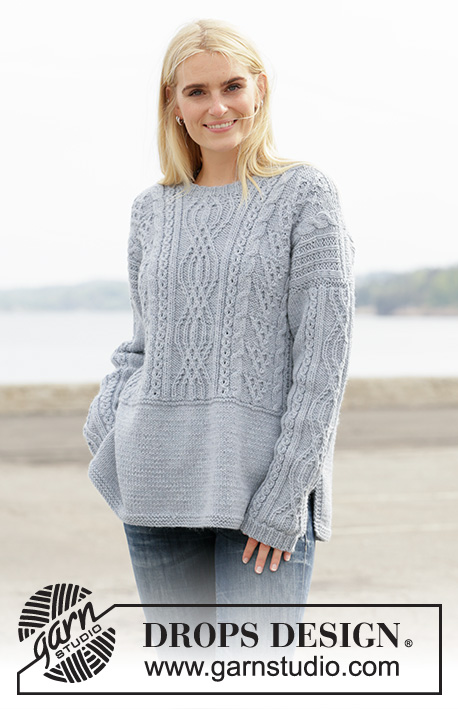
Knitted jumper in DROPS Alaska. The piece is worked with cables and texture. Sizes S - XXXL.
DROPS 205-28 |
||||||||||||||||||||||||||||||||||
|
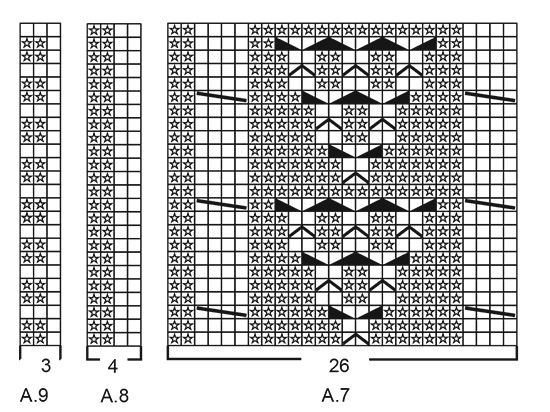
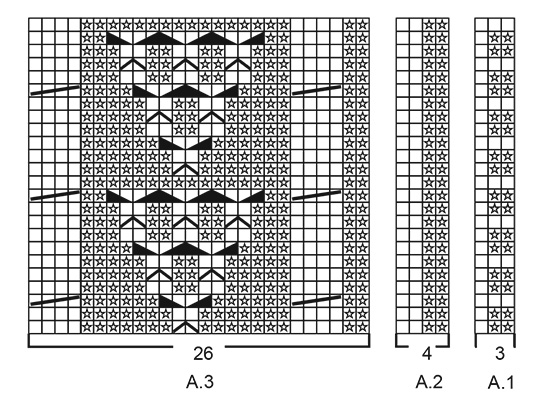
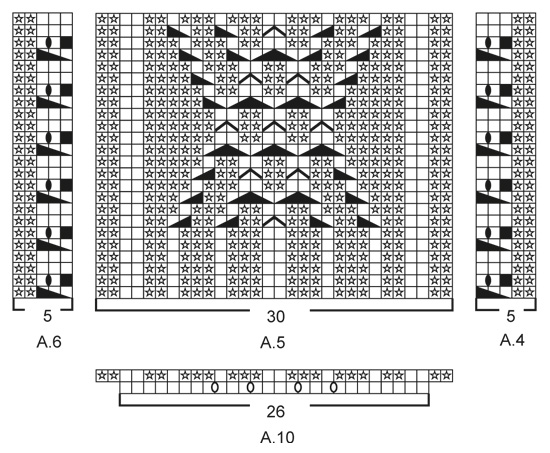
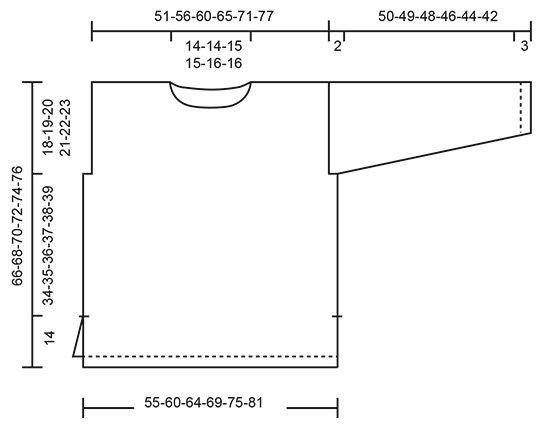
------------------------------------------------------- EXPLANATIONS FOR THE PATTERN: ------------------------------------------------------- RIDGE/GARTER STITCH (worked back and forth): Knit all rows. 1 ridge in height = Knit 2 rows. INCREASE TIP-1 (evenly spaced): To work out how to increase evenly, count the total number of stitches on needle (e.g. 90 stitches) and divide by the number of increases to be made (e.g. 24) = 3.75. In this example, increase by making 1 yarn over after approx. each 4th stitch. On the next row work the yarn overs twisted to avoid holes. PATTERN: See diagrams A.1 to A.10. Diagrams A.2 and A.8 apply only to sizes XXL and XXXL. DECREASE TIP: Decrease 1 stitch by purling 2 stitches together (decrease on a purled section). INCREASE TIP (for sleeves): All increases worked from the right side! Increase 1 stitch by making 1 yarn over. On the next row work the yarn over twisted to avoid a hole. The increased stitches are worked in stocking stitch. RIDGE/GARTER STITCH (worked in the round): 1 ridge = 2 rounds. Ie, knit 1 round and purl 1 round. ------------------------------------------------------- START THE PIECE HERE: ------------------------------------------------------- JUMPER - SHORT OVERVIEW OF THE PIECE: The piece is worked back and forth in sections and sewn together to finish. The sleeves are worked back and forth. The neck is worked in the round. BACK PIECE: Cast on 88-96-102-110-120-130 stitches with circular needle size 5 mm and Alaska. Work 3 RIDGES – read description above. Change to circular needle size 5.5 mm and work stocking stitch with 3 edge stitches in garter stitch on each side. REMEMBER THE KNITTING TENSION! When the piece measures 14 cm cast on 1 new stitch at the end of the next 2 rows (mark the split) = 90-98-104-112-122-132 stitches. Then work stocking stitch with 1 edge stitch in garter stitch on each side of the piece. When the piece measures approx. 18-19-19-20-20-21 cm – adjust to after a row from the wrong side and change to circular needle size 5 mm. Work 2 ridges – on the last row in the ridges increase 24-22-22-26-34-30 stitches evenly spaced – read INCREASE TIP = 114-120-126-138-156-162 stitches. SIZES S-M-L-XL: Change back to circular needle size 5.5 mm. Then work pattern as follows – from the right side: 1 edge stitch in garter stitch, 1 stitch in stocking stitch, A.1 (= 3 stitches) a total of 3-4-5-7 times, A.3 (= 26 stitches), A.4 (= 5 stitches), A.5 (= 30 stitches), A.6 (= 5 stitches), A.7 (= 26 stitches), A.9 (= 3 stitches) a total of 3-4-5-7 times, 1 stitch stocking stitch and 1 edge stitch in garter stitch. SIZES XXL-XXXL: Change back to circular needle size 5.5 mm. Then work pattern as follows – from the right side: 1 edge stitch in garter stitch, 1 stitch in stocking stitch, A.1 (= 3 stitches) a total of 7-8 times, A.2 (= 4 stitches), A.4 (= 5 stitches), A.3 (= 26 stitches), A.4 (= 5 stitches), A.5 (= 30 stitches), A.6 (= 5 stitches), A.7 (= 26 stitches), A.6 (= 5 stitches), A.8 (= 4 stitches), A.9 (= 3 stitches) a total of 7-8 times, 1 stitch in stocking stitch and 1 edge stitch in garter stitch. ALL SIZES: Continue this pattern and repeat the diagrams in height. When the piece measures 48-49-50-51-52-53 cm cast off 3-3-3-3-3-3 stitches at the beginning of the next 2 rows for the armholes = 108-114-120-132-150-156 stitches. Continue the pattern as before with 1 edge stitch in garter stitch on each side of the piece. When the piece measures 63-65-67-69-71-73 cm decrease (purled) 4 stitches evenly over the middle 22 stitches - read DECREASE TIP = 104-110-116-128-146-152 stitches. On the next row from the right side cast off the middle 20-20-22-22-24-24 stitches for neck and each shoulder is finished separately = 42-45-47-53-61-64 stitches. Then cast off 1 stitch on the next row from the neck = 41-44-46-52-60-63 stitches on shoulder. Continue working until the piece measures approx. 65-67-69-71-73-75 cm – adjust so you finish after a row from the wrong side. Then work 1 ridge where you decrease 4 stitches evenly spaced on the first row = 37-40-42-48-56-59 stitches. Knit 1 row from the right side and cast off with knit from the wrong side – make sure the cast-off edge is not tight! Work the other shoulder in the same way. FRONT PIECE: Cast on and work in the same way as the back piece. When the piece measures 57-59-61-62-64-66 cm work the next row as follows: Work the first 47-50-52-58-67-70 stitches as before, work the next 14-14-16-16-16-16 stitches at the same time as you decrease(purled) 4 stitches evenly spaced and then place these stitches on a thread for neck (= 10-10-12-12-12-12 stitches on thread) and work the remaining 47-50-52-58-67-70 stitches as before. Then cast off for neck on each row from the neck as follows: Cast off 2 stitches 2 times and 1 stitch 2-2-2-2-3-3 times = 41-44-46-52-60-63 stitches. Continue working until the piece measures approx. 65-67-69-71-73-75 cm – adjust so you finish after a row from the wrong side. Then work 1 ridge where you decrease 4 stitches evenly spaced on the first row = 37-40-42-48-56-59 stitches. Knit 1 row from the right side and cast off with knit from the wrong side – make sure the cast-off edge is not tight! Work the other shoulder in the same way. SLEEVE: The sleeve is worked back and forth with circular needle. Cast on 38-38-41-41-44-44 stitches (including 1 edge stitch on each side) with circular needle size 5 mm and Alaska. Work as follows from the right side: 1 edge stitch in garter stitch, (knit 1/ purl 2) until there is 1 stitch left and 1 edge stitch in garter stitch. Continue this rib for 3 cm. Change to circular needle size 5.5 mm, purl 1 row from the wrong side and increase 4-6-5-5-4-6 stitches evenly spaced = 42-44-46-46-48-50 stitches. The next row is worked as follows – from the right side: 1 edge stitch in garter stitch, 2-3-4-4-5-6 stitches in stocking stitch, A.4 (= 5 stitches), A.10 (= 26 stitches), A.6 (= 5 stitches), 2-3-4-4-5-6 stitches in stocking stitch and 1 edge stitch in garter stitch. When A.10 has been worked in height there are 46-48-50-50-52-54 stitches on the needle. Continue with A.5 (= 30 stitches) over A.10; the remaining stitches are continued as before. Repeat A.5 in height. When the piece measures 7-8-8-7-6-7 cm increase 1 stitch inside the 1 edge stitch on each side – read INCREASE TIP. Increase like this every 3½-3-3-2½-2½-2 cm a total of 12-13-13-15-15-16 times = 70-74-76-80-82-86 stitches. When the piece measures 48-47-46-44-42-40 cm insert 1 marker on both sides of the piece. They mark where the sleeve will be sewn to the armhole (marker = side seam on jumper). Continue working until the sleeve measures 49-48-47-45-43-41 cm. Then decrease (purled) 4 stitches evenly on A.5 from the right side = 66-70-72-76-78-82 stitches. Cast off on the next row from the right side. The sleeve measures 50-49-48-46-44-42 cm (shorter measurements in larger sizes due to longer yoke). Work the other sleeve in the same way. ASSEMBLY: Sew the shoulders seams with grafting stitches inside the cast-off edge. Sew in the sleeves and sew the bottom of the armholes (marker on the sleeve should match the side seam on the body). Sew the sleeve seams and side seams in one go inside the 1 edge stitch as far as the 1 edge stitch on the front/back piece (= approx. 14 cm split). NECK: The neck is worked in the round. Start from the right side and knit up 60-60-63-66-69-69 stitches (including the stitches from the thread on the front) with circular needle size 5 mm. Work rib (= knit 1 / purl 2) for 3 cm. Cast off with knit over knit and purl over purl. |
||||||||||||||||||||||||||||||||||
Diagram explanations |
||||||||||||||||||||||||||||||||||
|
||||||||||||||||||||||||||||||||||
 |
||||||||||||||||||||||||||||||||||
 |
||||||||||||||||||||||||||||||||||
 |
||||||||||||||||||||||||||||||||||
 |
||||||||||||||||||||||||||||||||||
Have you finished this pattern?Tag your pictures with #dropspattern #mistsoftimesweater or submit them to the #dropsfan gallery. Do you need help with this pattern?You'll find 29 tutorial videos, a Comments/Questions area and more by visiting the pattern on garnstudio.com. © 1982-2026 DROPS Design A/S. We reserve all rights. This document, including all its sub-sections, has copyrights. Read more about what you can do with our patterns at the bottom of each pattern on our site. |
||||||||||||||||||||||||||||||||||


With over 40 years in knitting and crochet design, DROPS Design offers one of the most extensive collections of free patterns on the internet - translated to 17 languages. As of today we count 324 catalogues and 12290 patterns translated into English (UK/cm). 12290
We work hard to bring you the best knitting and crochet have to offer, inspiration and advice as well as great quality yarns at incredible prices! Would you like to use our patterns for other than personal use? You can read what you are allowed to do in the Copyright text at the bottom of all our patterns. Happy crafting!
Post a comment to pattern DROPS 205-28
We would love to hear what you have to say about this pattern!
If you want to leave a question, please make sure you select the correct category in the form below, to speed up the answering process. Required fields are marked *.