
Popular categories
Looking for a yarn?


Comments / Questions (136)
![]() Kristine wrote:
Kristine wrote:
Hei! Ang. strillefasthet: Jeg får ikke 10 cm på pinne 4,5, men ca. pinne 5,5. I oppskriften står det at jeg skal begynne med rundpinne 4,5. Ettersom jeg har brukt 5,5 til riktig strikkefasthet, vil det si at jeg begynner med 5,5 i oppskriften? Og når det står at jeg skal øke til 5,5, vil det for mitt vedkommende bety at jeg skal øke til 6,5? Mvh nybegynner på strikkefasthet og genserstrikk
09.02.2019 - 00:25DROPS Design answered:
Hei Kristine, Strikkefastheten beskrevet her er med pinne 5,5, så da har du riktige fasthet. Så bruk pinnene som beskrevet i oppskriften - begynne med 4,5 og bytt til 5,5. God fornøyelse!
09.02.2019 - 08:33
![]() Anna wrote:
Anna wrote:
Hello! Why this instruction without elevation, this is correct? I knit this pullover, but it not comfortable to wear without elevation on raglan.... (((((
07.02.2019 - 10:16DROPS Design answered:
Dear Anna, some of our patterns do have an elevation some don't, to match everyone's taste. You can make an elevation if you like too, taking inspiration from a top down jumper with an elevation. Happy knitting!
07.02.2019 - 12:31
![]() Sofie wrote:
Sofie wrote:
Hej Jeg forstår ikke helt hvilke pinde man skal bruge? Kan jeg bruge: Rundpind 4,5 og 5,5 på 80cm Og strømpepinde 4,5 og 5,5?
13.01.2019 - 15:19DROPS Design answered:
Hei Sofie. Settpinnene brukes til ermet da rundpinnene er litt for lange til så få masker. Rundpinnene brukes til bolen. Jeg vil tro du trenger en 40cm rundpinne til halsen: 80 blir for lang, og settpinner blir for kort. Når det kommer til pinnestørrelsen du må ha (altså tykkelsen) avgjøres dette av strikkefastheten. Alle strikker forskjellig så du må bruke den pinnestørrelsen som gir deg 16 masker og 20 pinner glattstrikk på 10 cm i bredden og 10 cm i høyden. Kanskje må du gå opp eller ned 1 pinnestørrelse i forhold til det som står. Har du feil strikkefasthet blir plaggets mål feil. God fornøyelse
16.01.2019 - 11:57
![]() Sophie wrote:
Sophie wrote:
Bonjour, Joli modèle, simple et très confortable. Il est assez ample. Je l'ai réalisé en orange et le rendu est super. Merci drops design
08.01.2019 - 12:58
![]() Dorthe wrote:
Dorthe wrote:
Hallo! Ich bin am Beginn der Ärmel angekommen - dort, wo die Maschen stillgelegt werden und wundere mich, dass der "Bruch" nicht immer an der selben Stelle des Musters ist. Ich hätte irgendwie erwartet, dass die Trennung immer genau zwischen den beiden rechten Maschen in der Mitte von A1 erfolg. Habe ich da einen Denk- oder im Gestrick einen Zählfehler?
04.01.2019 - 20:36DROPS Design answered:
Liebe Dorthe, können Sie uns bitte bescheid sagen, welche Größe Sie stricken? Danke im voraus!
07.01.2019 - 09:12
![]() Ane Markussen wrote:
Ane Markussen wrote:
Kan det godt passe, at denne model er lige høj i halsen foran og bagpå..? Jeg synes at ribben i halsen går meget højt op foran..? Glædelig jul. Mvh Ane
20.12.2018 - 07:14DROPS Design answered:
Hei Ane. Ja det strikkes ikke forhøyning i nakken på denne genseren, så den er lik foran og bak. Du må gjerne legge til en forhøyning selv, om du ønsker at den skal være høyere i nakken. God fornøyelse og god jul
20.12.2018 - 07:35
![]() Tine wrote:
Tine wrote:
Er gået i gang med at tage ud ved mønstret A1 efter halsen. Skal jeg gøre det en maske før/efter mønstret? Ærmet bliver ikke bredere ved udtagningerne eller hvordan? Udtagningerne ligger ved siden af A1 og på billedet ser det ud til ærmet får flere masker på?
01.12.2018 - 11:03DROPS Design answered:
Hei Tine. Du øker 1 maske på hver side av A.1, det økes rett før/rett etter A.1. Det er totalt 4 A.1 på omgangen - i hver overgang mellom bol og ermer. Det betyr at ved hver A.1 økes 1 maske på ermet, og 1 maske på bolen = 8 masker økt på hele omgangen (2 på fortsykket, 2 på bakstykket og 2 på hvert erme). God fornøyelse
05.12.2018 - 09:32
![]() Catherine Berg wrote:
Catherine Berg wrote:
Thank you so very much
29.11.2018 - 04:02
![]() Catherine Berg wrote:
Catherine Berg wrote:
I am knitting this sweater. I dont understand these instructions. If I increase every other row (A1 = 8 stiches) I added up 184 stitches not 280. Please help. Cathy\\r\\nContinue this pattern at the same time as you increase 1 stitch on each side of A.1 to RAGLAN – see description above. Increase every 2nd round a total of 20-23-23-26-28-30 times. After all the increases there are 248-272-280-312-328-356 stitches on the needle.
26.11.2018 - 04:11DROPS Design answered:
Dear Mrs Berg, there are 96 sts before increase for raglan and you will increase for raglan - see RAGLAN- 8 sts a total of 23 times = 8 sts x 23 = 184 sts will be increased in total. so that you have then: 96 + 184 sts = 280 sts. Happy knitting!
26.11.2018 - 10:50
![]() Anna Wilks wrote:
Anna Wilks wrote:
Hi, is this quite an "airy" jumper ('scuse the pun)? I'm knitting a tension square and already finding I need to go up a needle size, maybe 2. Also, are the first tension instructions for air and yarns from yarn group C?
04.11.2018 - 12:54DROPS Design answered:
Dear Mrs Wilks, the usual tension to DROPS Air is 17 sts = 10 cm, we are working here with a tension of 16 sts = 10 cm, so the fabric will be somewhat loose. You can use DROPS Air or any yarn from yarn group C - read more about alternatives here. Happy knitting!
05.11.2018 - 09:31
|
|||||||
Carly Pullover#carlypullover |
|||||||
 |
 |
||||||
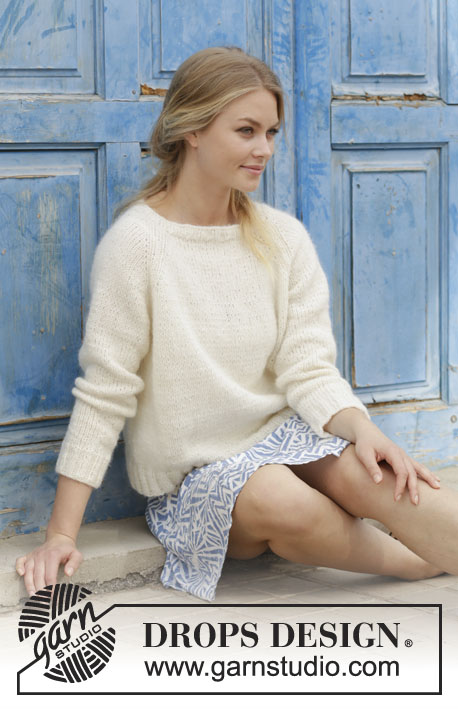
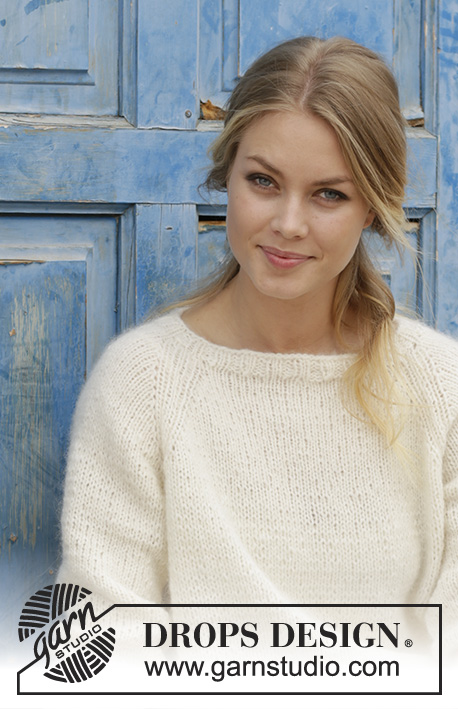
Knitted jumper with raglan, worked top down. Sizes S - XXXL. The piece is worked in DROPS Air.
DROPS 186-30 |
|||||||
|
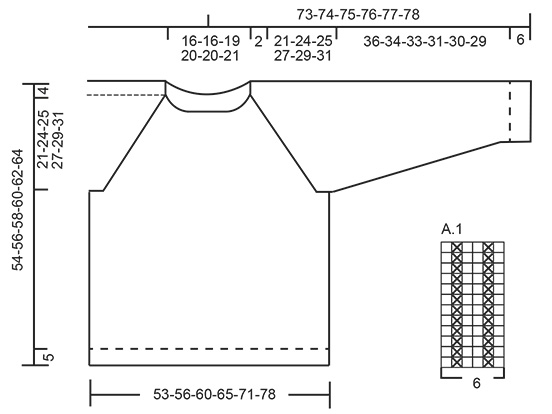
INFORMATION FOR THE PATTERN: PATTERN: See diagram A.1. The diagram shows all the rows in the pattern seen from the right side. RAGLAN: Increase to raglan on each side of A.1 (= 8 stitches increased per round). Increase by making 1 yarn over, on the next round work the yarn over twisted to avoid a hole. INCREASE TIP (evenly spaced): To work out how to increase evenly, count the total number of stitches on the round (e.g. 168 stitches) and divide by the number of increases to be made (e.g. 24) = 7. In this example, increase by making 1 yarn over after every 7th stitch. On the next round, work the yarn overs twisted to avoid holes. DECREASE TIP (for sleeves): Decrease 1 stitch on each side of the marker thread as follows: Work until there are 3 stitches left before the marker thread, slip 1 stitch as if to knit, knit 1, pass the slipped stitch over the knitted stitch, knit 2 stitches (the marker thread sits in the middle of these 2 stitches) knit the next 2 stitches together. ---------------------------------------------------------- The piece is worked in the round with circular needle from mid back, top down. The sleeves are worked with short circular needle/double pointed needles. JUMPER: Cast on 80-84-88-96-96-104 stitches with circular needle size 4.5 mm and Air. Knit 1 round, then work rib (= knit 2 / purl 2) for 2 cm. The beginning of the round = mid back. Change to circular needle size 5.5 mm and work the next round as follows: Knit 15-16-17-18-18-20 stitches - AT THE SAME TIME as you increase 2-1-2-2-2-3 stitches evenly over these stitches, knit 10-10-10-12-12-12 stitches, knit 30-32-34-36-36-40 stitches – AT THE SAME TIME as you increase 4-2-4-4-4-6 stitches evenly over these stitches, knit 10-10-10-12-12-12 stitches, knit 15-16-17-18-18-20 stitches – AT THE SAME TIME as you increase 2-1-2-2-2-3 stitches evenly over these stitches = 88-88-96-104-104-116 stitches. REMEMBER THE KNITTING TENSION! The next round is worked as follows: Knit 14-14-16-17-17-20 stitches (=half back piece), A.1 (= 6 stitches), knit 4-4-4-6-6-6 stitches (= sleeve), A.1, knit 28-28-32-34-34-40 stitches (= front piece), A.1, knit 4-4-4-6-6-6 stitches (= sleeve), A.1, knit 14-14-16-17-17-20 stitches (= half back piece). Continue this pattern at the same time as you increase 1 stitch on each side of A.1 to RAGLAN – see description above. Increase every 2nd round a total of 20-23-23-26-28-30 times. After all the increases there are 248-272-280-312-328-356 stitches on the needle. Continue with pattern and stocking stitch (without increasing) until the piece measures 23-26-27-29-31-33 cm from the cast-on edge mid front. Work the next round as follows: Work 39-42-43-48-52-57 stitches (= half back piece), place the next 46-52-54-60-60-64 stitches on 1 thread (= sleeve), cast on 6-6-10-8-10-10 new stitches on the needle (= under the sleeve), knit 78-84-86-96-104-114 stitches (= front piece), place the next 46-52-54-60-60-64 stitches on 1 thread (= sleeve), cast on 6-6-10-8-10-10 new stitches on the needle (= under the sleeve), and work the remaining 39-42-43-48-52-57 stitches (= half back piece). BODY: = 168-180-192-208-228-248 stitches. Insert a marker. THE PIECE IS NOW MEASURED FROM HERE. Continue in the round with stocking stitch until the piece measures 25-24-25-24-24-24 cm. Knit 1 round where you increase 24-28-28-32-36-36 stitches evenly on round – read INCREASE TIP = 192-208-220-240-264-284 stitches. Change to circular needle size 4.5 mm and work rib (= knit 2 / purl 2) for 5 cm. Cast off with knit over knit and purl over purl - to avoid the cast-off edge being tight you can cast off with needle size 5.5 mm. The piece measures approx. 54-56-58-60-62-64 cm from the shoulder down. SLEEVE: The piece is worked in the round with short circular needle/double pointed needles. Place the 46-52-54-60-60-64 stitches from the thread on the one side of the piece on circular needle/double pointed needles size 5.5 mm and in addition cast on 6-6-10-8-10-10 new stitches mid under sleeve = 52-58-64-68-70-74 stitches. Insert 1 marker thread in the middle of the new stitches. THE PIECE IS NOW MEASURED FROM HERE. Work stocking stitch in the round. When the piece measures 2 cm decrease 2 stitches mid under sleeve – read DECREASE TIP. Decrease every 4-3-2-2-1½-1½ cm a total of 9-11-14-15-15-16 times = 34-36-36-38-40-42 stitches. When the piece measures 36-34-33-31-30-29 cm knit 1 round where you increase 6-4-8-6-8-6 stitches evenly on round = 40-40-44-44-48-48 stitches. Change to double pointed needles size 4.5 mm and work rib (= knit 2 / purl 2). Continue with rib for 5 cm, then cast off with knit over knit and purl over purl. The sleeve measures approx. 42-40-39-37-36-35 cm. Work the other sleeve in the same way. ASSEMBLY: Sew the openings under the sleeves. |
|||||||
Diagram explanations |
|||||||
|
|||||||
 |
|||||||
Have you finished this pattern?Tag your pictures with #dropspattern #carlypullover or submit them to the #dropsfan gallery. Do you need help with this pattern?You'll find 25 tutorial videos, a Comments/Questions area and more by visiting the pattern on garnstudio.com. © 1982-2026 DROPS Design A/S. We reserve all rights. This document, including all its sub-sections, has copyrights. Read more about what you can do with our patterns at the bottom of each pattern on our site. |
|||||||


With over 40 years in knitting and crochet design, DROPS Design offers one of the most extensive collections of free patterns on the internet - translated to 17 languages. As of today we count 324 catalogues and 12290 patterns translated into English (UK/cm). 12290
We work hard to bring you the best knitting and crochet have to offer, inspiration and advice as well as great quality yarns at incredible prices! Would you like to use our patterns for other than personal use? You can read what you are allowed to do in the Copyright text at the bottom of all our patterns. Happy crafting!
Post a comment to pattern DROPS 186-30
We would love to hear what you have to say about this pattern!
If you want to leave a question, please make sure you select the correct category in the form below, to speed up the answering process. Required fields are marked *.