
Popular categories
Looking for a yarn?


Comments / Questions (15)
![]() Eva wrote:
Eva wrote:
I am knitted up to the armhole and about to continue the back piece. The instruction says that "Continue with stocking stitch and cast off for the armhole" and Not continue with pattern as stated for the the front piece? is the back piece from the armhole knitted just plain sticking stitch???
20.02.2021 - 16:59DROPS Design answered:
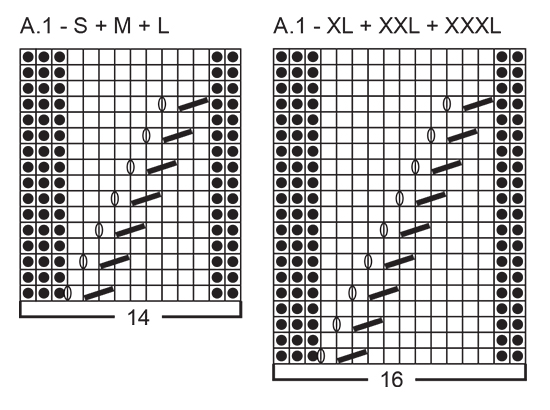
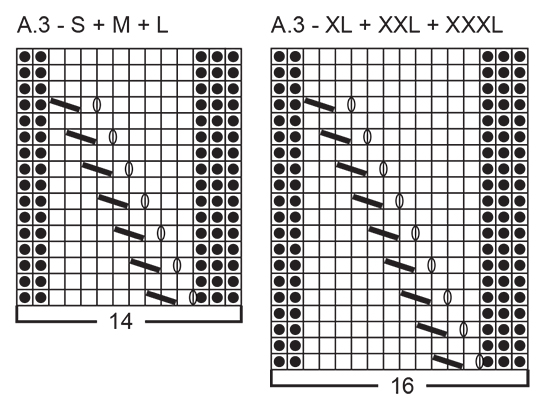
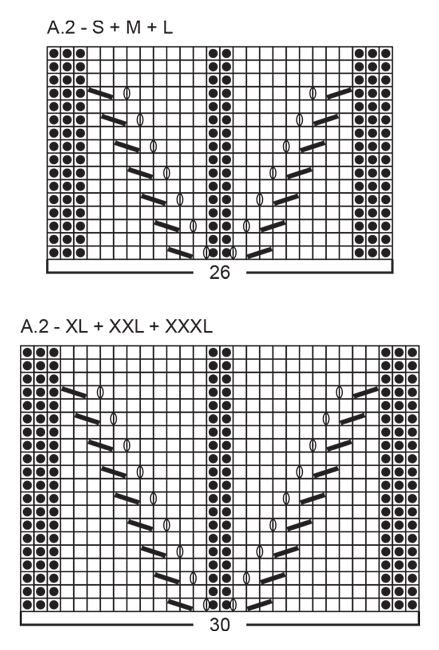
Dear Eva, the pattern and diagrams A.1, A.2 and A.3 are only worked on the front piece from the beginning, this means back piece is entirely worked with stocking stitch. Hope this helps. Happy knitting!
22.02.2021 - 08:10
![]() Jo Moïse wrote:
Jo Moïse wrote:
En ce temps de confinement j'ai de la laine en stock.Le modèle Rivage 199/22 me plaît. Comment adapter les motifs ajourés? L'échantillon 24m32r est converti en 28m38r. Merci de votre réponse
21.04.2020 - 18:29DROPS Design answered:
Bonjour Mme Moïse, nous ne sommes malheureusement pas en mesure de pouvoir adapter chacun de nos modèles à chaque demande individuelle. Vous pouvez vous adresser au votre magasin où vous avez acheté votre laine (certains sont restés disponibles), ou bien sur un forum tricot. Merci pour votre compréhension. Bon tricot!
22.04.2020 - 08:24
![]() Kathi wrote:
Kathi wrote:
Danke für die schnelle Antwort. Aber was ist mit „am Anfang jeder Reihe gemeint?“ Nehme ich die 9 Maschen mit einem Mal ab oder teile ich die Abnahmen über mehrere Reihen auf, bis ich insgesamt 9 M abgenommen habe? LG
17.01.2019 - 14:56DROPS Design answered:
Liebe Kathi, es wird insgesamt 9 Maschen aber auf beiden Seiten: 2 M 3 Mal und 1 M 3 mal: am Anfang der nächste Hinreihe ketten Sie 2 M, am Anfang der nächste Rückreihe ketten Sie 2 M ab = es wurden 2 M auf beiden Seiten abgekettet, dh am Anfang der 2 nächsten Reihen haben Sie 2 Maschen abgekettet. Diese beide Reihe noch 2 weitere Mal wiederholen = jetzt haben Sie 2 M 3x auf beiden Seiten abgekettet. Viel Spaß beim stricken!
17.01.2019 - 15:21
![]() Kathi wrote:
Kathi wrote:
Hallo, wie ist das mit den Abnahmen für die Armausschnitte am Rückenteil gemeint: 3 Maschen 0-0-0-1-1-2 x, 2 M 2-2-3-2-3-3 x und 1 Masche 1-2-3-3-4-4 x = 68-72-74-82-86-90 Maschen. Ich stricke L und verstehe wie viele Maschen jeweils beidseitig abgenommen werden müssen. LG
17.01.2019 - 09:01DROPS Design answered:
Liebe Kathi, Sie sollen für die Armausschnitte auf beiden Seiten (am Anfang jeder Reihe) so abketten: 2 M 3 x und 1 Masche 3 x =12+6 M. Sie hatten 92 M - 18 M = 74 M. bleiben (= 9 M werden auf beiden Seiten abgekettet). Viel Spaß beim stricken!
17.01.2019 - 09:40
![]() Kathi wrote:
Kathi wrote:
Vielen Dank für die schnelle Antwort. Aber woher weiß ich, ob ich in der Hinrunde oder Rückrunde bin? Bei mir stellen sich die rechten Masche, die man auf der Vorderseite sehen müsste, als linke Maschen da.
10.01.2019 - 13:03DROPS Design answered:
Liebe Kathi, das Rumpfteil wird in der Runde gestrickt, dann stricken Sie z.B. A.1 mit 2 li M, dann Löchermuster mit rechten Maschen - siehe Grösse - und mit 3 li M enden (= 14-16 M je nach der Grösse). Die li Maschen (= schwarze Punkte) werden immer links in der Runde gestrickt und die leere Kästchen werden immer rechts in der Runde gestrickt. Wenn Sie dann Vorder und Rückenteil separat stricken, lesen Sie die Löcherreihen = Hinreihen rechts nach links und die anderen (gerade) Reihen links nach rechts. Viel Spaß beim stricken!
10.01.2019 - 13:13
![]() Kathi wrote:
Kathi wrote:
Hallo, ich verstehe die Diagramm-Abfolge nicht. Woran erkenne ich, wann ich eine Hin- oder eine Rückreihe stricken muss? Man fängt doch bei A1 unten rechts an, und strickt weiter mit A2 und A3 oder? Da das Rumpfteil in Runden gestrickt werden soll, stricke ich doch nur von rechts nach links, oder nicht? Bitte dringend um Hilfe. Vielen Dank, liebe Grüße. Kathi
10.01.2019 - 08:57DROPS Design answered:
Liebe Kathi, ja genau, Diagramme lesen Sie von der unteren Ecke an der rechten Seite, rechts nach links bei jeder Runde - wenn Sie dann später hin und zurück stricken, lesen Sie die Rückreihen links nach rechts. Viel Spaß beim stricken!
10.01.2019 - 10:10
![]() Dilou wrote:
Dilou wrote:
Bjr , Mon pull est fini et je constate que sur les motifs des côtés, les lignes ajourées descendent au lieu de monter . Sur la ligne centrale par contre tout est correct. Cela n est pas grave en soi mais ça me chiffonne , car si je veux progresser il faut que je comprenne mon erreur ! Pouvez vous m'aider? Merci pour vos précieux conseils et vos superbes modéles
14.04.2018 - 15:09DROPS Design answered:
Bonjour Dilou, avez-vous bien suivi les diagrammes comme il faut? soit A.1 (= les jours partent vers la droite), A.2, et A.3 (= les jours partent vers la gauche)? N'hésitez pas à montrer votre ouvrage (même en photo et par mail) à votre magasin DROPS, on pourra fort probablement vous aider. Bon tricot!
16.04.2018 - 08:59
![]() Dilou wrote:
Dilou wrote:
Bonjour , je viens de terminer ce modèle très joli,mais j ai un petit problème :le bas du pull s enroule.Y-a - il une raison à cela, ?aurais je dû faire plus de côtes?Y a t i lun moyen de corrriger ça ? Avez vous un conseil pour eviter que ça se reproduise car j ai déjà eu ce problème.Merci
28.03.2018 - 10:04DROPS Design answered:
Bonjour Dilou, vous pouvez le bloquer: l'humidifier et le faire sécher à plat (avec des épingles si nécessaire). Bon tricot!
28.03.2018 - 15:53
![]() Martine wrote:
Martine wrote:
På den norske versjonen av summer sky mangler symbolene i forklaringen. Altså, jeg vet ikke hvilket symbol som betyr hva. Hvem av strekene er to rett sammen og hvem av strekene er ta en maske løst av?
15.02.2018 - 17:42DROPS Design answered:
Hei Martine. Usikker på hvorfor du ikke ser dem, alt er fint når jeg sjekker. Om du ikke får lastet alt ned, kommer iallefall diagramteksten her: Blank rute = rett fra retten, vrang fra vrangen. Sort sirkel = vrang fra retten, rett fra vrangen. 2 blanke ruter med en oval sirkel med strekk midt på = mellom 2 masker lages det 1 kast om pinnen. To ruter med strekk fra øvre høyre hjørne og ned til venstre hjørne = strikk 2 rett sammen.To ruter med strekk fra øvre venstre hjørene og ned til høyre hjørne = ta 1 maske løs av pinnen som om den skulle strikkes rett, strikk 1 rett, løft den løse masken over masken som ble strikket. God Fornøyelse.
16.02.2018 - 08:27
![]() Dilou wrote:
Dilou wrote:
Pouvez vous me dire si on peut tricoter les manches avec des aiguilles circulaires plutot que des aiguilles double pointe et si oui quelle dimension de fil faut il prendre ?merci , grâce à vous j avance bien mon modèle ?
08.02.2018 - 16:19DROPS Design answered:
Bonjour Dilou, tout à fait, vous pouvez tricoter les manches en rond avec une aiguille circulaire de 80 cm avec la technique du magic loop. Happy knitting!
08.02.2018 - 17:21
|
||||||||||||||||
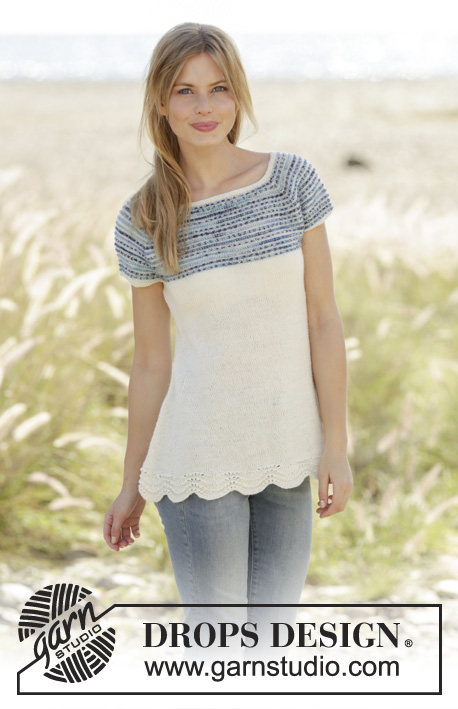
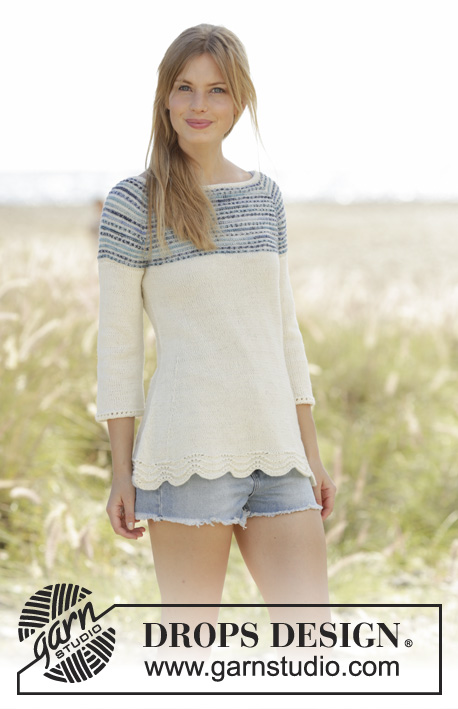
Summer Sky#summerskysweater |
||||||||||||||||
 |
 |
|||||||||||||||
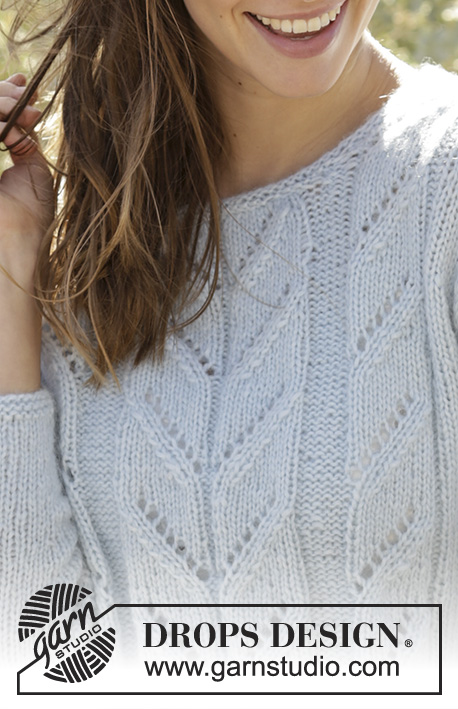
Knitted jumper with lace pattern in DROPS Air. Sizes S - XXXL.
DROPS 177-27 |
||||||||||||||||
|
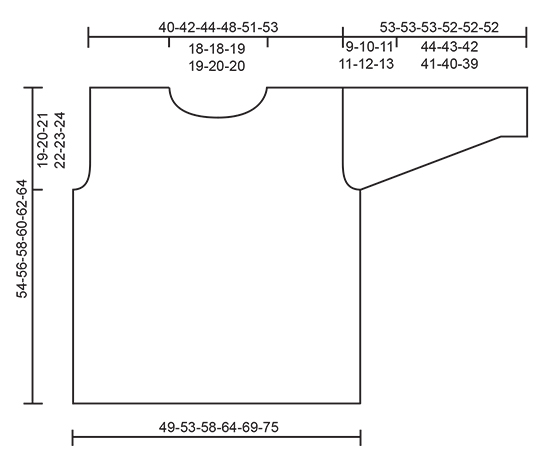
RIDGE / GARTER STITCH (worked in the round): 1 ridge = 2 rounds. * knit 1 round and purl 1 round *, repeat from *-*. PATTERN: See diagrams A.1 to A.3. The diagrams show all rows in the pattern from the right side. Choose the diagram for your size. INCREASE TIP (for mid underarm): Start 2 stitches before the marker thread, make 1 yarn over, knit 4 (the marker thread sits in the middle of these 4 stitches), make 1 yarn over (= 2 stitches increased). On the next row, work the yarn overs twisted knit so that there are no holes. ---------------------------------------------------------- JUMPER: The body is worked in the round on circular needle up to the armholes. Then work the front and back pieces separately, back and forth on the circular needle. The sleeves are worked in the round on double pointed needles/short circular needle. BODY: Cast on 168-180-196-216-236-256 stitches with circular needle size 5 mm and Air. Change to circular needle size 4 mm and work 2 RIDGES - see description above. Change back to circular needle size 5 mm. Insert 1 marker thread at the beginning of the round and 1 marker thread after 84-90-98-108-118-128 stitches (= the sides). Work 1 round knit. The next round is worked as follows: 15-18-22-23-28-33 stitches stocking stitch, A.1 (= 14-14-14-16-16-16 stitches), A.2 (= 26-26-26-30-30-30 stitches), A.3 (= 14-14-14-16-16-16 stitches), work stocking stitch for the rest of the round. Continue the pattern in the same way and allow the marker threads to follow the work upwards. REMEMBER THE KNITTING TENSION! When the piece measures 35-36-37-38-39-40 cm cast off 6 stitches in each side for the armholes (3 stitches on each side of both marker threads). Front and back pieces are continued separately. BACK PIECE: = 78-84-92-102-112-122 stitches. Continue with stocking stitch and cast off for the armhole at the beginning of each row in each side as follows: 3 stitches 0-0-0-1-1-2 times, 2 stitches 2-2-3-2-3-3 times and 1 stitch 1-2-3-3-4-4 times = 68-72-74-82-86-90 stitches. Continue working until the piece measures 52-54-56-58-60-62 cm. Now cast off the middle 28-28-30-30-32-32 stitches for the neck and each shoulder is finished separately. Continue with stocking stitch and cast off 1 stitch on the next row from the neck = 19-21-21-25-26-28 stitches left on the shoulder. Continue working until the piece measures 54-56-58-60-62-64 cm and then cast off. Work the other shoulder in the same way. FRONT PIECE: = 78-84-92-102-112-122 stitches. Continue with the pattern as before and cast off for the armhole at the beginning of each row in each side in the same way as for the back piece = 68-72-74-82-86-90 stitches. Continue working until the piece measures 48-50-52-52-54-56 cm. Now place the middle 22-22-22-22-20-20 stitches on a thread for the neck and each shoulder is worked separately. Continue the pattern as before and cast off at the beginning of each row from the neck as follows: 2 stitches 1-1-1-1-2-2 times and 1 stitch 2-2-3-3-3-3 times = 19-21-21-25-26-28 stitches left on the shoulder. Continue working until the piece measures 54-56-58-60-62-64 cm and then cast off. Work the other shoulder in the same way. SLEEVES: Cast on 34-36-38-38-40-42 stitches with double pointed needles size 5 mm and Air. Change to double pointed needles size 4 mm and work 2 RIDGES - see description above. Change back to double pointed needles size 5 mm. Insert 1 marker thread at the beginning of the round = mid underarm. Work in stocking stitch in the round. When the piece measures 10-8-8-8-6-10 cm increase 2 stitches mid underarm – READ INCREASE TIP. Increase in this way every 3-3-2½-2-2-1½cm in total 11-12-13-16-17-18 times = 56-60-64-70-74-78 stitches. When the piece measures 44-43-42-41-40-39 cm (shorter measurements in the larger sizes due to broader shoulder width and longer sleeve cap), cast off the middle 6 stitches under sleeve and the sleeve cap is finished back and forth on a short circular needle. Work stocking stitch and cast off at the beginning of each row in each side as follows: 2 stitches 2-3-3-3-3-3 times and 1 stitch 4-4-5-5-5-6 times. Continue to cast off 2 stitches at the beginning of each row in each side until the piece measures approx. 52-52-52-51-51-51 cm. Cast off 3 stitches 1 time in each side and then cast off the remaining stitches. The sleeve measures approx. 53-53-53-52-52-52 cm. Work one more sleeve in the same way. ASSEMBLY: Sew the shoulder seams inside the cast-off edge. Sew in the sleeves. NECKLINE: Knit up from the right side approx. 80 to 92 stitches around the neckline (including the stitches from the thread in front) with a short circular needle size 4 mm. Work 1 round purl, 1 round knit and 1 round purl. Change to short circular needle size 5 mm and cast off while working in knit on the right side. |
||||||||||||||||
Diagram explanations |
||||||||||||||||
|
||||||||||||||||
 |
||||||||||||||||
 |
||||||||||||||||
 |
||||||||||||||||
 |
||||||||||||||||
Have you finished this pattern?Tag your pictures with #dropspattern #summerskysweater or submit them to the #dropsfan gallery. Do you need help with this pattern?You'll find 29 tutorial videos, a Comments/Questions area and more by visiting the pattern on garnstudio.com. © 1982-2026 DROPS Design A/S. We reserve all rights. This document, including all its sub-sections, has copyrights. Read more about what you can do with our patterns at the bottom of each pattern on our site. |
||||||||||||||||


With over 40 years in knitting and crochet design, DROPS Design offers one of the most extensive collections of free patterns on the internet - translated to 17 languages. As of today we count 324 catalogues and 12290 patterns translated into English (UK/cm). 12290
We work hard to bring you the best knitting and crochet have to offer, inspiration and advice as well as great quality yarns at incredible prices! Would you like to use our patterns for other than personal use? You can read what you are allowed to do in the Copyright text at the bottom of all our patterns. Happy crafting!
Post a comment to pattern DROPS 177-27
We would love to hear what you have to say about this pattern!
If you want to leave a question, please make sure you select the correct category in the form below, to speed up the answering process. Required fields are marked *.