
Popular categories
Looking for a yarn?


Comments / Questions (24)
![]() Yvonne wrote:
Yvonne wrote:
Op de foto heeft get patroon meer kleuren dan genoemd bij de gebruikte wol. Welke kleuren zijn er daar nog meer gebruikt en hoeveel?
06.08.2017 - 12:01DROPS Design answered:
Hoi Yvonne, Door het kleurverloop in pink dream van fabel print lijkt het alsof er verschillende kleuren zijn gebreuikt. Je hebt dus alleen fabel pink dream en naturel nodig.
06.08.2017 - 22:30
![]() Kristina Sjönnemo wrote:
Kristina Sjönnemo wrote:
Aha, jag räknade inte in de första 8 minskade maskorna som står efter rubriken RAGLANMINSKNING, så därför blev det för många maskor. Men nu fick jag det klart för mig! Tack!
08.06.2017 - 15:01
![]() Kristina Sjönnemo wrote:
Kristina Sjönnemo wrote:
Hej igen, tack för svar! Jag skrev lite dumt i frågan om maskantalet bara. Jag stickar mönstret för 6/9 månader. (Skrev strl 2 och menade inte för en 2åring utan den andra storl i mönstret ;) ) Jag har 229m i början på oket och ska avsluta med 61, det stämmer inte för mig! Står det fel? Tack för svar / Kristina
08.06.2017 - 11:07DROPS Design answered:
Då jag kollar denna storlek så stämmer det också; du ska minska totalt 144 maskor för raglan och avm totalt 24 m för halsen: 229 - 144 - 24 blir då 61 maskor.
08.06.2017 - 13:51
![]() Kristina Sjönnemo wrote:
Kristina Sjönnemo wrote:
Hej, jag undrar över stycket som handlar om oket och avm för halskant. Vad betyder att maska av 8 m "1 gång" i början på varje varv för halsringning? Är "1 gång" samma sak som ett varv eller ska jag maska av 8 m i början av både räta varvet och det aviga varvet så att det blir symmetriskt? Jag får inte heller ihop maskantalet. Det blir inte 61 m kvar efter alla minskningar (stickar strl 2)
07.06.2017 - 11:07DROPS Design answered:
Du ska avm i varje sida, dvs. både från rät- och avigsidan. Maskantalet stämmer: Du börjar oket med 285 m, det minskas totalt 192 m för raglan och det avm totalt 28 m för halsen, då blir det 65 m kvar.
07.06.2017 - 13:31
![]() Eva-Maria wrote:
Eva-Maria wrote:
Hej, varför ska man lägga upp så många fler maskor till resåren än det sedan ska stickas slätstickning över? Jag tycker det blir en tjock och klumpig resår. Oftast brukar jag börja med färre än mönstren anger
13.05.2017 - 16:26DROPS Design answered:
Hej Eva-Maria, Du behöver fler maskor när du stickar resår, då resår är elastisk och drar ihop sig. Lycka till!
16.05.2017 - 09:45
![]() Mieke wrote:
Mieke wrote:
Hoeveel vulling heb ik nodig voor Fabeldier? Alvast bedankt.
01.11.2016 - 15:25DROPS Design answered:
Hoi Mieke. Dat weet ik niet - hangt er een beetje vanaf hoe veel je wilt vullen ;) Meestal koop je een zakje met vulling, en dat zou genoeg moeten zijn.
01.11.2016 - 16:07Ann wrote:
Jeg har nå begynt med raglanfellingen på genseren, men hva gjør jeg med hver fjerde maske (lus) i M2 mønsteret som er i hver 3. Omgang i stripene som strikkes med motsatt farge, med fellingen vil de ikke bli liggende over hverandre. Det blir feil om det blir "rotet" til herfra og opp.
31.01.2016 - 19:52DROPS Design answered:
Hvis du ikke har flere m at strikke lus i, så strikker du bare i den anden farve, men du sørger selv for at fortsætte lusen i samme mønster og altså over hinanden som tidligere. God fornøjelse!
03.03.2016 - 15:49
![]() Anja Breder wrote:
Anja Breder wrote:
Hei. Mener dere at man skal redusere maskeantallet når man begynner på glatt? På forhånd takk for hjelpen :-) mvh, anja
20.05.2014 - 20:29DROPS Design answered:
Hej Anja. Ja, det er korrekt.
21.05.2014 - 12:31
![]() Cathee wrote:
Cathee wrote:
Lovely but like other knitters the tension was hard to obtain and sizing was generous
05.03.2013 - 12:18
![]() Caroline Perlström wrote:
Caroline Perlström wrote:
Vad behöver jag ändra/tänka på om jag vill sticka koftan i garnet BabyMerino isstället för i Fabel?
01.10.2012 - 16:38DROPS Design answered:
Fabel och Baby Merino tillhör garngrupp A och kan användas i samma mönster. Du kan få hjälp hos DROPS återförsäljare med att räkna om garnåtgång.
04.10.2012 - 09:58
|
|||||||
Carnival Star#carnivalstarjacket |
|||||||
 |
 |
||||||
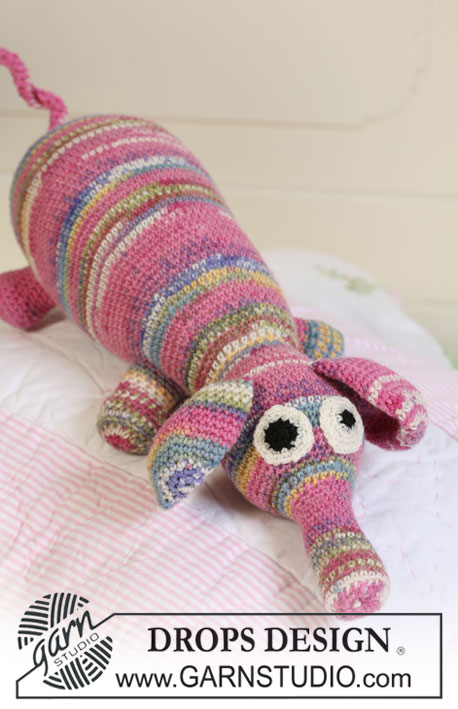
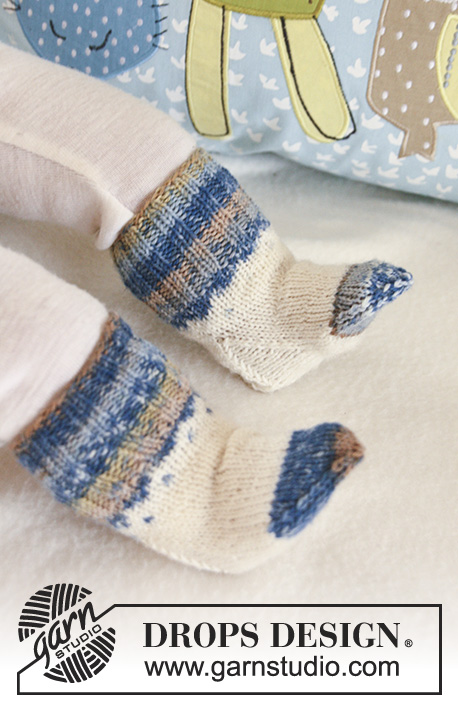
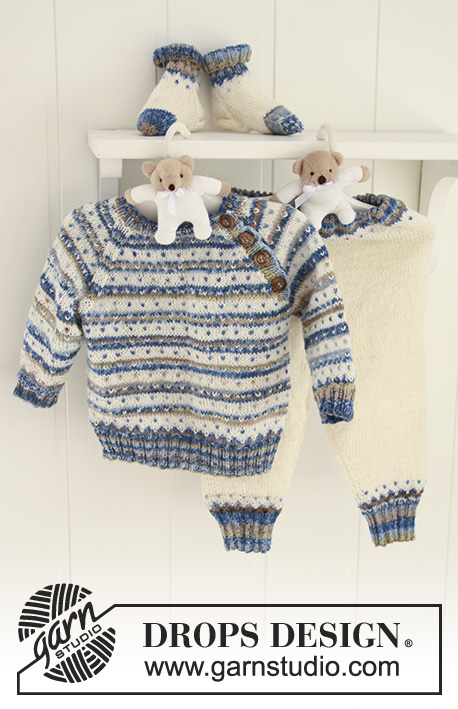
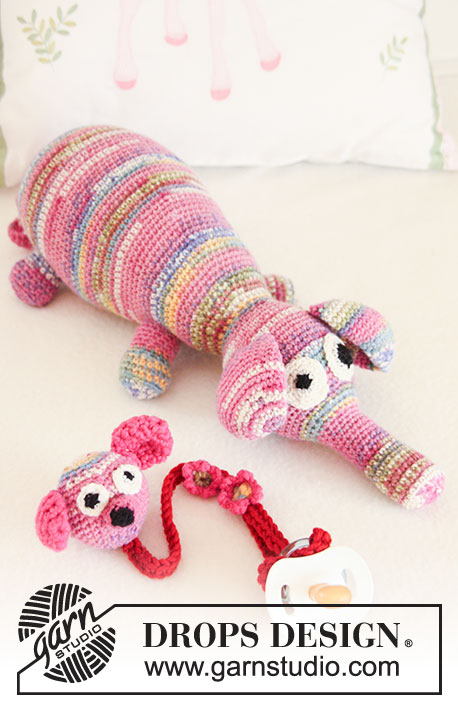
Set of knitted jacket with stripes, dots and raglan plus socks for baby and children in DROPS Fabel. Matching crochet plushie and dummy leash in DROPS Fabel and DROPS Merino Extra Fine.
DROPS Baby 19-4 |
|||||||
|
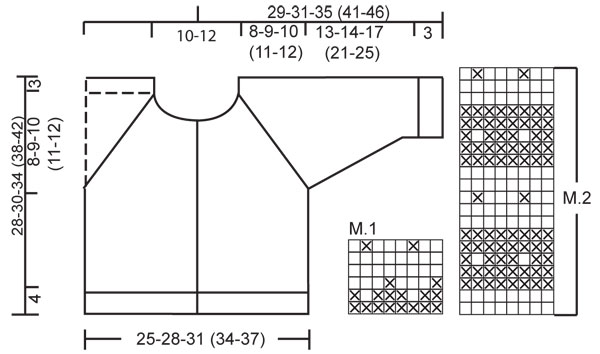
JACKET: PATTERN: See diagram M.1 and M.2. The entire pattern is worked in stocking st. GARTER ST (back and forth on needle): K all rows. DECREASING TIP (applies to raglan): FROM RS: Dec as follows in each transition between sleeve and body piece (beg 3 sts before marker): K2 tog, K2 (marker sits between these 2 sts), slip 1 st as if to K, K1, psso. FROM WS: Dec as follows in each transition between sleeve and body piece (beg 3 sts before marker): P2 tog into back of loop, P2 (marker sits between these 2 sts), P2 tog. NOTE! Make sure sts sit the right way as seen from RS. ---------------------------------------------------------- ---------------------------------------------------------- JACKET: BODY PIECE: Worked back and forth on circular needle from mid front. Cast on 148-168-184 (200-220) sts (includes 1 edge st each side) on circular needle size 2.5 mm with pink dream. P 1 row from WS, then continue in rib, K2/P2 with 1 edge st and K2 each side towards mid front (as seen from RS). When rib measures 4 cm work 1 row stocking st, AT THE SAME TIME dec 17-21-21 (21-25) sts evenly = 131-147-163 (179-195) sts. Insert a marker 33-37-41 (45-49) sts in from each side = 65-73-81 (89-97) sts between markers on back piece. Continue in M.1 with 1 edge st each side towards mid front – NOTE: repeat M.1 across the row until 2 sts remain on needle, work 1 st like first st in M.1 and finish with 1 edge st. After M.1 continue in M.2 in the same way with 1 edge st each side. REMEMBER THE KNITTING TENSION! When piece measures approx 17-18-21 (24-27) cm - adjust after 1 stripe in M.2 (i.e. 5 rows in one colour) - work next row as follows: work 29-33-37 (41-45) sts (= front piece), cast off 8 sts for armhole, work 57-65-73 (81-89) sts (= back piece), cast off 8 sts for armhole, work 29-33-37 (41-45) sts (= front piece). Put piece aside and knit the sleeves. SLEEVE: Worked in the round on double pointed needles. Cast on 40-44-44 (48-52) sts on double pointed needles size 2.5 mm with pink dream. K 1 round, then continue in rib, K2/P2. When rib measures 3 cm K 1 round, AT THE SAME TIME dec 3 sts evenly = 37-41-41 (45-49) sts. Insert a marker at beg of round = mid under sleeve. Continue in M.1. – NOTE: repeat M.1 across the round until 1 st remain, work this st like the first st in M.1. After M.1 continue in M.2 in the same way. AT THE SAME TIME when piece measures 6 cm inc 1 st each side of marker. Repeat the inc on every 4-4-4 (5-6) round a total of 8-8-12 (12-12) times = 53-57-65 (69-73) sts – incorporate inc sts in pattern as you go along. When piece measures approx 16-17-20 (24-28) cm - adjust to the same row in M.2 as on body piece – cast off 8 sts mid under sleeve = 45-49-57 (61-65) sts left on needle. Put piece aside and knit the other sleeve. YOKE: Slip sleeves on the same circular needle as body pieces where cast off for armholes = 205-229-261 (285-309) sts. Insert a marker in all 4 transitions between sleeves and body piece. READ ALL OF THE FOLLOWING SECTION BEFORE CONTINUING! Continue M.2 – make sure stripes on sleeves and body piece match. RAGLAN DEC: At the same time dec 1 st on each side of all markers, beg from RS (= 8 dec per row) – SEE DECREASING TIP! Repeat the dec on every other row a total of 12-14-13 (14-16) times and then on every row: 4-4-9 (10-10) times. NECK: At the same time when piece measures 23-25-29 (32-36) cm cast off to shape the neckline at the beg of every row from mid front: 6-8-8 (8-10) sts 1 time, 2 sts 1 time and 1 st 2-2-2 (4-4) times. After all dec for raglan and neck are complete there are 57-61-61 (65-69) sts left on needle and piece measures approx 28-30-34 (38-42) cm from cast on row to shoulder. Slip sts on a stitch holder. LEFT FRONT BAND: Pick up approx 68-76-88 (96-108) sts (divisible by 4) along left front piece on circular needle size 2.5 mm with pink dream. Work rib, K2/P2, back and forth on needle with 1 edge st in garter st and K2 each side (as seen from RS). Cast off with K over K and P over P when front band measures 2 cm. RIGHT FRONT BAND: Like left front band, but after 2 rows make 4-4-4 (5-5) buttonholes evenly distributed – place the bottom buttonhole approx 2 cm from bottom edge and the top one approx 4 cm from the top (the last buttonhole is made on neckline). 1 BUTTONHOLE = K2 tog and make 1 YO. NOTE! For neatest result make buttonholes in P sts (as seen from RS) by P2 tog. NECKLINE: Slip sts from neck back on circular needle size 2.5 mm, and pick up approx 16 to 22 sts on each neckline at front with pink dream (also pick up on front bands) = approx 89 to 113 sts. P 1 row from WS with 1 st each side in garter st, AT THE SAME TIME dec evenly to 84-88-92 (96-100) sts. Continue in rib, K2/P2, with 1 edge st in garter st and K2 each side towards mid front (as seen from RS). AT THE SAME TIME after 2 rows rib make 1 buttonhole in line with the others on front band. Cast off with K over K and P over P when neckline measures 2 cm. ASSEMBLY: Sew openings under sleeves. Sew on buttons. -------------------------------------------------------------------- SOCKS: SOCK: PATTERN: See diagram M.1 – pattern worked in stocking st. HEEL DECREASES: ROW 1 (= RS): Work row until 6-6-6 (7-8) sts remain, slip next st as if to K, K1, psso, turn piece. ROW 2 (= WS): Work row until 6-6-6 (7-8) sts remain, slip next st as if to P, P1, psso, turn piece. ROW 3 (= RS): Work row until 5-5-5 (6-7) sts remain, slip next st as if to K, K1, psso, turn piece. ROW 4 (= WS): Work row until 5-5-5 (6-7) sts remain, slip next st as if to P, P1, psso, turn piece. Continue dec like this with 1 less st before each dec until there are 8-10-10 (10-12) sts on needle. DECREASING TIP: Dec as follows before marker: K2 tog. Dec as follows after marker: Slip 1 st as if to K, K1, psso. --------------------------------------------------------- --------------------------------------------------------- SOCK: Cast on 48-52-52 (56-60) sts on double pointed needles size 2.5 mm with pink dream. Work rib, K2/P2 for 5-6-6 (7-7) cm. K 1 round, AT THE SAME TIME dec 12 sts evenly = 36-40-40 (44-48) sts. Now continue in M.1. After M.1 continue in off-white and stocking st. When piece measures 7-8-8 (9-9) cm keep the first 18-20-20 (22-26) sts on needle for heel and slip the remaining 18-20-20 (22-22) sts on a stitch holder (= upper foot). Work stocking st back and forth on needle on heel sts for 3-3.5-4 (4-4.5) cm – insert a marker. Now work HEEL DECREASES – see above! After heel dec pick up 8-9-10 (10-11) sts each side of heel and slip sts from stitch holder back on needle = 42-48-50 (52-56) sts. Continue in the round in stocking st, AT THE SAME TIME on first round dec 1 st before the 18-20-20 (22-22) sts on upper foot by K2 tog, and dec 1 st after the 18-20-20 (22-22) sts on upper foot by slipping 1 st as if to K, K1, psso. Repeat the dec on every other round a total of 3-6-7 (5-7) times = 36-36-36 (42-42) sts. Continue until sock measures 8-9-10 (12-14) cm from marker on heel. Now insert 1 new marker each side with 18-18-18 (21-21) sts on upper foot and under foot between markers. Dec 1 st each side of both markers – SEE DECREASING TIP. Repeat the dec on every round a total of 7-7-7 (8-8) times = 8-8-8 (10-10) sts left on needle. Cut the thread, pull through remaining sts, tighten and fasten. Sock measures approx 10-11-12 (14-16) cm. --------------------------------------------------------------------- FABULOUS ANIMAL: CROCHET INFO: Replace first dc at beg of each round with 1 ch and finish each round with 1 sl st in first dc from beg of round. CROCHET DC TOG: Crochet 2 dc tog to 1 dc as follows: Insert hook in first st, pick up thread, insert hook in next st, pick up thread, make 1 YO and pull thread through all 3 sts on hook. --------------------------------------------------------- --------------------------------------------------------- BODY: Beg at the back end of animal and crochet towards the head and trunk. Then crochet ears, legs, tail and eyes, which are sewn on afterwards. BODY: Crochet 4 ch with crochet hook size 3.5 mm with pink dream and form a ring with 1 sl st in first ch. SEE CROCHET INFO! ROUND 1: Crochet 6 dc in ring. ROUND 2: 2 dc in each dc = 12 dc. ROUND 3: * 1 dc in first dc, 2 dc in next dc *, repeat from *-* = 18 dc. ROUND 4: * 1 dc in each of the first 2 dc, 2 dc in next dc *, repeat from *-* = 24 dc. ROUND 5: * 1 dc in each of the first 3 dc, 2 dc in next dc *, repeat from *-* = 30 dc. ROUND 6: * 1 dc in each of the first 4 dc, 2 dc in next dc *, repeat from *-* = 36 dc. ROUND 7: * 1 dc in each of the first 5 dc, 2 dc in next dc *, repeat from *-* = 42 dc. ROUND 8: * 1 dc in each of the first 6 dc, 2 dc in next dc *, repeat from *-* = 48 dc. ROUND 9: * 1 dc in each of the first 7 dc, 2 dc in next dc *, repeat from *-* = 54 dc. ROUND 10: * 1 dc in each of the first 8 dc, 2 dc in next dc *, repeat from *-* = 60 dc. ROUND 11: * 1 dc in each of the first 9 dc, 2 dc in next dc *, repeat from *-* = 66 dc. ROUND 12-14: Crochet 1 dc in each dc = 66 dc. ROUND 15: * 1 dc in each of the first 10 dc, 2 dc in next dc *, repeat from *-* = 72 dc. ROUND 16-21: Crochet 1 dc in each dc = 72 dc. ROUND 22: * 1 dc in each of the first 11 dc, 2 dc in next dc *, repeat from *-* = 78 dc. ROUND 23-33: Crochet 1 dc in each dc = 78 dc. ROUND 34: * 1 dc in each of the first 11 dc, then crochet the next 2 dc tog (see above) *, repeat from *-* = 72 dc. ROUND 35-37: Crochet 1 dc in each dc = 72 dc. ROUND 38: * 1 dc in each of the first 10 dc, then crochet the next 2 dc tog *, repeat from *-* = 66 dc. ROUND 39-41: Crochet 1 dc in each dc = 66 dc. ROUND 42: * 1 dc in each of the first 9 dc, then crochet the next 2 dc tog *, repeat from *-* = 60 dc. ROUND 43-45: Crochet 1 dc in each dc = 60 dc. ROUND 46: * 1 dc in each of the first 8 dc, then crochet the next 2 dc tog *, repeat from *-* = 54 dc. ROUND 47-48: Crochet 1 dc in each dc = 54 dc. ROUND 49: * 1 dc in each of the first 7 dc, then crochet the next 2 dc tog *, repeat from *-* = 48 dc. ROUND 50-51: Crochet 1 dc in each dc = 48 dc. ROUND 52: * 1 dc in each of the first 6 t dc, then crochet the next 2 dc tog *, repeat from *-* = 42 dc. ROUND 53-54: Crochet 1 dc in each dc = 42 dc. ROUND 55: * 1 dc in each of the first 5 dc, then crochet the next 2 dc tog *, repeat from *-* = 36 dc. ROUND 56: Crochet 1 dc in each = 36 dc. ROUND 57: * 1 dc in each of the first 4 dc, then crochet the next 2 dc tog *, repeat from *-* = 30 dc. ROUND 58: Crochet 1 dc in each dc = 30 dc. ROUND 59: * 1 dc in each of the first 3 dc, then crochet the next 2 dc tog *, repeat from *-* = 24 dc. Fill the body with cotton wool and continue in the round for head without cutting the thread. ROUND 1: * 1 dc in each of the first 2 dc, 2 dc in next dc *, repeat from *-* = 32 dc. ROUND 2: Crochet 1 dc in each dc = 32 dc. ROUND 3: * 1 dc in each of the first 3 dc, 2 dc in next dc *, repeat from *-* = 40 dc. ROUND 4: Crochet 1 dc in each dc = 40 dc. ROUND 5: * 1 dc in each of the first 4 dc, 2 dc in next dc *, repeat from *-* = 48 dc. ROUND 6: Crochet 1 dc in each dc = 48 dc. ROUND 7: * 1 dc in each of the first 5 dc, 2 dc in next dc *, repeat from *-* = 56 dc. ROUND 8-17: Crochet 1 dc in each dc = 56 dc. ROUND 18: * 1 dc in each of the first 5 dc, then crochet the next 2 dc tog *, repeat from *-* = 48 dc. ROUND 19: Crochet 1 dc in each dc = 48 dc. ROUND 20: * 1 dc in each of the first 4 dc, then crochet the next 2 dc tog *, repeat from *-* = 40 dc. ROUND 21: Crochet 1 dc in each dc = 40 dc. ROUND 22: * 1 dc in each of the first 3 dc, then crochet the next 2 dc tog *, repeat from *-* = 32 dc. ROUND 23: Crochet 1 dc in each dc = 32 dc. ROUND 24: * 1 dc in each of the first 2 dc, then crochet the next 2 dc tog *, repeat from *-* = 24 dc. ROUND 25: Crochet 1 dc in each dc = 24 dc. ROUND 26: * 1 dc in first dc, then crochet the next 2 dc tog *, repeat from *-* = 16 dc. Fill the head with cotton wool and continue in the round for trunk without cutting the thread. ROUND 1-14: Crochet 1 dc in each dc = 16 dc. ROUND 15: * 1 dc in first dc, 2 dc in next dc *, repeat from *-* = 24 dc. ROUND 16-17: Crochet 1 dc in each dc = 24 dc. ROUND 18: Crochet 2 dc tog all the way round = 12 dc – NOTE: Crochet in the back loop of st. Fill trunk with cotton wool. ROUND 19: Crochet 1 dc in each dc = 12 dc. ROUND 20: Crochet 2 dc tog all the way round = 6 dc. Cut the thread, pull it through remaining sts, tighten and fasten. LEGS: Crochet 4 ch with crochet hook size 3.5 mm with pink dream and form a ring with 1 sl st in first ch. ROUND 1: Crochet 4 dc in ring. ROUND 2: Crochet 2 dc in each dc = 8 dc. ROUND 3: Crochet 2 dc in each dc = 16 dc. ROUND 4: * 1 dc in first dc, 2 dc in next dc *, repeat from *-* = 24 dc. ROUND 5: Crochet 1 dc in each dc = 24 dc – NOTE: Crochet in back loop of st. ROUND 6: Crochet 1 dc in each dc = 24 dc – NOTE: Crochet through both loops again. ROUND 7: Crochet 1 dc in each dc, at the same time crochet tog the first 2 and the last 2 dc on round = 22 dc. ROUND 8: Crochet 1 dc in each dc, at the same time crochet the 8th and 9th, 10th and 11th, 12th and 13th and 14th and 15th dc tog = 18 dc. Continue in the round with 1 dc in each dc until leg measures approx 4.5 cm, cut the thread. Crochet 1 more leg in the same way. Fill both legs with cotton wool and sew them to the side under the body at the front – see photo. Crochet 2 hind legs in the same way but finish when legs measures approx 2.5 cm. Fill legs with cotton wool and sew to the side under the body at the back. EARS: Crochet 4 ch with crochet hook size 3.5 mm with pink dream and form a ring with 1 sl st in first ch. ROUND 1: Crochet 6 dc in ring. ROUND 2: Crochet 2 dc in each dc = 12 dc. ROUND 3: * 1 dc in first dc, 2 dc in next dc *, repeat from *-* = 18 dc. ROUND 4: * 1 dc in each of the first 2 dc, 2 dc in next dc *, repeat from *-* = 24 dc. ROUND 5: * 1 dc in each of the first 3 dc, 2 dc in next dc *, repeat from *-* = 30 dc. ROUND 6: * 1 dc in each of the first 4 dc, 2 dc in next dc *, repeat from *-* = 36 dc. ROUND 7: * 1 dc in each of the first 5 dc, 2 dc in next dc *, repeat from *-* = 42 dc. ROUND 8-15: Crochet 1 dc in each dc = 42 dc. ROUND 16: * 1 dc in each of the first 5 dc, then crochet the next 2 dc tog *, repeat from *-* = 36 dc. ROUND 17: * 1 dc in each of the first 4 dc, then crochet the next 2 dc tog *, repeat from *-* = 30 dc. Place piece flat and crochet 1 dc in each dc through both layers = 15 dc, turn piece and crochet 2 dc tog across return row = 8 dc. Cut the thread and sew ear to the top of head. Crochet 1 more ear in the same way and attach to the opposite side of head. TAIL: Crochet 20 ch with crochet hook size 3.5 mm with pink dream. Crochet 1 dtr in 5th ch from hook and continue with 1 dtr in each ch, AT THE SAME TIME crochet 2 dtr tog across the row – NOTE: When crochet 2 dtr tog wait with the last YO and pull through on first dtr, crochet next dtr and pull the last YO through all sts on hook. Sew the tail to mid back of animal. EYES: Crochet 4 ch with crochet hook size 3.5 mm with black and form a ring with 1 sl st in first ch. ROUND 1: Crochet 6 dc in ring. ROUND 2: Crochet 2 dc in each dc = 12 dc, change to off-white. ROUND 3: * 1 dc in first dc, 2 dc in next dc *, repeat from *-* = 18 dc. ROUND 4: * 1 dc in each of the first 2 dc, 2 dc in next dc *, repeat from *-* = 24 dc. Cut the thread and sew the eye to one side at the front of head. Crochet 1 more eye in the same way, but change to off-white after round 1 and sew to the other side at the front of head. ---------------------------------------------------------------------- DUMMY HOLDER: CROCHET INFO: Replace first dc on round with 1 ch and finish each round with 1 sl st in first dc from beg of round. CROCHET DC TOG: Crochet 2 dc tog to 1 dc as follows: Insert hook in first st, pick up thread, insert hook in next st, pick up thread, make 1 YO and pull thread through all 3 sts on hook. SAFETY TIP: Keep baby safe and adjust the length of the string to your baby, recommended string length approx 18-20 cm/7"-8" --------------------------------------------------------- --------------------------------------------------------- STRING AND HEAD: Beg with the string and then crochet the head. Then crochet ears, eyes, snout and the flowers, which are sewn on afterwards. STRING: READ CROCHET INFO! Crochet a ch-row measuring approx 28 cm with crochet hook size 4 mm with red. Crochet 1 dc in second ch from hook, and then 1 dc in each ch across the row. Crochet 3 ch and the end of row and form a ring with these 3 ch with 1 sl st in first ch on ch-row. Change to crochet hook size 3 mm and pink dream and crochet the head as follows: ROUND 1: Crochet 2 dc in the outermost dc on the string, crochet 4 dc in ring = 6 dc. ROUND 2: 2 dc in each dc = 12 dc. ROUND 3: Crochet 1 dc in each dc = 12 dc. ROUND 4: * 1 dc in first dc, 2 dc in next dc *, repeat from *-* = 18 dc. ROUND 5: Crochet 1 dc in each dc = 18 dc. ROUND 6: * 1 dc in each of the first 2 dc, 2 dc in next dc *, repeat from *-* = 24 dc. ROUND 7: Crochet 1 dc in each dc = 24 dc. ROUND 8: * 1 dc in each of the first 3 dc, 2 dc in next dc *, repeat from *-* = 30 dc. ROUND 9: Crochet 1 dc in each dc = 30 dc. ROUND 10: * 1 dc in each of the first 4 dc, 2 dc in next dc *, repeat from *-* = 36 dc. ROUND 11-14: Crochet 1 dc in each dc = 36 dc. ROUND 15: * 1 dc in each of the first 4 dc, then crochet tog the next 2 dc (see above) *, repeat from *-* = 30 dc. ROUND 16: Crochet 1 dc in each dc = 30 dc. ROUND 17: * 1 dc in each of the first 3 dc, then crochet tog the next 2 dc *, repeat from *-* = 24 dc. ROUND 18: Crochet 1 dc in each dc = 24 dc. ROUND 19: * 1 dc in each of the first 2 dc, then crochet tog the next 2 dc *, repeat from *-* = 18 dc. ROUND 20: * 1 dc in first dc, then crochet tog the next 2 dc *, repeat from *-* = 12 dc. ROUND 21: Crochet 2 dc tog all the way round = 6 dc. Fill the head with cotton wool, cut the thread, pull it through remaining sts, tighten and fasten. EARS: Crochet 4 ch with crochet hook size 4 mm with cerise and form a ring with 1 sl st in first ch. ROUND 1: Crochet 6 dc in ring. ROUND 2: * 1 dc in first dc, 2 dc in next dc *, repeat from *-* = 9 dc. ROUND 3: * 1 dc in each of the first 2 dc, 2 dc in next dc *, repeat from *-* = 12 dc. ROUND 4-6: Crochet 1 dc in each dc = 12 dc. Place piece flat and crochet 1 dc in each dc through both layers = 6 dc, turn piece and crochet 2 dc tog across the row = 3 dc. Cut the thread and sew ear to the top of head to the side. Crochet 1 more ear and attach to the opposite side of head. SNOUT: Crochet 4 ch with crochet hook size 3 mm with black and form a ring with 1 sl st in first ch. ROUND 1: Crochet 6 dc in ring. Change to pink dream. ROUND 2: Crochet 1 dc in each dc = 6 dc. ROUND 3: Crochet 2 dc in each dc = 12 dc. ROUND 4: Crochet 1 dc in each dc = 12 dc. Fill the snout with cotton wool and sew snout to the middle of head with neat sts. EYES: Crochet 4 ch with crochet hook size 3 mm with black and form a ring with 1 sl st in first ch. ROUND 1: Crochet 3 dc in ring. ROUND 2: Crochet 2 dc in each dc = 6 dc. Change to off-white. ROUND 3: Crochet 2 dc in each dc = 12 dc, cut the thread. Make 1 more eye in the same way but change to off-white after the first round. Sew eyes to the front of head. FLOWER: Crochet 4 ch with crochet hook size 3 mm with pink dream (try to find a yellow/green section of the yarn) and form a ring with 1 sl st in first ch. ROUND 1: Crochet 10 dc in ring. Change to cerise. ROUND 2: * Crochet 2 ch, 1 dc in first ch, skip 1 dc, 1 dc in next dc *, repeat from *-* = 5 leaves. Cut and fasten threads. Fold the string approx 8-10 cm from the top and attach the flower to string sewing through both layers of string. Crochet 1 more flower and attach to the string below the first flower. Sew a small safety pin to the back of head. Fold string double over dummy and pull head through the loop. |
|||||||
Diagram explanations |
|||||||
|
|||||||
 |
|||||||
Have you finished this pattern?Tag your pictures with #dropspattern #carnivalstarjacket or submit them to the #dropsfan gallery. Do you need help with this pattern?You'll find 32 tutorial videos, a Comments/Questions area and more by visiting the pattern on garnstudio.com. © 1982-2026 DROPS Design A/S. We reserve all rights. This document, including all its sub-sections, has copyrights. Read more about what you can do with our patterns at the bottom of each pattern on our site. |
|||||||


With over 40 years in knitting and crochet design, DROPS Design offers one of the most extensive collections of free patterns on the internet - translated to 17 languages. As of today we count 324 catalogues and 12290 patterns translated into English (UK/cm). 12290
We work hard to bring you the best knitting and crochet have to offer, inspiration and advice as well as great quality yarns at incredible prices! Would you like to use our patterns for other than personal use? You can read what you are allowed to do in the Copyright text at the bottom of all our patterns. Happy crafting!
Post a comment to pattern DROPS Baby 19-4
We would love to hear what you have to say about this pattern!
If you want to leave a question, please make sure you select the correct category in the form below, to speed up the answering process. Required fields are marked *.