Comments / Questions (97)
![]() Tanja wrote:
Tanja wrote:
Wordt er bij de muts 2 keer A.1B in de hoogte gebreid?
29.11.2019 - 21:23DROPS Design answered:
Dag Tanja,
Ja, je breit A.1b inderdaad 2 keer in de hoogte bij de muts, 1 keer waarbij je op de laatste naald steken verdeeld mindert en 1 keer waarbij je alle steken in de laatste naald 2 aan 2 recht samenbreit.
07.12.2019 - 11:21
![]() Tanja wrote:
Tanja wrote:
Mij is de (bij de muts) de overgang tussen A.3 b en A.1b onduidelijk. Eerst moet je meerderen om daarna in de volgende naald te meerderen..? En hoe zit het met minderen als je bij het einde van A.1 b komt? Moet je 16-24 steken minderen of 2 aan 2?
17.11.2019 - 15:15DROPS Design answered:
Dag Tanja,
Als je klaar bent met A.3b, dan brei je 1 naald recht en meerder je verdeeld over de toer 12-14 steken door omslagen te maken die je op de volgende naald gedraaid breit. Daarna brei je A.1b en pas in de laatste naald van A.1b minder je 16-24 steken verdeeld door steken samen te breien.
p.s: Bovenaan het patroon staan ook tips hoe je meerdert of mindert.
23.11.2019 - 15:47
![]() Chantal wrote:
Chantal wrote:
Bonjour! Ma question sur les diagrammes était plutôt, quand je regarde le diagramme je lis de droite a gauche pour le rang endroit et de gauche à droite pour le rang envers , ou les rangs envers se tricote comme ils se présentes? Merci de votre aide 😀
11.11.2019 - 15:47DROPS Design answered:
Bonjour Chantal, sur l'endroit vous lisez effectivement les diagrammes de droite à gauche, et sur l'envers, vous les lisez de gauche à droite. Voir aussi comment tricoter un diagramme. Bon tricot!
11.11.2019 - 16:22
![]() Chantal wrote:
Chantal wrote:
Bonjour! Les diagrammes est-ce que droite c’est endroit et à gauche c’est envers? Merci de votre aide
08.11.2019 - 17:32DROPS Design answered:
Bonjour Chantal, vous trouverez la légende des symboles juste entre le texte et les diagrammes. Par ex; 1 case noire = jersey endroit, 1 case avec un | est 1 m en jersey envers, et ainsi de suite. Bon tricot!
11.11.2019 - 09:45
![]() Caroline wrote:
Caroline wrote:
Bonjour, j ai un décalage de 3 mailles de la maille centrale après le A3C, j ai tout recommencé et j ai de nouveau ce décalage de 3 mailles, si on suit le diagramme la maille centrale est 3 mailles trop tôt, pouvez vous m aider merci
06.11.2019 - 12:34DROPS Design answered:
Bonjour Caroline, avez-vous bien 73 m entre les 2 m point mousse et la maille centrale? Si c'est bien le cas, alors vous pouvez tricoter A.3A = 14 m, 2 x A.3B = 44 m, A.3C = 15 m soit 14+44+15= 73 m. Bon tricot!
06.11.2019 - 13:43
![]() Caroline wrote:
Caroline wrote:
Bonjour, j ai un décalage de 3 mailles de la maille centrale après le A3C, j ai recommencé tout depuis le début et de nouveau le décalage de 3 mailles pour la maille centrale, pouvez vous m éclairer merci
06.11.2019 - 12:29
![]() Chantal wrote:
Chantal wrote:
Bonjour! Je fais le châle et à l’endroit technique,augmentation/diminution pour le châle vous dites que toute les augmentations et diminutions se font sur l’endroit mais au dernier rang 4 sur l’envers vous dites de faire 34 augmentations mais nous sommes à l’envers au rang 4 . Dois je faire quand même ces augmentations à l’envers? Merci
05.11.2019 - 06:39DROPS Design answered:
Bonjour Chantal, ce point va être vérifié par nos stylistes, mais à priori, pour avoir le bon nombre de mailles vous allez devoir augmenter au rang 4, donc sur l'envers, la technique sera la même que sous AUGMENTATIONS/DIMINUTIONS. Bon tricot!
05.11.2019 - 08:54
![]() Crocus wrote:
Crocus wrote:
Comment tricoter une maille endroit sous la maille suivante ? Une vidéo aurait été bienvenue. Je ne comprends pas pourquoi il s'agit de la maille suivante... Merci pour votre aide.
02.11.2019 - 23:28DROPS Design answered:
Bonjour Crocus, au lieu de tricoter la maille suivante sur l'aiguille, on tricote dans la maille sous celle sur l'aiguille, comme pour une maille double. Bon tricot!
04.11.2019 - 16:42
![]() Hansi Koekkoek wrote:
Hansi Koekkoek wrote:
Ik zie nog geen verschil tussen de oude en nieuwe telpatronen A.5A - A.5B - A.5C - A.6A en A.6C. Klopt dat?
20.09.2019 - 14:30
![]() Hansi Koekkoek wrote:
Hansi Koekkoek wrote:
Patroon 203-14. A.5B in 27e naald zijn er 24 steken, in 28e naald 22 steken hoe moet ik dit oplossen?
20.09.2019 - 00:34
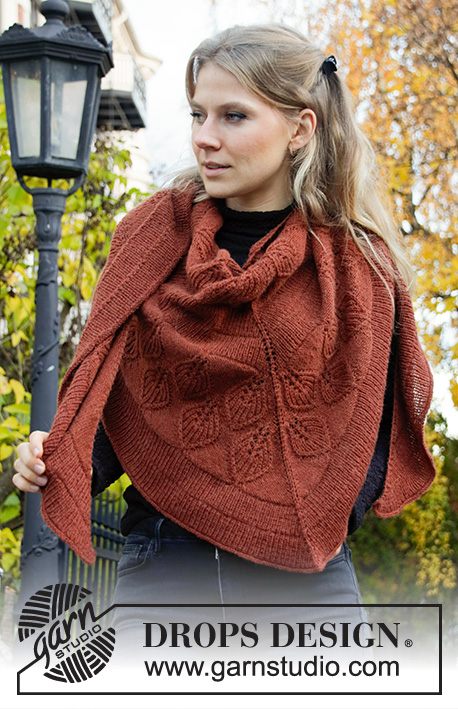
Lacey Laurels#laceylaurelsshawl |
|||||||||||||||||||||||||||||||
 |
 |
||||||||||||||||||||||||||||||
Knitted hat and shawl in DROPS Alpaca. The piece is worked with rib and leaf pattern in Fisherman’s rib.
DROPS 203-14 |
|||||||||||||||||||||||||||||||
|
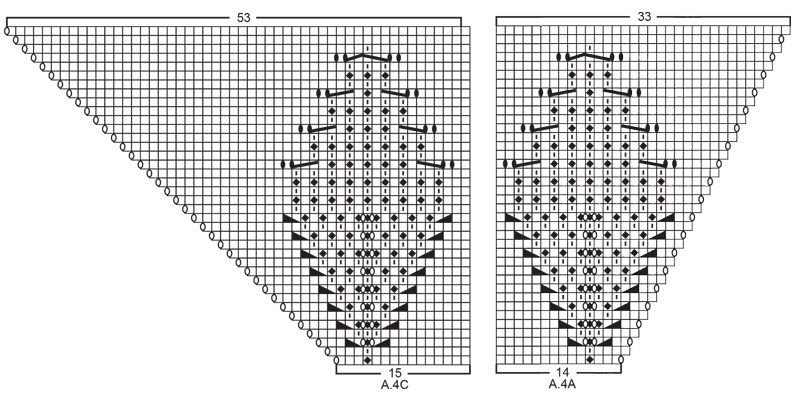
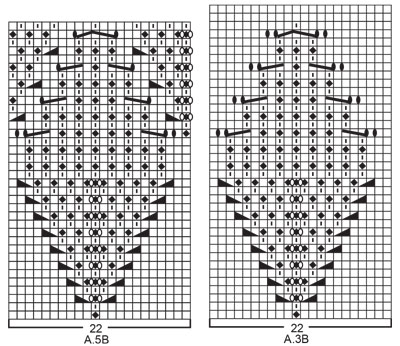
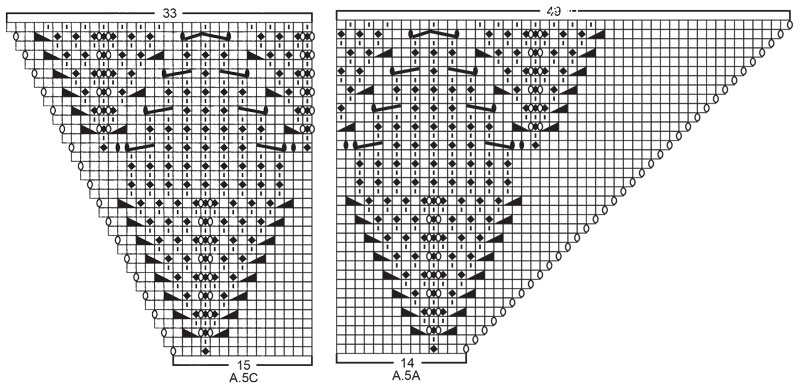
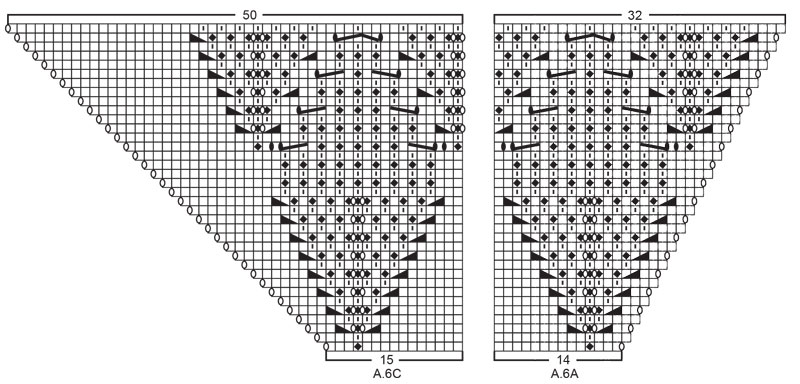
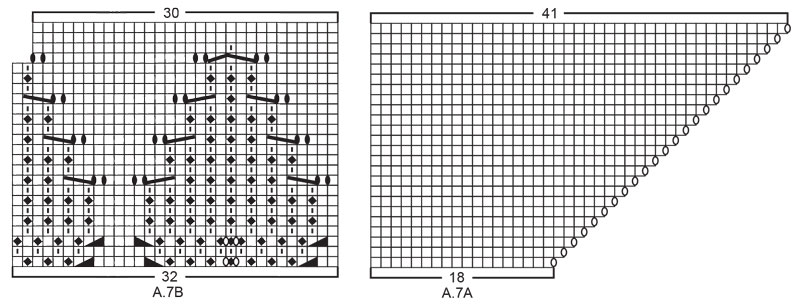
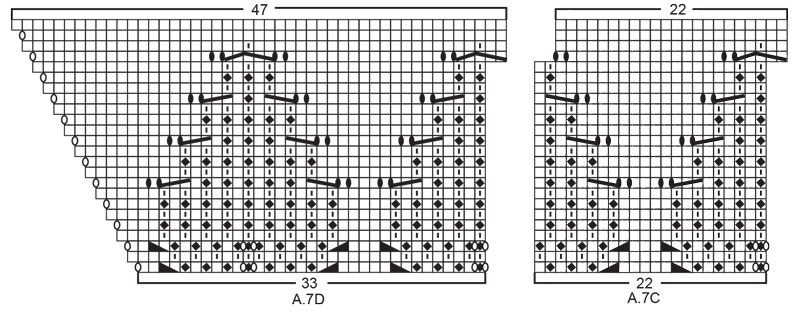
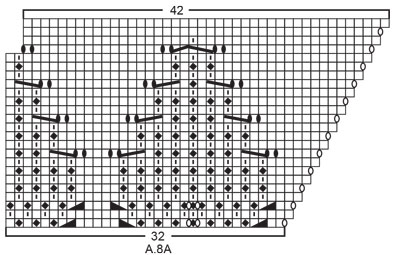
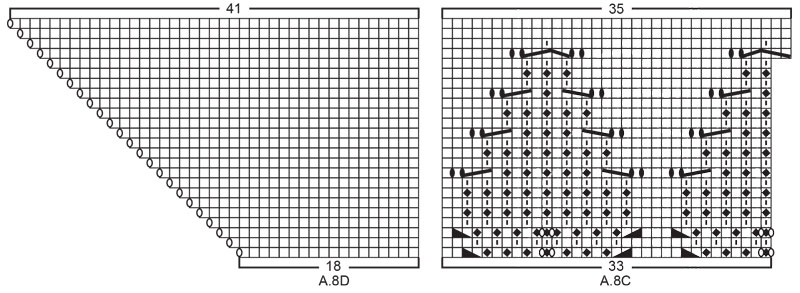
------------------------------------------------------- EXPLANATIONS FOR THE PATTERN: ------------------------------------------------------- RIDGE/GARTER STITCH (worked back and forth): Knit all rows. 1 ridge in height = Knit 2 rows. PATTERN: Hat: See diagrams A.1B and A.3B. Shawl: See diagrams A.1 to A.8. The diagrams show all rows in the pattern seen from the right side. DIAGRAM TIP: This pattern contains many diagrams; it might be a good idea to cut out all the diagrams and arrange them in the right order (see the order given in the text). INCREASE/DECREASE TIP (evenly spaced on hat): To work out how to increase/decrease evenly, count the total number of stitches on needle (e.g. 122 stitches) and divide by the number of increases/decreases to be made (e.g. 10) = 12.2. In this example, increase by making 1 yarn over after approx. each 12th stitch. On the next round work the yarn overs twisted to avoid holes. When decreasing, work together approx. each 11th and 12th stitch. INCREASE/DECREASE TIP (evenly spaced on shawl): To work out how to increase/decrease evenly on each side of the middle stitch, count the total number of stitches on needle (e.g. 81 stitches) minus the edge stitches and middle stitch (5 stitches) and divide the remaining stitches by 2 ( to find the number of stitches on each side of the middle stitch). Then divide these stitches by the number of increases/decreases to be made on each side (e.g. 18) = 2.1. In this example, increase by making 1 yarn over after approx. each 2nd stitch. Do not increase over edge stitches or middle stitch. When decreasing, work approximately all stitches together 2 and 2. ------------------------------------------------------- START THE PIECE HERE: ------------------------------------------------------- HAT – SHORT OVERVIEW OF THE PIECE: The piece is worked in the round with short circular needle, bottom up. Change to double pointed needles when necessary. HAT: Cast on 120-126 stitches with short circular needle size 2.5 mm and Alpaca. Knit 1 round. Then work rib in the round (= knit 1 / purl 1) for 5-6 cm. Knit 1 round where you increase 12-28 stitches evenly spaced – read INCREASE/DECREASE TIP = 132-154 stitches. Change to circular needle size 3 mm and work A.3B in the round (= 6-7 repeats of 22 stitches). REMEMBER THE KNITTING TENSION! When A.3B has been completed the piece measures approx. 16-17 cm from the cast-on edge. Knit 1 round where you increase 12-14 stitches evenly spaced = 144-168 stitches. Work A.1B. AT THE SAME TIME on the last round in A.1B decrease 16-24 stitches evenly spaced = 128-144 stitches. Work A.1B one more time in height. AT THE SAME TIME on the last round in A.1B knit all stitches together 2 and 2 = 64-72 stitches. Then work stocking stitch. AT THE SAME TIME, on every 2nd round, knit all stitches together 2 and 2 until there are 8 stitches left. Cut the strand, pull it through the remaining stitches, tighten and fasten well. The hat measures approx. 26-27 cm from the top down. ------------------------------------------------------- SHAWL - SHORT OVERVIEW OF THE PIECE: The piece is worked back and forth with circular needle, top down. Due to the number of stitches it might be a good idea to divide the piece onto several needles of the same size. SHAWL: Cast on 7 stitches with circular needle size 3 mm and Alpaca. Knit 1 row (= wrong side). Then work and increase as follows: ROW 1 (= right side): Work 2 edge stitches in GARTER STITCH – read description above, 1 yarn over, work 1 stitch in stocking stitch, 1 yarn over, 1 stitch in stocking stitch (= middle stitch), 1 yarn over, 1 stitch in stocking stitch, 1 yarn over and finish with2 edge stitches in garter stitch (= 4 stitches increased). ROW 2 (= wrong side): Work 2 edge stitches in garter stitch, 1 yarn over, work stocking stitch until there are 2 stitches left on the row (yarn overs purled to leave holes), 1 yarn over and finish with 2 edge stitches in garter stitch (= 2 stitches increased). ROW 3 (= right side): 2 edge stitches in garter stitch, 1 yarn over, work stocking stitch as far as the middle stitch, 1 yarn over, 1 stitch in stocking stitch (= middle stitch), 1 yarn over, work stocking stitch until there are 2 stitches left on the row, 1 yarn over and finish with 2 edge stitches in garter stitch (= 4 stitches increased). ROW 4 (= wrong side): 2 edge stitches in garter stitch, 1 yarn over, work stocking stitch until there are 2 stitches left on the row (yarn overs purled to leave holes), 1 yarn over and finish with 2 edge stitches in garter stitch (= 2 stitches increased). Repeat rows 3 and 4 until there are 83 stitches on the needle and the last row was worked from the right side. REMEMBER THE KNITTING TENSION! Work the next row in the same way as row 4 (= wrong side) and increase at the same time 17 stitches evenly spaced on each side of the middle stitch (34 stitches increased on row in addition to the increase worked inside the 2 edge stitches on each side) – read INCREASE/DECREASE TIP = 119 stitches on the needle. Work diagrams A.1 and A.2 as follows from the right side: Work 2 edge stitches in garter stitch, A.1A over 2 stitches (1 time in width), A.1B over 52 stitches (26 times in width), A.1C over 3 stitches (1 time in width), 1 stitch in stocking stitch (= middle stitch), work A.2A over 3 stitches, A.2B over 52 stitches (26 times in width), A.2C over 2 stitches and finish with 2 edge stitches in garter stitch. Continue this pattern. When the last row in A.1 and A.2 remains there are 159 stitches on the needle. Work the last row and at the same time decrease 5 stitches evenly spaced on each side of the middle stitch (10 stitches decreased evenly + 2 stitches increased in diagrams) – read INCREASE/DECREASE TIP = 151 stitches. Work diagrams A.3 and A.4 as follows from the right side: Work 2 edge stitches in garter stitch, A.3A over 14 stitches (1 time in width), A.3B over 44 stitches (2 times in width), work A.3C over 15 stitches (1 time in width), 1 stitch in stocking stitch (= middle stitch), work A.4A over 14 stitches, A.3B over 44 stitches (2 times in width), A.4C over 15 stitches and finish with 2 edge stitches in garter stitch. Continue this pattern. When the last row in A.3 and A.4 remains there are 263 stitches on the needle. Work the last row and, at the same time, increase 43 stitches evenly spaced on each side of the middle stitch (86 stitches increased evenly and 2 stitches increased in diagrams) = 351 stitches. Work diagrams A.1 and A.2 as follows from the right side: Work 2 edge stitches in garter stitch, A.1A over 2 stitches (1 time in width), A.1B over 168 stitches (84 times in width), work A.1C over 3 stitches (1 time in width), 1 stitch in stocking stitch (= middle stitch), A.2A over 3 stitches, A.2B over 168 stitches (84 times in width), work A.2C over 2 stitches and finish with 2 edge stitches in garter stitch. Continue this pattern. When the last row in A.1 and A.2 remains there are 391 stitches on the needle. Work the last row and increase at the same time 1 stitch on each side of the middle stitch (2 stitches increased evenly and 2 stitches increased in diagrams) = 395 stitches. Now work A.1 and A.2 one more time in height; i.e. work the next row from the right side as follows: 2 edge stitches in garter stitch, A.1A over 2 stitches (1 time in width), A.1B over 190 stitches (95 times in width), work A.1C over 3 stitches (1 time in width), 1 stitch in stocking stitch (= middle stitch), A.2A over 3 stitches, A.2B over 190 stitches (95 times in width), A.2C over 2 stitches and finish with 2 edge stitches in garter stitch. Continue this pattern. When the last row in A.1 and A.2 remains there are 435 stitches on the needle. Work the last row and decrease at the same time 11 stitches evenly spaced on each side of the middle stitch (22 stitches decreased evenly + 2 stitches increased in diagrams) = 415 stitches. Work diagrams A.5 and A.6 as follows from the right side: 2 edge stitches in garter stitch, A.5A over 14 stitches (1 time in width), work A.5B over 176 stitches (8 times in width), A.5C over 15 stitches (1 time in width), 1 stitch in stocking stitch (= middle stitch), A.6A over 14 stitches, A.5B over 176 stitches (8 times in width), A.6C over 15 stitches and finish with 2 edge stitches in garter stitch. Continue this pattern. When the last row in A.5 and A.6 is finished there are 523 stitches on the row. Work diagrams A.7 and A.8 as follows from the right side: 2 edge stitches in garter stitch, A.7A over 18 stitches (1 time in width), A.7B over 32 stitches (1 time in width), A.7C over 176 stitches (8 times in width), work A.7D over 33 stitches (1 time in width), 1 stitch in stocking stitch (= middle stitch), A.8A over 32 stitches, A.7C over 176 stitches (8 times in width), A.8C over 33 stitches, A.8D over 18 stitches and finish with 2 edge stitches in garter stitch. Continue this pattern. When the last row in A.7 and A.8 remain there are 593 stitches on the needle. Work the last row and increase at the same time 72 stitches evenly spaced on each side of the middle stitch (144 stitches increased evenly and 2 stitches increased in diagrams) = 739 stitches. Work diagrams A.1 and A.2 as follows from the right side: 2 edge stitches in garter stitch, A.1A over 2 stitches (1 time in width), A.1B over 362 stitches (181 times in width), A.1C over 3 stitches (1 time in width), 1 stitch in stocking stitch (= middle stitch), A.2A over 3 stitches, work A.2B over 362 stitches (181 times in width), A.2C over 2 stitches and finish with 2 edge stitches in garter stitch. Continue this pattern. When the last row in A.1 and A.2 remains there are 779 stitches on the row. Work the last row and increase at the same time 1 on each side of the middle stitch (2 stitches increased evenly and 2 stitches increased in diagrams) = 783 stitches. Now work A.1 and A.2 one more time in height; i.e. work as follows from the right side: 2 edge stitches in garter stitch, A.1A over 2 stitches (1 time in width), A.1B over 384 stitches (192 times in width), A.1C over 3 stitches (1 time in width), 1 stitch in stocking stitch (= middle stitch), A.2A over 3 stitches, work A.2B over 384 stitches (192 times in width), A.2C over 2 stitches and finish with 2 edge stitches in garter stitch. Continue this pattern. When the last row in A.1 and A.2 has been completed there are 825 stitches on the row. The piece measures approx. 65 cm measured along the middle stitch. Cast off as described below. ELASTIC CAST-OFF EDGE: To avoid the cast-off edge being tight, cast off with knit from the right side as follows: Knit 2, * insert the left needle in the 2 stitches on the right needle, from left to right and knit them together, knit 1 *, work from *-* until there is 1 stitch left on the row. Cut the strand and pull it through the last stitch. Fasten strands. SHAPING TIP: Moisten the piece and shape to the right measurements. |
|||||||||||||||||||||||||||||||
Diagram explanations |
|||||||||||||||||||||||||||||||
|
|||||||||||||||||||||||||||||||
 |
|||||||||||||||||||||||||||||||
 |
|||||||||||||||||||||||||||||||
 |
|||||||||||||||||||||||||||||||
 |
|||||||||||||||||||||||||||||||
 |
|||||||||||||||||||||||||||||||
 |
|||||||||||||||||||||||||||||||
 |
|||||||||||||||||||||||||||||||
 |
|||||||||||||||||||||||||||||||
 |
|||||||||||||||||||||||||||||||
 |
|||||||||||||||||||||||||||||||
Have you finished this pattern?Tag your pictures with #dropspattern #laceylaurelsshawl or submit them to the #dropsfan gallery. Do you need help with this pattern?You'll find 17 tutorial videos, a Comments/Questions area and more by visiting the pattern on garnstudio.com. © 1982-2025 DROPS Design A/S. We reserve all rights. This document, including all its sub-sections, has copyrights. Read more about what you can do with our patterns at the bottom of each pattern on our site. |
|||||||||||||||||||||||||||||||






Post a comment to pattern DROPS 203-14
We would love to hear what you have to say about this pattern!
If you want to leave a question, please make sure you select the correct category in the form below, to speed up the answering process. Required fields are marked *.