
Popular categories
Looking for a yarn?


Comments / Questions (98)
![]() Judit Krisch wrote:
Judit Krisch wrote:
Kedves Drops Team! A rugalmas leláncolás gyorsabb és egyszerűbb, ha horgolótűt használunk a jobb oldali kötőtű helyett. Így ugyanolyan rugalmas lezárást kapunk, de tapasztalatom szerint kétszer olyan gyorsan lehet haladni a lezárással, ami 825 szem esetében elég nagy munka. Üdvözlettel: Krisch Judit
15.02.2022 - 14:31
![]() Mathilde wrote:
Mathilde wrote:
Bonjour, Pouvez vous m’expliquer ce que signifie : 1 maille endroit en piquant sous la maille suivante Je ne comprend pas Merci Je vous remercie
28.01.2022 - 20:54
![]() Line wrote:
Line wrote:
Når jeg skal tage 2 ind mod højre skal jeg så strikke 5 masker ret sammen ? Der står : strik 3 masker og 2 slå om (=5 masker ) ret sammen.
24.01.2022 - 16:19DROPS Design answered:
Hei Line. Her har det blitt noen ord for mye i den danske oversettelsen. Det skal stå: = tag 2 masker ind mod højre således: Strik 3 masker ret sammen (= 2 masker taget ind) mvh DROPS Design
25.01.2022 - 13:45
![]() Alice wrote:
Alice wrote:
Bonjour, En réalisant le rang de A4 où il faut diminuer 4 mailles, j'ai perdu des mailles doubles qui se sont détricotées, et impossible de les reformer. Pouvez-vous m'aider ? C'est un vrai casse tête, je vais sans doute les remailler simplement comme des mailles envers. Merci.
20.01.2022 - 11:56DROPS Design answered:
Bonjour Alice, est-ce que l'une des ces 2 vidéos: rattrapper une maille lâchée dans des côtes anglaises bicolores ou/et reprendre des mailles en côtes anglaises? Même si vous ne tricotez pas en bicolore, la technique sera la même. Bonne chance!
20.01.2022 - 16:57
![]() Carol Theophilidou wrote:
Carol Theophilidou wrote:
I am writing to ask if this pattern is available in English translation.
26.12.2021 - 22:13DROPS Design answered:
Dear Carol, yes - you can choose language from menu by main photo. English translation you could find HERE Happy knitting!
26.12.2021 - 22:23
![]() BN wrote:
BN wrote:
Bonjour, Pour le châle, après réalisation de l'échantillon je me rends compte que je dois utiliser des aiguilles en 3.5 au lieu de 3. Dois-je prévoir plus de laine? Merci
09.12.2021 - 10:32DROPS Design answered:
Bonjour BN, quelle que soit la taille des aiguilles pour votre échantillon, si vous avez bien les 24 mailles x 32 rangs jersey = 10 x 10 cm, et que vous conservez bien cette tension pendant la réalisation de votre châle, alors la quantité de laine sera suffisante. Retrouvez plus d'infos ici. Bon tricot!
09.12.2021 - 15:09
![]() Kirsten wrote:
Kirsten wrote:
Wat is het verschil met in de hoogte breien en gewoon in de rondte breien (muts)? Dit wordt genoemd na de eerste keer A1b.
04.11.2021 - 13:25DROPS Design answered:
Dag Kirsten,
Je breit de muts inderdaad gewoon in de rondte. Na 1 toer heb je de eerst rij in het telpatroon gebreid. Als je alle rijen in het telpatroon hebt gebreid, dan heb je het telpatroon 1 keer in de hoogte gebreid.
11.11.2021 - 08:58
![]() Mila wrote:
Mila wrote:
Liebes drops Team, wunderbares Muster und die Farbe ein Traum. Nur erscheint mir die Wolle sehr fein und leicht flauschig. Kann es sein dass das Modell mit unterschiedlichen Garnen gestrickt wurde. Das sieht viel "schwerer" aus.
21.10.2021 - 23:47DROPS Design answered:
Liebe Mila, dieses Tuch wurde mit Alpaca gestrickt, aber ein anderes Garn der Garngruppe A könnnen Sie auch benutzen - den Garnumrechner wird Ihnen damit helfen. Viel Spaß bim stricken!
22.10.2021 - 07:20
![]() Maria wrote:
Maria wrote:
Hur gör jag när jag ska sticka en rät maska i maskan under när den maskan är ett omslag? Vilket händer med 2 av maskorna på varv 5 i diagram A3? Det blir en lång tråd på baksidan vilket inte känns rätt om jag stickar i omslaget, men det finns ingen rät maska under. Tacksam för svar.
26.08.2021 - 06:22DROPS Design answered:
Hei Maria. Når du strikker i masken under som har et kast, prøv å dra litt i arbeidet slik at tråden jevner seg ut. Det skal bli et hull i et hullmønstret. Vi skal prøve å få laget en video som viser det litt bedre. mvh DROPS design
27.08.2021 - 13:39
![]() Taveau Alice wrote:
Taveau Alice wrote:
Bonjour, je suis un peu perdue pour le début de cet ouvrage.. Sur l’endroit, on a le début du fil en bas à gauche. N’est ce pas ? Ensuite, on augmente à chaque rang avec des jetés. Pour les mailles Jersey tricotées à chaque rang, il s’agit de tricoter des mailles endroit sur l’endroit et envers sur l’envers ? Ou un point mousse en tricotant toutes les mailles à l’endroit ? Merci beaucoup pour votre aide !
07.07.2021 - 21:34DROPS Design answered:
Bonjour Mme Taveau, pour ce châle, le 1er rang après avoir monté les mailles est un rang sur l'envers (à tricoter à l'envers). Le 1er rang sur l'endroit sera donc celui où l'extrémité du fil de montage est à votre gauche. Vous tricotez les mailles centrales en jersey = à l'endroit sur l'endroit et à l'envers sur l'envers - cf description des rangs 1 et à 4. Bon tricot!
08.07.2021 - 09:22
|
|||||||||||||||||||||||||||||||
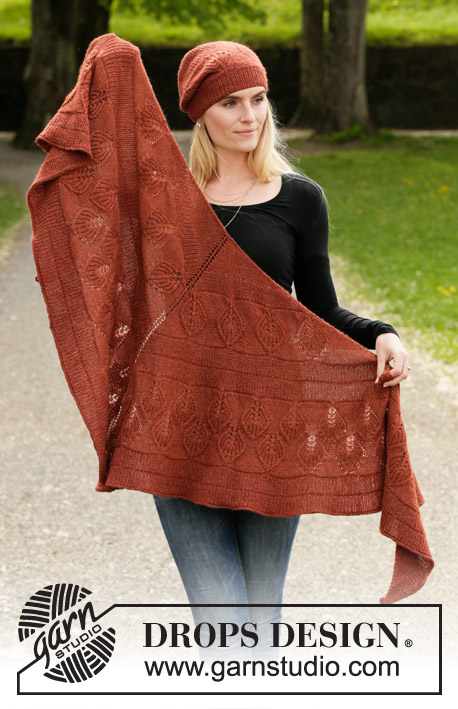
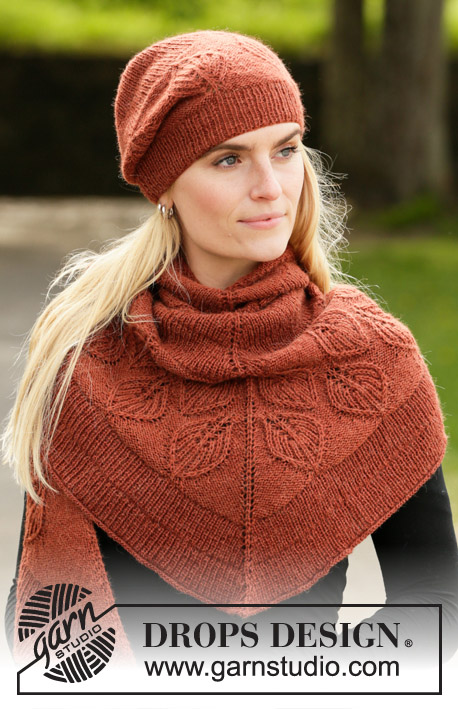
Lacey Laurels#laceylaurelsshawl |
|||||||||||||||||||||||||||||||
 |
 |
||||||||||||||||||||||||||||||
Knitted hat and shawl in DROPS Alpaca. The piece is worked with rib and leaf pattern in Fisherman’s rib.
DROPS 203-14 |
|||||||||||||||||||||||||||||||
|
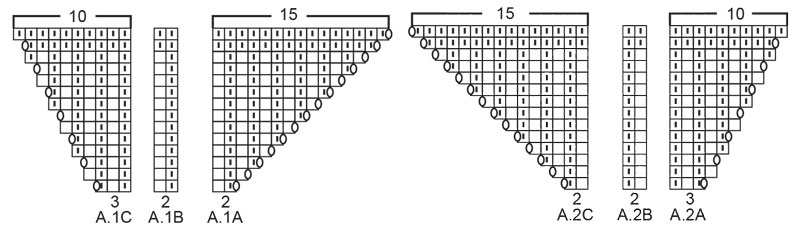
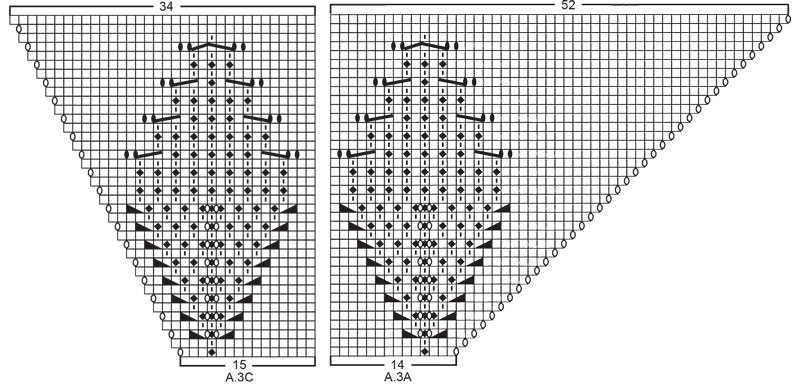
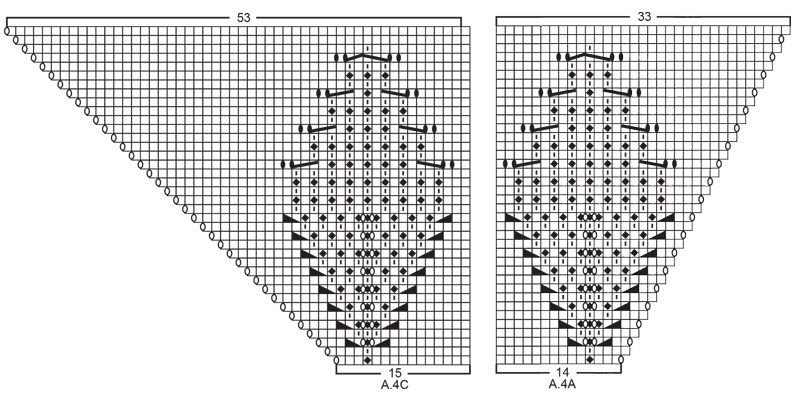
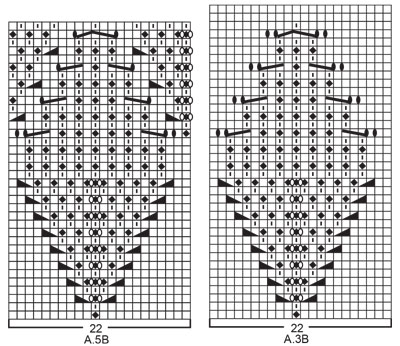
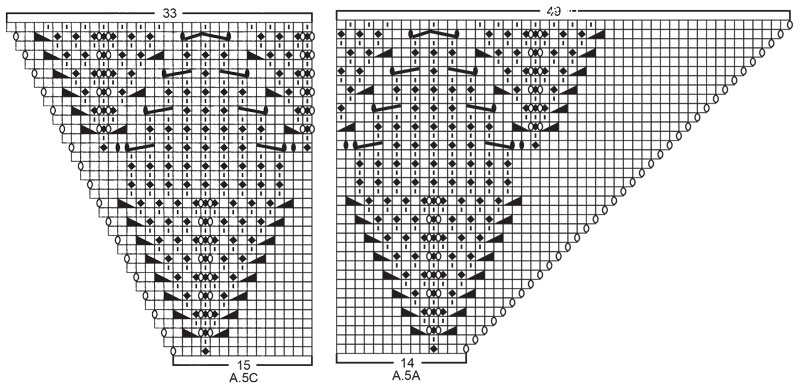
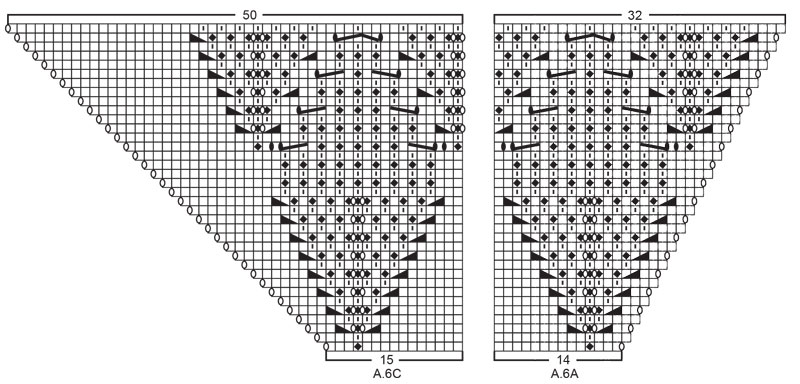
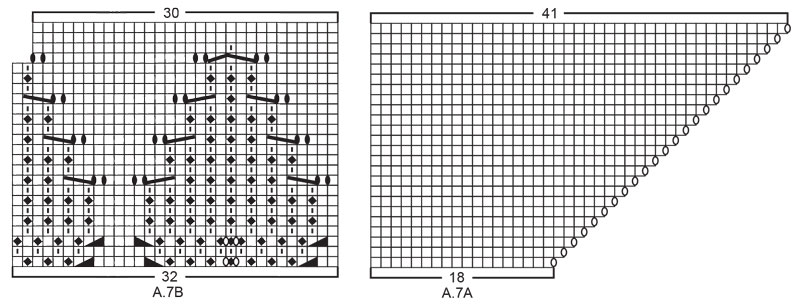
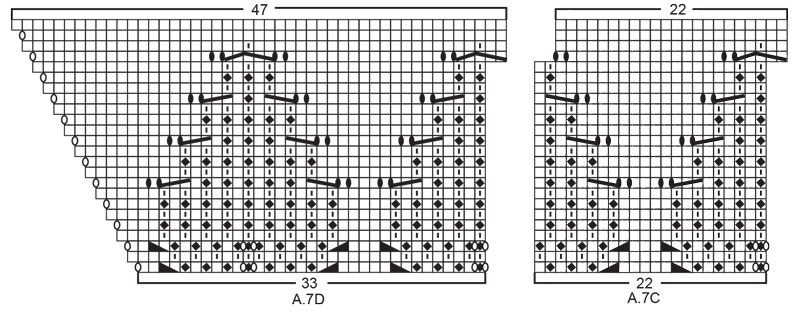
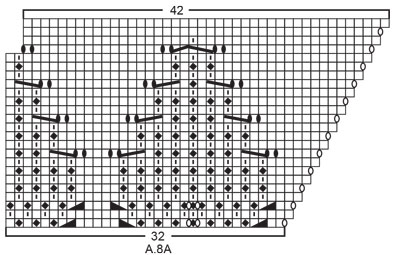
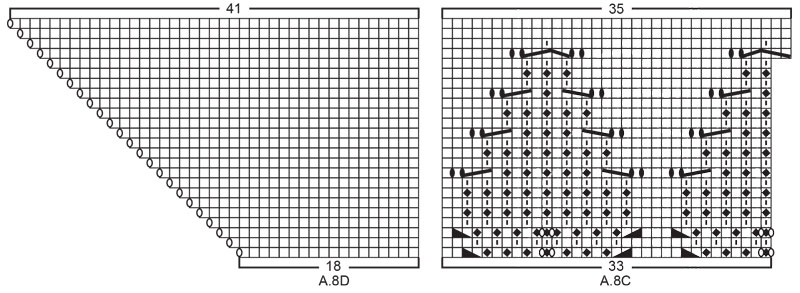
------------------------------------------------------- EXPLANATIONS FOR THE PATTERN: ------------------------------------------------------- RIDGE/GARTER STITCH (worked back and forth): Knit all rows. 1 ridge in height = Knit 2 rows. PATTERN: Hat: See diagrams A.1B and A.3B. Shawl: See diagrams A.1 to A.8. The diagrams show all rows in the pattern seen from the right side. DIAGRAM TIP: This pattern contains many diagrams; it might be a good idea to cut out all the diagrams and arrange them in the right order (see the order given in the text). INCREASE/DECREASE TIP (evenly spaced on hat): To work out how to increase/decrease evenly, count the total number of stitches on needle (e.g. 122 stitches) and divide by the number of increases/decreases to be made (e.g. 10) = 12.2. In this example, increase by making 1 yarn over after approx. each 12th stitch. On the next round work the yarn overs twisted to avoid holes. When decreasing, work together approx. each 11th and 12th stitch. INCREASE/DECREASE TIP (evenly spaced on shawl): To work out how to increase/decrease evenly on each side of the middle stitch, count the total number of stitches on needle (e.g. 81 stitches) minus the edge stitches and middle stitch (5 stitches) and divide the remaining stitches by 2 ( to find the number of stitches on each side of the middle stitch). Then divide these stitches by the number of increases/decreases to be made on each side (e.g. 18) = 2.1. In this example, increase by making 1 yarn over after approx. each 2nd stitch. Do not increase over edge stitches or middle stitch. When decreasing, work approximately all stitches together 2 and 2. ------------------------------------------------------- START THE PIECE HERE: ------------------------------------------------------- HAT – SHORT OVERVIEW OF THE PIECE: The piece is worked in the round with short circular needle, bottom up. Change to double pointed needles when necessary. HAT: Cast on 120-126 stitches with short circular needle size 2.5 mm and Alpaca. Knit 1 round. Then work rib in the round (= knit 1 / purl 1) for 5-6 cm. Knit 1 round where you increase 12-28 stitches evenly spaced – read INCREASE/DECREASE TIP = 132-154 stitches. Change to circular needle size 3 mm and work A.3B in the round (= 6-7 repeats of 22 stitches). REMEMBER THE KNITTING TENSION! When A.3B has been completed the piece measures approx. 16-17 cm from the cast-on edge. Knit 1 round where you increase 12-14 stitches evenly spaced = 144-168 stitches. Work A.1B. AT THE SAME TIME on the last round in A.1B decrease 16-24 stitches evenly spaced = 128-144 stitches. Work A.1B one more time in height. AT THE SAME TIME on the last round in A.1B knit all stitches together 2 and 2 = 64-72 stitches. Then work stocking stitch. AT THE SAME TIME, on every 2nd round, knit all stitches together 2 and 2 until there are 8 stitches left. Cut the strand, pull it through the remaining stitches, tighten and fasten well. The hat measures approx. 26-27 cm from the top down. ------------------------------------------------------- SHAWL - SHORT OVERVIEW OF THE PIECE: The piece is worked back and forth with circular needle, top down. Due to the number of stitches it might be a good idea to divide the piece onto several needles of the same size. SHAWL: Cast on 7 stitches with circular needle size 3 mm and Alpaca. Knit 1 row (= wrong side). Then work and increase as follows: ROW 1 (= right side): Work 2 edge stitches in GARTER STITCH – read description above, 1 yarn over, work 1 stitch in stocking stitch, 1 yarn over, 1 stitch in stocking stitch (= middle stitch), 1 yarn over, 1 stitch in stocking stitch, 1 yarn over and finish with2 edge stitches in garter stitch (= 4 stitches increased). ROW 2 (= wrong side): Work 2 edge stitches in garter stitch, 1 yarn over, work stocking stitch until there are 2 stitches left on the row (yarn overs purled to leave holes), 1 yarn over and finish with 2 edge stitches in garter stitch (= 2 stitches increased). ROW 3 (= right side): 2 edge stitches in garter stitch, 1 yarn over, work stocking stitch as far as the middle stitch, 1 yarn over, 1 stitch in stocking stitch (= middle stitch), 1 yarn over, work stocking stitch until there are 2 stitches left on the row, 1 yarn over and finish with 2 edge stitches in garter stitch (= 4 stitches increased). ROW 4 (= wrong side): 2 edge stitches in garter stitch, 1 yarn over, work stocking stitch until there are 2 stitches left on the row (yarn overs purled to leave holes), 1 yarn over and finish with 2 edge stitches in garter stitch (= 2 stitches increased). Repeat rows 3 and 4 until there are 83 stitches on the needle and the last row was worked from the right side. REMEMBER THE KNITTING TENSION! Work the next row in the same way as row 4 (= wrong side) and increase at the same time 17 stitches evenly spaced on each side of the middle stitch (34 stitches increased on row in addition to the increase worked inside the 2 edge stitches on each side) – read INCREASE/DECREASE TIP = 119 stitches on the needle. Work diagrams A.1 and A.2 as follows from the right side: Work 2 edge stitches in garter stitch, A.1A over 2 stitches (1 time in width), A.1B over 52 stitches (26 times in width), A.1C over 3 stitches (1 time in width), 1 stitch in stocking stitch (= middle stitch), work A.2A over 3 stitches, A.2B over 52 stitches (26 times in width), A.2C over 2 stitches and finish with 2 edge stitches in garter stitch. Continue this pattern. When the last row in A.1 and A.2 remains there are 159 stitches on the needle. Work the last row and at the same time decrease 5 stitches evenly spaced on each side of the middle stitch (10 stitches decreased evenly + 2 stitches increased in diagrams) – read INCREASE/DECREASE TIP = 151 stitches. Work diagrams A.3 and A.4 as follows from the right side: Work 2 edge stitches in garter stitch, A.3A over 14 stitches (1 time in width), A.3B over 44 stitches (2 times in width), work A.3C over 15 stitches (1 time in width), 1 stitch in stocking stitch (= middle stitch), work A.4A over 14 stitches, A.3B over 44 stitches (2 times in width), A.4C over 15 stitches and finish with 2 edge stitches in garter stitch. Continue this pattern. When the last row in A.3 and A.4 remains there are 263 stitches on the needle. Work the last row and, at the same time, increase 43 stitches evenly spaced on each side of the middle stitch (86 stitches increased evenly and 2 stitches increased in diagrams) = 351 stitches. Work diagrams A.1 and A.2 as follows from the right side: Work 2 edge stitches in garter stitch, A.1A over 2 stitches (1 time in width), A.1B over 168 stitches (84 times in width), work A.1C over 3 stitches (1 time in width), 1 stitch in stocking stitch (= middle stitch), A.2A over 3 stitches, A.2B over 168 stitches (84 times in width), work A.2C over 2 stitches and finish with 2 edge stitches in garter stitch. Continue this pattern. When the last row in A.1 and A.2 remains there are 391 stitches on the needle. Work the last row and increase at the same time 1 stitch on each side of the middle stitch (2 stitches increased evenly and 2 stitches increased in diagrams) = 395 stitches. Now work A.1 and A.2 one more time in height; i.e. work the next row from the right side as follows: 2 edge stitches in garter stitch, A.1A over 2 stitches (1 time in width), A.1B over 190 stitches (95 times in width), work A.1C over 3 stitches (1 time in width), 1 stitch in stocking stitch (= middle stitch), A.2A over 3 stitches, A.2B over 190 stitches (95 times in width), A.2C over 2 stitches and finish with 2 edge stitches in garter stitch. Continue this pattern. When the last row in A.1 and A.2 remains there are 435 stitches on the needle. Work the last row and decrease at the same time 11 stitches evenly spaced on each side of the middle stitch (22 stitches decreased evenly + 2 stitches increased in diagrams) = 415 stitches. Work diagrams A.5 and A.6 as follows from the right side: 2 edge stitches in garter stitch, A.5A over 14 stitches (1 time in width), work A.5B over 176 stitches (8 times in width), A.5C over 15 stitches (1 time in width), 1 stitch in stocking stitch (= middle stitch), A.6A over 14 stitches, A.5B over 176 stitches (8 times in width), A.6C over 15 stitches and finish with 2 edge stitches in garter stitch. Continue this pattern. When the last row in A.5 and A.6 is finished there are 523 stitches on the row. Work diagrams A.7 and A.8 as follows from the right side: 2 edge stitches in garter stitch, A.7A over 18 stitches (1 time in width), A.7B over 32 stitches (1 time in width), A.7C over 176 stitches (8 times in width), work A.7D over 33 stitches (1 time in width), 1 stitch in stocking stitch (= middle stitch), A.8A over 32 stitches, A.7C over 176 stitches (8 times in width), A.8C over 33 stitches, A.8D over 18 stitches and finish with 2 edge stitches in garter stitch. Continue this pattern. When the last row in A.7 and A.8 remain there are 593 stitches on the needle. Work the last row and increase at the same time 72 stitches evenly spaced on each side of the middle stitch (144 stitches increased evenly and 2 stitches increased in diagrams) = 739 stitches. Work diagrams A.1 and A.2 as follows from the right side: 2 edge stitches in garter stitch, A.1A over 2 stitches (1 time in width), A.1B over 362 stitches (181 times in width), A.1C over 3 stitches (1 time in width), 1 stitch in stocking stitch (= middle stitch), A.2A over 3 stitches, work A.2B over 362 stitches (181 times in width), A.2C over 2 stitches and finish with 2 edge stitches in garter stitch. Continue this pattern. When the last row in A.1 and A.2 remains there are 779 stitches on the row. Work the last row and increase at the same time 1 on each side of the middle stitch (2 stitches increased evenly and 2 stitches increased in diagrams) = 783 stitches. Now work A.1 and A.2 one more time in height; i.e. work as follows from the right side: 2 edge stitches in garter stitch, A.1A over 2 stitches (1 time in width), A.1B over 384 stitches (192 times in width), A.1C over 3 stitches (1 time in width), 1 stitch in stocking stitch (= middle stitch), A.2A over 3 stitches, work A.2B over 384 stitches (192 times in width), A.2C over 2 stitches and finish with 2 edge stitches in garter stitch. Continue this pattern. When the last row in A.1 and A.2 has been completed there are 825 stitches on the row. The piece measures approx. 65 cm measured along the middle stitch. Cast off as described below. ELASTIC CAST-OFF EDGE: To avoid the cast-off edge being tight, cast off with knit from the right side as follows: Knit 2, * insert the left needle in the 2 stitches on the right needle, from left to right and knit them together, knit 1 *, work from *-* until there is 1 stitch left on the row. Cut the strand and pull it through the last stitch. Fasten strands. SHAPING TIP: Moisten the piece and shape to the right measurements. |
|||||||||||||||||||||||||||||||
Diagram explanations |
|||||||||||||||||||||||||||||||
|
|||||||||||||||||||||||||||||||
 |
|||||||||||||||||||||||||||||||
 |
|||||||||||||||||||||||||||||||
 |
|||||||||||||||||||||||||||||||
 |
|||||||||||||||||||||||||||||||
 |
|||||||||||||||||||||||||||||||
 |
|||||||||||||||||||||||||||||||
 |
|||||||||||||||||||||||||||||||
 |
|||||||||||||||||||||||||||||||
 |
|||||||||||||||||||||||||||||||
 |
|||||||||||||||||||||||||||||||
Have you finished this pattern?Tag your pictures with #dropspattern #laceylaurelsshawl or submit them to the #dropsfan gallery. Do you need help with this pattern?You'll find 17 tutorial videos, a Comments/Questions area and more by visiting the pattern on garnstudio.com. © 1982-2026 DROPS Design A/S. We reserve all rights. This document, including all its sub-sections, has copyrights. Read more about what you can do with our patterns at the bottom of each pattern on our site. |
|||||||||||||||||||||||||||||||


With over 40 years in knitting and crochet design, DROPS Design offers one of the most extensive collections of free patterns on the internet - translated to 17 languages. As of today we count 324 catalogues and 12290 patterns translated into English (UK/cm). 12290
We work hard to bring you the best knitting and crochet have to offer, inspiration and advice as well as great quality yarns at incredible prices! Would you like to use our patterns for other than personal use? You can read what you are allowed to do in the Copyright text at the bottom of all our patterns. Happy crafting!
Post a comment to pattern DROPS 203-14
We would love to hear what you have to say about this pattern!
If you want to leave a question, please make sure you select the correct category in the form below, to speed up the answering process. Required fields are marked *.