
Popular categories
Looking for a yarn?


Comments / Questions (98)
![]() Georgina Chahoud wrote:
Georgina Chahoud wrote:
Hej, när jag stickar A.3 och A.4 så blir det 21 aviga maskor mellan rätmaskorna som stickas i maskan under. På andra sidan, om jag följer mönstret, blir det 22 aviga maskor. Det kan väl inte stämma. Är det fel hos mig eller på mönstret? Mvh Georgina
04.05.2024 - 08:52DROPS Design answered:
Hei Georgina. Oppskriften er oversendt Design avd. for en dobbeltsjekk. mvh DROPS Design
06.05.2024 - 11:18
![]() Matilde wrote:
Matilde wrote:
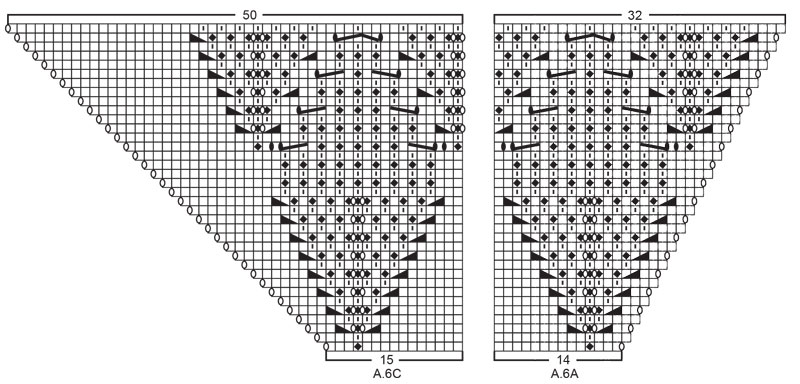
I diagrammerne A5 og A6 kan jeg ikke få maskeantallet til at gå op. Ifølge opskriften skal der strikkes 14, 176 og 15 masker på den ene side af midt-masken og 14, 176 og 15 masker på den anden side af midt-masken. Når man så vender striktøjet om for at strikke på vrangsiden, er der en maske for meget i begyndelsen og en maske for lidt i enden. I alle andre mønstre i opskriften er diagrammerne spejlet på hver side af midt-masken, men ikke her. Er der noget jeg overser?
20.03.2024 - 11:05DROPS Design answered:
Hei Matilde. Sett maskemarkører mellom hver diagram, så har du bedre oversikt. Husk å flytte maskemarkørene når det økes. På første pinne (retten) har du 2 kantmasker - 14 - 176 - 15 - midtmaske - 14 - 176 - 15 - 2 kantmasker. På andre pinne (vrangen) har du: 2 kantmasker- 16 - 176 - 15 - midtmaske - 16 - 176 - 15 - 2 kantmasker. Husk økningene (hver pinne i diagram A.5A og A.6C og annen hver pinne i diagram A.5C og A.6A). Selv om det er ujevnt antall masker, vil dette jevne seg ut lengre oppe i diagrammene. mvh DROPS Design
02.04.2024 - 11:34
![]() Martina wrote:
Martina wrote:
Im Diagramm das 7. Symbol
11.01.2024 - 16:22DROPS Design answered:
Liebe Martina, dieses Symbol finden Sie z.B. in den Diagrammen A.3 bis A.8 beidseitig von den Blättern, hier sollen Sie einen Umschlag stricken, aber den wird dann verschränkt gestrickt, damit kein Loch entsteht. Viel Spaß beim stricken!
12.01.2024 - 07:40
![]() Martina wrote:
Martina wrote:
In dem Diagramm finde ich ein Symbol (ein schwarz ausgefüllter Kreis in einem Kästchen) welches ich nicht in der Strick Anleitung wiederfinde. Wird dieses nicht in der Strickanleitung verwendet? Danke
10.01.2024 - 21:17DROPS Design answered:
Liebe Martina, meinen Sie das 3. Symbol unter Diagrambeschreibung? das finden Sie in A.3, A.4,A.5 ..; für die Patentmaschen. Viel Spaß beim stricken!
11.01.2024 - 07:59
![]() Cristina wrote:
Cristina wrote:
Buondì, non ho ben capito come fare a lavorare con due ferri, dovrei tagliare a metà il lavoro e poi cucire? Grazie
12.12.2023 - 16:08DROPS Design answered:
Buongiormo Cristina, non è necessario tagliare il lavoro, è semplicemente un consiglio dovuto al numero elevato di maglie: lavorando però con i ferri circolari può allungare i cavi unendo più cavi con gli appositi connettori. Buon lavoro!
21.12.2023 - 08:14
![]() Trui wrote:
Trui wrote:
De omslagen in rij 2 en 4 heb ik averecht gebreid, en omslagen van naald 1 en 3 heb ik recht gebreid. Hoe worden de omslagen naast de ribbelsteken gebreid? Links en rechts naast de middelste steek van de rij krijg ik een mooi gaatje, maar er zitten ook gaatjes aan beide kanten naast de eerste twee steken (ribbelsteek) van iedere rij. Op de foto zie ik die gaatjes niet terug, hoort dat wel? Ook opvallend: de gaatjes naast de ribbelsteek zijn aan de linkerzijde groter dan rechts. Hoe komt dat?
08.12.2023 - 20:32DROPS Design answered:
Dag Trui,
Ja, aan het begin van de naald horen ook gaatjes te zitten door de omslagen niet gedraaid te breien. Als je dit niet mooi vindt, kun je die omslagen ook gedraaid breien. Als je een omslag tussen een rechte en een averecht steek maakt, maak je eigenlijk een halve omslag, deze zou je bewust wat losser kunnen maken, zodat alle gaatjes gelijk worden.
10.12.2023 - 16:28
![]() Céline wrote:
Céline wrote:
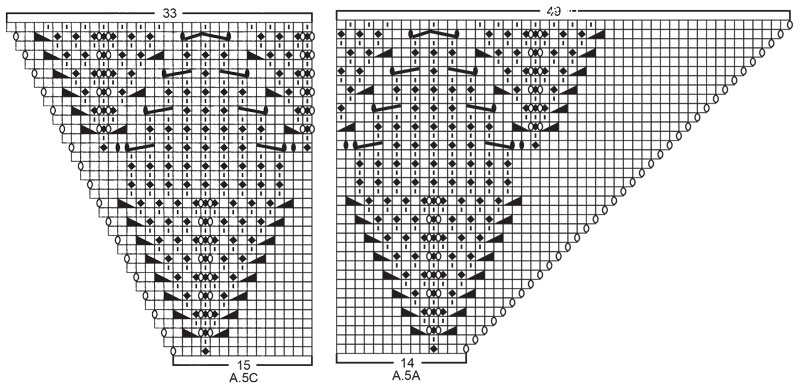
Ok merci pour votre réponse, ce qui confirme qu'il y a bien une erreur dans les diagramme A5A-A5B-A5C-A6A-A6C car on ne voit qu'un jeté noir de chaque coté de la pointe (diminution de 4 mailles) au lieu de 2 jetés de chaque côté comme les autres schémas, merci d'en prendre note svp
14.11.2023 - 10:58DROPS Design answered:
Bonjour Céline, les diagrammes sont justes, vous avez 2 ovales blancs + 2 ovales noirs (1 de chaque côté de la diminution de 4 mailles) Pour chacun des derniers rangs d ces diagrammes, vous avez bien 2 jetés blancs pour compenser les triangles noirs et 4 jetés (2 blancs + 2 noirs) pour commencer les diminutions de 2 mailles faites 2 fois. Bon tricot!
14.11.2023 - 11:21
![]() Céline wrote:
Céline wrote:
Bonjour, en haut des diagrammes A5A,A5B,A5C,A6A,A6C, sur la point de la feuille, j'ai 5 mailles au début mais après les 4 diminutions et les 2 jetés noirs, je me retrouve avec 3mailles et non 5 comme indiqué, du coup je me retrouve avec 2 mailles de moins par motif, pouvez-vous vérifier qu'il n'y a pas d'erreur svp car j'ai recompté et pour mois 5-4dim + 2 jeté= 3, merci
14.11.2023 - 09:43DROPS Design answered:
Bonjour Céline, vous devez bien conserver votre nombre de mailles:vous devez avoir 2 jetés + 1 jeté, 1 diminution de 4 mailles, 1 jeté = autrement dit, vous diminuez 4 mailles et vous avez fait 4 jetés, le nombre de mailles reste bien le même. Bon tricot!
14.11.2023 - 10:54
![]() Birthe wrote:
Birthe wrote:
Hallo! Wie werden beim Tuch in Reihe 3 die Umschläge aus Reihe 2 bzw. 4 gestrickt? Rechts, so dass Löcher entstehen oder rechts verschränkt, dass keine Löcher entstehen? Vielen Dank!
15.10.2023 - 10:51DROPS Design answered:
Liebe Birthe, die Zunahmen werden glatt rechts gestrickt, links bei den Rückreihen und rechts bei den Hinreihen. Viel Spaß beim stricken!
16.10.2023 - 09:39
![]() Birthe wrote:
Birthe wrote:
Hallo! Wie werden beim Tuch in Reihe 3 die Umschläge aus Reihe 2 bzw. 4 gestrickt? Rechts, so dass Löcher entstehen oder rechts verschränkt, dass keine Löcher entstehen? Vielen Dank!
15.10.2023 - 10:50
|
|||||||||||||||||||||||||||||||
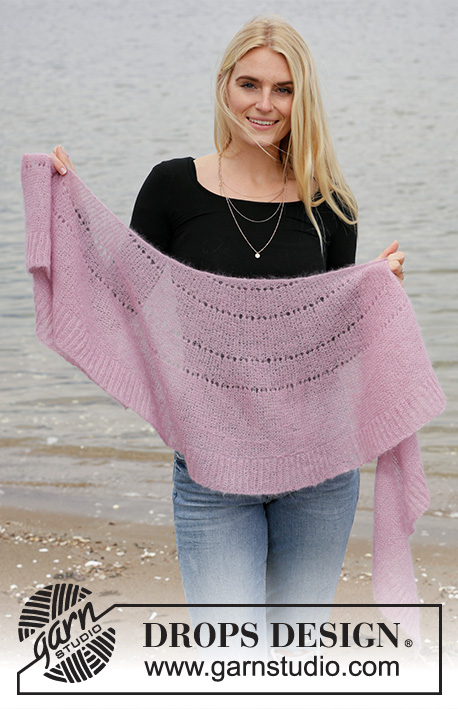
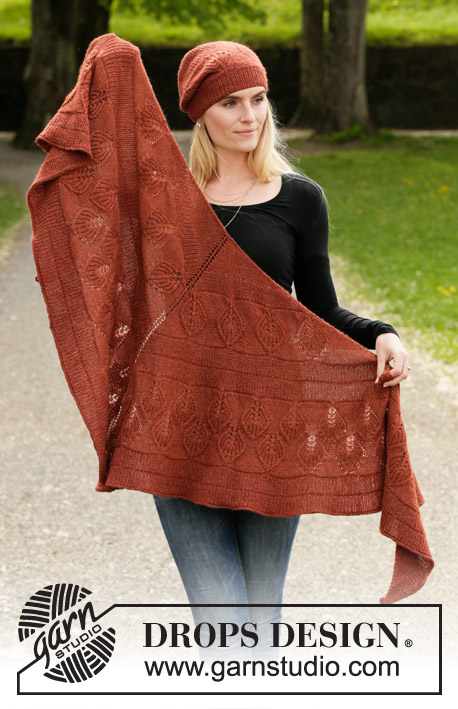
Lacey Laurels#laceylaurelsshawl |
|||||||||||||||||||||||||||||||
 |
 |
||||||||||||||||||||||||||||||
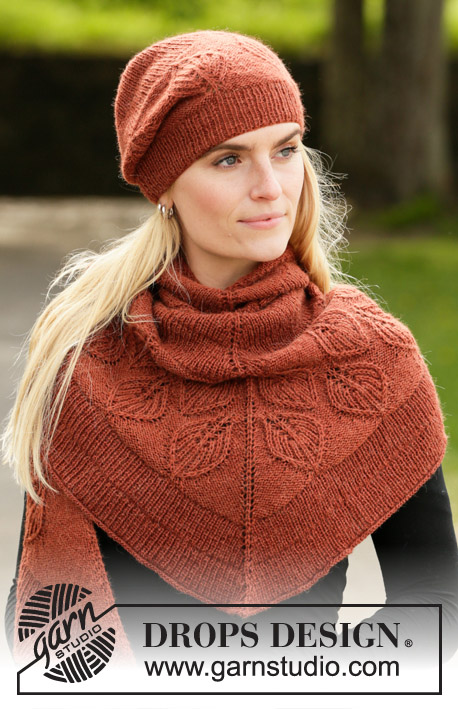
Knitted hat and shawl in DROPS Alpaca. The piece is worked with rib and leaf pattern in Fisherman’s rib.
DROPS 203-14 |
|||||||||||||||||||||||||||||||
|
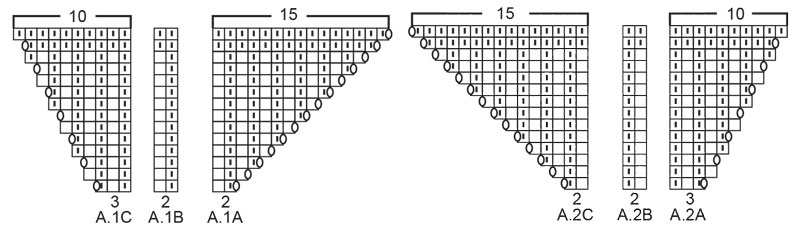
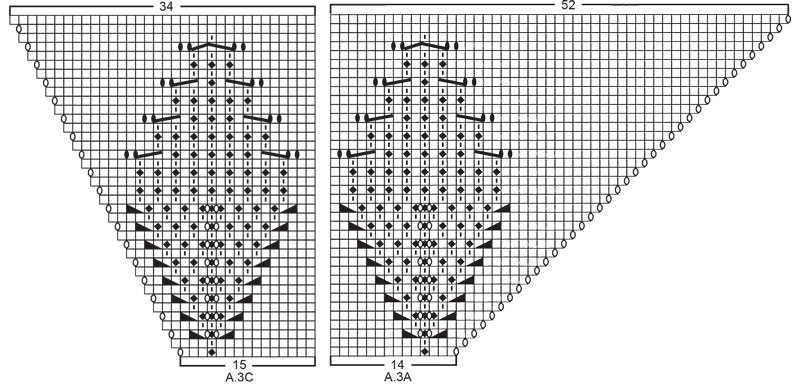
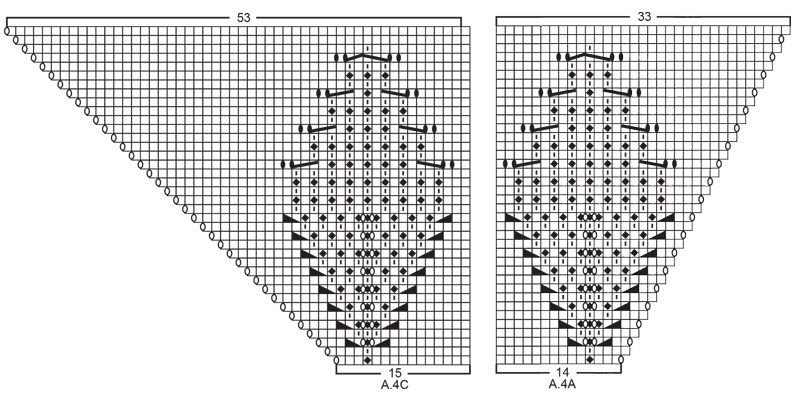
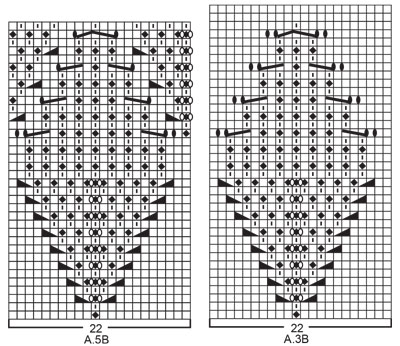
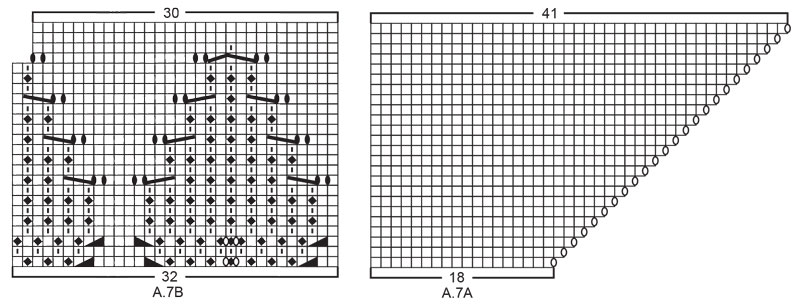
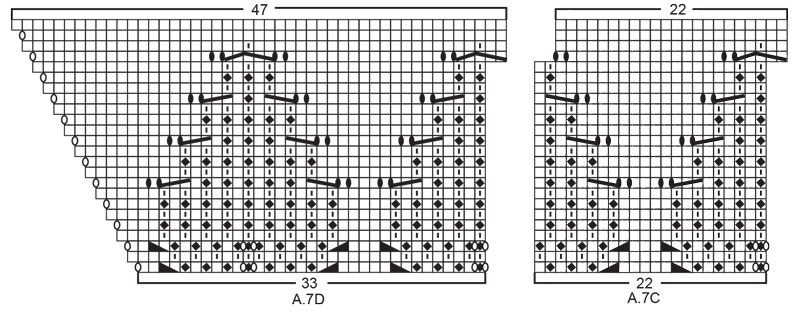
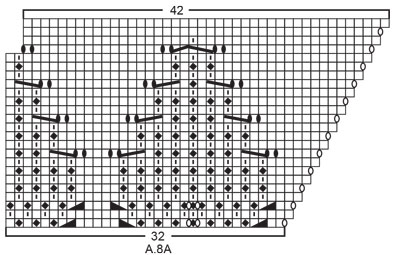
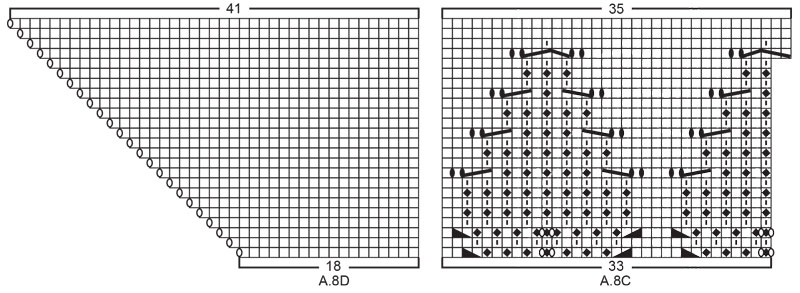
------------------------------------------------------- EXPLANATIONS FOR THE PATTERN: ------------------------------------------------------- RIDGE/GARTER STITCH (worked back and forth): Knit all rows. 1 ridge in height = Knit 2 rows. PATTERN: Hat: See diagrams A.1B and A.3B. Shawl: See diagrams A.1 to A.8. The diagrams show all rows in the pattern seen from the right side. DIAGRAM TIP: This pattern contains many diagrams; it might be a good idea to cut out all the diagrams and arrange them in the right order (see the order given in the text). INCREASE/DECREASE TIP (evenly spaced on hat): To work out how to increase/decrease evenly, count the total number of stitches on needle (e.g. 122 stitches) and divide by the number of increases/decreases to be made (e.g. 10) = 12.2. In this example, increase by making 1 yarn over after approx. each 12th stitch. On the next round work the yarn overs twisted to avoid holes. When decreasing, work together approx. each 11th and 12th stitch. INCREASE/DECREASE TIP (evenly spaced on shawl): To work out how to increase/decrease evenly on each side of the middle stitch, count the total number of stitches on needle (e.g. 81 stitches) minus the edge stitches and middle stitch (5 stitches) and divide the remaining stitches by 2 ( to find the number of stitches on each side of the middle stitch). Then divide these stitches by the number of increases/decreases to be made on each side (e.g. 18) = 2.1. In this example, increase by making 1 yarn over after approx. each 2nd stitch. Do not increase over edge stitches or middle stitch. When decreasing, work approximately all stitches together 2 and 2. ------------------------------------------------------- START THE PIECE HERE: ------------------------------------------------------- HAT – SHORT OVERVIEW OF THE PIECE: The piece is worked in the round with short circular needle, bottom up. Change to double pointed needles when necessary. HAT: Cast on 120-126 stitches with short circular needle size 2.5 mm and Alpaca. Knit 1 round. Then work rib in the round (= knit 1 / purl 1) for 5-6 cm. Knit 1 round where you increase 12-28 stitches evenly spaced – read INCREASE/DECREASE TIP = 132-154 stitches. Change to circular needle size 3 mm and work A.3B in the round (= 6-7 repeats of 22 stitches). REMEMBER THE KNITTING TENSION! When A.3B has been completed the piece measures approx. 16-17 cm from the cast-on edge. Knit 1 round where you increase 12-14 stitches evenly spaced = 144-168 stitches. Work A.1B. AT THE SAME TIME on the last round in A.1B decrease 16-24 stitches evenly spaced = 128-144 stitches. Work A.1B one more time in height. AT THE SAME TIME on the last round in A.1B knit all stitches together 2 and 2 = 64-72 stitches. Then work stocking stitch. AT THE SAME TIME, on every 2nd round, knit all stitches together 2 and 2 until there are 8 stitches left. Cut the strand, pull it through the remaining stitches, tighten and fasten well. The hat measures approx. 26-27 cm from the top down. ------------------------------------------------------- SHAWL - SHORT OVERVIEW OF THE PIECE: The piece is worked back and forth with circular needle, top down. Due to the number of stitches it might be a good idea to divide the piece onto several needles of the same size. SHAWL: Cast on 7 stitches with circular needle size 3 mm and Alpaca. Knit 1 row (= wrong side). Then work and increase as follows: ROW 1 (= right side): Work 2 edge stitches in GARTER STITCH – read description above, 1 yarn over, work 1 stitch in stocking stitch, 1 yarn over, 1 stitch in stocking stitch (= middle stitch), 1 yarn over, 1 stitch in stocking stitch, 1 yarn over and finish with2 edge stitches in garter stitch (= 4 stitches increased). ROW 2 (= wrong side): Work 2 edge stitches in garter stitch, 1 yarn over, work stocking stitch until there are 2 stitches left on the row (yarn overs purled to leave holes), 1 yarn over and finish with 2 edge stitches in garter stitch (= 2 stitches increased). ROW 3 (= right side): 2 edge stitches in garter stitch, 1 yarn over, work stocking stitch as far as the middle stitch, 1 yarn over, 1 stitch in stocking stitch (= middle stitch), 1 yarn over, work stocking stitch until there are 2 stitches left on the row, 1 yarn over and finish with 2 edge stitches in garter stitch (= 4 stitches increased). ROW 4 (= wrong side): 2 edge stitches in garter stitch, 1 yarn over, work stocking stitch until there are 2 stitches left on the row (yarn overs purled to leave holes), 1 yarn over and finish with 2 edge stitches in garter stitch (= 2 stitches increased). Repeat rows 3 and 4 until there are 83 stitches on the needle and the last row was worked from the right side. REMEMBER THE KNITTING TENSION! Work the next row in the same way as row 4 (= wrong side) and increase at the same time 17 stitches evenly spaced on each side of the middle stitch (34 stitches increased on row in addition to the increase worked inside the 2 edge stitches on each side) – read INCREASE/DECREASE TIP = 119 stitches on the needle. Work diagrams A.1 and A.2 as follows from the right side: Work 2 edge stitches in garter stitch, A.1A over 2 stitches (1 time in width), A.1B over 52 stitches (26 times in width), A.1C over 3 stitches (1 time in width), 1 stitch in stocking stitch (= middle stitch), work A.2A over 3 stitches, A.2B over 52 stitches (26 times in width), A.2C over 2 stitches and finish with 2 edge stitches in garter stitch. Continue this pattern. When the last row in A.1 and A.2 remains there are 159 stitches on the needle. Work the last row and at the same time decrease 5 stitches evenly spaced on each side of the middle stitch (10 stitches decreased evenly + 2 stitches increased in diagrams) – read INCREASE/DECREASE TIP = 151 stitches. Work diagrams A.3 and A.4 as follows from the right side: Work 2 edge stitches in garter stitch, A.3A over 14 stitches (1 time in width), A.3B over 44 stitches (2 times in width), work A.3C over 15 stitches (1 time in width), 1 stitch in stocking stitch (= middle stitch), work A.4A over 14 stitches, A.3B over 44 stitches (2 times in width), A.4C over 15 stitches and finish with 2 edge stitches in garter stitch. Continue this pattern. When the last row in A.3 and A.4 remains there are 263 stitches on the needle. Work the last row and, at the same time, increase 43 stitches evenly spaced on each side of the middle stitch (86 stitches increased evenly and 2 stitches increased in diagrams) = 351 stitches. Work diagrams A.1 and A.2 as follows from the right side: Work 2 edge stitches in garter stitch, A.1A over 2 stitches (1 time in width), A.1B over 168 stitches (84 times in width), work A.1C over 3 stitches (1 time in width), 1 stitch in stocking stitch (= middle stitch), A.2A over 3 stitches, A.2B over 168 stitches (84 times in width), work A.2C over 2 stitches and finish with 2 edge stitches in garter stitch. Continue this pattern. When the last row in A.1 and A.2 remains there are 391 stitches on the needle. Work the last row and increase at the same time 1 stitch on each side of the middle stitch (2 stitches increased evenly and 2 stitches increased in diagrams) = 395 stitches. Now work A.1 and A.2 one more time in height; i.e. work the next row from the right side as follows: 2 edge stitches in garter stitch, A.1A over 2 stitches (1 time in width), A.1B over 190 stitches (95 times in width), work A.1C over 3 stitches (1 time in width), 1 stitch in stocking stitch (= middle stitch), A.2A over 3 stitches, A.2B over 190 stitches (95 times in width), A.2C over 2 stitches and finish with 2 edge stitches in garter stitch. Continue this pattern. When the last row in A.1 and A.2 remains there are 435 stitches on the needle. Work the last row and decrease at the same time 11 stitches evenly spaced on each side of the middle stitch (22 stitches decreased evenly + 2 stitches increased in diagrams) = 415 stitches. Work diagrams A.5 and A.6 as follows from the right side: 2 edge stitches in garter stitch, A.5A over 14 stitches (1 time in width), work A.5B over 176 stitches (8 times in width), A.5C over 15 stitches (1 time in width), 1 stitch in stocking stitch (= middle stitch), A.6A over 14 stitches, A.5B over 176 stitches (8 times in width), A.6C over 15 stitches and finish with 2 edge stitches in garter stitch. Continue this pattern. When the last row in A.5 and A.6 is finished there are 523 stitches on the row. Work diagrams A.7 and A.8 as follows from the right side: 2 edge stitches in garter stitch, A.7A over 18 stitches (1 time in width), A.7B over 32 stitches (1 time in width), A.7C over 176 stitches (8 times in width), work A.7D over 33 stitches (1 time in width), 1 stitch in stocking stitch (= middle stitch), A.8A over 32 stitches, A.7C over 176 stitches (8 times in width), A.8C over 33 stitches, A.8D over 18 stitches and finish with 2 edge stitches in garter stitch. Continue this pattern. When the last row in A.7 and A.8 remain there are 593 stitches on the needle. Work the last row and increase at the same time 72 stitches evenly spaced on each side of the middle stitch (144 stitches increased evenly and 2 stitches increased in diagrams) = 739 stitches. Work diagrams A.1 and A.2 as follows from the right side: 2 edge stitches in garter stitch, A.1A over 2 stitches (1 time in width), A.1B over 362 stitches (181 times in width), A.1C over 3 stitches (1 time in width), 1 stitch in stocking stitch (= middle stitch), A.2A over 3 stitches, work A.2B over 362 stitches (181 times in width), A.2C over 2 stitches and finish with 2 edge stitches in garter stitch. Continue this pattern. When the last row in A.1 and A.2 remains there are 779 stitches on the row. Work the last row and increase at the same time 1 on each side of the middle stitch (2 stitches increased evenly and 2 stitches increased in diagrams) = 783 stitches. Now work A.1 and A.2 one more time in height; i.e. work as follows from the right side: 2 edge stitches in garter stitch, A.1A over 2 stitches (1 time in width), A.1B over 384 stitches (192 times in width), A.1C over 3 stitches (1 time in width), 1 stitch in stocking stitch (= middle stitch), A.2A over 3 stitches, work A.2B over 384 stitches (192 times in width), A.2C over 2 stitches and finish with 2 edge stitches in garter stitch. Continue this pattern. When the last row in A.1 and A.2 has been completed there are 825 stitches on the row. The piece measures approx. 65 cm measured along the middle stitch. Cast off as described below. ELASTIC CAST-OFF EDGE: To avoid the cast-off edge being tight, cast off with knit from the right side as follows: Knit 2, * insert the left needle in the 2 stitches on the right needle, from left to right and knit them together, knit 1 *, work from *-* until there is 1 stitch left on the row. Cut the strand and pull it through the last stitch. Fasten strands. SHAPING TIP: Moisten the piece and shape to the right measurements. |
|||||||||||||||||||||||||||||||
Diagram explanations |
|||||||||||||||||||||||||||||||
|
|||||||||||||||||||||||||||||||
 |
|||||||||||||||||||||||||||||||
 |
|||||||||||||||||||||||||||||||
 |
|||||||||||||||||||||||||||||||
 |
|||||||||||||||||||||||||||||||
 |
|||||||||||||||||||||||||||||||
 |
|||||||||||||||||||||||||||||||
 |
|||||||||||||||||||||||||||||||
 |
|||||||||||||||||||||||||||||||
 |
|||||||||||||||||||||||||||||||
 |
|||||||||||||||||||||||||||||||
Have you finished this pattern?Tag your pictures with #dropspattern #laceylaurelsshawl or submit them to the #dropsfan gallery. Do you need help with this pattern?You'll find 17 tutorial videos, a Comments/Questions area and more by visiting the pattern on garnstudio.com. © 1982-2026 DROPS Design A/S. We reserve all rights. This document, including all its sub-sections, has copyrights. Read more about what you can do with our patterns at the bottom of each pattern on our site. |
|||||||||||||||||||||||||||||||


With over 40 years in knitting and crochet design, DROPS Design offers one of the most extensive collections of free patterns on the internet - translated to 17 languages. As of today we count 324 catalogues and 12290 patterns translated into English (UK/cm). 12290
We work hard to bring you the best knitting and crochet have to offer, inspiration and advice as well as great quality yarns at incredible prices! Would you like to use our patterns for other than personal use? You can read what you are allowed to do in the Copyright text at the bottom of all our patterns. Happy crafting!
Post a comment to pattern DROPS 203-14
We would love to hear what you have to say about this pattern!
If you want to leave a question, please make sure you select the correct category in the form below, to speed up the answering process. Required fields are marked *.