
Popular categories
Looking for a yarn?


Comments / Questions (100)
![]() Jardé wrote:
Jardé wrote:
Bonjour Drops design, J’adore votre site mais il faudrait penser aux petites tailles car même quand on est fine la taille S est souvent trop grande. C’est trop triste de devoir renoncer à vos beaux modèles ou de devoir éliminer 90 % d’entre eux. Bien à vous
24.04.2026 - 17:17DROPS Design answered:
Bonjour Mme Jardé et merci, vous trouverez ici tous nos modèles femme en XS - presque tous les modèles de la dernière collection printemps-été sont disponibles en XS, cela pourra peut-être vous inspirer. Bon tricot!
27.04.2026 - 07:30
![]() Emma wrote:
Emma wrote:
Hi. If i measure 41inch across the chest what size would I be? I can't see if there is a positive ease etc. or any guide to which size I would be? Many thanks
10.03.2026 - 14:37DROPS Design answered:
Hi Emma, 41 inches = 104 cms. If you look at the size chart at the bottom of the page, you will see that size L will give you 104 cms and size XL 112 cms. The cardigan is not supposed to be tight fitting, so the XL size would probably be best. Regards, Drops Team.
11.03.2026 - 07:10
![]() Fabiana wrote:
Fabiana wrote:
Buenas tardes, me gustaría saber el tamaño aproximado de cada talla. Muchas gracias por los maravillosos modelos y las explicaciones!
17.02.2026 - 21:17DROPS Design answered:
Hola Fabiana, puedes encontrar el esquema de medidas con las medidas finales de la prenda en la parte inferior de la página; todas las medidas están en cm. Puedes leer más información sobre cómo interpretar nuestros esquemas de medidas aquí.
22.02.2026 - 23:28
![]() Traude wrote:
Traude wrote:
I have been "working" on this cardigan for about 18 months. What is missing is a nice bind-off. I have tried various stretchy bind-offs which work fine with wool. Since this is knitted from cotton, it is not as flexible, and the bind-off flares outwards. Oddly enough, everything looks fine at the bottom rib, Would you have any suggestions? Thank you!
31.10.2025 - 18:50DROPS Design answered:
Hi Traude, please see all the cast off methods we have in 42 videos HERE. I am sure you will find something suitable for you. Happy knitting!
18.11.2025 - 09:14
![]() Laura wrote:
Laura wrote:
Hi! For the body, is A6 worked the whole way down under the sleeves or is the main pattern worked in instead after the decrease? Thank you!
19.10.2025 - 20:27DROPS Design answered:
Hi Laura, A.6 is worked the whole way down the body, as far as the rib at the bottom, Regards, Drops Team.
21.10.2025 - 07:42
![]() Andrea wrote:
Andrea wrote:
Hallo, in der Anleitung heißt es beim Rumpfteil nach dem Stilllegen der Ärmel "so viele Rapporte des Lochmusters stricken..." Damit ist ja aber nicht A.6 gemeint, oder? A.6 nur für die 8M unter den Ärmeln? Welcher Teil der Diagramme ist gemeint? Vielen Dank. Ich freue mich schon die Jacke zu stricken. Wird eine Herausforderung für mich :)
09.09.2025 - 17:05DROPS Design answered:
Liebe Andrea, mit dem Lochmuster ist das an der Passe begonnene Lochmuster gemeint, das Sie ja am Rumpfteil weiterstricken. A.6 wird zusätzlich unter den 8 Maschen unter den Armen gestrickt. Viel Spaß beim Stricken!
16.09.2025 - 09:45
![]() Sylvie wrote:
Sylvie wrote:
À quoi sert il d'augmenter de 47 le nombre de mailles en fin d'ouvrage pour terminer tout de suite avec les 2 cm de côtes ?
05.09.2025 - 19:46DROPS Design answered:
Bonjour Sylvie, il faut davantage de mailles pour les côtes avec les aiguilles 3 que pour le jersey avec les aiguilles 4, et, comme on ne veut pas que la bordure du bas du gilet resserre l'ouvrage, on doit augmenter avant de tricoter les côtes. Bon tricot!
08.09.2025 - 10:05
![]() Jana wrote:
Jana wrote:
Hello, I need an advice regarding yoke (size S). In the first row I add 8 stitches so I have 123. But if I count the stitches on the pattern, I get only 119 (added in A1, A2, A4, A5) for row 2, whereas I have 123. Where am I missing another 4 stitches? Thank you!!
26.08.2025 - 22:08DROPS Design answered:
Dear Jana, you should have 123 stitches. The stitches increased on the front/back pieces are worked into A.1, A.2, A.4 and A.5. Meanwhile, the yarn overs in the sleeves sections are purled twisted and then worked in stocking stitch (so you will have knit 1, yarn over, knit 17, 1 yarn over, knit 1). Happy knitting!
31.08.2025 - 20:28
![]() Lenka wrote:
Lenka wrote:
Dobrý den, mám prosím dotaz k sedlu. V 1. řadě do vzoru přidám 8 ok (mám 123). Když pletu třetí řadu, tak mi tam vychází jen 4 oka navíc (A1, A5, A2, A4), mám tedy jen 119 ok (+8 nové nahozených). Vzor mi tedy vychází o 4 oka kratší. Kde prosím dělám chybu?
24.08.2025 - 11:11
![]() Joanna wrote:
Joanna wrote:
Dzień dobry, robię rozmiar L. skończyłem przerabiać 1x schemat na długość i zastanawiam się co dalej? Przerabiam 5 oczek ściągacza, 1 oczko, A1 i co dalej? Czy przerabiam jeszcze jeden raz A1 (ale niecały) czy przerabiam „normalne” prawe oczka aż dojdę do reglanu? Pozdrawiam i dziękuję ☺️
18.07.2025 - 20:04DROPS Design answered:
Witaj Joanno, gdy schematy zostaną przerobione 1 raz na wysokość, dalej przerabiasz w taki sam sposób. Czyli przerabiasz te same schematy, ale niektóre będą szersze. Pojawi się 1 dodatkowy motyw ażurowy w schematach A.1 i A.5 oraz A.2 i A.4. Pozdrawiamy!
19.07.2025 - 15:28
|
||||||||||||||||
Raspberry Kiss#raspberrykisscardigan |
||||||||||||||||
 |
 |
|||||||||||||||
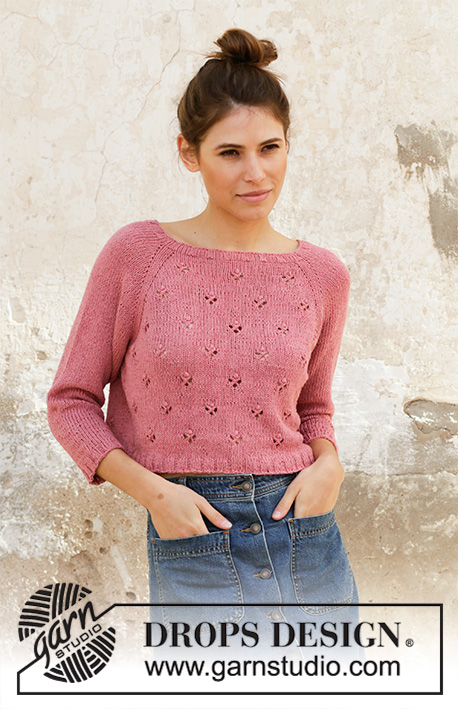
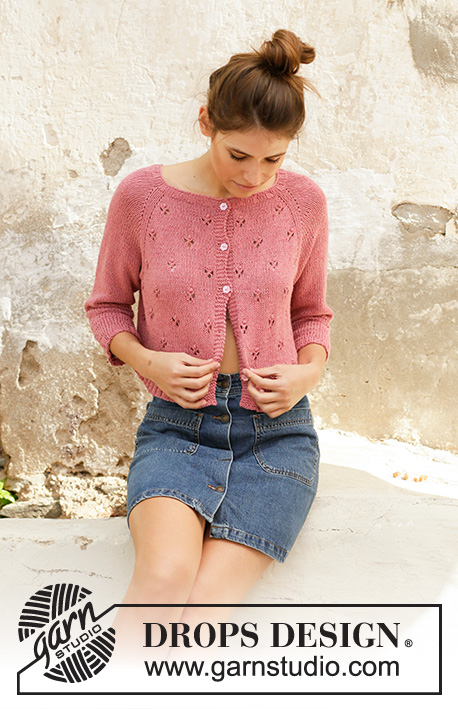
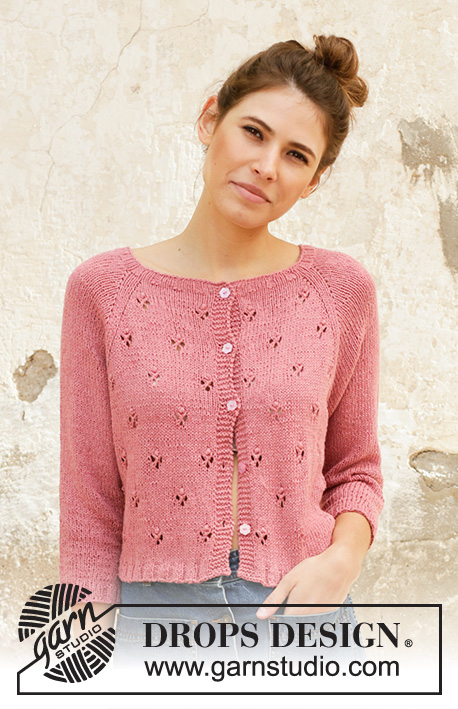
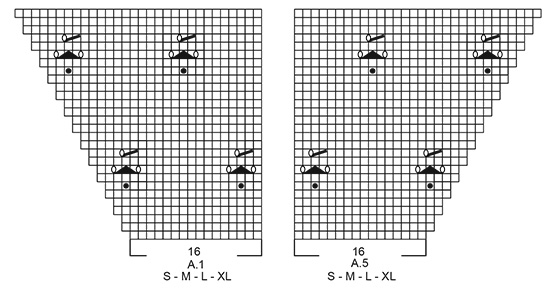
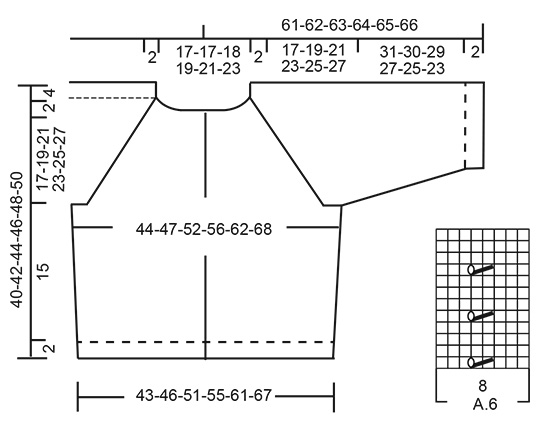
Knitted jacket with raglan in DROPS Belle. Piece is knitted top down with lace pattern. Size: S - XXXL
DROPS 202-6 |
||||||||||||||||
|
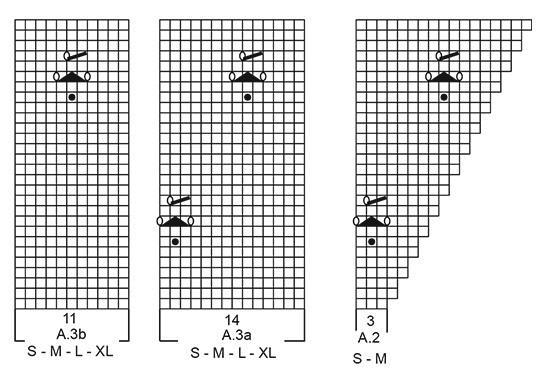
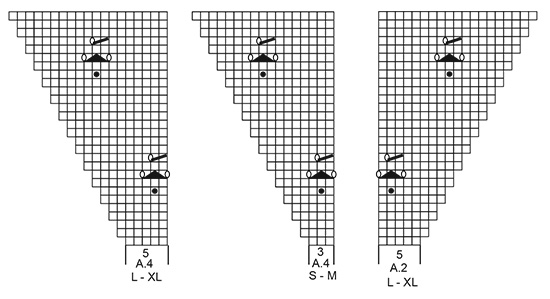
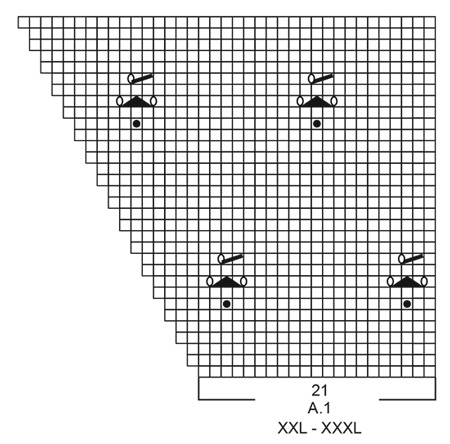
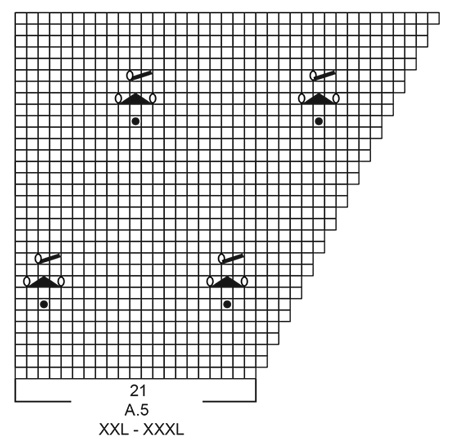
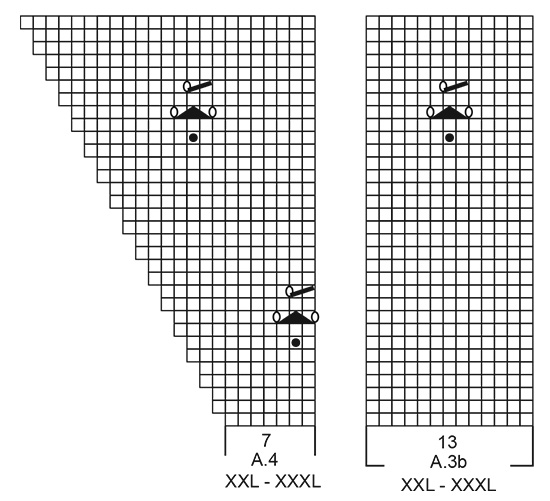
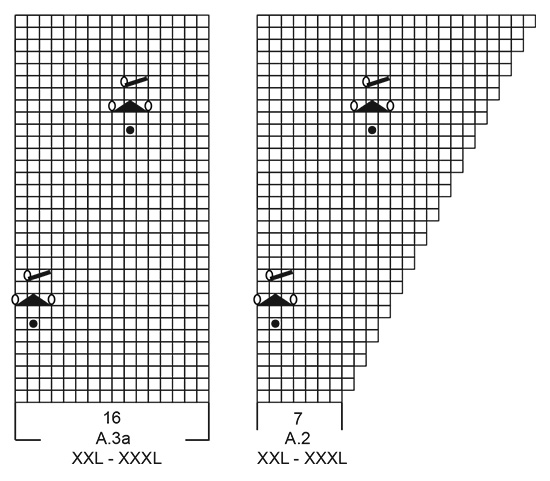
---------------------------------------------------------- EXPLANATION FOR THE PATTERN: ---------------------------------------------------------- GARTER STITCH (back and forth): Knit all rows. 1 ridge vertically = knit 2 rows. PATTERN: See diagrams A.1 to A.6. Choose diagram for your size (applies to A.1-A.2). Diagrams show all rows in pattern seen from the right side. DECREASE TIP-1 (evenly): To calculate how to decrease evenly, use the total number of stitches on row (e.g. 118 stitches), minus bands (e.g. 10 stitches) and divide the remaining stitches by number of decreases to be done (e.g. 3) = 36. In this example decrease by knitting every 35th and 36th stitch together. DECREASE TIP-2 (applies to body and sleeves): All decreases are done from the right side! Decrease 1 stitch on each side of A.6 as follows: Work until 2 stitches remain before A.6 and knit 2 together, knit A.6, slip 1 stitch knitwise, knit 1, pass slipped stitch over stitch worked. INCREASE TIP (evenly): To calculate how to increase evenly, use the total number of stitches on row (e.g. 189 stitches), minus bands (e.g. 10 stitches) and divide the remaining stitches by number of increases to be done (e.g. 24) = 7.5. In this example increase by making 1 yarn over after alternately every 7th and 8th stitch. On next row (wrong side) work yarn overs twisted to avoid holes. RAGLAN: All increases are done from the right side. Increase 1 stitch in each side of 3 knit stitches in every transition between front/back piece and sleeves (= 8 stitches increased on row). Increase 1 stitch by making 1 yarn over. On next row (wrong side) purl yarn overs twisted to avoid holes. Then work the new stitch in stocking stitch on sleeves and work pattern on front and back piece. BUTTONHOLES: Decrease for buttonholes on right band (when garment is worn). Decrease from right side when 3 stitches remain on row as follows: Make 1 yarn over, knit the next 2 stitches together, knit last stitch. On next row knit yarn over to make holes. Decrease first buttonhole when rib in neck measures approx. 1½-2 cm. Then decrease the next 4 approx. 7-7-8-8-9-9 cm between each. ---------------------------------------------------------- START THE PIECE HERE: ---------------------------------------------------------- JACKET - SHORT OVERVIEW OF THE PIECE: Worked back and forth on circular needle, top down. Work sleeves in the round on double pointed needles/a short circular needle, top down. NECK EDGE: Cast on 118-118-123-128-138-143 stitches on circular needle size 3 mm with Belle. Purl 1 row from wrong side. Then work rib as follows from right side: 5 band stitches in GARTER STITCH - read explanation above, (knit 3/purl 2) until 8 stitches remain on needle, knit 3, 5 band stitches in garter stitch. Continue back and forth like this until rib measures 2 cm - remember BUTTONHOLES - read explanation above. Knit 1 row while decreasing 3-3-2-7-1-6 stitches evenly - read DECREASE TIP-1 (evenly) = 115-115-121-121-137-137 stitches. Purl 1 row from wrong side (work the 5 band stitches in garter stitches). YOKE: Switch to circular needle size 4 mm. Work in PATTERN - read explanation above, as follows: 5 band stitches in garter stitch, knit 0-0-1-1-0-0, A.1 over the next 16-16-16-16-21-21 stitches, make 1 yarn over, knit 2, insert a marker thread here (= left front piece), knit 1, make 1 yarn over, knit 15, make 1 yarn over, knit 1, insert a marker thread here (= sleeve), knit 2, 1 yarn over, A.2 over the next 3-3-5-5-7-7 stitches, A.3a over the next 14-14-14-14-16-16 stitches, A.3b over the next 11-11-11-11-13-13 stitches, A.4 over the next 3-3-5-5-7-7 stitches, make 1 yarn over, knit 2, insert a marker thread here (= back piece), knit 1, make 1 yarn over, knit 15, make 1 yarn over, knit 1, insert a marker thread here (= sleeve), knit 2, make 1 yarn over, A.5 over the next 16-16-16-16-21-21 stitches, knit 0-0-1-1-0-0, 5 band stitches in garter stitch (= right front piece). 8 stitches have been increased for RAGLAN - read explanation above. Continue pattern back and forth like this and increase every other row 24-26-29-32-35-38 times in total = 307-323-353-377-417-441 stitches. REMEMBER THE KNITTING TENSION. When diagrams have been worked 1 time vertically, continue pattern the same way. When all increases for raglan are done, piece measures approx. 19-21-23-25-27-29 cm from cast-on edge and down mid front. Work next row as follows: NOTE: In size S and L divide the piece for sleeves and body at the marker threads. In size M, XL, XXL and XXXL work some of the stitches (= 1-2-1-3 stitches) on sleeves on to needle for body, so that the transition between body and sleeves are now longer at the marker threads. Work the first 47-50-53-58-64-69 stitches, slip the next 65-67-75-77-85-87 stitches on a stitch holder (= sleeve), cast on 8-10-12-12-12-14 new stitches on needle (= in the side under sleeve), work the next 83-89-97-107-119-129 stitches (= back piece), slip the next 65-67-75-77-85-87 stitches on a stitch holder (= sleeve), cast on 8-10-12-12-12-14 new stitches on needle (= in the side under sleeve), work the remaining 47-50-53-58-64-69 stitches on needle. NOW MEASURE PIECE FROM HERE! BODY: = 193-209-227-247-271-295 stitches. Work pattern A.6 (= 8 stitches) over the middle 8 stitches under sleeves, 5 band stitches in garter stitch in each side towards and work as many repetitions of pattern that will fit out towards each side (pattern should fit pattern on yoke!), work the remaining stitches in stocking stitch. When piece measures 4 cm, decrease 1 stitch on each side of A.6 in each side - read DECREASE TIP-2 (= 4 stitches decreased) = 189-205-223-243-267-291 stitches. When piece measures 15 cm (adjust to finish after one whole lace pattern vertically and some rounds with stocking stitch), increase 24-28-35-40-46-47 stitches evenly – read INCREASE TIP = 213-233-258-283-313-338 stitches. Switch to circular needle size 3 mm. Work rib from right side as follows: 5 band stitches in garter stitch, (knit 3/purl 2) until 8 stitches remain on row, knit 3, 5 band stitches in garter stitch. When rib measures 2 cm, cast off with knit over knit and purl over purl. Make sure that the cast-off edge is not too tight. Use a larger needle size when casting off. Jacket measures approx. 40-42-44-46-48-50 cm from shoulder and down. SLEEVE: Slip the 65-67-75-77-85-87 stitches from stitch holder in one side back on a short circular needle/double pointed needles size 4 mm. Pick in addition up 1 stitch in each of the 8-10-12-12-12-14 stitches under sleeve = 73-77-87-89-97-101 stitches. Continue in the round with stocking stitch and work A.6 over the middle 8 stitches under sleeve. When piece measures 4-4-3-3-3-2 cm, decrease 2 stitches under sleeves - remember DECREASE TIP-2. Decrease in the different sizes as follows: Size S: Decrease like this on alternately every 2 and 3 cm 11 times in total. Size M: Decrease like this every 2 cm 12 times in total. Size L: Decrease like this on every 1,5 cm 16 times in total. Size XL: Decrease like this on every 1,5 cm 16 times in total. Size XXL: Decrease like this every cm 19 times in total. Size XXXL: Decrease like this every cm 20 times in total. When all decreases on sleeve are done there are 51-53-55-57-59-61 stitches on round. Continue until sleeve measures 31-30-29-27-25-23 cm. Now increase 4-7-5-8-6-9 stitches evenly = 55-60-60-65-65-70 stitches. Switch to double pointed needles size 3 mm. Work rib (knit 3/purl 2) for 2 cm. Cast off stitches with knit over knit and purl over purl. Make sure that the cast-off edge is not too tight. Use a larger needle size when casting off. Sleeve measures approx. 33-32-31-29-27-25 cm. Work the other sleeve the same way. ASSEMBLY: Sew the buttons on to left band. |
||||||||||||||||
Diagram explanations |
||||||||||||||||
|
||||||||||||||||
 |
||||||||||||||||
 |
||||||||||||||||
 |
||||||||||||||||
 |
||||||||||||||||
 |
||||||||||||||||
 |
||||||||||||||||
 |
||||||||||||||||
 |
||||||||||||||||
Have you finished this pattern?Tag your pictures with #dropspattern #raspberrykisscardigan or submit them to the #dropsfan gallery. Do you need help with this pattern?You'll find 29 tutorial videos, a Comments/Questions area and more by visiting the pattern on garnstudio.com. © 1982-2026 DROPS Design A/S. We reserve all rights. This document, including all its sub-sections, has copyrights. Read more about what you can do with our patterns at the bottom of each pattern on our site. |
||||||||||||||||


With over 40 years in knitting and crochet design, DROPS Design offers one of the most extensive collections of free patterns on the internet - translated to 17 languages. As of today we count 324 catalogues and 12290 patterns translated into English (UK/cm). 12290
We work hard to bring you the best knitting and crochet have to offer, inspiration and advice as well as great quality yarns at incredible prices! Would you like to use our patterns for other than personal use? You can read what you are allowed to do in the Copyright text at the bottom of all our patterns. Happy crafting!
Post a comment to pattern DROPS 202-6
We would love to hear what you have to say about this pattern!
If you want to leave a question, please make sure you select the correct category in the form below, to speed up the answering process. Required fields are marked *.