
Popular categories
Looking for a yarn?


Comments / Questions (65)
![]() Lara wrote:
Lara wrote:
Buongiorno, nello SPRONE verso la metà dite "...lavorare le 6 maglie successive con il motivo come prima..", non capisco a quale motivo fa rifermento. Nel CORPO invece, quando inizio con lo schema A3,? Grazie in anticipo!
11.02.2019 - 09:00DROPS Design answered:
Buongiorno Lara. Deve lavorare le 6 m come le ha lavorate in precedenza, seguendo il diagramma (limitatamente alle 6 m). Lavora il diagramma A3 a partire dal giro successivo a quello in cui ha messo in attesa sui fermamaglie le maglie delle maniche. Buon lavoro!
11.02.2019 - 09:24
![]() Lara wrote:
Lara wrote:
Buongiorno, è la prima volta che eseguo un vostro diagramma e non capisco bene quanti ferri devo fare nei diagrammi A1/2 dove sono indicati 16 f., inoltre devo fare 1 aumento ogni 2 giri x 24 volte, quindi in totale per finire il diagramma quanti giri devo fare? Grazie!
08.02.2019 - 17:18DROPS Design answered:
Buonasera Lara, il motivo deve continuarlo fino a quando il lavoro misura 19-21-23-24-26-29 cm, scegliendo la misura che corrisponde alla taglia che sta lavorando, e durante la lavorare del motivo lavorerà anche gli aumenti per il raglan ogni 2 giri come indicato. Buon lavoro!
08.02.2019 - 23:05
![]() Sandra wrote:
Sandra wrote:
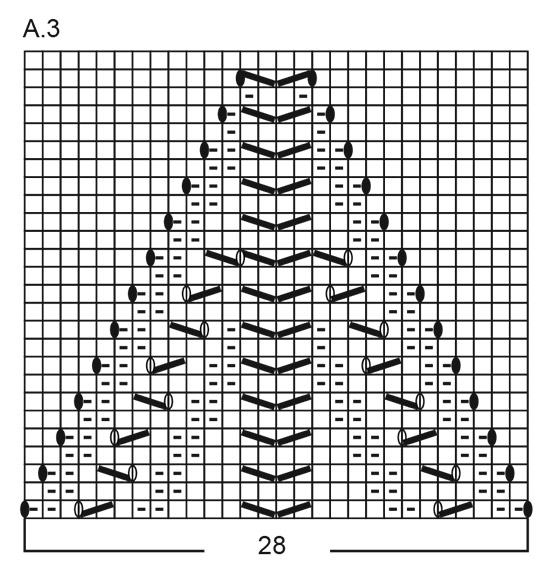
Hallo ich bin bei Muster A 3 angekommen und komme damit überhaupt nicht zurecht. Wenn ich doch in der Mitte 2 Maschen abnehme dann können doch in der nächsten Reihe nicht die gleichen Maschen wieder da sein, wenn ich an dieser Stelle nicht zugenommen habe, die Zunahmen an den Seiten haben doch nichts mit der Mitte zutun. Bin echt am verzweifeln und finde es so schade dass ich nicht nach der Anleitung weiterstricken kann weil es ein wirklich sehr schönes Modell ist. Ich bitte um Hilfe!! Danke
04.01.2019 - 08:44DROPS Design answered:
Liebe Sandra, in A.3 nehmen Sie eine Masche zu vor und nach dem Muster (= 4. Symbol), und gleichzeitig nehmen Sie 2 Maschen in der Mitte vom Diagram ab = die Maschenanzahl bleibt gleich aber das Muster verschiebt sich in de Mitte und wird nach und nach "verschwinden". Viel Spaß beim stricken!
04.01.2019 - 12:40
![]() Rikke LJ wrote:
Rikke LJ wrote:
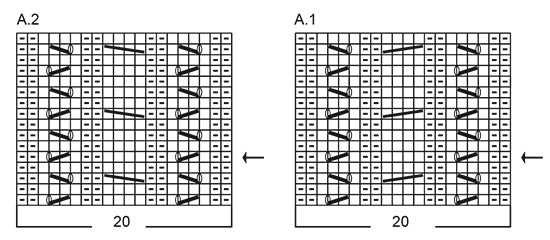
DETTE ER DET RIGTIGE SPØRGSMÅL (kom til at henvise til det forkerte diagram før....) Jeg er i tvivl om gentagelsespilen i diagrammerne A.2 og A.1. Betyder det at række 5 (den med pilen) skal gentages èn gang , når man har strikket række nr. 16 (og altså hele mønsteret igennem)?
24.10.2018 - 11:40DROPS Design answered:
Hej Rikke, jo når du har strikket A.1 og A.2 starter du ved pilen igen og gentager diagrammet fra pilen og op, da vil du få 5 pinde imellem hver af de snoninger som går over 4 masker. God fornøjelse!
30.10.2018 - 10:00
![]() Yvonne wrote:
Yvonne wrote:
Ik denk dat ik het heb gevonden. Gewoon recht boven recht en averecht boven averecht blijven breien. En niet verspringen zoals ik het schema lijkt ,
04.09.2018 - 07:50
![]() Yvonne wrote:
Yvonne wrote:
Hallo, Kun je me helpen? Ik zit enorm te klungelen met de A3. Er worden om de twee pennentwee steken samen gebreid, maar in de volgende lijn moeten er 4 gebreid worden.ik kom er niet aan uit, en ben kennelijk niet de enige. Ik zag een Engelse dame die ook hulp vroeg, maar ik ken de Engelse "breitechnologie" niet. Dus hulp in het Nederlands graag. Dank en fijn WE
01.09.2018 - 18:35DROPS Design answered:
Dag Yvonne, Op de oneven naalden minder je in totaal 4 steken in A.3 maar deze worden gecompenseerd met 4 omslagen, waardoor het totaal aantal steken gelijk blijft. Door de minderingen (samenbreien en steek over gebreide steek halen) verschuift het patroon in een punt. Je kunt precies het patroon blijven volgen, dus gewoon per naald kijken welke steken je moet breien. Als de minderingen in het midden mooi boven elkaar zitten, komt het met de rest ook wel goed.
06.09.2018 - 11:56
![]() Grażyna wrote:
Grażyna wrote:
Dzień dobry. Chyba brakuje mi wyobraźni i nie mogę zrozumieć, co w opisie karczka znaczy " 6 następnych oczek jak wcześniej". Pewnie w trakcie robótki sprawa by się wyjaśniła. Proszę o wyjaśnienie.Pozdrawiam
09.08.2018 - 10:12DROPS Design answered:
Witamy! 6 następnych oczek jak wcześniej, oznacza, że należy przerobić je tak jak schodzą z drutu (prawe na prawo, a lewe na lewo). Życzę powodzenia i proszę koniecznie pokazać gotowy sweterek w naszej grupie DROPS Workshop na facebooku. Pozdrawiamy
10.08.2018 - 20:40Snezhanna wrote:
Hello! I have a question about side increases on the pattern A.3: it says I should make side increases 4sts prior to the middle. When I've done so, I could see that I've got the extra stitch on the pattern A3, row( round) 9. How should it fit the pattern? I'm confused
18.07.2018 - 03:13DROPS Design answered:
Dear Snezhanna, make sure you always have 28 sts in A.3 and that you dec in the middle of repeat with K2 tog, marker, slip 1 as if to K, K1, psso every other round/row. Number of sts will remain constant, just lace pattern will dec to a tip while number of sts worked in stocking stitch will increase on each side of the lace pattern/marker. Happy knitting!
18.07.2018 - 09:15
![]() Astrid Sæter wrote:
Astrid Sæter wrote:
Held på å strikke denne og har et lite spørsmål når det gjelder ermene. Hvorfor er ermene lengre jo mindre størrelse? For oftest så bruker det jo å være omvendt. Er det feil i mønsteret? Ser også at det skal økes 8 masker før vrangbord, hvorfor det?
12.06.2018 - 20:39DROPS Design answered:
Hei Astrid. Det er riktig at ermene strikkes kortere i større størrelser fordi de ofte har videre skulder/ermkuppel-parti. Det økes masker før vrangborden for at det ikke skal bli så altfor stor viddeforskjell på vrangborden og resten av ermet. Du går ned en pinnestørrelse på vrangborden, i tillegg til at vrangbord naturlig trekker seg litt sammen, så det er for å utgjevne forskjellen litt. God fornøyelse.
15.06.2018 - 15:24
![]() Christiane wrote:
Christiane wrote:
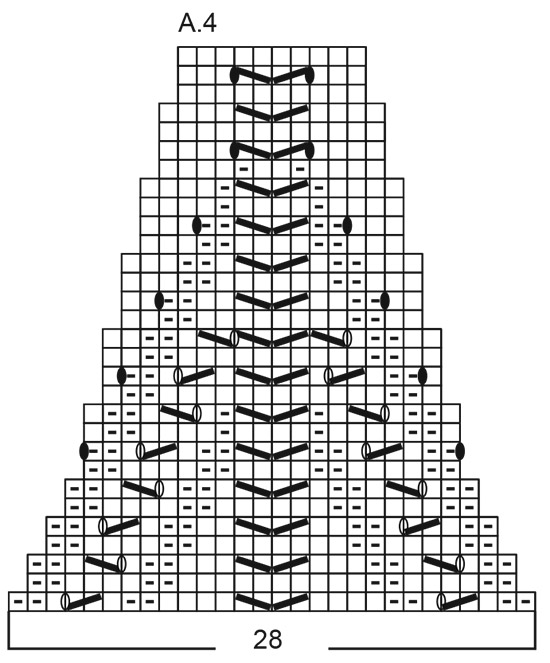
Hallo, ich stricke die Ärmel und kann das Muster A4 nicht finden. Soll ich jetzt das Muster A3 (28 Maschen) stricken? Komme nicht weiter.
22.05.2018 - 15:53DROPS Design answered:
Liebe Christiane, A.4 finden Sie unten (letzes Diagram), kurz über die Maßskizze. Viel Spaß beim stricken!
22.05.2018 - 16:09
|
||||||||||||||||||||||||||||
Madrid#madridsweater |
||||||||||||||||||||||||||||
 |
 |
|||||||||||||||||||||||||||
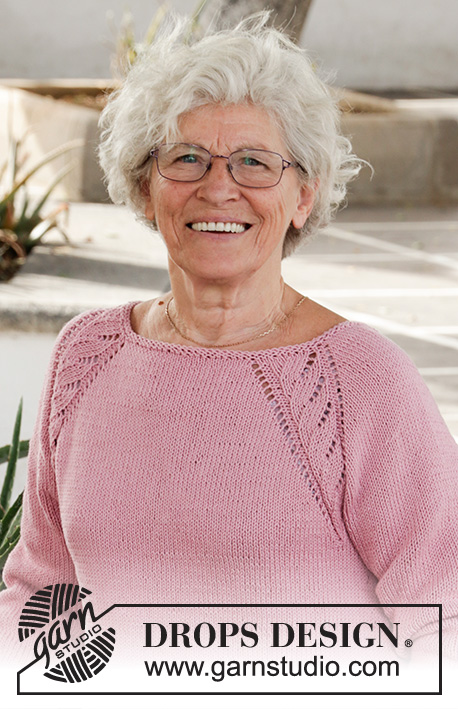
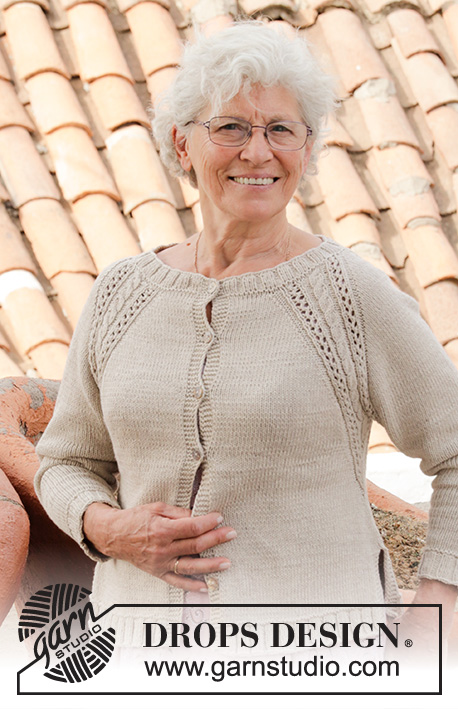
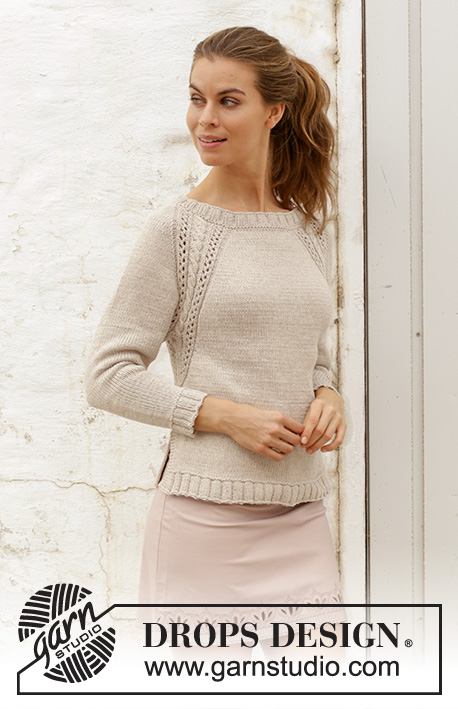
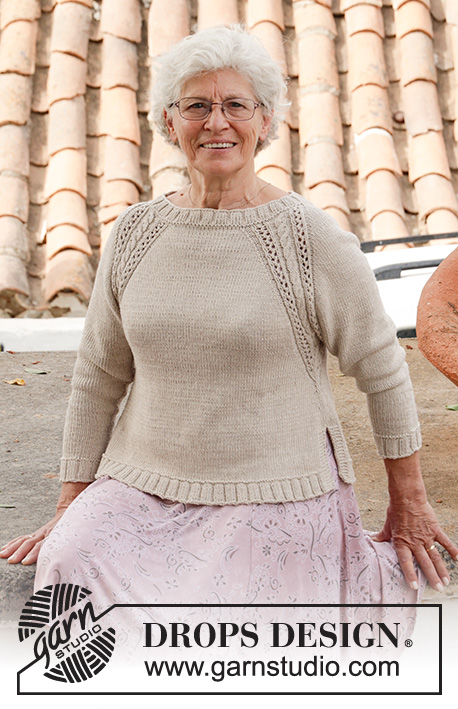
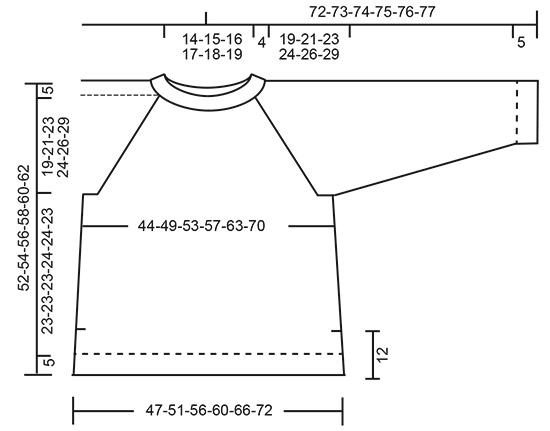
Knitted jumper with raglan, cables, lace pattern and split in sides, worked top down. Sizes S - XXXL. The piece is worked in DROPS Cotton Light.
DROPS 188-19 |
||||||||||||||||||||||||||||
|
INFORMATION FOR THE PATTERN: RIDGE/GARTER STITCH (worked in the round): 1 ridge = 2 rounds. Knit 1 round and purl 1 round. RIDGE/GARTER STITCH (worked back and forth): 1 ridge = Knit 2 rows. PATTERN: See diagrams A.1 to A.4. The diagrams show all the rows in the pattern seen from the right side. RAGLAN: Increase 1 stitch on each side of each repeat of A.1/A.2 (= 8 stitches increased on the round). Increase 1 stitch by making 1 yarn over. On the next round knit the yarn overs twisted to avoid holes. INCREASE TIP-1 (evenly spaced): To work out how to increase evenly, count the total number of stitches on the needle (e.g. 110 stitches), and divide by the number of increases to be made (e.g. 4) = 27.5. In this example, increase alternately after every 27th and 28th stitch. Increase with a yarn over after the stitch and work the yarn over twisted on the next row to avoid a hole. INCREASE TIP-2 (for sides): All increases are made from the right side! Work until there are 2 stitches left before the marker thread, 1 yarn over, knit 4 (the marker sits in the middle of these 4 stitches), 1 yarn over. On the next round knit the yarn overs twisted to avoid holes. DECREASE TIP (for sleeves): Decrease 1 stitch on each side of the marker thread as follows: Work until there are 2 stitches left before the marker thread, knit 2 stitches together, (marker thread sits here), slip 1 stitch as if to knit, knit 1, pass the slipped stitch over. ---------------------------------------------------------- JUMPER: The piece is worked in the round with circular needle, top down as far as the split at the bottom of the body. Then the front and back pieces are finished separately back and forth. The sleeves are worked in the round with double pointed needles/ short circular needle. NECK: Cast on 110-115-120-125-135-145 stitches with circular needle size 3.5 mm and Cotton Light. Knit 1 round. Then work rib (knit 3 / purl 2) for 4 cm. Work 1 RIDGE – see description above, where on the first round you increase 4-7-10-9-11-17 stitches evenly – read INCREASE TIP-1 (evenly spaced) = 114-122-130-134-146-162 stitches. YOKE: Change to circular needle size 4 mm. Insert a marker here. THE PIECE IS NOW MEASURED FROM HERE! Work pattern as follows: Knit 8-10-12-13-16-20 stitches (= half back piece), make 1 yarn over, A.1 (= 20 stitches), 1 yarn over, knit 1 (= sleeve), 1 yarn over, A.2 (= 20 stitches), 1 yarn over, knit 16-20-24-26-32-40 stitches (= front piece), 1 yarn over, A.1, 1 yarn over, knit 1 (= sleeve), 1 yarn over, A.2, 1 yarn over, knit 8-10-12-13-16-20 stitches (= half back piece). The first increase to RAGLAN – see description above, is now finished. Continue the pattern like this and increase every 2nd round a total of 24-27-30-33-36-39 times = 306-338-370-398-434-474 stitches. REMEMBER THE KNITTING TENSION. When all the increases to raglan are finished, the piece measures 17-19-21-24-26-28 cm. Continue pattern without increasing until the piece measures 19-21-23-24-26-29 cm. The next round is worked as follows: Knit 32-37-42-46-52-59 stitches, work the next 6 stitches in pattern as before, purl 2, knit 2 (= half back piece), place the next 69-75-81-87-93-99 stitches on a thread (= sleeve), cast on 8 new stitches on the needle (= side under sleeve), knit 2, purl 2, work the next 6 stitches in pattern as before, knit 64-74-84-92-104-118 stitches, work the next 6 stitches in pattern as before, purl 2, knit 2 (= front piece), place the next 69-75-81-87-93-99 stitches on a thread (= sleeve), cast on 8 new stitches on the needle (= side under sleeve), knit 2, purl 2, work the next 6 stitches in pattern as before, knit 32-37-42-46-52-59 stitches (= half back piece). THE PIECE IS NOW MEASURED FROM HERE! BODY: = 184-204-224-240-264-292 stitches. Insert 1 marker thread in each side, in the middle of the new stitches cast on. Continue in the round with knit and A.3 (= 28 stitches) over the 8 new stitches cast on under the sleeves + 10 stitches on each side of these (i.e. 14 stitches on each side of the marker thread in each side). When A.3 has been completed in height, the piece measures 9 cm. Continue in the round with knit and on the next round increase 1 stitch on each side of the marker thread in each side – read INCREASE TIP-2 (for sides)! Increase like this every 3 cm a total of 3 times = 196-216-236-252-276-304 stitches. Continue with knit until the piece measures 16-16-16-17-17-16 cm. Now divide the piece into front and back pieces, which are finished separately back and forth. Place the one set of 98-108-118-126-138-152 stitches between the marker threads on a thread for the front piece and work the back piece as follows: BACK PIECE: = 98-108-118-126-138-152 stitches. Work stocking stitch with 5 stitches garter stitch in each side. When the piece measures 23-23-23-24-24-23 cm increase 30-30-30-37-40-41 stitches evenly on row (but not over the stitches in garter stitch) = 128-138-148-163-178-193 stitches. Change to circular needle size 3.5 mm. Work 1 ridge. Work rib from the right side as follows: 5 stitches in garter stitch, (knit 3 / purl2) until there are 8 stitches left on the row, knit 3, 5 stitches in garter stitch. Continue like this until the rib measures 5 cm. Cast off with knit over knit and purl over purl. To avoid the cast-off edge being tight you can make a yarn over after approx. every 5th stitch. The yarn over is cast off as a normal stitch. The piece measures a total of 52-54-56-58-60-62 cm from the shoulder down. FRONT PIECE: = 98-108-118-126-138-152 stitches. Place the other set of stitches back on circular needle size 4 mm and work in the same way as for the back piece. SLEEVE: Place the 69-75-81-87-93-99 stitches from the thread on the one side of the piece onto double pointed needles/short circular needle size 4 mm and, in addition, knit up 1 new stitch in each of the 8 stitches cast on under the sleeve = 77-83-89-95-101-107 stitches. Insert a marker thread in the middle of the new stitches (= 4 new stitches on each side of the marker thread). Work A.4 (= 28 stitches) mid under the sleeve so that there are 14 stitches of A.4 on each side of the marker thread mid under sleeve. The remaining stitches on the round are worked knitted. When the whole of A.4 has been worked in height you have decreased 18 stitches = 59-65-71-77-83-89 stitches. Continue to decrease 2 stitches under the sleeve – read DECREASE TIP! Decrease like this every 10th-7th-6th-5th-4th-3rd round a total of 7-9-11-13-15-17 times = 45-47-49-51-53-55 stitches. Continue with knit until the sleeve measures 37-35-34-33-32-29 cm. Now increase 5-8-6-9-7-10 stitches evenly on round = 50-55-55-60-60-65 stitches. Change to double pointed needles size 3.5 mm. Work 1 ridge. Then work rib (knit 3 / purl 2) until the sleeve measures 42-40-39-38-37-34 cm from the division. Cast off with knit over knit and purl over purl. To avoid the cast-off edge being tight you can make a yarn over after approx. every 5th stitch. The yarn over is cast off as a normal stitch. Work the other sleeve in the same way. |
||||||||||||||||||||||||||||
Diagram explanations |
||||||||||||||||||||||||||||
|
||||||||||||||||||||||||||||
 |
||||||||||||||||||||||||||||
 |
||||||||||||||||||||||||||||
 |
||||||||||||||||||||||||||||
 |
||||||||||||||||||||||||||||
Have you finished this pattern?Tag your pictures with #dropspattern #madridsweater or submit them to the #dropsfan gallery. Do you need help with this pattern?You'll find 33 tutorial videos, a Comments/Questions area and more by visiting the pattern on garnstudio.com. © 1982-2026 DROPS Design A/S. We reserve all rights. This document, including all its sub-sections, has copyrights. Read more about what you can do with our patterns at the bottom of each pattern on our site. |
||||||||||||||||||||||||||||


With over 40 years in knitting and crochet design, DROPS Design offers one of the most extensive collections of free patterns on the internet - translated to 17 languages. As of today we count 324 catalogues and 12290 patterns translated into English (UK/cm). 12290
We work hard to bring you the best knitting and crochet have to offer, inspiration and advice as well as great quality yarns at incredible prices! Would you like to use our patterns for other than personal use? You can read what you are allowed to do in the Copyright text at the bottom of all our patterns. Happy crafting!
Post a comment to pattern DROPS 188-19
We would love to hear what you have to say about this pattern!
If you want to leave a question, please make sure you select the correct category in the form below, to speed up the answering process. Required fields are marked *.