
Popular categories
Looking for a yarn?


Comments / Questions (18)
![]() Amandine wrote:
Amandine wrote:
Bonjour, j'écris pour vous faire deux retours. Il y a une erreur dans l'explication des manches, vous indiquez "Après avoir tricoté le rang d'assemblage de l'ourlet picot (= celui avec la flèche dans le diagramme)" mais c'est le rang avec l'étoile, pas celui avec la flèche. Enfin, j'ai manqué de laine de la couleur des bordures, les 50g annoncés n'ont pas été suffisants pour tricoter la taille S. Merci pour le patron, très joli pull.
06.03.2025 - 18:44DROPS Design answered:
Bonjour Delphine, merci pour votre retour, la phrase a été reformulée - aviez-vous bien la bonne tension à la fois en hauteur et en largeur? Même en tricotant?
07.03.2025 - 10:17
![]() Carole wrote:
Carole wrote:
Bonjour, il est indiqué de "Coudre les mailles rabattues des épaules en grafting." or je ne trouve aucune façon de faire du grafting sur des mailles rabattues, pourriez-vous m'indiquer de quoi il s'agit svp ? Merci.
06.03.2025 - 18:40DROPS Design answered:
Bonjour Carole, vous pouvez utiliser la technique que nous montrons dans cette vidéo. Bon assemblage!
07.03.2025 - 08:43
![]() Christina wrote:
Christina wrote:
Hej Drops 187-13 Jag förstår inte hur jag ska göra varvet * (stjärna) , vända upp det stickade till baksidan? Tacksam för hjälp, kan ni visa hur jag ska göra.
05.01.2021 - 15:41DROPS Design answered:
Hei Christina. Har du sett hjelpevideoene til denne genseren? Selv om den viser et skjørt, så er teknikken den sammen. Se på: Hur man stickar en vikt kant till en kjol. mvh DROPS design
13.01.2021 - 14:58
![]() Martina wrote:
Martina wrote:
Ich verstehe die letzten 2 Reihen des Wellenmusters nicht. Ich soll lt. Anleitung am Ende der vorletzten Reihe eine Masche aufnehmen, und am Ende der letzten Reihe. Lt. Anleitung und Diagramm soll ich aber am Ende der vorletzten Reihe auch 1 Masche abnehmen (= 2 Maschen zusammenstricken). Das macht doch keinen Sinn? Wenn ich 1 Masche zunehme und 1 Masche abnehme, ist die Maschenzahl doch die gleiche, dann kann ich das doch so lassen, wie es ist (also weder auf- noch abnehmen)?
21.12.2020 - 21:02DROPS Design answered:
Liebe Martina, man braucht für die Naht eine Masche mehr beiseitig (deshalb muss man 2 Maschen anschlagen), aber bei der vorletzte Reihe in A.1 wird nur 1 Masche abgenommen. Viel Spaß beim stricken!
22.12.2020 - 09:41
![]() Anne M Sullivan wrote:
Anne M Sullivan wrote:
Doing cap of sleeve, the instructions say cast off 4 stitches each side 1 time then 3 stitches 1 time then 2 stitches and continue until sleeve measures 41 (was 33). Then cast off 3 stitches 1 time and then cast off rest. Now does this mean 2 stitches 1 time or beginning each row until work measures 41cms?
03.02.2020 - 17:49DROPS Design answered:
Dear Mrs Sullivan, this means you will cast off 2 stitches at the beginning of the rows from RS and from WS until the sleeve measures 41 cm from the marker thread. The number of times/stitches cast off will depend on your tension in height, measurement is here more important than number of rows/stitches, but just make sure you cast off the same number of stitches on each side. Happy knitting!
04.02.2020 - 10:31
![]() Marchal Christina wrote:
Marchal Christina wrote:
Bonjour, J'ai acheté le nombre de pelotes qui étaient indiqués. Hors, je n'ai pas assez de couleur beige pour finir le début de mon devant. Il est écrit 50g. Est ce une erreur? Je vous avoue, je suis très décu de ne pas pouvoir finir mon pull et je dois attendre une demaine maintenant pour recevoir la pelote manquante.
11.01.2020 - 18:39
![]() Marie wrote:
Marie wrote:
Bonjour pourriez vous me donner plus d explications pour les 4 mailles tricotees ensemble à gauche et à droite. Merci
26.03.2019 - 20:31DROPS Design answered:
Bonjour Marie! Pour tricoter 4 mailles ensemble suivez simplement la technique du video ICI. Les autres tutoriels vidéo associes a ce modele se trouvent a gauche des explications. Bon travail!
27.03.2019 - 07:47
![]() Pamela Cornish wrote:
Pamela Cornish wrote:
Hi, I don't understand how to work the folded eyelet row. Am I right in understanding that each cast on stitch should be used. If so, I am confused because I have just decreased by a lot on the knitting row and therefore if I do that I will run out of stitches to keep using to knit together with the cast on stitch. I hope that this makes sense! Thanks. Pam
03.08.2018 - 17:17DROPS Design answered:
Dear Pamela, there is no decrease on the piece before you finish the folded edge. On the row the eyelets are done aside the edge stitches *1 yarnover, 2KTOG* should be repeated, that is one yarnover for every knitted together stitch. I hope this helps. Happy Knitting!
04.08.2018 - 23:44
![]() Sara Karlsson wrote:
Sara Karlsson wrote:
Hej Jag får inte ihop antalet maskor som ska vara på framsida per axel. Jag har 84 maskor och ska sätta de 22 i mitten på en tråd, då får jag 31 per sida. Så ska jag minska 2 maskor 3 gånger = 6 maskor och 1 maska 2 gånger. Då har jag minskat 8 maskor per sida och har då 23 maskor men i mönstret står det att jag ska ha 21? Vad blir fel? Mvh Sara Karlsson
05.07.2018 - 21:51DROPS Design answered:
Hej Sara, vi ser var du menar. Vi skall be design titta på mönstret och lägga ut en rättelse. Om inte du vill vänta på den, kan du minska 2 maskor till så du har samma antal maskor som på ryggen. Tack för information och lycka till :)
09.07.2018 - 08:49
![]() Anne wrote:
Anne wrote:
Hej. Jeg er nået til at skulle lave ærmekuppel og forstår ikke hvordan der skal tages ind i den forbindelse. 1. Tages der ind på både start og slut af hver pind? 2. Tages der både ind på ret og vrang pinde? 3. Når der står: 2 masker til ærmet måler X, skal man så blive ved med at tage to masker ind og i så fald, hvor mange masker skal der så være i alt når der står luk de resterende m af?
01.06.2018 - 14:34DROPS Design answered:
Hei Anne. Når det står at du skal felle på begynnelsen av hver pinne i hver side, betyr dette at det felles fra både rettsiden og vrangsiden – kun på begynnelsen av pinnen. Når det står fell 4 masker 1 gang, betyr dette at det felles over 2 pinner: Fell 4 masker på starten av pinnen fra retten, snu arbeidet, fell 4 masker på starten av pinnen fra vrangen = 8 masker felt. Videre står det fell 2 masker til arbeidet måler X, da skal det felles på samme måte: 2 masker felles på begynnelsen av hver pinne til riktig mål. God fornøyelse.
06.06.2018 - 13:11
|
|||||||||||||||||||||||||||||||
Adele#adelesweater |
|||||||||||||||||||||||||||||||
 |
 |
||||||||||||||||||||||||||||||
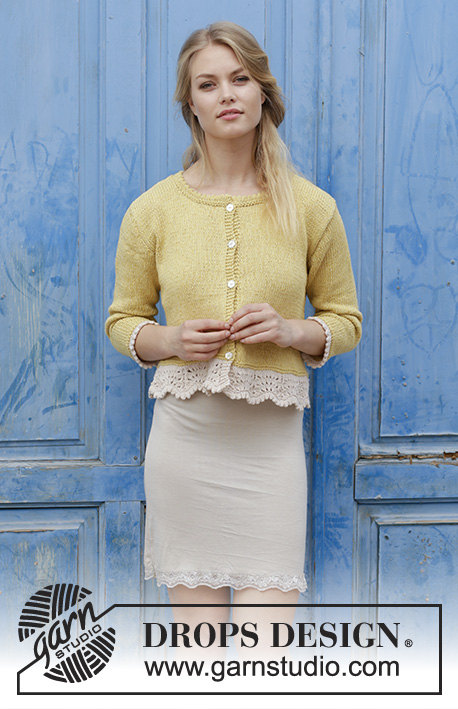
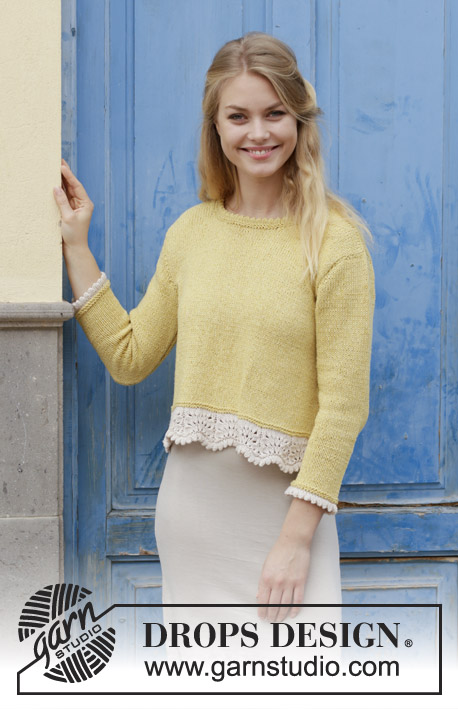
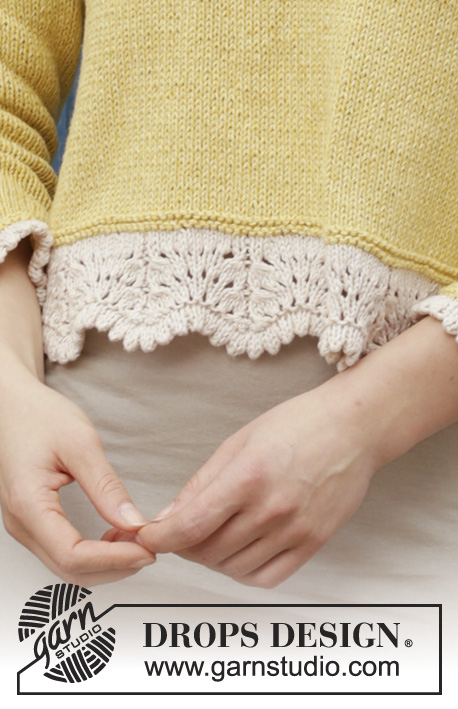
Knitted jumper with edge in wave pattern and vent in the sides. Size: S - XXXL Piece is knitted in DROPS Belle.
DROPS 187-14 |
|||||||||||||||||||||||||||||||
|
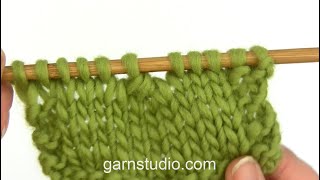
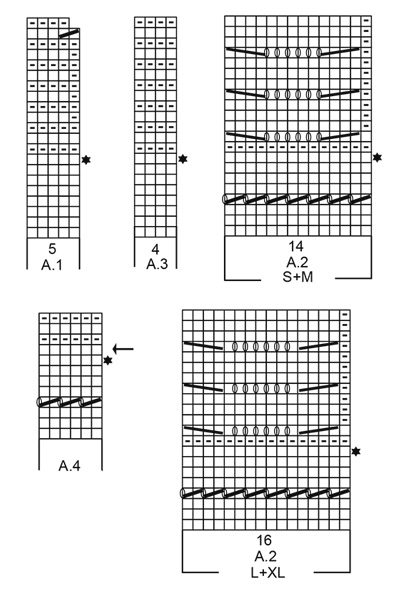
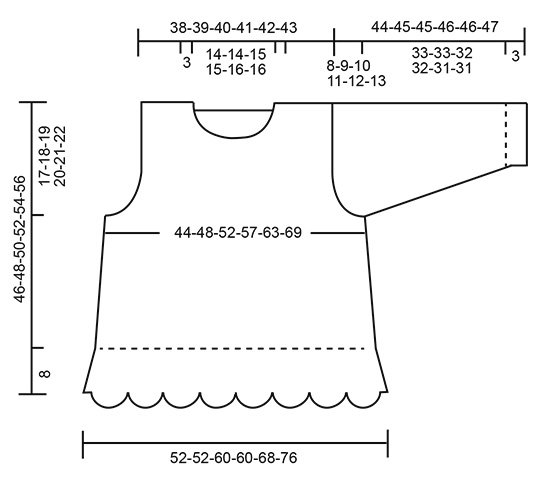
INFORMATION FOR PATTERN: GARTER STITCH (worked in the round): 1 ridge = 2 rounds. Knit 1 round and purl 1 round. GARTER STITCH (back and forth): 1 ridge = knit 2 rows. PATTERN: See diagrams A.1 to A.4. Choose diagram for your size. Diagrams show all rows in pattern seen from the right side. NOTE! First row in diagrams is worked from wrong side! DECREASE TIP-1: To calculate how to decrease evenly, use the total number of stitches on row (e.g. 122 stitches) and divide stitches by number of decreases to be done (e.g. 20) = 6.1. In this example knit approx. every 5th and 6th stitch together. DECREASE TIP-2: All decreases are done from the right side. Decrease as follows after 1 edge stitch in garter stitch: Slip 1 stitch knitwise, knit 1, pass slipped stitch over stitch worked. Decrease as follows before 1 edge stitch in garter stitch: Work until 3 stitches remain, knit 2 together, 1 edge stitch in garter stitch. INCREASE TIP: All increases are done from right side. Increase 1 stitch inside 1 edge stitch in garter stitch in each side by making a yarn over. On next row purl yarn overs twisted to avoid holes. Then work the new stitches in stocking stitch. ---------------------------------------------------------- JUMPER: Worked back and forth on circular needle, bottom up. Work first an edge in wave pattern with light beige. Then switch to dandelion and work 2 ridges before continuing in stocking stitch. Work sleeves back and forth on circular needle. BACK PIECE: Cast on 121-121-137-137-153-169 stitches with light beige on circular needle size 4 mm. Work first row from wrong side as follows: A.1 (= 5 stitches), A.2 – choose diagram for your size (= 8 repetition of 14-14-16-16-18-20 stitches), A.3 (= 4 stitches). On the last 2 rows in A.1-A.3 cast on 1 new stitch at the end of row (marks vent) – NOTE: decrease 1 stitch on next to last row in A.1 = 122-122-138-138-154-170 stitches. When A.1 to A.3 have been worked, switch to dandelion. Knit 1 row while decreasing 20-12-18-8-12-16 stitches evenly - read DECREASE TIP-1 = 102-110-120-130-142-154 stitches. Knit 1 row from wrong side, knit 1 row from right side and knit 1 row from wrong side. Insert a marker here. NOW MEASURE PIECE FROM HERE! REMEMBER THE KNITTING TENSION! Now work in stocking stitch with 1 edge stitch in GARTER STITCH - see explanation above, in each side, AT THE SAME TIME when piece measures 0-1-2-3-4-5 cm decrease 1 stitch in each side – read DECREASE TIP-2. Decrease like this approx. every 4 cm 4 times in total = 94-102-112-122-134-146 stitches. When piece measures 21-22-23-24-25-26 cm, cast off stitches in each side for armholes as follows: Cast off 3 stitches 1-2-2-3-4-5 times, 2 stitches 1-1-2-3-4-5 times and 1 stitch 1-1-3-2-2-2 times = 82-84-86-88-90-92 stitches. Continue in stocking stitch with 1 edge stitch in garter stitch in each side. When piece measures 35-37-39-41-43-45 cm, cast off the middle 40-40-42-42-44-44 stitches for neck and finish each shoulder separately. Then cast off 1 stitch on next row from neck =20-21-21-22-22-23 stitches for shoulder. Continue until piece measures 38-40-42-44-46-48 cm (46-48-50-52-54-56 cm in total from shoulder and down). Cast off. Make sure that the cast-off is not too tight! Work the other shoulder the same way. FRONT PIECE: Cast on and work as on back piece until piece measures 30-32-33-35-36-38 cm from marker thread. Now slip the middle 22-22-24-24-24-24 stitches on 1 stitch holder for neck and finish each shoulder separately. Then cast off for neck at beginning of every row from neck as follows: Cast off 2 stitches 4 times and 1 stitch 2-2-2-2-3-3 times = 20-21-21-22-22-23 stitches for shoulder. Continue until piece measures 38-40-42-44-46-48 cm (46-48-50-52-54-56 cm in total from shoulder and down). Adjust towards back piece. Cast off. Make sure that the cast-off edge is not too tight. Work the other shoulder the same way. SLEEVE: Worked back and forth on circular needle, bottom up. Cast on 44-46-48-50-52-54 stitches on circular needle size 4 mm with light beige. Work pattern as follows: 1 edge stitch in garter stitch, A.4 - NOTE: first row in diagram is from wrong side and is purled from wrong side, 1 edge stitch in garter stitch. On row after working together with cast-on edge (= row with arrow in diagram) switch to dandelion. Insert a marker thread here. NOW MEASURE PIECE FROM HERE! Now work in stocking stitch with 1 edge stitch in garter stitch in each side. When piece measures 8-5-5-4-4-3 cm, increase 1 stitch in each side – read INCREASE TIP! Increase like this every 6th row 11-12-7-6-0-0 times and every 4th row 0-0-7-9-17-18 times = 66-70-76-80-86-90 stitches. When sleeve measures 33-33-32-32-31-31 cm (shorter measurements in the larger sizes because of longer sleeve cap and wider shoulders), cast off for sleeve cap at beginning of every row in each side as follows: Cast off 4 stitch 1 time, 3 stitches 1 time, 2 stitches until sleeve measures 40-41-41-42-42-43 cm, cast off 3 stitches 1 time and cast off the remaining stitches. Sleeve measures approx. 44-45-45-46-46-47 cm including edge at the bottom of sleeve. Work another sleeve. ASSEMBLY: Sew shoulders with grafting/kitchener stitches inside cast-off edge. Sew sleeves in body. Sew seam under sleeves and continue down along the side until stitch cast on for vent (= 8 cm for vent). Sew inside 1 edge stitch in garter stitch in each side. Repeat in the other side. NECK EDGE: Begin from right side and knit up 100-100-106-106-112-112 stitches (including stitches from stitch holder at the front) with dandelion on circular needle size 4 mm. Work 2 ridges in GARTER STITCH in the round - see explanation above. Then work as follows: Knit 1 round. Then work A.4 in the round until 7th round in diagram has been worked. Knit 1 round. Cast off by knitting but for every 4th stitch make 1 yarn over. Cast off yarn over as stitch. NOTE! Avoid a tight cast-off edge, the folding edge will tip outwards when assembled if too tight. Fold at eyelet row in A.4 so that hem is on the inside of garment. Sew cast-off edge in the top ridge. Make sure that to avoid a tight seam. |
|||||||||||||||||||||||||||||||
Diagram explanations |
|||||||||||||||||||||||||||||||
|
|||||||||||||||||||||||||||||||
 |
|||||||||||||||||||||||||||||||
 |
|||||||||||||||||||||||||||||||
 |
|||||||||||||||||||||||||||||||
Have you finished this pattern?Tag your pictures with #dropspattern #adelesweater or submit them to the #dropsfan gallery. Do you need help with this pattern?You'll find 37 tutorial videos, a Comments/Questions area and more by visiting the pattern on garnstudio.com. © 1982-2026 DROPS Design A/S. We reserve all rights. This document, including all its sub-sections, has copyrights. Read more about what you can do with our patterns at the bottom of each pattern on our site. |
|||||||||||||||||||||||||||||||


With over 40 years in knitting and crochet design, DROPS Design offers one of the most extensive collections of free patterns on the internet - translated to 17 languages. As of today we count 324 catalogues and 12260 patterns translated into English (UK/cm). 12260
We work hard to bring you the best knitting and crochet have to offer, inspiration and advice as well as great quality yarns at incredible prices! Would you like to use our patterns for other than personal use? You can read what you are allowed to do in the Copyright text at the bottom of all our patterns. Happy crafting!
Post a comment to pattern DROPS 187-14
We would love to hear what you have to say about this pattern!
If you want to leave a question, please make sure you select the correct category in the form below, to speed up the answering process. Required fields are marked *.