
Popular categories
Looking for a yarn?


Comments / Questions (33)
![]() Cath wrote:
Cath wrote:
Bonjour, j'en suis aux épaules du dos mais au niveau des rangs raccourcis je me retrouve avec un trou au niveau des 9 mailles . On laisse de côté les 9 mailles pour les 3 rangs raccourcis ? On ne fait pas un aller retour avec la totalité des mailles une fois sur deux ? J'espère avoir été claire dans ma question. Merci pour votre réponse Cordialement
27.10.2024 - 06:16DROPS Design answered:
Bonjour Cath, pour former le biais de l'épaule, on va laisser en attente 9 m (en M et L) côté épaule/emmanchure tous les 2 rangs, on reprendra ensuite ces mailles pour les rabattre. Dans cettre vidéo, nous montrons comment former le biais d'une épaule puis comment rabattre les mailles, cela pourra sans doute vous aider. Bon tricot!
28.10.2024 - 09:25
![]() Christine T wrote:
Christine T wrote:
Bonjour, Au niveau dos, après A8 et A8 a ; ai besoin de précision. svp Je ne vois pas comment se forme l'épaule. Ai bien rabattu les 13 mailles centrales pour le cou. Est-ce que je termine le rang ? Et après pour l'épaule ? Ce n'est pas clair pour moi. Merci par avance et à vous lire. Cordialement
17.06.2024 - 23:19DROPS Design answered:
Bonjour Christine, rabattez 1 maille au début du rang suivant à partir de l'encolure, puis mettez en attente tous les rangs en fin de rang (de l'encolure vers l'emmanchure): 3 x 8 m, puis à la fin du dernier rang (de l'épaule vers l'encolure) montez 2 mailles et rabattez les mailles de l'épaule en I-cord. Tricotez l'autre épaule de la même façon. Bon tricot!
18.06.2024 - 07:52
![]() Elisabet Henriksen wrote:
Elisabet Henriksen wrote:
FEJL i opskrift Opskrift og foto stemmer ikke overens. På foto er vist en cardigan med V-hals og opskriften lyder på en med sjalskrave. Det synes jeg I skal få rettet. Nu må jeg så selv finde ud af indtagninger til V-hals.
16.06.2024 - 16:33DROPS Design answered:
Hei Elisabet. Nei, det er ikke feil. Jakken har en liten sjalskrage som dannes når de forkortede pinnene strikkes. mvh DROPS Design
24.06.2024 - 13:29
![]() Maritza wrote:
Maritza wrote:
Hola. No entiendo lo que tengo que hacer en la ultima vuelta de la espalda...en los hombros Despues de montar los 2 puntos...me toca teje por el reves..y no entiendo que debo hacer. Ayuda!!!. Muchas gracias
16.05.2024 - 14:51DROPS Design answered:
Hola Maritza, puedes ver el siguiente video para entender cómo se trabajan los hombros; el final del video debería ayudarte para esta sección concreta: https://www.garnstudio.com/video.php?id=1721&lang=es
19.05.2024 - 23:34
![]() Denise Normandeau wrote:
Denise Normandeau wrote:
Comment passez vous de 122 à 142 maille au début du dos entre A1 et A2 .
31.01.2024 - 01:14DROPS Design answered:
Bonjour Mme Normandeau, lorsque vous tricotez l'avant-dernier rang de A.2 vous allez augmenter 1 maille, ainsi vous allez ainsi augmenter 20 fois 1 maille (on répète 20 fois A.2 en largeur) et passer de 122 à 142 mailles. Bon tricot!
31.01.2024 - 08:46
![]() Christine wrote:
Christine wrote:
Bonjour & Merci pour ce beau modèle. Au niveau dos : après A1 : 110 mailles en taille S ; je ne comprends pas COMMENT l'on arrive à 128 mailles à la fin de A2. Serait-ce l'histoire des mailles en fin de rangs ? Pourriez-vous nous expliquer clairement comment faire ces augmentations, svp Merci par avance
08.01.2024 - 16:12DROPS Design answered:
Bonjour Christine, à l'avant-dernier rang de A.2, on va faire 1 jeté avant la dernière maille envers, on va ainsi augmenter 1 maille dans chaque A2, autrement dit, on va augmenter 18 mailles au total (1 pour chacun des 18 A.2) = 110+18 = 128 mailles. Bon tricot!
09.01.2024 - 07:17
![]() Christina wrote:
Christina wrote:
Lovely pattern! I chose it because I like the different sections, and was looking for a v-necked cardigan that would have some weight. However, on reading through the pattern I see instructions for a shawl collar, and noticed that the shawl collar is on the diagram, yet I don't see it in the photos. The photo that helped me choose this pattern is the one where the model has her hair behind her right shoulder. Do the photos belong to a version of this pattern without the shawl collar?
11.11.2023 - 18:26DROPS Design answered:
Dear Christina, this is a mixture of a v-neck and a shawl collar. The shape of it will be a v-neck but the neck edge is worked with the rest of the body, like in shawl collar jackets. That's why it has both tags and is named as shawl collar. However, the final result should be as seen in the photo. Happy knitting!
12.11.2023 - 23:35
![]() Charlotte Boström wrote:
Charlotte Boström wrote:
Hej! Min stickfasthet stämmer på bredden men på höjden behöver jag 23 varv istället för 20. Eftersom mönstret baseras på varv snarare än cm, hur rekommenderar ni att jag justerar?
17.09.2023 - 21:09DROPS Design answered:
Hej Charlotte, alle mål findes med, så du kan altid fortsætte mønsteret til målet som står i opskriften. Generelt, om arbejdet skal fylde mere på højden (uden at det bliver bredere) kan du prøve at strikke vrangpinden med ½ pindenummer tykkere :)
26.09.2023 - 14:42
![]() MONS wrote:
MONS wrote:
Bonjour, est-ce qu'on peu avoir l'explication pour un col normal et pas un col châle sur la photo le col est simple les explications c'est un col châle Merci
26.05.2023 - 08:44DROPS Design answered:
Bonjour Mme Mons, ce col châle se tricote un peu comme dans la vidéo, sauf avec des rangs raccourcis pour créer l'arrondi du col. Vous pouvez volontiers modifier l'encolure dos comme vous le souhaitez, en vous basant sur un modèle qui vous convient. Bon tricot!
26.05.2023 - 11:47
![]() Christine wrote:
Christine wrote:
Bonjour, Modèle CRACKED WALNUTS JACKET n° 235-2 Les manches se tricotent-elles en rond ou en aller-retour ? A vous lire. Merci par avance
24.05.2023 - 22:41DROPS Design answered:
Bonjour Christine, les manches de ce modèle se tricotent en rond sur aiguilles doubles pointes et/ou aiguille circulaire. Bon tricot!
25.05.2023 - 09:15
|
||||||||||||||||||||||
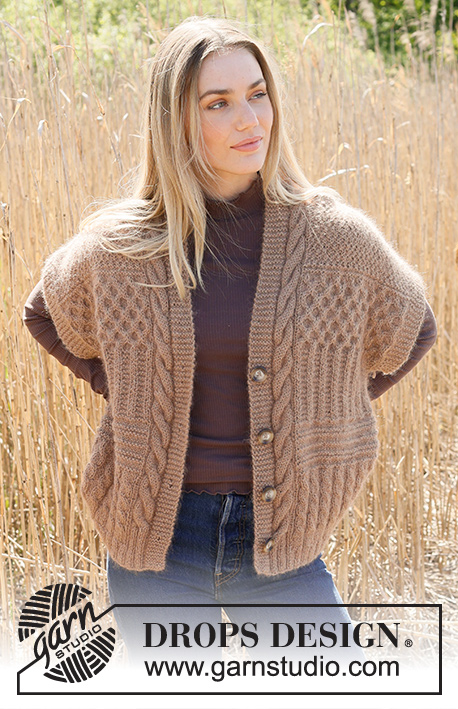
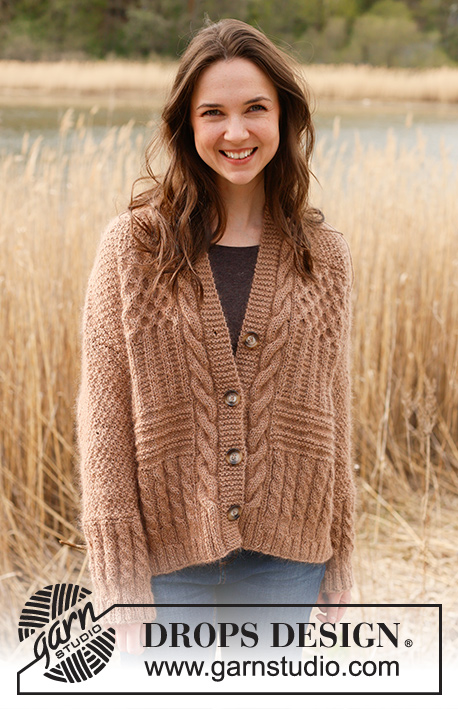
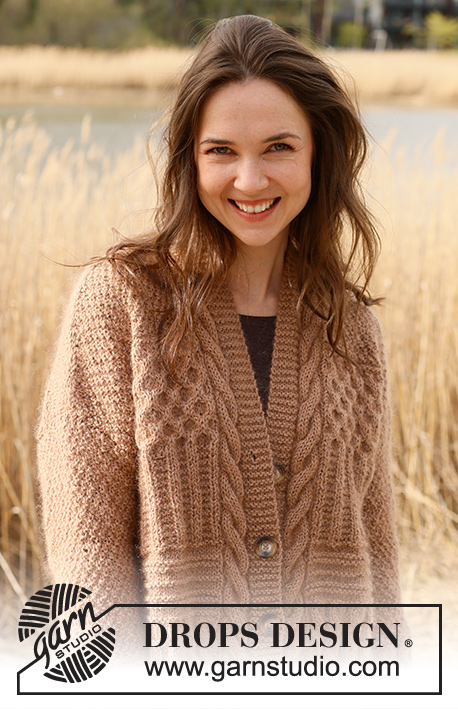
Cracked Walnuts Jacket#crackedwalnutsjacket |
||||||||||||||||||||||
 |
 |
|||||||||||||||||||||
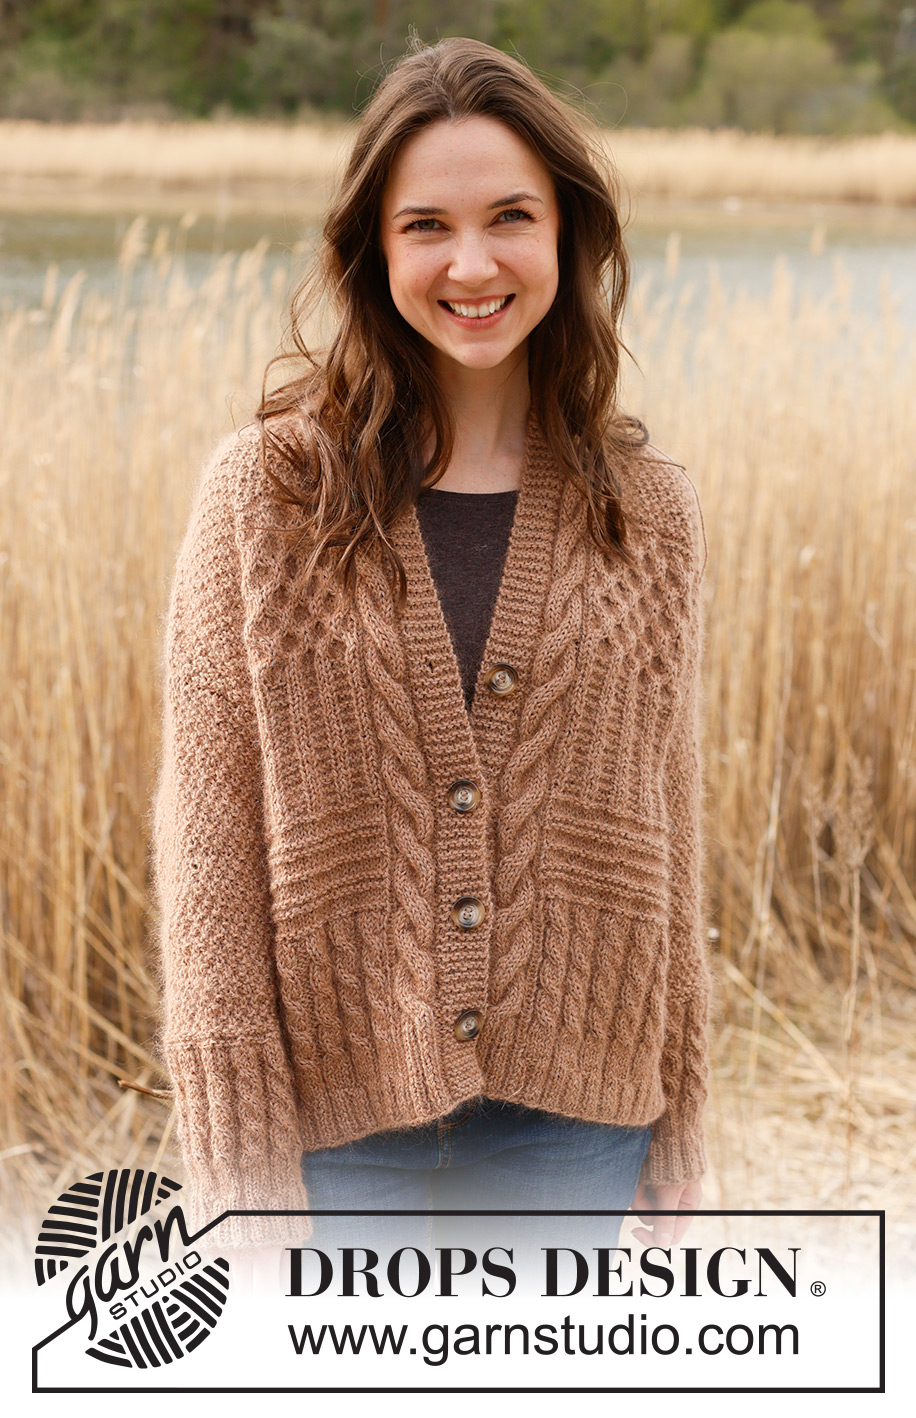
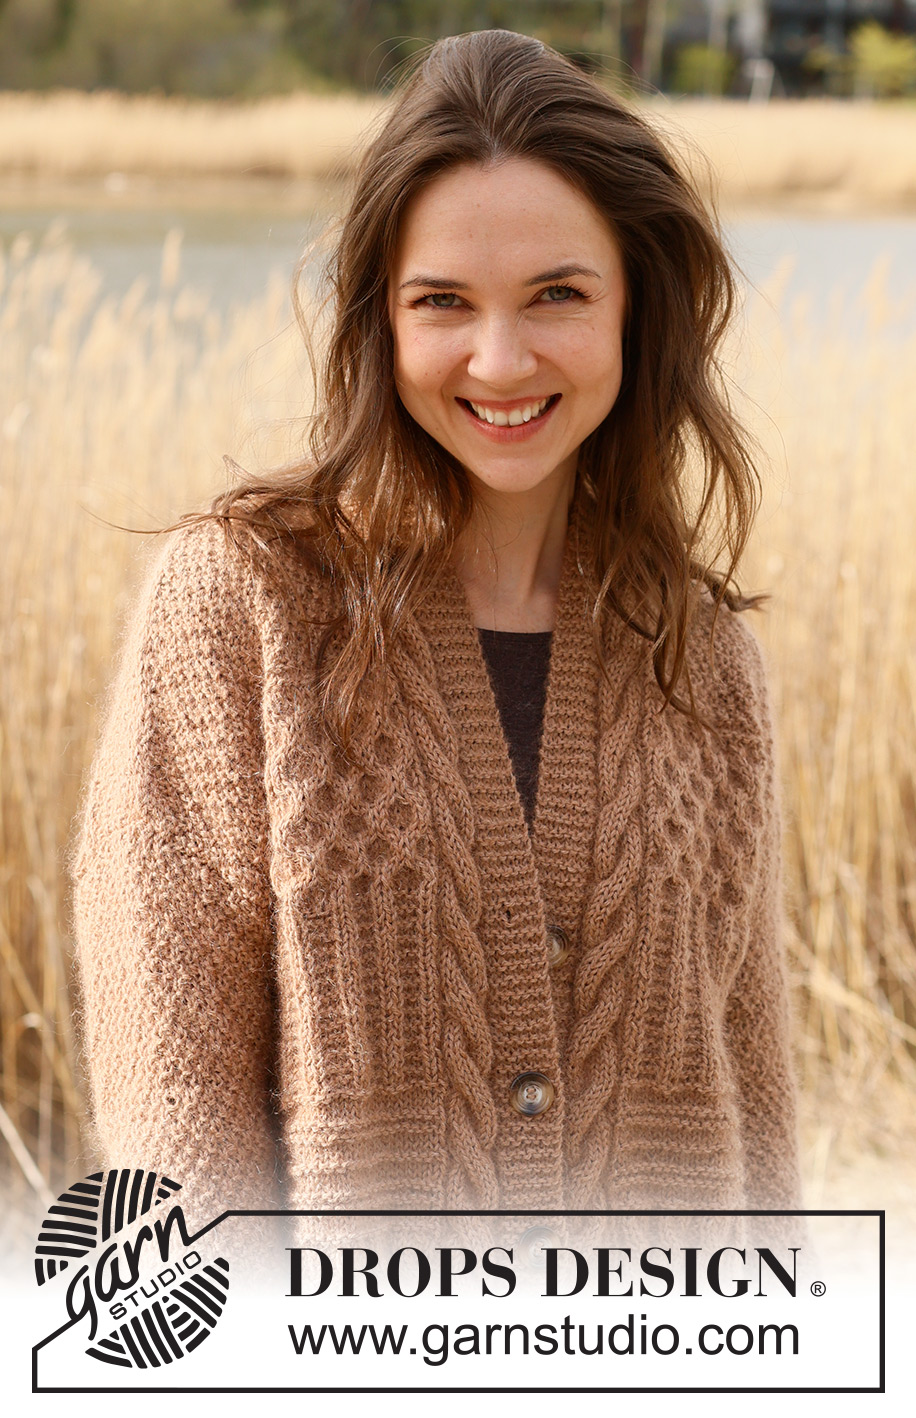
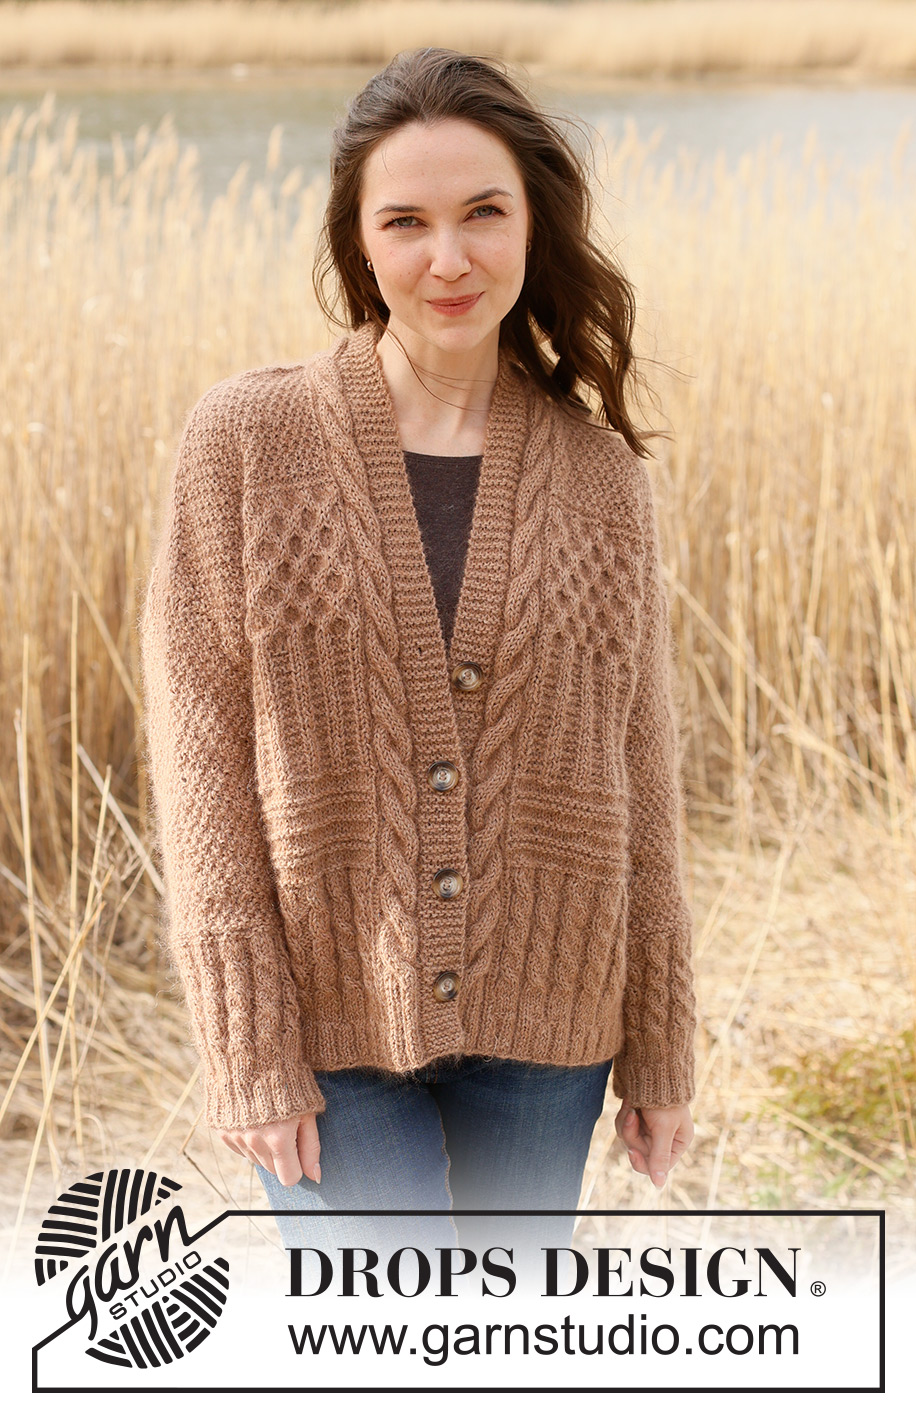
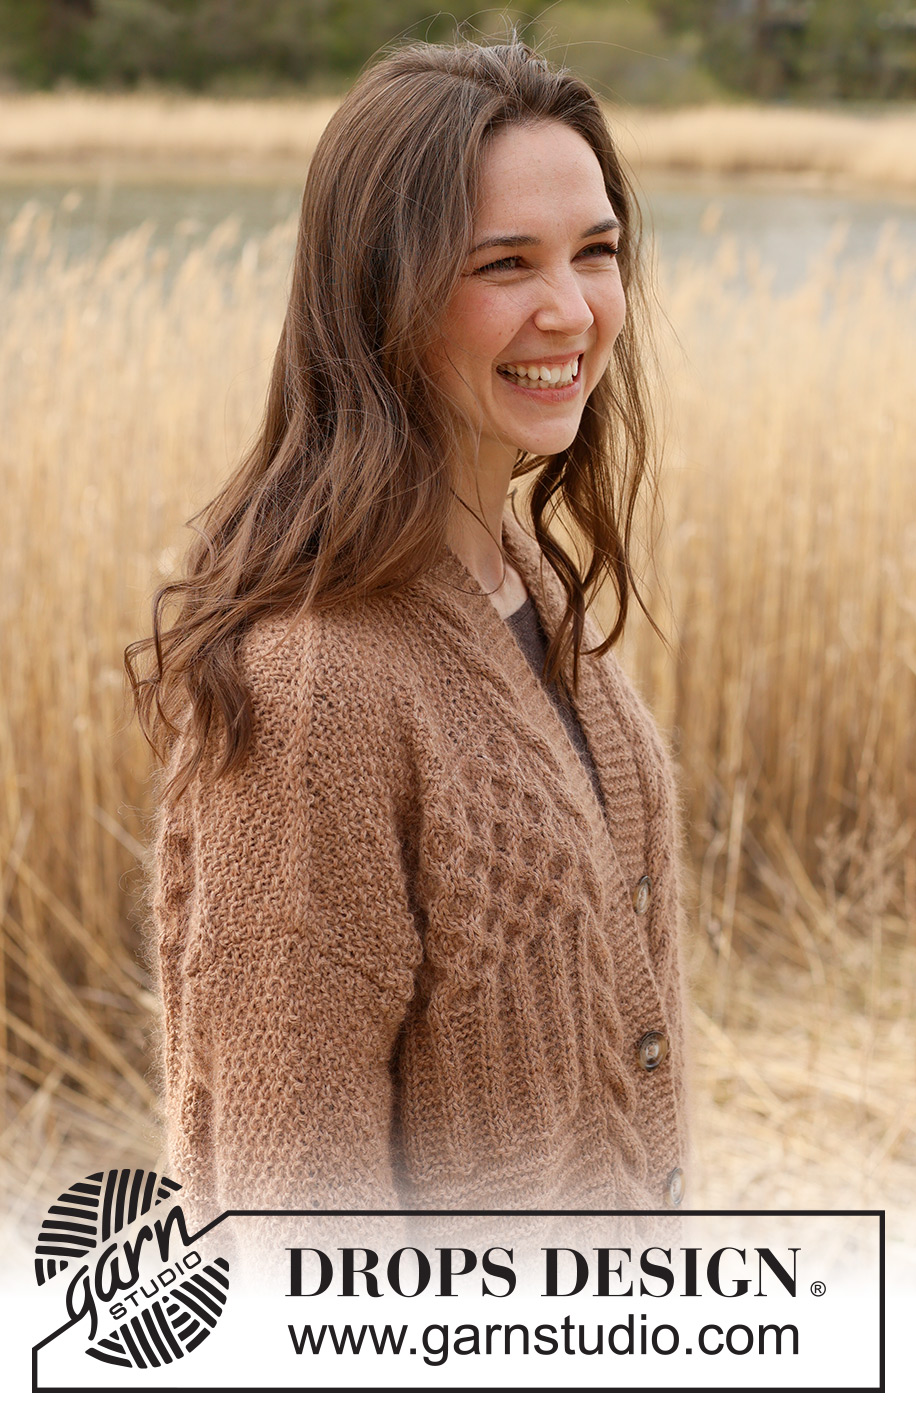
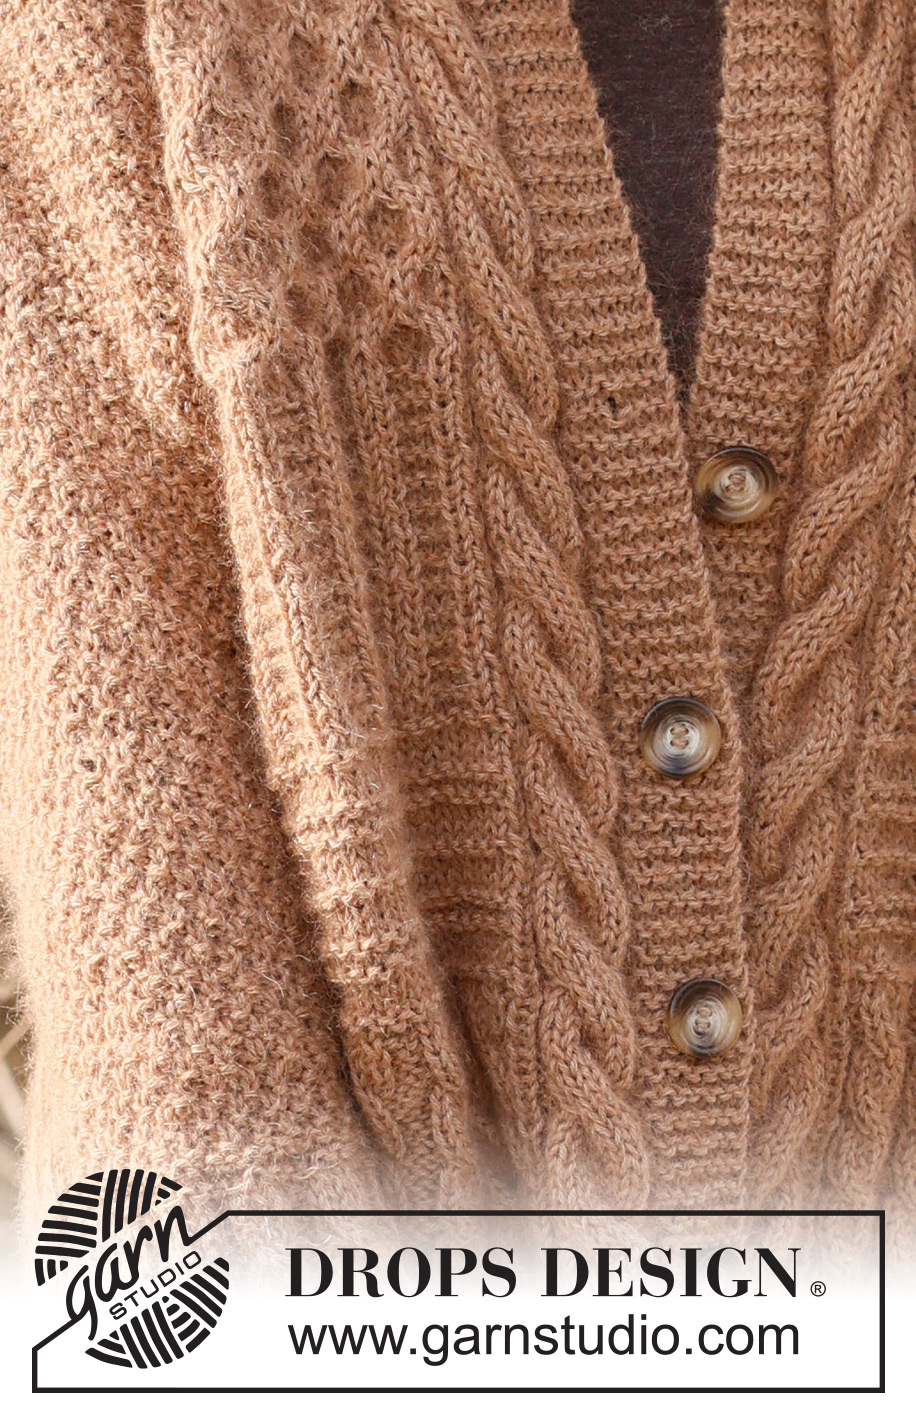
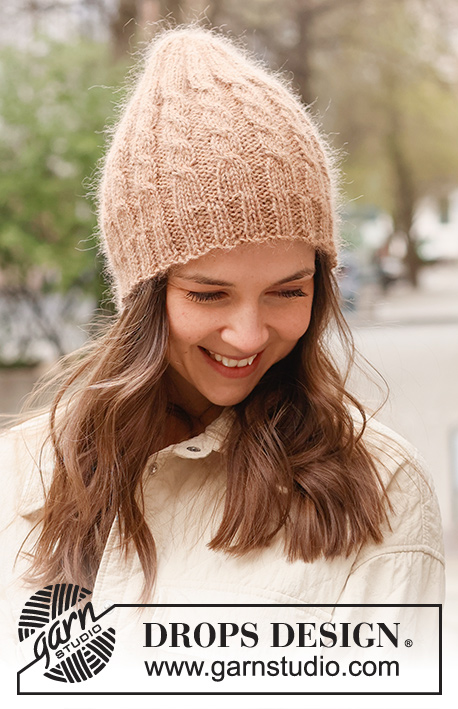
Knitted jacket in DROPS Kid-Silk and DROPS Puna / DROPS Merino Extra Fine. Piece is knitted bottom up with textured pattern, ridges, cables and rib. Size XS – XXL.
DROPS 235-2 |
||||||||||||||||||||||
|
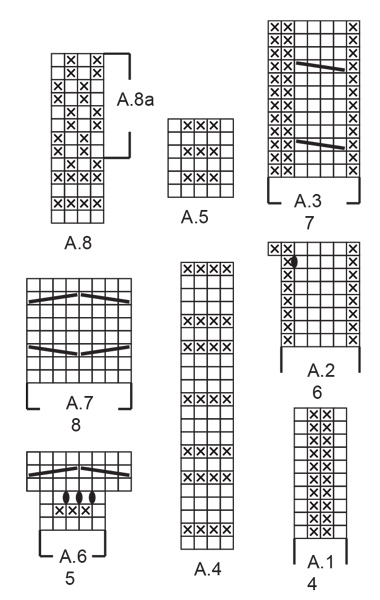
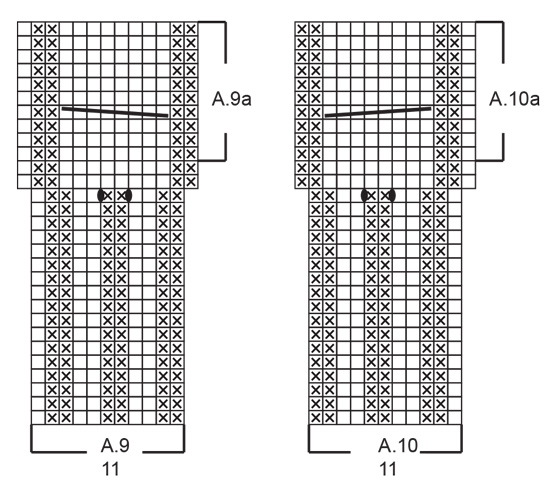
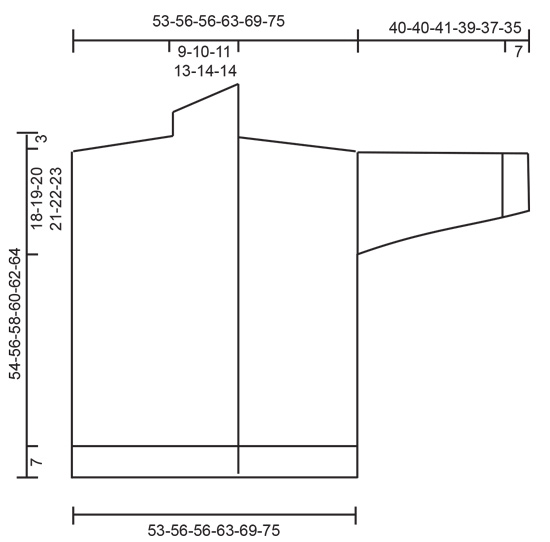
---------------------------------------------------------- EXPLANATION FOR THE PATTERN: ---------------------------------------------------------- GARTER STITCH (back and forth): Knit all rows. 1 ridge vertically = knit 2 rows. PATTERN: See diagrams A.1 to A.10. Diagrams show all rows in pattern seen from the right side. KNIT TOGETHER: FROM RIGHT SIDE: Slip 1 stitch knitwise, knit 1, pass slipped stitch over stitch worked. FROM WRONG SIDE: Purl 2 together. STOCKING STITCH: When working from wrong side, purl and when working from right side, knit. INCREASE TIP (applies to sleeves): Work 1 past marker, make 1 yarn over, work as before until 2 stitches remain before marker at the end of round thread, make 1 yarn over. On next round work yarn overs twisted. BUTTONHOLES (bottom up): Decrease for buttonholes on right band. 1 BUTTONHOLE = knit third and fourth stitch from edge together and make 1 yarn over. On next row knit yarn over to make hole. Decrease for buttonholes when piece measures: XS: 6, 14, 22 and 30 cm S: 6, 14, 22 and 30 cm M: 6, 14, 23 and 32 cm L: 7, 16, 25 and 34 cm XL: 6, 14, 22, 29 and 36 cm. XXL: 6, 14, 22, 29 and 36 cm. ---------------------------------------------------------- START THE PIECE HERE: ---------------------------------------------------------- JACKET - SHORT OVERVIEW OF THE PIECE: Work front and back piece bottom up, back and forth in parts. Work sleeves bottom up in the round on double pointed needles/circular needle. BACK PIECE: Cast on 98-110-110-122-134-146 stitches on circular needle size 4 mm with 1 strand of each quality (2 strands). Purl 1 row from wrong side. Work next row as follows from right side: 1 edge stitch in GARTER STITCH – read explanation above, work A.1 until 1 stitch remains, 1 edge stitch in garter stitch. When A.1 has been worked 1 time vertically, work pattern as follows: 1 edge stitch in garter stitch, work A.2 until 1 stitch remains, 1 edge stitch in garter stitch. When A.2 has been worked 1 time vertically, there are 114-128-128-142-156-170 stitches on needle. Switch to circular needle size 5.5 mm. Work pattern as follows: 1 edge stitch in garter stitch, work A.3 until 1 stitch remains, 1 edge stitch in garter stitch. REMEMBER THE KNITTING TENSION! Repeat A.3 vertically until piece measures 16-17-19-19-21-22 cm. Work pattern, begin from right side as follows: 1 edge stitch in garter stitch, work A.4 until 1 stitch remains and decrease at the same time 27-36-36-40-44-48 stitches evenly, 1 edge stitch in garter stitch = 87-92-92-102-112-122 stitches. When A.4 has been worked 1 time vertically, work pattern as follows: 1 edge stitch in garter stitch, work A.5 until 1 stitch remains, 1 edge stitch in garter stitch. Repeat A.5 vertically. Continue pattern like this until piece measures 33-35-36-38-39-41 cm. Work pattern, begin from right side as follows: 1 edge stitch in garter stitch, work A.6 until 1 stitch remains, 1 edge stitch in garter stitch. When A.6 has been worked 1 time vertically, there are 138-146-146-162-178-194 stitches on needle. Work pattern as follows: 1 edge stitch in garter stitch, work A.7 until 1 stitch remains, 1 edge stitch in garter stitch. Work A.7 3 times in total vertically. Piece measures approx. 45-47-48-50-51-53 cm. Work pattern as follows: 1 edge stitch in garter stitch, work A.8 until 1 stitch remains and decrease at the same time 51-54-54-60-66-72 stitches evenly 1 edge stitch in garter stitch = 87-92-92-102-112-122 stitches. When A.8 has been worked 1 time vertically, work A.8a vertically until finished measurements. When piece measures 50-52-54-56-58-60 cm, cast off the middle 13-14-16-18-20-20 stitches and finish each shoulder (37-39-38-42-46-51 stitches) separately. On next row from neck cast off 1 stitch at the beginning of row = 36-38-37-41-45-50 stitches. When piece measures 51-53-55-57-59-61 cm, work diagonal shoulder, begin on next row from the neck as follows: * Work pattern as before until 8-9-9-10-11-12 stitches remain, turn and work back *, work from *-* 3 times in total. I.e. work 8-9-9-10-11-12 stitches less on every row from the neck. On last row towards neck, cast on 2 new stitches at the end of row = 38-40-39-43-47-52 stitches. Now work and cast off with an edge over shoulder stitches. Work stitches cast on with shoulder stitches as follows: Work * 1 stitch in STOCKING STITCH – read explanation above, work next stitch together with first/next stitch from shoulder - read KNIT TOGETHER, pass the 2 stitches back on needle they came from with strand on wrong side of piece, make sure that strand is not too tight *, work from *-* until all stitches from shoulder have been worked together with the 2 new stitches cast on. Cast off the 2 stitches. Work the other shoulder the same way. RIGHT FRONT PIECE: Cast on 61-67-67-73-79-85 stitches on circular needle size 4 mm with 1 strand of each quality. Purl until 7 stitches remain, 7 band stitches in garter stitch. On next row from right side work pattern as follows: 7 band stitches in garter stitch, A.9, purl 1-0-0-1-0-1, knit 1-0-0-1-0-1, work A.1 until 1 stitch remains, 1 edge stitch in garter stitch. When A.1 has been worked 1 time vertically, work pattern from right side as follows: 7 band stitches in garter stitch, A.9 as before, work A.2 until 1 stitch remains, 1 edge stitch in garter stitch. Decrease for BUTTONHOLES - read explanation above. When A.2 has been worked 1 time vertically, there are 70-77-77-84-91-98 stitches on needle. Switch to circular needle size 5.5 mm. Work pattern as follows: 7 band stitches in garter stitch, A.9a, make 1 yarn over (this is done so that the pattern is the same mid front on both front pieces), work A.3 until 1 stitch remains, 1 edge stitch in garter stitch = 71-78-78-85-92-99 stitches. Knit yarn over twisted on next row, then purl from right side and knit from wrong side. Repeat A.3 vertically until piece measures 16-17-19-19-21-22 cm. Work pattern, begin from right side as follows: 7 band stitches in garter stitch, A.9a as before, work A.4 until 1 stitch remains and decrease at the same time 15-17-17-19-21-23 stitches evenly, 1 edge stitch in garter stitch = 56-61-61-66-71-76 stitches. When A.4 has been worked 1 time vertically, work pattern as follows: 7 band stitches in garter stitch, A.9a as before, work A.5 until 1 stitch remains, 1 edge stitch in garter stitch. Repeat A.5 vertically. Continue pattern like this until piece measures 33-35-36-38-39-41 cm. Work pattern, begin from right side as follows: 7 band stitches in garter stitch, A.9a as before, work A.6 until 1 stitch remains, 1 edge stitch in garter stitch. When A.6 has been worked 1 time vertically, there are 77-85-85-93-101-109 stitches on needle. Work pattern as follows: 7 band stitches in garter stitch, A.9a as before, work A.7 until 1 stitch remains, 1 edge stitch in garter stitch. Work A.7 3 times in total vertically. Piece measures approx. 45-47-48-50-51-53 cm. Work pattern as follows: 7 band stitches in garter stitch, A.9a as before, work A.8 until 1 stitch remains and decrease at the same time 21-24-24-27-30-33 stitches evenly, 1 edge stitch in garter stitch = 56-61-61-66-71-76 stitches. When A.8 has been worked 1 time vertically, work A.8a vertically until finished measurements. When piece measures 51-53-55-57-59-61 cm, work diagonal shoulder, begin on next row from the neck as follows: * Work pattern as before until 8-9-9-10-11-12 stitches remain, turn and work back *, work from *-* 3 times in total. I.e. work 8-9-9-10-11-12 stitches less on every row from the neck. On next row towards the neck work until 20-23-24-25-26-26 stitches remain, slip the last 20-23-24-25-26-26 stitches on a thread for shawl collar and cast on 2 new stitches at the end of row = 38-40-39-43-47-52 stitches. Now work and cast off with an edge over shoulder stitches. Work stitches cast on with shoulder stitches as follows: Work * 1 stitch in stocking stitch, work next stitch together with first/next stitch from shoulder – remember KNIT TOGETHER, pass the 2 stitches back on needle they came from with strand on wrong side of piece, make sure not to tighten yarn too much *, work from *-* until all stitches from shoulder have been worked together with the 2 new stitches cast on. Cast off the 2 stitches. SHAWL COLLAR: Slip the 20-23-24-25-26-26 stitches from stitch holder on circular needle size 5.5 mm. Work as follows from wrong side: 0-2-3-3-5-5 stitches in garter stitch, knit over knit and purl over purl until 7 stitches remain, work 7 band stitches in garter stitch. Continue like this (i.e. cables are done) and work short rows as follows: ROW 1 (= right side): Work the first 16-19-20-21-22-22 stitches, turn and tighten yarn. ROW 2 (= wrong side): Work 16-19-20-21-22-22 stitches. ROW 3 (= right side): Work over all stitches, turn and tighten yarn. ROW 4 (= wrong side): Work over all stitches. Work 1st to 4th row until shawl collar measures approx. 7-8-8-9-9-9 cm on the shortest. Work 1 ridge over all stitches. Cast off. LEFT FRONT PIECE: Cast on 61-67-67-73-79-85 stitches on circular needle size 4 mm with 1 strand of each quality. Work 7 band stitches in garter stitch, purl the rest of row. On next row from right side work pattern as follows: 1 edge stitch in garter stitch, work A.1 until 20-18-18-20-18-20 stitches remain, knit 1-0-0-1-0-1, purl 1-0-0-1-0-1, A.10, 7 band stitches in garter stitch. When A.1 has been worked 1 time vertically, work pattern from right side as follows: 1 edge stitch in garter stitch, work A.2 until 18 stitches remain, A.10 as before, 7 band stitches in garter stitch. When A.2 has been worked 1 time vertically, there are 70-77-77-84-91-98 stitches on needle. Switch to circular needle size 5.5 mm. Work pattern as follows: 1 edge stitch in garter stitch, work A.3 until 20 stitches remain, A.10a, 7 band stitches in garter stitch. Repeat A.3 vertically until piece measures 16-17-19-19-21-22 cm. Work pattern, begin from right side as follows: 1 edge stitch in garter stitch, work A.4 until 20 stitches remain and decrease at the same time 14-16-16-18-20-22 stitches evenly, A.10a as before, 7 band stitches in garter stitch = 56-61-61-66-71-76 stitches. When A.4 has been worked 1 time vertically, work pattern as follows: 1 edge stitch in garter stitch, work A.5 until 20 stitches remain, A.10a as before, 7 band stitches in garter stitch. Repeat A.5 vertically. Continue pattern like this until piece measures 33-35-36-38-39-41 cm. Work pattern, begin from right side as follows: 1 edge stitch in garter stitch, work A.6 until 20 stitches remain, A.10a as before, 7 band stitches in garter stitch. When A.6 has been worked 1 time vertically, there are 77-85-85-93-101-109 stitches on needle. Work pattern as follows: 1 edge stitch in garter stitch, work A.7 until 20 stitches remain, A.10a as before, 7 band stitches in garter stitch. Work A.7 3 times in total vertically. Piece measures approx. 45-47-48-50-51-53 cm. Work pattern as follows: 1 edge stitch in garter stitch, work A.8 until 20 stitches remain and decrease at the same time 21-24-24-27-30-33 stitches evenly, A.10a as before, 7 band stitches in garter stitch = 56-61-61-66-71-76 stitches. When A.8 has been worked 1 time vertically, work A.8a vertically until finished measurements. When piece measures 51-53-55-57-59-61 cm, work diagonal shoulder, begin on next row from the neck as follows: * Work pattern as before until 8-9-9-10-11-12 stitches remain, turn and work back *, work from *-* 3 times in total. I.e. work 8-9-9-10-11-12 stitches less on each row from the neck. On next row towards the neck work until 20-23-24-25-26-26 stitches remain, slip the last 20-23-24-25-26-26 stitches on a thread for shawl collar and cast on 2 new stitches at the end of row = 38-40-39-43-47-52 stitches. Now work and cast off with an edge over shoulder stitches. Work stitches cast on with shoulder stitches as follows: Work * 1 stitch in stocking stitch, work next stitch together with first/next stitch from shoulder – remember KNIT TOGETHER, pass the 2 stitches back on needle they came from with strand on wrong side of piece, make sure not to tighten yarn too much *, work from *-* until all stitches from shoulder have been worked together with the 2 new stitches cast on. Cast off the 2 stitches. SHAWL COLLAR: Slip the 20-23-24-25-26-26 stitches from stitch holder on circular needle size 5.5 mm. Work as follows from wrong side: 7 band stitches in garter stitch, knit over knit and purl over purl until 0-2-3-3-5-5 stitches remain, and work the last stitches in garter stitch. Continue like this (i.e. cables are done) and work short rows as follows: ROW 1 (= wrong side): Work the first 16-19-20-21-22-22 stitches, turn and tighten yarn. ROW 2 (= right side): Work 16-19-20-21-22-22 stitches. ROW 3 (= wrong side): Work over all stitches, turn and tighten yarn. ROW 4 (= right side): Work over all stitches. Work 1st to 4th row until shawl collar measures approx. 7-8-8-9-9-9 cm on the shortest. Work 1 ridge over all stitches. Cast off. SLEEVES: Cast on 60-60-60-72-72-72 stitches on double pointed needles size 4 mm with 1 strand of each quality. Knit 1 round. Insert 1 marker at beginning of round. Work A.1 in the round. When A.1 has been worked 1 time vertically, work A.2 over all stitches. When A.2 has been worked 1 time vertically, there are 70-70-70-84-84-84 stitches on needle. Switch to double pointed needles size 5.5 mm. Work A.3 over all stitches. Work A.3 2 times in total vertically. Work A.8 over all stitches, on first round decrease 22-22-22-26-26-26 stitches evenly = 48-48-48-58-58-58 stitches. Repeat A.8a vertically until finished measurements. AT THE SAME TIME when piece measures 20 cm, increase 1 stitch on each side of marker - read INCREASE TIP! Increase like this every 3½-3½-2½-3-3-2 cm 6-6-8-6-6-8 times in total = 60-60-64-70-70-74 stitches. Work the increased stitches in the pattern. Cast off when sleeve measures 40-40-41-39-37-35 cm. Knit another sleeve the same way. ASSEMBLY: Sew shoulder seams inside 1 stitch on i-cord edge. Sew shawl collar together mid back and sew it to neck line in the back of neck. Sew in sleeves. Sew side seams inside 1 edge stitch. Sew the buttons on to left front piece. |
||||||||||||||||||||||
Diagram explanations |
||||||||||||||||||||||
|
||||||||||||||||||||||
 |
||||||||||||||||||||||
 |
||||||||||||||||||||||
 |
||||||||||||||||||||||
Have you finished this pattern?Tag your pictures with #dropspattern #crackedwalnutsjacket or submit them to the #dropsfan gallery. Do you need help with this pattern?You'll find 35 tutorial videos, a Comments/Questions area and more by visiting the pattern on garnstudio.com. © 1982-2026 DROPS Design A/S. We reserve all rights. This document, including all its sub-sections, has copyrights. Read more about what you can do with our patterns at the bottom of each pattern on our site. |
||||||||||||||||||||||


With over 40 years in knitting and crochet design, DROPS Design offers one of the most extensive collections of free patterns on the internet - translated to 17 languages. As of today we count 324 catalogues and 12290 patterns translated into English (UK/cm). 12290
We work hard to bring you the best knitting and crochet have to offer, inspiration and advice as well as great quality yarns at incredible prices! Would you like to use our patterns for other than personal use? You can read what you are allowed to do in the Copyright text at the bottom of all our patterns. Happy crafting!
Post a comment to pattern DROPS 235-2
We would love to hear what you have to say about this pattern!
If you want to leave a question, please make sure you select the correct category in the form below, to speed up the answering process. Required fields are marked *.