
Popular categories
Looking for a yarn?


Comments / Questions (36)
![]() Mondon Marie Jo wrote:
Mondon Marie Jo wrote:
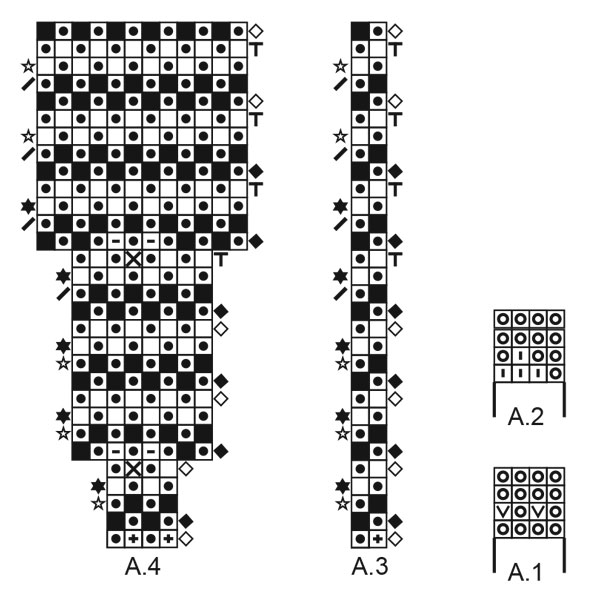
-j'ai respecté les couleurs indiquées hors j'obtiens l'inverse du modèle photographié - Si je respecte au niveau de l'empiècement le graphique A3 et A4, j'obtiens avec les jetés au dernier rang plus de 400 mailles pour un modèle L ! Que fait-on des jetés qui sont responsables de cette augmentation? Par ailleurs, les bordures! ne peut-on pas les tricoter sur une aiguille double pointe ?
05.02.2025 - 11:34DROPS Design answered:
Bonjour Mme Mondon, les jetés des côtes anglaises (= de A.3 et de A.4) ne comptent pas comme des mailles, car ils 'appartiennent' aux mailles glissées (pour chaque maille glissée, on a 1 jeté = soit 1 maille pour les 2). Autrement dit, A.3 ne compte que pour 2 mailles et à la fin de A.4 on a 12 mailles (pas 18 mailles) - retrouvez ici, en vidéo comment augmenter dans des côtes anglaises et comment tricoter les mailles au rang suivant. Les mailles de bordure des devant sont tricotées séparément pour avoir la bonne hauteur/longueur finale puis cousues le long de chaque devant. Bon tricot!
05.02.2025 - 13:27
![]() Mondon Marie Jo wrote:
Mondon Marie Jo wrote:
Ou bien autre possibilité tricoter en curry à l'endroit sur l'envers!
18.01.2025 - 19:39
![]() Mondon Marie Jo wrote:
Mondon Marie Jo wrote:
Bonjour, Sur la ligne 2 de A3 et A4, je suis sur l'envers ayant fait la première ligne à l'endroit en bleu jeans clair. je comprends que je dois tricoter en curry selon le diagramme sauf que l'on m'indique: " tricoter sur l'endroit en curry" et je suis sur l'envers. faut-il couper le fil et repartir sur l'endroit? Dans l'attente de votre retour pour ne pas perdre le fil! cordialement
18.01.2025 - 19:28DROPS Design answered:
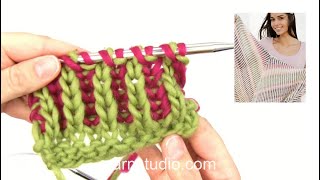
Bonjour Mme Mondon, quand on tricote des côtes anglaises bicolores en allers et retours, on alterne 2 rangs sur l'endroit et 2 rangs sur l'envers - retrouvez ici, en vidéo comment procéder - notez qu'il vous faudra bien suivre les diagrammes en même temps, la vidéo ne montre que la technique globale; autrement dit, après le 1er rang en bleu jean clair, remettez les mailles à droite sur l'aiguille circulaire pour pouvoir tricoter encore 1 rang sur l'endroit, mais en curry cette fois. Bon tricot!
20.01.2025 - 07:56
![]() Mary Catherine Searle wrote:
Mary Catherine Searle wrote:
Knitting the English rib on this jacket there is no mention of sliding stitches across needle as you do in the urban jacket. So should I be doing this for the mikado jacket? Thank you
12.09.2023 - 18:24
![]() Mary Catherine Searle wrote:
Mary Catherine Searle wrote:
Knitting the English rib on this jacket there is no mention of sliding stitches across needle as you do in the urban jacket. So should I be doing this for the mikado jacket? Thank you
12.09.2023 - 18:23DROPS Design answered:
Dear Mrs Searle, on the mikado jacket you will just work a part of yoke with English rib - as shown in diagram A.3 and A.4, ie you will alternately slip the stitches making a yarn over or knit/purl this stitch together with its yarn over. Or maybe I misunderstood your question?
13.09.2023 - 08:24
![]() Eva Albinsson wrote:
Eva Albinsson wrote:
Hur läser jag diagram A3 och A4 ? A3 = 2 maskor A4 = 4 maskor, varför är det symboler vid sidorna om diagrammet? Mvh Eva
25.07.2023 - 19:04DROPS Design answered:
Hei Eva Denne jakken strikkes med 2-farget helpatent. De ikonene du ser på hver side av diagram A.3 og A.4 forteller deg hvilken farge du skal strikke med og om det er fra retten eller vrangen. Når du strikker 1.rad av A.3, strikker du fra retten med lys jeansblå slik: 1 rett + lag 1 kast om høyre pinne, løft 1 maske løs over på høyre pinne som om den skulle strikkes vrang. Når du skal strikke videre med A.4 strikker du fremdeles fra retten med lys jeansblå. Når 1. rad er ferdigstrikket skal du fortsette å strikke fra retten (skyv maskene på pinne tilbake), strikk A.3 fra retten med fargen karri. Rad 3 og 4 strikkes fra vrangen, rad 5 og 6 fra retten igjen, osv.
28.07.2023 - 10:27
![]() Judith Goodison wrote:
Judith Goodison wrote:
I am trying to follow the diagram for A4 and A3 but in the symbol instructions some of the symbols say for example, "Work in Light Jeans from wrong side" but i am on a RS row - how can I do this? I am using a circular need to accommodate my stitches, but working as I would on normal needles. Also, the instructions say for example " Knit together the yarn over and stitch" is this 1 or 2 instructions? EG "knit 2 together by placing yarn over and stitch"
12.06.2023 - 14:48DROPS Design answered:
Dear Mrs Goodison, when working English rib with 2 colours, you will work alternately 2 rows from RS (first with one colour, then with the 2nd colour) and 2 rows from WS (first with one colour then with the 2nd colour). In this video, we show how to work English rib with 2 colours, it should help you understanding how to work the symbols (knit tog yarn over and stitch is just 1 instructions, see video). Happy knitting!
12.06.2023 - 15:53
![]() Erin G wrote:
Erin G wrote:
I am knitting 216-8. When reading from the diagram there is a solid black squares with instructions “purl together the yarn over and stitch”. Do I purl these stitches together regardless of whether I am on a RS or RS row or do I need to switch to knit together? Thank you
06.11.2022 - 16:29DROPS Design answered:
Dear Erin, you always purl them together, regardless of the side you are working on, since there is another symbol for knitting the yarn over and stitch together. Happy knitting!
06.11.2022 - 23:33
![]() Eva wrote:
Eva wrote:
Hej mönster A4 i patent är ju alla varv från rätsida hur stickar man avigsidan
14.03.2022 - 12:38DROPS Design answered:
Hei Eva. De 2 første pinnnene i diagram A.4 strikkes fra retten (se digramforklaringen, sort og hvit diamant ikon), mens 3. og 4. pinne strikkes fra vrangen (se diagramforklaringen, sort og hvit stjerne ikon). Altså strikk 1. pinne fra retten med lys jeansblå og når pinnen er strikket ut, skyv maskene tilbake og strikk neste pinne (2. pinne) også fra retten, men denne gangen med fargen karri. mvh DROPS Design
21.03.2022 - 11:51
![]() Draye Julia wrote:
Draye Julia wrote:
Bonjour Quand A3 et A4 sont terminés je commence la tresse lettone mais faut-il compter les jetés effectués au dernier rang ? faut-il les tricoter car j’ai effectivement 325 mailles mais avec les jetés cela fait beaucoup plus je vous remercie de votre superbe modèle Julia
20.12.2021 - 19:53DROPS Design answered:
Bonjour Julia, les jetés des mailles glissées ne comptent pas comme des mailles car ils appartiennent à la maille glissée, si vous avez 325 mailles en taille L, vous avez le bon nombre de mailles, au 1er rang de la tresse lettone, tricotez (en bleu jeans) 1 rang envers sur l'envers avec 1 maille lisière au point mousse de chaque côté et tricotez ainsi ensemble à l'envers les jetés avec leur maille glissée (il doit vous rester 325 m à la fin de ce rang). Bon tricot!
21.12.2021 - 07:18
|
||||||||||||||||||||||||||||||||||||||||||||||
Mikado Jacket#mikadojacket |
||||||||||||||||||||||||||||||||||||||||||||||
 |
 |
|||||||||||||||||||||||||||||||||||||||||||||
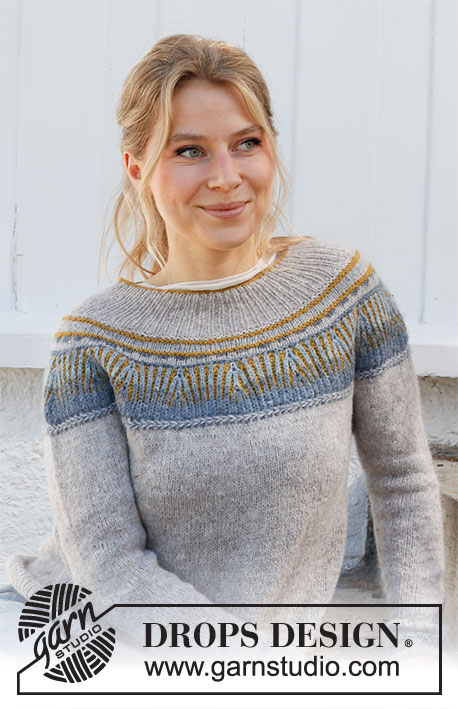
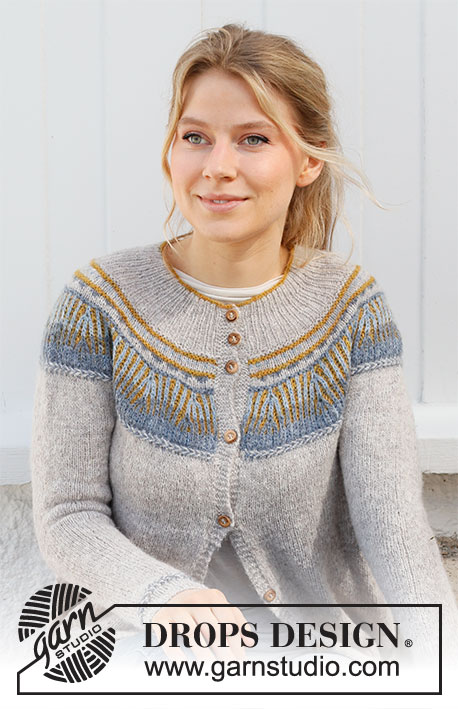
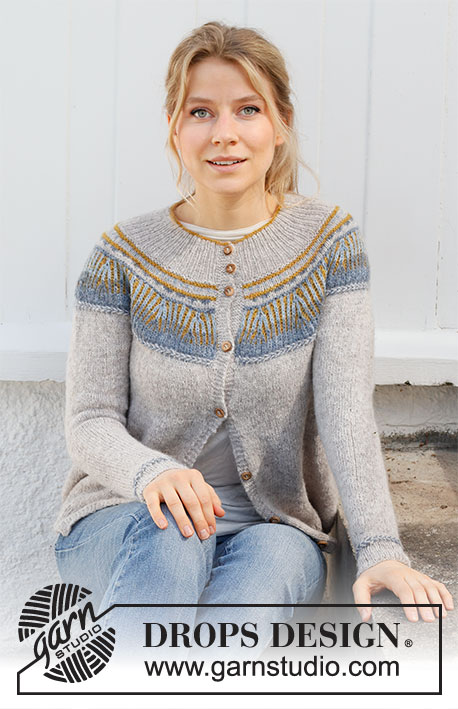
Knitted jacket with round yoke in DROPS Sky. The piece is worked top down with 2-coloured English rib and Latvian cables . Sizes S - XXXL.
DROPS 216-8 |
||||||||||||||||||||||||||||||||||||||||||||||
|
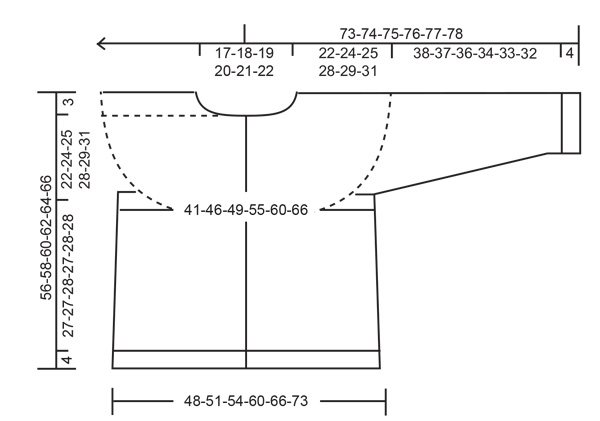
------------------------------------------------------- EXPLANATIONS FOR THE PATTERN: ------------------------------------------------------- RIDGE/GARTER STITCH (worked back and forth): Knit all rows. 1 ridge in height = Knit 2 rows. PATTERN: See diagrams A.1 to A.4. Diagrams A.1 and A.2 are worked in stocking stitch with 2-coloured pattern Diagrams A.3 and A.4 are worked in 2-coloured English rib. The diagrams show all rows in the pattern from the right side. INCREASE TIP-1 (evenly spaced): To work out how to increase evenly, count the total number of stitches on the needle (e.g. 133 stitches), minus the bands (e.g. 10 stitches) and divide the remaining stitches by the number of increases to be made (e.g. 14) = 8.78. In this example, increase by making 1 yarn over after approx. each 9th stitch. Do not increase on the bands. On the next row work the yarn overs twisted to avoid holes. INCREASE TIP-2 (for sides of body): All increases are worked from the right side! Work until there are 2 stitches left before the marker thread, make 1 yarn over, knit 4 (marker thread sits between these 4 stitches) make 1 yarn over (= 2 stitches increased at each marker thread; 4 stitches increased on round). On the next row purl the yarn overs twisted to avoid holes. Then work the new stitches in stocking stitch. DECREASE TIP (for mid under sleeve): Decrease 1 stitch on either side of the marker thread as follows: Work until there are 3 stitches left before the marker thread, knit 2 together, knit 2 (marker thread sits between these 2 stitches), slip 1 stitch as if to knit, knit 1 and pass the slipped stitch over the knitted stitch. BUTTONHOLE: Work buttonholes on the right band (when the garment is worn). Work from the right side when there are 3 stitches left on the row as follows: Make 1 yarn over, knit 2 together and knit 1. On the next row (wrong side), knit the yarn over to leave a hole. The first buttonhole is worked when the rib on the neck measures approx. 1½-2 cm. Then work the 2 next with 3 cm between them. The other 5-5-6-6-6-6 buttonholes are worked with approx. 8½-9-7½-8-8½-8½ cm between each one. CASTING-OFF TIP: To avoid the cast-off edge being tight you can cast off with a larger size needle. If the edge is still tight, make 1 yarn over after approx. each 4th stitch at the same time as casting off; the yarn overs are cast off as normal stitches. ------------------------------------------------------- START THE PIECE HERE: ------------------------------------------------------- JACKET – SHORT OVERVIEW OF THE PIECE: The neck and yoke are worked back and forth with circular needle from mid front and top down. The yoke is divided for body and sleeves and the body continued back and forth. The sleeves are worked in the round with short circular needle/double pointed needles, top down. NECK: Cast on 129-133-137-145-151-157 stitches (including 5 band stitches on each side towards mid front) with circular needle size 3 mm and curry. Purl 1 row (= wrong side). Change to light beige (cut the curry strand). Now work rib from the right side as follows: 5 band stitches in GARTER STITCH – read description above, * knit 1, purl 1 *, work from *-* until there are 6 stitches left on the row, knit 1 and finish with 5 band stitches in garter stitch. When the neck measures 1½-2 cm work BUTTONHOLE – read description above. Continue the rib for 7-8-8-9-9-10 cm from cast on edge. Change to circular needle size 4 mm. YOKE: ROW 1 (= right side): Knit and increase 14-14-18-18-22-26 stitches evenly spaced – read INCREASE TIP-1 = 143-147-155-163-173-183 stitches. ROW 2 (= wrong side): Knit. Place the 5 band stitches on threads on each side of the piece, without working them; pattern is now worked on the yoke and the bands finished separately afterwards = 133-137-145-153-163-173 stitches. Change to curry, cut the light beige strand. ROW 3: Knit and increase 20-20-20-20-26-28 stitches evenly spaced, cast on 1 stitch at the end of the row = 154-158-166-174-190-202 stitches. ROW 4: Knit and cast on 1 stitch at the end of the row = 155-159-167-175-191-203 stitches. When working pattern, the stitches which are not in the pattern are worked in the same colour as the first stitch in the pattern. ROW 5: Work 1 edge stitch in garter stitch, A.1 (= 4 stitches) until there are 2 stitches left on the row (= 38-39-41-43-47-50 times in width), work the next stitch in the same way as the first in A.1 and finish with 1 edge stitch in garter stitch. REMEMBER THE KNITTING TENSION! When A.1 has been worked 1 time in height, continue as follows: Change to curry (the light beige strand is not cut as it will soon be used again). ROW 1 (= right side): Knit and increase 12-12-14-16-20-28 stitches evenly spaced = 167-171-181-191-211-231 stitches. ROW 2 (= wrong side): Knit. ROW 3: Work 1 edge stitch in garter stitch, 0-0-1-0-0-0 stitches in stocking stitch, A.2 (= 4 stitches) until there are 2-2-3-2-2-2 stitches left (= 41-42-44-47-52-57 times in width), work the next stitch in the same way as the first stitch in A.2, 0-0-1-0-0-0 stitches in stocking stitch and finish with 1 edge stitch in garter stitch. When A.2 has been worked 1 time in height, the piece measures approx. 12-13-13-14-14-15 cm. Work stocking stitch with 1 edge stitch in garter stitch on each side and with light beige until the piece measures 12-13-13-14-15-17 cm. Continue as follows: Change to jeans blue (cut the light beige strand) and continue with circular needle size 3 mm. ROW 1 (= right side): Knit. ROW 2 (= wrong side): Knit. When working pattern, the stitches which are not in the pattern are worked in the same colour as the first stitch in the pattern. ROW 3: Work 1 edge stitch in garter stitch, A.3 (= 2 stitches), * A.4 (= 4 stitches), A.3 over 8-6-6-6-6-6 stitches (= 4-3-3-3-3-3 times in width) *, work from *-* until there are 8 stitches left (= 13-16-17-18-20-22 times in width), A.4 over 4 stitches, A.3 over 3 stitches and finish with 1 edge stitch in garter stitch. When A.3 and A.4 have been completed in height there are 279-307-325-343-379-415 stitches on the needle. Change to circular needle size 4 mm and continue with Latvian cables as follows: ROW 1 (= wrong side): Purl 1 row with 1 edge stitch in garter stitch on each side, using jeans blue. ROW 2 (= right side): Work 1 edge stitch in garter stitch using light beige, * knit 1 with light beige, knit 1 with jeans blue *, work from *-* until there are 2 stitches left, knit 1 with light beige and finish with 1 edge stitch in garter stitch with light beige. ROW 3 (= wrong side): Work 1 edge stitch in garter stitch with light beige, take both strands to the back, knit 1 with light beige. Take the jeans blue strand under the light beige strand and knit 1 with jeans blue. Continue to knit like this, in alternately light beige and jeans blue (always take the strand UNDER the strand from the last stitch worked) until there is 1 stitch left and finish with 1 edge stitch in garter stitch with light beige. ROW 4 (= right side): Work 1 edge stitch in garter stitch with light beige, take both strands to the front (towards you), purl 1 and keep the strands at the front. Take the jeans blue strand under the light beige strand and purl 1 with jeans blue and keep the strands at the front. Continue to purl like this, in alternately light beige and jeans blue (always take the strand UNDER the strand from the last stitch worked) until there is 1 stitch left and finish with 1 edge stitch in garter stitch in light beige. The piece measures approx. 21-22-22-23-24-26 cm. Continue the piece in stocking stitch and light beige. Cast off both edge stitches at the beginning of the next 2 rows = 277-305-323-341-377-413 stitches. Now work the bands as follows: RIGHT BAND: Place the stitches on circular needle size 4 mm and work with light beige as follows: Work back and forth in garter stitch but cast on 1 edge stitch at the end of the first row from the wrong side (towards the front piece). When the band is the same length as the yoke, cast off the edge stitch on the next row from the right side and place the stitches on the same needle as the yoke. LEFT BAND: Place the stitches on circular needle size 4 mm and work with light beige as follows: Work back and forth in garter stitch but cast on 1 edge stitch at the end of the first row from the right side (towards the front piece). When the band is the same length as the yoke, cast off the edge stitch on the next row from the wrong side, work 1 row from the right side and place the stitches on the same needle as the yoke. YOKE: = 287-315-333-351-387-423 stitches. Continue with light beige. Work stocking stitch with 5 band stitches in garter stitch on each side. The increases are finished in sizes S-M-L, but are continued in sizes XL-XXL-XXXL. SIZES XL-XXL-XXXL: On the next row from the right side increase 12-14-12 stitches evenly spaced = 363-401-435 stitches. Repeat the increase after 2 cm = 375-415-447 stitches. ALL SIZES: = 287-315-333-375-415-447 stitches. Work stocking stitch with 5 band stitches in garter stitch on each side. When the piece measures 22-24-25-28-29-31 cm from the cast-on edge, divide the piece for body and sleeves on the next row as follows: Work 5 band stitches in garter stitch, 39-44-46-53-59-65 stitches in stocking stitch (= front piece), place the next 60-64-68-76-84-88 stitches on for the sleeve and cast on 8 stitches under the sleeve, work 79-89-95-107-119-131 stitches in stocking stitch (= back piece), place the next 60-64-68-76-84-88 stitches on for the sleeve and cast on 8 stitches under the sleeve, work 39-44-46-53-59-65 stitches in stocking stitch and finish with 5 band stitches in garter stitch (= front piece). BODY: = 183-203-213-239-263-287 stitches. Insert 1 marker thread 48-53-55-62-68-74 stitches in from each side (= sides of body). There are 87-97-103-115-127-139 stitches between the threads on the back piece. Allow the marker threads to follow your work onwards; they will be used when increasing in the sides. Continue with stocking stitch and 5 band stitches in garter stitch on each side. When the piece measures 3 cm from the division, increase 1 stitch on each side of both marker threads (= 4 stitches increased) – read INCREASE TIP-2. Increase like this every 3-5-4-4-4-3 cm a total of 7-5-6-6-6-7 times= 211-223-237-263-287-315 stitches. When the piece measures 27-27-28-27-28-28 cm from the division, change to circular needle size 3 mm and work rib from the right side as follows: Work 5 band stitches in garter stitch, * knit 1, purl 1 *, work from *-* until there are 6 stitches left, knit 1 and 5 band stitches in garter stitch. Cast off with knit from the right side when the rib measures 4 cm – read CASTING-OFF TIP. The jacket measures approx. 56-58-60-62-64-66 cm from the shoulder down. SLEEVE: The sleeve is worked in the round with stocking stitch and light beige. Place the 60-64-68-76-84-88 stitches from the thread on the one side of the piece on double pointed needles size 4 mm and knit up 1 stitch in each of the 8 stitches cast on under the sleeve = 68-72-76-84-92-96 stitches. Insert a marker thread in the middle of the 8 stitches under the sleeve; it will be used when decreasing under the sleeve. Work stocking stitch in the round. When the piece measures 2 cm from the division, decrease 1 stitch on each side of the marker thread (= 2 stitches decreased) – read DECREASE TIP! Decrease like this every 2½-2½-2-1½-1½-1 cm a total of 12-13-14-17-20-21 times = 44-46-48-50-52-54 stitches. When the piece measures 37-36-35-33-32-31 cm from the division, work Latvian cables with light beige and jeans blue as follows: ROUND 1: * Knit 1 with jeans blue, knit 1 with light beige *, work from *-* to the end of the round. ROUND 2: Take both strands to the front of the piece (towards you). Take the jeans blue strand to the back, purl 1 and take the strand back to the front. Take the light beige strand under the jeans blue strand and then to the back, purl 1 and take the strand back to the front. Continue to purl like this with alternately jeans blue and light beige (always take the strand UNDER the strand from the last stitch worked). ROUND 3: Work in the same way as round 2 but always take the strand OVER the strand from the last stitch worked. Work 2 rounds of stocking stitch. Change to circular needle size 3 mm and work rib (= knit 1, purl 1) over all stitches. Cast off with knit when the rib measures 4 cm. The sleeve measures approx. 42-41-40-38-37-36 cm from the division. Work the other sleeve in the same way. ASSEMBLY: Sew the bands to the yoke, inside the 1 edge stitch. Sew the buttons onto the left band. |
||||||||||||||||||||||||||||||||||||||||||||||
Diagram explanations |
||||||||||||||||||||||||||||||||||||||||||||||
|
||||||||||||||||||||||||||||||||||||||||||||||
 |
||||||||||||||||||||||||||||||||||||||||||||||
 |
||||||||||||||||||||||||||||||||||||||||||||||
Have you finished this pattern?Tag your pictures with #dropspattern #mikadojacket or submit them to the #dropsfan gallery. Do you need help with this pattern?You'll find 33 tutorial videos, a Comments/Questions area and more by visiting the pattern on garnstudio.com. © 1982-2026 DROPS Design A/S. We reserve all rights. This document, including all its sub-sections, has copyrights. Read more about what you can do with our patterns at the bottom of each pattern on our site. |
||||||||||||||||||||||||||||||||||||||||||||||


With over 40 years in knitting and crochet design, DROPS Design offers one of the most extensive collections of free patterns on the internet - translated to 17 languages. As of today we count 324 catalogues and 12290 patterns translated into English (UK/cm). 12290
We work hard to bring you the best knitting and crochet have to offer, inspiration and advice as well as great quality yarns at incredible prices! Would you like to use our patterns for other than personal use? You can read what you are allowed to do in the Copyright text at the bottom of all our patterns. Happy crafting!
Post a comment to pattern DROPS 216-8
We would love to hear what you have to say about this pattern!
If you want to leave a question, please make sure you select the correct category in the form below, to speed up the answering process. Required fields are marked *.