
Popular categories
Looking for a yarn?


Comments / Questions (10)
![]() Barbro Johansson wrote:
Barbro Johansson wrote:
Mitt garn räckte inte!!! stickade storlek xl åtgången skulle vara 800gram jag köpte 900 gram trots 100gram mer räckte inte garnet
20.07.2025 - 09:00DROPS Design answered:
Hei Barbro. Så kjedelig å få for lite garn. Vi har ingen tilbakemeldig på at andre har fått for lite garn. Strikker du i DROPS Paris og er strikkefastheten din overholdt? mvh DROPS Design
31.07.2025 - 14:16
![]() Lena wrote:
Lena wrote:
Nu har insett mitt misstag i det senaste inlägget. Jag räknade maskorna i varv 2. Tack ändå att ni finns! Vänligen Lena
05.07.2025 - 22:03
![]() Lena wrote:
Lena wrote:
Hej! Vilket roligt mönster att sticka och så vackert ….. Men nu har jag stött på patrull. När jag har stickat A1 färdigt och har 184 maskor ska jag fortsätta med A2a, A2b och A2c. Men antalet maskor i A2a och A2c i diagrammet stämmer siffrorna och inte heller med siffrorna under eller med siffrorna i beskrivningen, som jag räknar. Vad har jag missat? Vänliga hälsningar Lena Christiansson
05.07.2025 - 10:50DROPS Design answered:
Hei Lena. Så bra at du fant ut av det selv. Da håper jeg du fikk strikket massse i weekenden :) mvh DROPS Design
07.07.2025 - 11:45
![]() Elly Osephius wrote:
Elly Osephius wrote:
Ik heb aluminium pennen. Maar nu glijden iedere keer de steken eraf. Hoe voorkom ik dit.
21.01.2022 - 22:25DROPS Design answered:
Dag Elly,
Misschien brei je iets te los waardoor de steken ervan af glijden?
24.01.2022 - 20:30
![]() Elly Osephius wrote:
Elly Osephius wrote:
Vraag over patroon A1. Na dat je 8 steken verdeeld heb over 4 naalden. Maar volgens patroon A1 moet je in de 2de toer 4 steken hebben en een lus tussen 2 steken. Hoe dan. Meerder je meteen in 1ste toer 2 steken en daar tussen 1 lus. Ook glijden de steken van de pen. Ik heb metalen naalden van 20 cm. Kan ik wel 184 steken over deze korte pennen krijgen zonder dat ze eraf glijden
19.01.2022 - 21:43DROPS Design answered:
Dag Elly,
Na het opzetten van 8 steken begin je met de eerste naald in A.1. Op de eerste naald in A.1 zijn er 2 steken en je meerdert voor de eerste steek en na de eerste steek. Dan heb je na de eerste naald met 4 keer A.1 in de breedte, dus 16 steken op de naald (8 steken en 8 omslagen.)
21.01.2022 - 08:53
![]() Annie-Claude POULARD wrote:
Annie-Claude POULARD wrote:
Merci beaucoup j ai mal lu je faisais des mailles croisées comme pour une torsade au lieu de diminution🤪
17.11.2020 - 20:46
![]() Annie-Claude POULARD wrote:
Annie-Claude POULARD wrote:
Bonjour difficultés rang 6 et 7 logiquement 8 mailles +4 jetés rang 6 devraient faire 12 mailles au rang 7. L erreur vient de moi ou du schéma A1? Merci pour votre réponse
17.11.2020 - 08:56DROPS Design answered:
Bonjour Mme Poulard, on rang 6 de A.1, vous n'augmentez que 2 mailles (il y a bien 4 jetés mais 2 diminutions = on augmente 2 mailles), autrement dit, tricotez A.1 ainsi au rang 6: 1 m end, 1 jeté, 2 m ens à l'end, 1 jeté, 1 m end, 1 jeté, glissez 1 m à l'end, 1 m end, passez la m glissée par-dessus la m tricotée, 1 jeté, 2 m end = 10 m. Bon tricot!
17.11.2020 - 10:50
![]() Oksana wrote:
Oksana wrote:
For the back piece it says: work in the same way as for the front piece... When working garter stitch up towards the neck and shoulders, work as follows: Work garter stitch back and forth until the piece measures 3-4-4-5-5-6 cm. Question: where exactly this garter stich starts from the pattern general for both: front and back piece?
26.04.2019 - 14:26DROPS Design answered:
Dear Oksana, shoulders and neckline are described under Front/ All sizes: Now work back and forth along the last side of the square (= up towards the neck and shoulders) as follows, ie after you have worked ridges/pattern depending on the size, after A.2 has been worked. Happy knitting!
26.04.2019 - 15:44
![]() Janne Kulseth wrote:
Janne Kulseth wrote:
Kan ikke finne hele oppskriften, bare diagrammet.
01.02.2019 - 15:26DROPS Design answered:
Hei Janne. Dette skal nå være endret så hele oppskrften er tilgjengelig. Takk for beskjed og god fornøyelse
04.02.2019 - 15:11
![]() Anne-griet Leupen wrote:
Anne-griet Leupen wrote:
What a delicate and light looking tunic. Lovely!
19.12.2018 - 01:43
|
||||||||||||||||||||||
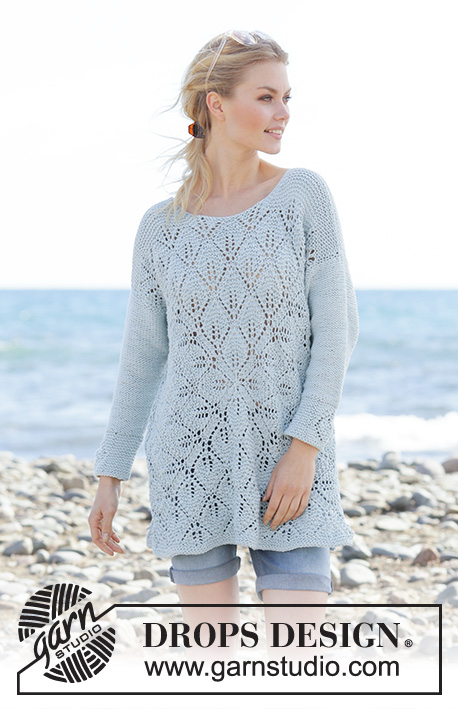
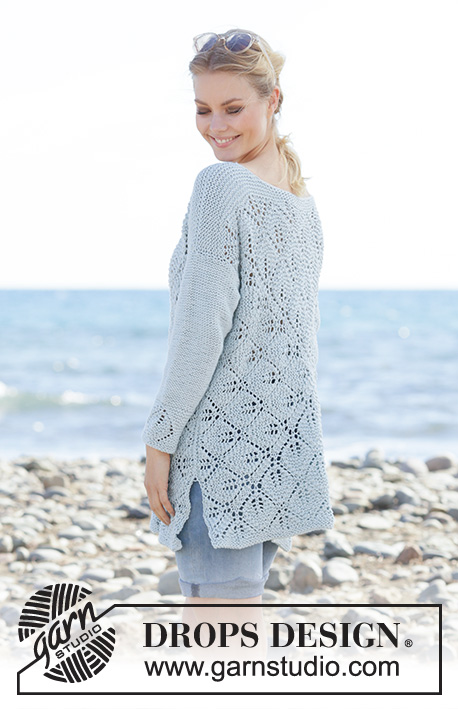
Bali Blue#balibluesweater |
||||||||||||||||||||||
 |
 |
|||||||||||||||||||||
Knitted long jumper in DROPS Paris. The piece is worked in garter stitch and lace pattern, from the middle outwards in a square. Sizes S - XXXL.
DROPS 199-31 |
||||||||||||||||||||||
|
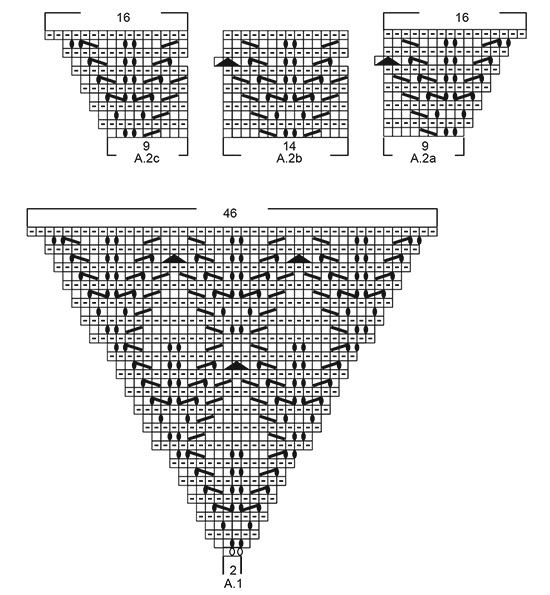
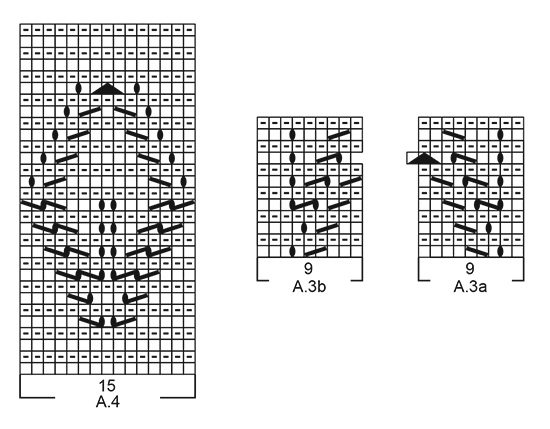
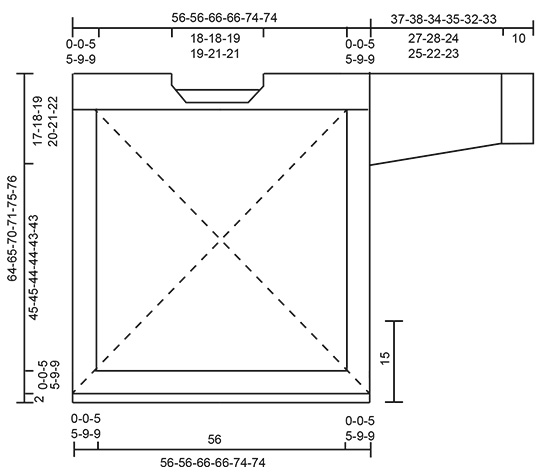
------------------------------------------------------- EXPLANATIONS FOR THE PATTERN: ------------------------------------------------------- RIDGE/GARTER STITCH (worked back and forth): Knit all rows. 1 ridge in height = Knit 2 rows. PATTERN: See diagrams A.1 to A.4. The diagrams show all rows in the pattern seen from the right side! MEASURING TIP (for square): To make it easier to measure the square, half the stitches can be placed on an extra circular needle so that it is possible to stretch the piece into a square. The piece should measure approx. 28 cm measured from the centre out, in the knitting direction (square measures approx. 56 cm x 56 cm) CASTING-OFF TIP: So that the cast-off edge is not tight, make 1 yarn over after approx. each 4th stitch. Yarn overs cast off as normal stitches. INCREASE/DECREASE TIP (evenly spaced): To work out how to increase/decrease evenly, count the total number of stitches on needle (e.g. 103 stitches) and divide by the number of increases/decreases to be made (e.g. 14) = 7.4. In this example, increase by making 1 yarn over after approx. each 7th stitch. On the next row work the yarn overs twisted to avoid holes. When decreasing, knit together alternately each 6th and 7th stitch and each 7th and 8th stitch. DECREASE TIP (for sleeves): All decreases are worked from the right side! Decrease 1 stitch inside the 1 edge stitch in garter stitch by purling 2 stitches together. ------------------------------------------------------- START THE PIECE HERE: ------------------------------------------------------- JUMPER - SHORT OVERVIEW OF THE PIECE: The piece is first worked in the round from the middle of the front/back piece and outwards in a square. Then the rest of the jumper is worked back and forth with circular needle. The sleeves are worked back and forth with circular needle, top down. NOTE: Due to the weight of the yarn and the texture, the garment will stretch somewhat after use. The pattern uses measurements which will give room for a complete leaf in height on the square. FRONT PIECE: Cast on 8 stitches with Paris and divide the stitches between 4 double pointed needles size 5 mm (= 2 stitches on each needle). Work pattern A.1 (= 2 stitches on first round) a total of 4 times on the round. Insert a marker thread in the transition between each repeat of A.1. The marker threads follow your work onwards to finished length and will be used to divide the stitches correctly. REMEMBER THE KNITTING TENSION! When A.1 has been completed in height there are 184 stitches on the round. Continue the pattern as follows: * Work A.2a over the first/next 9 stitches, A.2b over the next 28 stitches (= 2 repeats), A.2c over the next 9 stitches *, work from *-* a total of 4 times on the round. When the diagrams have been completed continue in the round in the same way, but each time the diagrams are completed in height there is room for 1 more repeat of A.2b in width between A.2a and A.2c along each side of the square. Continue like this until the piece measures approx. 28 cm from the centre and out to one side – read MEASURING TIP and adjust so that you finish after a complete repeat in height. If the knitting tension is correct, you have now worked 1 repeat of A.1 and 3 repeats of A.2a – A.2c in height; if you have worked fewer or more repeats of A.2a – A.2c in height the number of stitches will not tally with the pattern. There are now 88 stitches along each side of the square. Continue for the different sizes as follows: Sizes S and M: Square is now finished. Cast off the stitches along the first side of the square until there is 1 stitch left before the marker thread – read CASTING-OFF TIP, work 3 RIDGES – read description above, back and forth over the next stitch (= stitch before the marker thread) and the stitches up to the next marker thread (= bottom of front piece), then cast off these stitches and cut the strand. Cast off the stitches along the next side of the square until there is 1 stitch left before the marker thread – remember CASTING-OFF TIP. The remaining stitches on the round are up towards the neck and shoulders. Continue as described below. Sizes L and XL: Now work pattern back and forth along 3 sides of the square as follows: Work A.3a over the next 9 stitches, A.2b until there are 9 stitches left before the next corner, A.2c, A.2a, A.2b until there are 9 stitches left before the next corner, A.2c, A.2a, A.2b until there are 9 stitches left before the next corner, A.3b. Place the remaining stitches on the round on a thread (without working them). Turn and continue back and forth with this pattern until a complete repeat has been worked in height. Turn and cast off the stitches along the first side of the square until there is 1 stitch remaining before the marker thread – read CASTING-OFF TIP, work 3 RIDGES – read description above, back and forth over the next stitch (= stitch before the marker thread) and the stitches up to the next marker thread (= bottom of front piece), then cast off these stitches and cut the strand. Cast off the stitches along the next side of the square until there is 1 stitch left before the marker thread – remember CASTING-OFF TIP. The remaining stitches on the round are up towards the neck and shoulders. Continue as described below. Sizes XXL and XXXL: Now work pattern back and forth along 3 sides of the square as follows: Work A.3a over the next 9 stitches, A.2b until there are 9 stitches left before the next corner, A.2c, A.2a, A.2b until there are 9 stitches left before the next corner, A.2c, A.2a, A.2b until there are 9 stitches left before the next corner, A.3b. Place the remaining stitches on the round on a thread (without working them). Turn and continue back and forth with this pattern until a complete repeat has been worked in height. Then work 1 more repeat in height in the same way, but there is now room for 1 more repeat of A.2b along each of the 3 sides you are working. Turn and cast off the stitches along the first side of the square until there is 1 stitch remaining before the marker thread – read CASTING-OFF TIP, work 3 RIDGES – read description above, back and forth over the next stitch (= stitch before the marker thread) and the stitches up to the next marker thread (= bottom of front piece), then cast off these stitches and cut the strand. Cast off the stitches on the next side until there is 1 stitch left before the marker thread – remember CASTING-OFF TIP. The remaining stitches on the round are up towards the neck and shoulders. Continue as described below. All sizes: Now work back and forth along the last side of the square (= up towards the neck and shoulders) as follows: Start from the right side and knit up 0-0-8-8-14-14 stitches along the edge of A.3b which was worked outwards in the side in sizes L, XL, XXL and XXXL (does not apply to sizes S and M), work the stitches along the side of the square onto the same circular needle (= 89 stitches in all sizes) and knit up 0-0-8-8-14-14 stitches along the edge of A.3a which was worked outwards in the side in sizes L, XL, XXL and XXXL (does not apply to sizes S and M), = approx. 89-89-105-105-117-117 stitches. Work 1 row back from the wrong side - if the number of stitches is not 89-89-105-105-117-117 stitches, increase/decrease evenly on this row – read INCREASE/DECREASE TIP). On the next row cast off the middle 19-19-21-21-23-23 stitches on the row for the neck and each shoulder is finished separately. Then decrease for neck by knitting 2 stitches together inside the 3 stitches in garter stitch towards the neck. Decrease like this every row from the right side a total of 5 times = approx. 30-30-37-37-42-42 stitches on the shoulder. When the piece measures 6-7-7-8-8-9 cm from the square, cast off – remember CASTING-OFF TIP. Work the other shoulder in the same way. The front piece measures approx. 64-65-70-71-75-76 cm from the shoulder down. BACK PIECE: Cast on and work in the same way as for the front piece. Adjust the pattern to match the front piece, so that you work the same number of rows and you have the same number of stitches on front and back pieces. When working garter stitch up towards the neck and shoulders, work as follows: Work garter stitch back and forth until the piece measures 3-4-4-5-5-6 cm. On the next row from the right side cast off the middle 27-27-29-29-31-31 stitches for neck and each shoulder is finished separately. On the next row from the right side decrease 1 stitch inside the 3 edge stitches in garter stitch towards the neck = approx. 30-30-37-37-42-42 stitches. When the piece measures 6-7-7-8-8-9 cm cast off the stitches. Work the other shoulder in the same way. The jumper measures approx. 64-65-70-71-75-76 cm from the shoulder down. ASSEMBLY: Sew the shoulder seams with grafting stitches. Insert a marker thread in each side 17-18-19-20-21-22 cm down from the shoulder seam (= marks the armhole). Repeat on the other side of the jumper. SLEEVE: The sleeves are worked back and forth with circular needle, top down. Knit up from the right side 56-60-63-66-69-72 stitches between the 2 marker threads marking the armhole on one side with circular needle size 5.5 mm and Paris. Work stocking stitch with the wrong side out and with 1 edge stitch in garter stitch on each side. When the piece measures 4 cm decrease 1 stitch inside the 1 edge stitch in garter stitch on each side – read DECREASE TIP. Decrease as follows in the different sizes: Size S: Decrease like this every 2 cm a total of 11 times. Size M: Decrease like this every 2 cm a total of 12 times. Size L: Decrease like this alternately every cm and every 2 cm a total of 13 times. Size XL: Decrease like this alternately every cm and every 2.cm a total of 14 times. Size XXL: Decrease like this every cm a total of 14 times. Size XXXL: Decrease like this every cm a total of 15 times. When all the decreases are finished there are 34-36-37-38-41-42 stitches on the row. When the piece measures 27-28-24-25-22-23 cm there is 10 cm left to finished length. Try the garment on and adjust the length of the sleeve (the garment will stretch slightly over the shoulders). Change to circular needle size 5 mm. Work pattern as follows: Work 9-10-11-11-13-13 stitches in garter stitch, A.4 over the next 15 stitches, 10-11-11-12-13-14 stitches in garter stitch. Continue back and forth like this until A.4 is finished. The sleeve measures approx. 37-38-34-35-32-33 cm. Cast off. Work the other sleeve in the same way. ASSEMBLY: Sew underarm seam and continue down the side seam until there is 15 cm left for the split. Repeat on other side. Tack a thread up and down along the hole at the beginning of the square and tighten so that the hole is smaller. Cut and fasten the strand. |
||||||||||||||||||||||
Diagram explanations |
||||||||||||||||||||||
|
||||||||||||||||||||||
 |
||||||||||||||||||||||
 |
||||||||||||||||||||||
 |
||||||||||||||||||||||
Have you finished this pattern?Tag your pictures with #dropspattern #balibluesweater or submit them to the #dropsfan gallery. Do you need help with this pattern?You'll find 26 tutorial videos, a Comments/Questions area and more by visiting the pattern on garnstudio.com. © 1982-2026 DROPS Design A/S. We reserve all rights. This document, including all its sub-sections, has copyrights. Read more about what you can do with our patterns at the bottom of each pattern on our site. |
||||||||||||||||||||||


With over 40 years in knitting and crochet design, DROPS Design offers one of the most extensive collections of free patterns on the internet - translated to 17 languages. As of today we count 324 catalogues and 12290 patterns translated into English (UK/cm). 12290
We work hard to bring you the best knitting and crochet have to offer, inspiration and advice as well as great quality yarns at incredible prices! Would you like to use our patterns for other than personal use? You can read what you are allowed to do in the Copyright text at the bottom of all our patterns. Happy crafting!
Post a comment to pattern DROPS 199-31
We would love to hear what you have to say about this pattern!
If you want to leave a question, please make sure you select the correct category in the form below, to speed up the answering process. Required fields are marked *.