
Popular categories
Looking for a yarn?


Comments / Questions (127)
![]() Michaela Haubrich wrote:
Michaela Haubrich wrote:
Ich habe den Pullover für 4-5 Jahre genau nach Anleitung gestrickt und der Garnbdarf in der Hauptfarbe war 250g und nicht 200g wie in der Anleitung
06.11.2025 - 19:34
![]() Patricia wrote:
Patricia wrote:
Bonjour Je ne comprends pas ce que je dois faire avec les 8 mailles montées sous le bras. Je dois les laisser en attente avec celles prévues pour la manche ??? Merci de m’aider
02.11.2025 - 15:19DROPS Design answered:
Bonjour Patricia, les 8 mailles montées sous les manches remplacent les manches, ce sont les mailles des côtés; retrouvez dans cette leçon des photos montrant les étapes de la division (pour un raglan, mais la division se fera de la même façon), à partir de la photo 10. Bon tricot!
03.11.2025 - 08:04
![]() Jan wrote:
Jan wrote:
Hi, I'm totally confused and on the point of giving up...I have restarted the pattern at least 5 times and cannot get it to work!! I'm doing the pattern for age 7/8 and really struggling with YO increases, on row 3 of A1 the YO is every other pattern of 3 which essentially means that on the next row you have repeats of alternating 3 and 4 stitches, how does that work on a 3 pattern repeat on the following row...or am I just not reading the pattern right? Many thanks, Jan
30.10.2025 - 11:54DROPS Design answered:
Hi, Jan, there are no increases on row 3 or 4 in the pattern for size 7/8, the next increase after the first row is on row 5. This increase means that for row 6, you alternate between 1 and 2 stitches in off white between the stitches in mustard. Happy knitting!
30.10.2025 - 12:18
![]() Merel wrote:
Merel wrote:
Hallo, wat is de reden dat we bij de minderingen bij de mouw de 1e mindering 2 steken samen breien (voor de markeerdraad) en de 2e mindering 1 steek afhalen 2e steek breien en de afgehaalde steek over de gebreide steek heen halen ( na de markeerdraad). Waarom twee verschillende minderingen?
16.10.2025 - 19:30DROPS Design answered:
Dag Merel,
De reden daarvoor is dat deze verschillende manieren van minderen er anders uitzien, waardoor de steken anders 'liggen'.
12.11.2025 - 16:03
![]() Daria wrote:
Daria wrote:
Hello Did my increases by doing YO but it leaves a hole even though I twisted them in the next round. Any idea why? And can I just do different increase?
06.10.2025 - 06:48DROPS Design answered:
Hi Daria, it may be a little hole even if the yarn over is worked twisted, particularly when the yarn over is too loose. Of course you can choose a different type of increase, you will find them HERE. Happy knitting!
06.10.2025 - 07:41
![]() Louisebonnette wrote:
Louisebonnette wrote:
Que veut dire 32-7 merci
24.09.2025 - 01:23DROPS Design answered:
Bonjour Louisebonnette, il semble qu'il s'agit du numéro de ce modèle: Catalogue DROPS Children 32, modèle 7. Bon tricot!
24.09.2025 - 17:06
![]() Karin Saskia wrote:
Karin Saskia wrote:
Dank u voor het antwoord , maar als ik de eerste rij van diagram A 1 12 /18 volg kom ik niet op 88 steken uit, maar veel meer.
27.08.2025 - 10:37DROPS Design answered:
Dag Karin,
Als je de kleinste maat volgt begin je met A.1 als je 66 steken op de naald hebt. A.1 is 6 steken breed en dit herhaal je 11 keer. Na de eerste naald van A.1 heb je, als je de omslagen meetelt 88 steken op de naald omdat je in totaal 22 steken meerdert.
27.08.2025 - 20:51
![]() Karin Saskia wrote:
Karin Saskia wrote:
Ik maak de trui in de kleinste maat; als ik de eerste toer van de diagram lees zou ik het als volgt moeten breien ; 1 recht, 1 omslag, 5 recht, 1 omslag, 1 recht , 1 omslag, ,5 recht etc. Klopt dit?
25.08.2025 - 22:23DROPS Design answered:
Dag Karin,
Ja, dat klopt!
27.08.2025 - 10:27
![]() Caroline wrote:
Caroline wrote:
Hej! Jag stickar 12/28 mån och har problem med mönstret. Det uppstår på 6e raden. På rad 5 har en ökning gjorts så att det växelvis är tre vita och fyra vita maskor mellan den röda nedersta maskan i korset. Det tas ingen hänsyn till i rad 6 så korsen blir inte kors. Hur gör jagbflr att göra rätt här?
20.08.2025 - 22:42DROPS Design answered:
Hei Caroline. Når du skal strikke 6. rad av A.1 blir det 1 og 2 hvite masker mellom hvert korst, så det blir ikke 100% jevnt, men når man får på seg plagget vil dette jevne seg ut. mvh DROPS Design
15.09.2025 - 13:16
![]() Karin Saskia wrote:
Karin Saskia wrote:
Ik maak de kleinste maat van deze trui; en hen een vraag over de pas. Bij de vijfde naald meerderen klopt bij mij het patroon niet meer. Wat gaat er nu fout?
28.07.2025 - 10:32DROPS Design answered:
Dag Karin,
Ik weet niet precies waar je bent, maar als je de hals klaar is (met eventuele verhoging aan de achterkant) , heb je 66 steken op de naald en dan begin je met het telpatroon. Het telpatroon is 6 steken in de breedte, dus je herhaalt het telpatroon 11 keer op de naald. De meerderingen zijn aangegeven in het telpatroon in de vorm van omslagen aan het begin van de naald. De eerste meerdering is pas op de 6e naald. Na die naald van meerderingen bestaat 1 patroonherhaling uit 7 steken in de breedte.
28.07.2025 - 21:43
|
||||||||||
Little Missy#littlemissysweater |
||||||||||
 |
 |
|||||||||
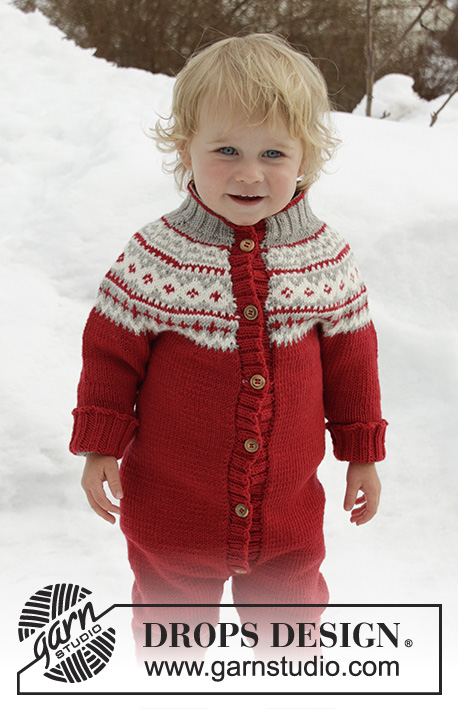
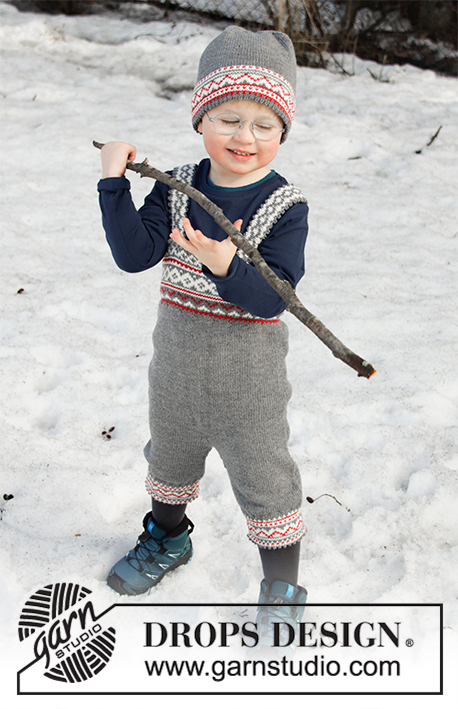
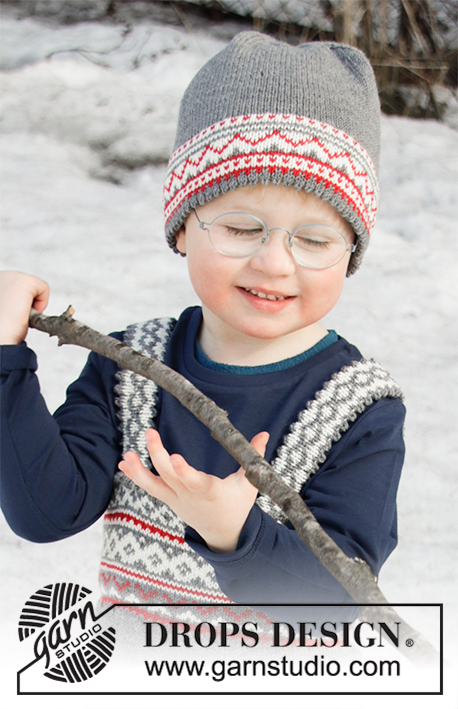
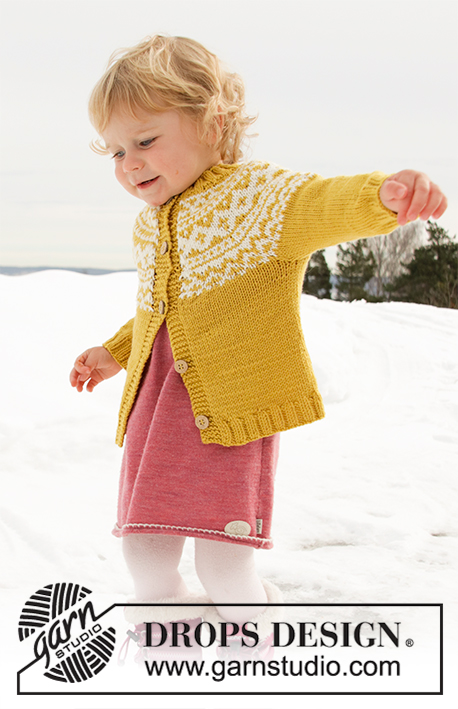
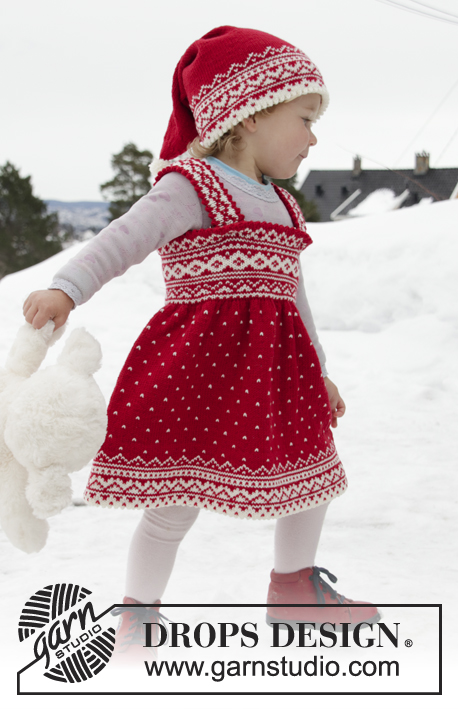
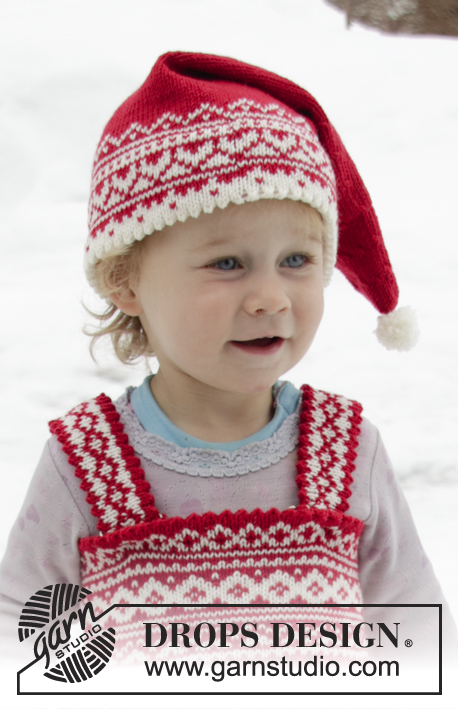
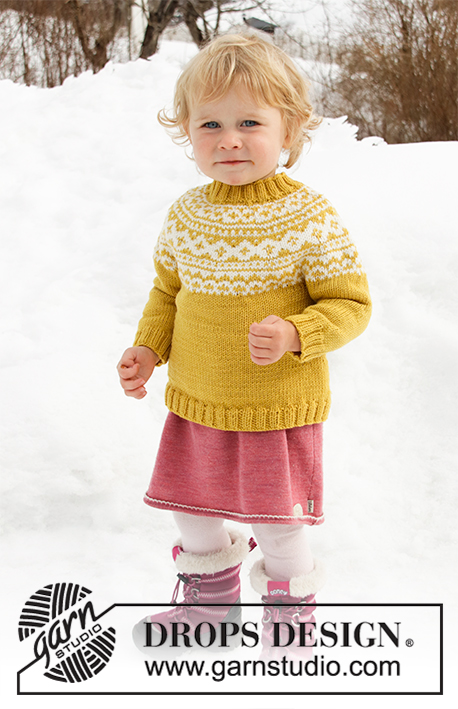
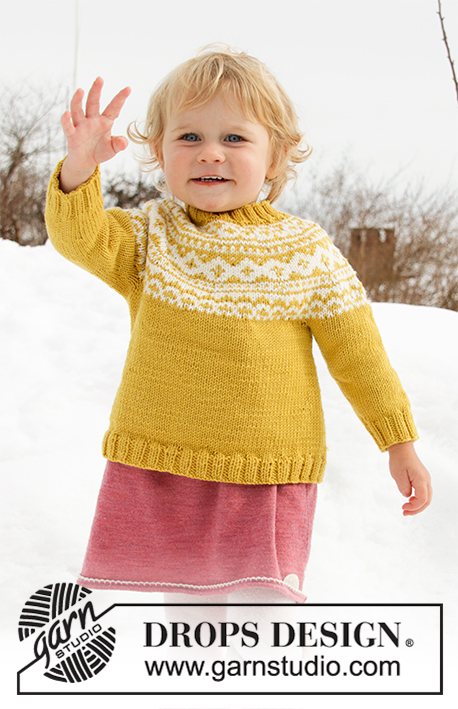
Knitted jumper for babies and children with round yoke in DROPS Merino Extra Fine. The piece is worked top down with Nordic pattern. Sizes 12 months – 12 years.
DROPS Children 32-7 |
||||||||||
|
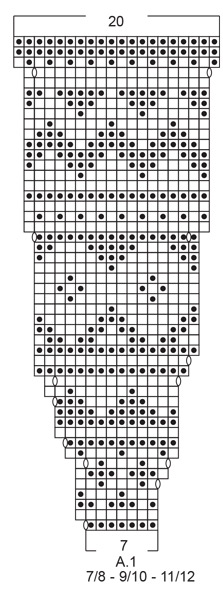
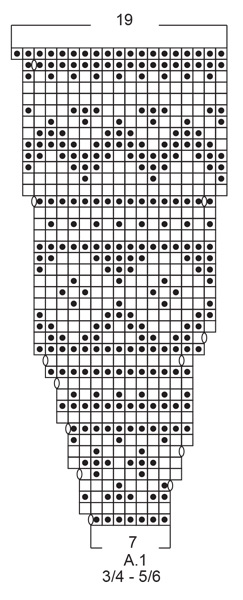
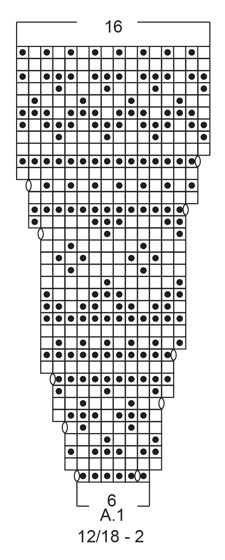
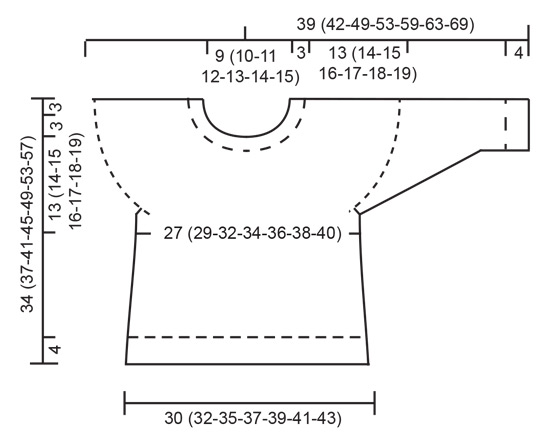
EXPLANATIONS FOR THE PATTERN: ------------------------------------------------------- PATTERN: See diagram A.1. Choose diagram for your size. The whole pattern is worked in stocking stitch. DECREASE/INCREASE TIP: To work out when to decrease/increase evenly, count the total number of stitches on the needle (e.g. 72 stitches) and divide by the number of decreases/increases to be made (e.g. 6) = 12. In this example, decrease by working together each 11th and12th stitch, or increase after each 12th stitch by making 1 yarn over (the yarn overs are worked twisted on the next row to avoid holes). INCREASE TIP (for sides of body): Increase 1 stitch on each side of the marker thread as follows: Start 2 stitches before the marker thread, make 1 yarn over, knit 4 (marker thread sits in the middle of these 4 stitches), make 1 yarn over (= 2 stitches increased). Increase like this by both marker threads (4 stitches increased). On the next row work the yarn overs twisted to avoid holes. DECREASE TIP (for mid under sleeve): Decrease 1 stitch on each side of the marker thread as follows: Start 3 stitches before the marker thread, knit 2 together, knit 2 (marker thread sits between these 2 stitches), slip 1 stitch as if to knit, knit 1 and pass the slipped stitch over the knitted stitch (= 2 stitches decreased). ELEVATION (back of neck): Skip this section if you do not want an elevation. Insert 1 marker at the beginning of the round (= mid back). Knit 6 stitches, turn, tighten the strand and purl 12 stitches, turn, tighten the strand and continue by working 8 (8-8-10-10-10-10) stitches more than previous turn each time you turn 3 more times in each side (= 4 times in total in each side), after last turn, knit to mid back. ------------------------------------------------------- START THE PIECE HERE: ------------------------------------------------------- JUMPER - SHORT OVERVIEW OF THE PIECE: The piece is worked in the round, top down. You work the yoke first which is then divided into sleeves and body. The round starts approx. mid back. The body is worked in the round with circular needle. The sleeves are worked in the round with double pointed needles. NECK: Cast on 72 (76-80-84-88-96-100) stitches with double pointed needles/short circular needle size 3 mm and mustard (in the 2 smallest sizes, you need to cast on with double pointed needles until you have enough stitches, the other sizes can be cast on and worked with short circular needle). Knit 1 round. Then work rib (= knit 2 / purl 2). Continue this rib for 3 cm. YOKE: Change to double pointed needles/circular needle size 4 mm. Knit 1 round where you decrease 6 (4-3-0-4-5-9) stitches evenly on round – read DECREASE/INCREASE TIP = 66 (72-77-84-84-91-91) stitches. You can now work an elevation in back of neck so that the yoke in slightly higher at the back. This elevation can be left out; the neck is then the same front and back – work ELEVATION – read description above, or just continue. Work pattern according to A.1 - NOTE: Choose diagram for your size (= 11 (12-11-12-12-13-13) repeats of 6 (6-7-7-7-7-7) stitches). Continue and increase as shown in diagram. REMEMBER THE KNITTING TENSION! When A.1 has been completed there are 176 (192-209-228-240-260-260) stitches on the needle. Continue with stocking stitch and mustard. On the next round increase 7 (7-10-7-3-0-11) stitches evenly on round = 183 (199-219-235-243-260-271) stitches. When the piece measures 13 (14-15-16-17-18-19) cm mid front (measured without the neck), divide the piece as follows: Work 25 (27-30-32-34-36-38) stitches, place the next 42 (46-50-54-54-58-60) stitches on 1 thread for sleeve (without working them), cast on 8 new stitches, work 49 (53-59-63-67-72-75) stitches, place the next 42 (46-50-54-54-58-60) stitches on 1 thread for sleeve (without working them), cast on 8 new stitches and work the remaining 25 (27-30-32-34-36-38) stitches as before = 115 (123-135-143-151-160-167) stitches. BODY: Insert 1 marker thread in the middle of the 8 stitches cast on under each sleeve (= 57 (61-67-71-75-80-83) stitches between marker threads on front piece). THE PIECE IS NOW MEASURED FROM HERE! When the piece measures 3 cm from where body and sleeves were divided, increase on each side of both marker threads – read INCREASE TIP. Repeat the increase when the piece measures 6 and 9 cm from where body and sleeves were divided = 127 (135-147-155-163-172-179) stitches. When the piece measures 11 (13-16-19-22-25-28) cm from where body and sleeves were divided, increase 9 (9-9-9-9-8-9) stitches on next round = 136 (144-156-164-172-180-188) stitches. Change to circular needle size 3. Work rib (= knit 2 / purl 2) for 4 cm. Then cast off with knit over knit and purl over purl. The whole jumper measures approx. 34 (37-41-45-49-53-57) cm, measured from the shoulder. SLEEVE: Place the stitches from the one thread on double pointed needles size 4 mm and knit up 1 stitch in each of the 8 stitches cast on under the sleeve = 50 (54-58-62-62-66-68) stitches. Insert 1 marker thread in the middle of the 8 stitches (= mid under sleeve). THE PIECE IS NOW MEASURED FROM HERE! Work stocking stitch in the round with mustard. When the sleeve measures 1 cm from where sleeve and body were divided, decrease 2 stitches mid under sleeve – read DECREASE TIP. Decrease like this every 1½ (2-2-2½-3-3½-3½) cm a total of 6 (6-8-8-8-8-9) times = 38 (42-42-46-46-50-50) stitches. When the sleeve measures 14 (16-21-24-28-31-35) cm from where it was divided from the body, decrease 2 stitches evenly on round = 36 (40-40-44-44-48-48) stitches. Change to double pointed needles size 3 mm and work rib in the round (= knit 2 / purl 2) for 4 cm or to desired length. Then cast off with knit over knit and purl over purl. The sleeve measures a total of approx.18 (20-25-28-32-35-39) cm from where it was divided from the body. Work the other sleeve in the same way. |
||||||||||
Diagram explanations |
||||||||||
|
||||||||||
 |
||||||||||
 |
||||||||||
 |
||||||||||
 |
||||||||||
Have you finished this pattern?Tag your pictures with #dropspattern #littlemissysweater or submit them to the #dropsfan gallery. Do you need help with this pattern?You'll find 29 tutorial videos, a Comments/Questions area and more by visiting the pattern on garnstudio.com. © 1982-2026 DROPS Design A/S. We reserve all rights. This document, including all its sub-sections, has copyrights. Read more about what you can do with our patterns at the bottom of each pattern on our site. |
||||||||||


With over 40 years in knitting and crochet design, DROPS Design offers one of the most extensive collections of free patterns on the internet - translated to 17 languages. As of today we count 324 catalogues and 12290 patterns translated into English (UK/cm). 12290
We work hard to bring you the best knitting and crochet have to offer, inspiration and advice as well as great quality yarns at incredible prices! Would you like to use our patterns for other than personal use? You can read what you are allowed to do in the Copyright text at the bottom of all our patterns. Happy crafting!
Post a comment to pattern DROPS Children 32-7
We would love to hear what you have to say about this pattern!
If you want to leave a question, please make sure you select the correct category in the form below, to speed up the answering process. Required fields are marked *.