
Categorie popolari
State cercando un filato?


Commenti / Domande (108)
![]() Inger Kertelhein ha scritto:
Inger Kertelhein ha scritto:
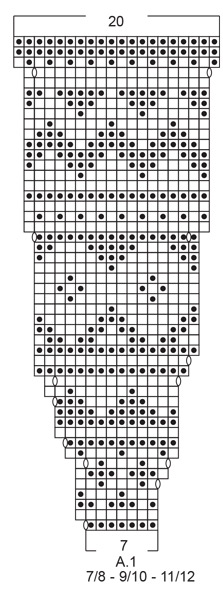
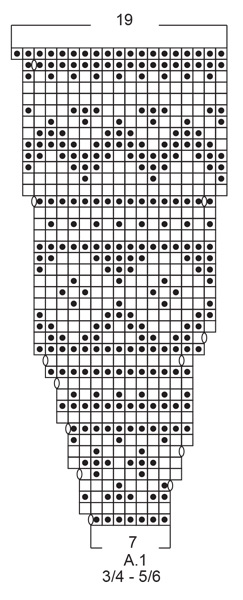
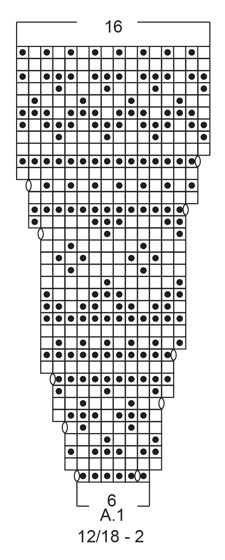
Hallo Ich verstehe leider überhaupt nicht wie ich , wenn ich am Anfang bin vom Diagramm A1 zunehmen soll??? In der ersten Reihe habe ich 7 Maschen zugenommen nach jeder 11ten Masche das war klar . Aber wie geht es weiter? Ich nehme doch jetzt nicht in jeder weiteren Reihe 7 Maschen zu dann habe ich nach 42 Reihen viel zu viel Maschen. Wenn ich die Umschläge nehme wie im Diagramm angezeigt habe ich nach 42 Reihen zu wenig Maschen. Ich habe gerade keinen Überblick
29.03.2025 - 10:11DROPS Design ha risposto:
Liebe Frau Kertelhein, A.1 liest man von unten nach oben und wird über die ganze Runde wiederholt; wenn Sie z.B. das Diagram 11 Mal wiederholen, und bei der 1. Reihe 2 Umschläge in A.1 arbeiten sollen, dann werden Sie 2 Maschen x 11 = 22 M bei der 1. Runde zunehmen; und so in jedem A.1 wie beschrieben stricken bzw zunehmen bis es 16, 19 oder 20 Maschen nach der letzten Zunahme am Ende A.1 sind, so sind es insgesamt 176 (192-209-228-240-260-260) Maschen wenn A.1 fertig ist. Setzen Sie z.B. Markierer zwischen jedem Rapport, das kann Ihnen helfen, die Diagramme zu wiederholen und die Maschenanzahl nach jeder Runde zu prüfen. Viel Spaß beim Stricken!
31.03.2025 - 08:24
![]() Burger-Akkerman ha scritto:
Burger-Akkerman ha scritto:
Bijna klaar met het lijfje , de kleinste maat. Na het boordje moet ik dan volgens patroon 34 cm totaal hebben Ik kom echter op : patroon 13 cm plus lijfje 11 cm plus boordje 4 cm is totaal 28 cm Ook bij de grotere maten kan ik niet de juiste lengte berekenen. Wat gaat er fout bij mijn telling?
26.03.2025 - 23:05
![]() Burger-Akkerman ha scritto:
Burger-Akkerman ha scritto:
Ik brei de kleinste maat en het valt me op dat de meerderingen in het diagram niet mooi verwerkt zijn ivm het mooi doorlopen van het patroon. Het is het mooist als de meerderingen gedaan moeten worden in een toer met 1 kleur; heb dit voor mezelf aangepast, maar dat vereist wel wat gereken
23.03.2025 - 13:09
![]() Anne Croft ha scritto:
Anne Croft ha scritto:
This is the 2nd time I have submitted this comment. I have completed this pattern and had to purchase two additional balls of the main color and hand 1.5 balls of the other color left. My measurements were exact so I know my tension was correct.
08.03.2025 - 15:59
![]() Louise Hansen ha scritto:
Louise Hansen ha scritto:
Jeg tror, der er noget galt med maskeantallet i str. 5/6. Delingen i bærestykket deles med 32+32 m til bagstykke og 63 m til forstykke samt 2x 8 m under ærmerne = 143 m. I næste afsnit står, at der skal være 71 m mellem trådene under ærmerne = 142 m. Hvor skal den sidste m være? Herefter tages 4 m ud 3 gange = 155 m, så stadig ikke samme antal masker for og bag. Håber I kan forklare og rette. Tak for hjælpen. Vh Louise
27.02.2025 - 12:46DROPS Design ha risposto:
Hej Louise, når du sætter 1 mærk i hver side får du 36 + 71 + 36 = 143 masker :)
06.03.2025 - 11:18
![]() Julie ha scritto:
Julie ha scritto:
How do I down load the pattern ?
17.02.2025 - 20:02DROPS Design ha risposto:
Hi Julie, Just click on the picture of the pattern you want to make and the written pattern will automatically be downloaded. Happy crafting!
18.02.2025 - 06:49
![]() Helen ha scritto:
Helen ha scritto:
Additionally I don't understand how increasing stitches whilst maintaining the colour pattern works. There doesn't seem to be a video showing this. Thanks
26.01.2025 - 12:28DROPS Design ha risposto:
Dear Helen, please see our answer below. Happy knitting!
26.01.2025 - 19:45
![]() H Elen ha scritto:
H Elen ha scritto:
Thank you for your prompt reply! I am knitting size 7. I cast on 88 then had to reduce 4 before starting the pattern therefore I had 84. I'm actually starting row 5. I understand that after 8 stitches of pattern I increase one stitch and repeat this until the end of the round? Reading the grid left to right? I did not do the neck elevation. I currently have 96 stitches. But by doing the increase the pattern does not line up correctly due to the extra stitch. Hope you can help? Thanks
26.01.2025 - 12:08DROPS Design ha risposto:
Dear Helen, the charts are worked right to left since you always work on the right side (when working in the round). You make 1 yarn over at the beginning of each repeat and, as seen in the next round, the new stitch is at the beginning of the pattern repeat. So the other stitches in the pattern should align one over the other. Take into account that, as you increase, the transition between one repeat and the other should still be invisible because the increased stitches are worked into the pattern. Happy knitting!
26.01.2025 - 19:45
![]() Helen ha scritto:
Helen ha scritto:
I'm knitting Little Missy & up to 6th row of the pattern. The next increase in the pattern repeat is making the pattern shift, so the stitches are not lining up like in the grid. Can you please tell me what I am doing incorrectly? Thank you
25.01.2025 - 12:04DROPS Design ha risposto:
Dear Helen, the only increases worked should be the ones in the chart, so the grid should match the one in your piece. What size are you working (since the chart varies depending on the size)? In the smaller sizes you make 1 yarn over at the start of the round and you have an extra stitch at the beginning in the round in the next round, so it matches. In the larger sizes in row 7 you have 2 increases, one increases 1 stitch at the beginning and another one towards the end. The stitches should align on the next round. Happy knitting!
25.01.2025 - 23:53
![]() Louise ha scritto:
Louise ha scritto:
Jeg tror, der er noget galt med maskeantallet i str. 5/6. Delingen i bærestykket deles med 32+32 m til bagstykke og 63 m til forstykke samt 2x 8 m under ærmerne = 143 m. I næste afsnit står, at der skal være 71 m mellem trådene under ærmerne = 142 m. Hvor skal den sidste m være? Herefter tages 4 m ud 3 gange = 155 m, så stadig ikke samme antal masker for og bag. Håber I kan forklare og rette. Tak for hjælpen. Vh Louise
20.01.2025 - 18:37
|
||||||||||
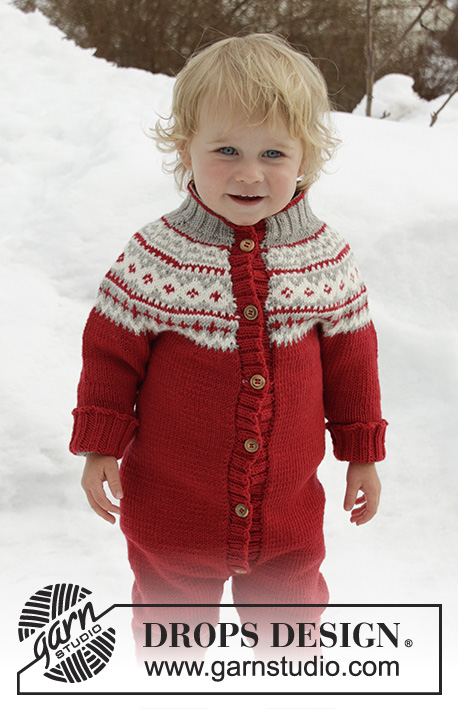
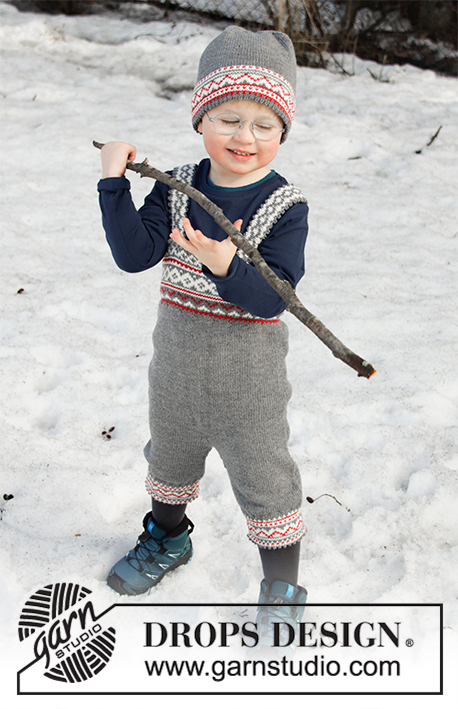
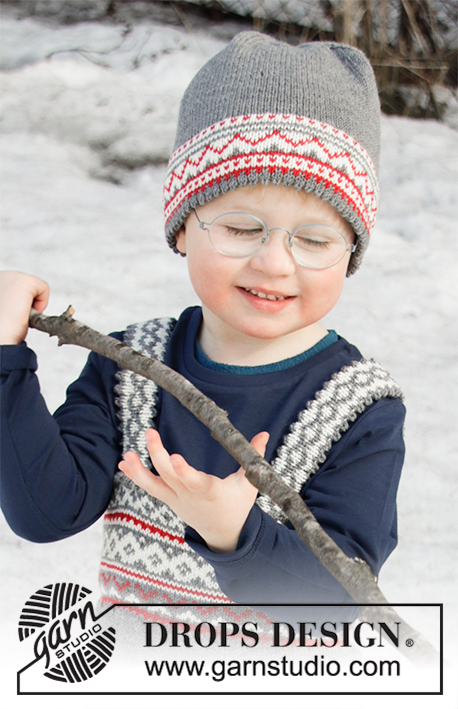
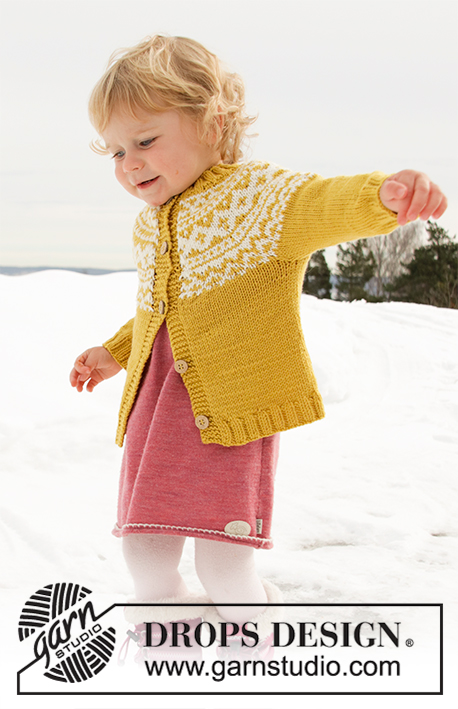
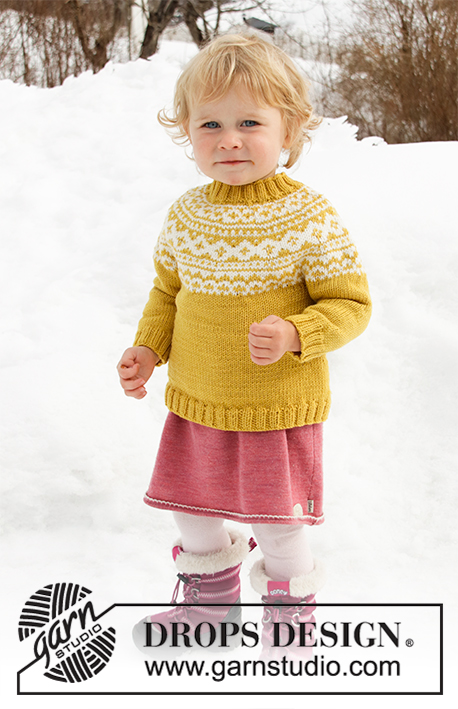
Little Missy#littlemissysweater |
||||||||||
 |
 |
|||||||||
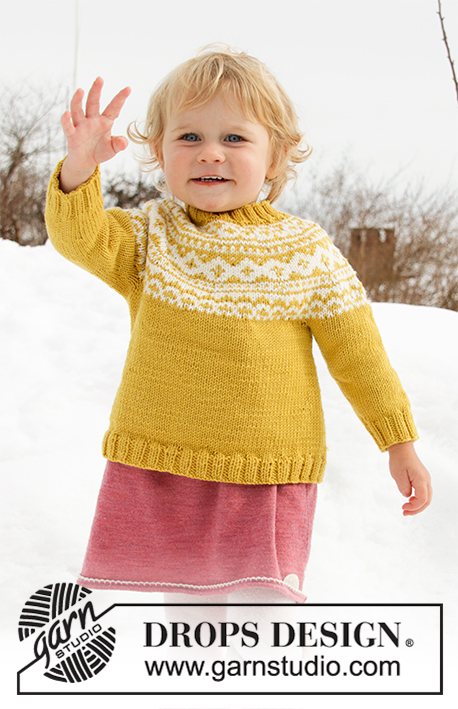
Maglione lavorato ai ferri per baby e bambini con sprone rotondo in DROPS Merino Extra Fine. Lavorato dall’alto in basso con motivo nordico. Taglie: 12 mesi – 12 anni.
DROPS Children 32-7 |
||||||||||
|
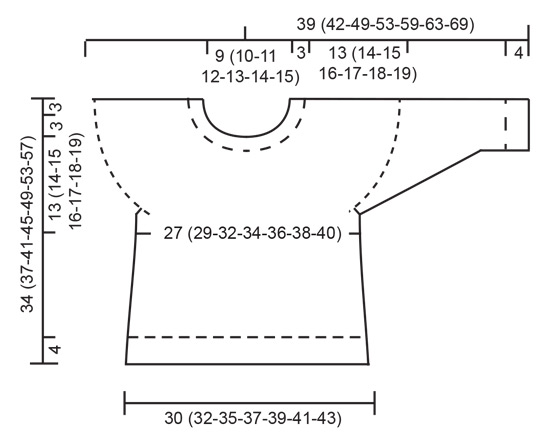
------------------------------------------------------- SPIEGAZIONI DEL MODELLO: ------------------------------------------------------- MOTIVO: Vedere il diagramma A.1. Scegliere il diagramma per la vostra taglia. Lavorare tutto il motivo a maglia rasata. SUGGERIMENTO PER GLI AUMENTI/DIMINUZIONI: Per stabilire ogni quanto diminuire/aumentare sul giro, prendere il n° totale di maglie sul ferro (ad esempio 72 maglie) e dividerlo per il n° di diminuzioni/aumenti da fare (ad esempio 6) = 12. In questo esempio, diminuire lavorando insieme ogni 11esima e 12esima maglia, o aumentare dopo ogni 12esima maglia facendo 1 gettato (lavorare i gettati a ritorto sul ferro successivo per evitare buchi). SUGGERIMENTO PER GLI AUMENTI (ai lati del corpo): Aumentare 1 maglia a ogni lato del segnapunti come segue: iniziare 2 maglie prima del segnapunti, 1 gettato, 4 maglie diritto (= il segnapunti è al centro di queste 4 maglie), 1 gettato (= 2 aumenti). Aumentare in questo modo all’altezza di entrambi i segnapunti (4 aumenti).Sul giro successivo lavorare il gettato a ritorto per evitare buchi. SUGGERIMENTO PER LE DIMINUZIONI (al centro sotto le maniche): Diminuire 1 maglia a ogni lato del segnapunti come segue: iniziare 3 maglie prima del segnapunti, 2 maglie insieme a diritto, 2 maglie diritto (= il segnapunti è al centro di queste 2 maglie), passare 1 maglia a diritto senza lavorarla, 1 maglia diritto, accavallare la maglia passata sopra quella appena lavorata (= 2 diminuzioni). ALZATA (dietro del collo): Saltare questo paragrafo se non volete l’alzata. Inserire 1 segnapunti circa al centro davanti (dopo 33 (36-38-42-42-46-46) maglie). Lavorare a diritto fino a quando rimangono 8 (8-8-10-10-12-12) maglie diritto prima del segnapunti, girare, tirare il filo e lavorare a rovescio fino a quando rimangono 8 (8-8-10-10-12-12) maglie dall’altro lato, girare, tirare il filo e lavorare a diritto fino a quando rimangono 16 (16-16-18-18-20-20) maglie, girare, tirare il filo e lavorare a rovescio fino a quando rimangono 16 (16-16-18-18-20-20) maglie dall’altro lato. Continuare a lavorare con 8 maglie in meno ad ogni giro, altre 2 volte a ogni lato, girare tirare il filo e lavorare a diritto fino al centro dietro. ------------------------------------------------------- INIZIO DEL LAVORO: ------------------------------------------------------- MAGLIONE – BREVE RIASSUNTO DEL LAVORO: Lavorato in tondo, dall’alto in basso. Lavorare prima lo sprone, poi dividere il lavoro per il corpo e le maniche. Il giro inizia circa al centro dietro. Lavorare il corpo in tondo con i ferri circolari. Lavorare le maniche in tondo con i ferri a doppia punta. COLLO: Avviare 72 (76-80-84-88-96-100) maglie con i ferri a doppia punta/ferri circolari corti n° 3 mm (nelle 2 taglie più piccole potete avviare e lavorare con i ferri a doppia punta fino a quando ci saranno abbastanza maglie per usare i ferri circolari; per le altre taglie potete avviare e lavorare con i ferri circolari corti). Lavorare 1 giro diritto. Poi lavorare a coste (= 2 maglie diritto / 2 maglie rovescio). Continuare queste coste per 3 cm. SPRONE: Passare ai ferri a doppia punta/ferri circolari corti n° 4 mm. Lavorare 1 giro diritto e diminuire 6 (4-3-0-4-5-9) maglie in modo uniforme sul giro – leggere il SUGGERIMENTO PER LE DIMINUZIONI/AUMENTI = 66 (72-77-84-84-91-91) maglie. Ora potete lavorare un’alzata sul dietro del collo in modo che lo sprone sia leggermente più alto sul dietro. E’ possibile saltare quest’alzata; il collo sarà identico sul davanti e sul dietro – lavorare l’ALZATA – leggere la descrizione sopra o continuare il lavoro. Lavorare il motivo A.1 - NOTA: Scegliere il diagramma per la vostra taglia (= 11 (12-11-12-12-13-13) ripetizioni di 6 (6-7-7-7-7-7) maglie). Continuare questo motivo e aumentare come indicato nel diagramma. FARE ATTENZIONE ALLA TENSIONE DEL LAVORO! Alla fine di A.1 ci sono 176 (192-209-228-240-260-260) maglie sul ferro. Continuare a maglia rasata con il senape. Sul giro successivo aumentare 7 (7-10-7-3-0-11) maglie in modo uniforme sul giro = 183 (199-219-235-243-260-271) maglie. Quando il lavoro misura 13 (14-15-16-17-18-19) cm al centro davanti (misurati senza il collo), dividere il lavoro come segue: lavorare 25 (27-30-32-34-36-38) maglie, mettere le 42 (46-50-54-54-58-60) maglie successive in sospeso per la manica (senza lavorarle), avviare 8 maglie, lavorare 49 (53-59-63-67-72-75) maglie, mettere le 42 (46-50-54-54-58-60) maglie successive in sospeso per la manica (senza lavorarle), avviare 8 maglie, lavorare le 25 (27-30-32-34-36-38) maglie rimaste come prima = 115 (123-135-143-151-160-167) maglie. CORPO: Inserire 1 segnapunti al centro delle 8 maglie avviate sotto ogni manica (= 57 (61-67-71-75-80-83) maglie tra i segnapunti sul davanti). ORA MISURARE IL LAVORO DA QUI! Quando il lavoro misura 3 cm dal punto di divisione, aumentare a ogni lato di entrambi i segnapunti – leggere il SUGGERIMENTO PER GLI AUMENTI. Ripetere questi aumenti quando il lavoro misura 6 e 9 cm dal punto di divisione = 127 (135-147-155-163-172-179) maglie. Quando il lavoro misura 11 (13-16-19-22-25-28) cm dal punto di divisione, aumentare 9 (9-9-9-9-8-9) maglie in modo uniforme sul giro successivo = 136 (144-156-164-172-180-188) maglie. Passare ai ferri circolari n° 3 mm. Lavorare a coste (= 2 maglie diritto / 2 maglie rovescio) per 4 cm. Poi intrecciare con diritto su diritto e rovescio su rovescio. Tutto il maglione misura circa 34 (37-41-45-49-53-57) cm, misurato dalla spalla. MANICA: Riportare le maglie da un fermamaglie sui ferri a doppia punta n° 4 mm e riprendere 1 maglia in ognuna delle 8 maglie avviate sotto la manica = 50 (54-58-62-62-66-68) maglie. Inserire 1 segnapunti al centro di queste 8 maglie (= centro sotto la manica). ORA MISURARE IL LAVORO DA QUI! Lavorare a maglia rasata in tondo con il senape. Quando la manica misura 1 cm dal punto di divisione, diminuire 2 maglie al centro sotto la manica – leggere il SUGGERIMENTO PER LE DIMINUZIONI. Diminuire in questo modo ogni 1½ (2-2-2½-3-3½-3½) cm per un totale di 6 (6-8-8-8-8-9) volte = 38 (42-42-46-46-50-50) maglie. Quando la manica misura 14 (16-21-24-28-31-35) cm dal punto di divisione, diminuire 2 maglie in modo uniforme sul giro = 36 (40-40-44-44-48-48) maglie. Passare ai ferri a doppia punta n° 3 mm e lavorare a coste in tondo (= 2 maglie diritto / 2 maglie rovescio) per 4 cm o fino alla lunghezza desiderata. Poi intrecciare con diritto su diritto e rovescio su rovescio. La manica misura circa 18 (20-25-28-32-35-39) cm in totale dal punto di divisione. Lavorare l’altra manica nello stesso modo. |
||||||||||
Spiegazioni del diagramma |
||||||||||
|
||||||||||
|
||||||||||
|
||||||||||
|
||||||||||
|
||||||||||
Avete terminato questo modello?Allora taggate le vostre foto con #dropspattern #littlemissysweater o inviatele alla #dropsfan gallery. Avete bisogno di aiuto con questo modello?Troverete 27 video tutorial, una sezione per i commenti/domande e molto altro guardando il modello su www.garnstudio.com © 1982-2025 DROPS Design A/S. Ci riserviamo tutti i diritti. Questo documento, compreso tutte le sue sotto-sezioni, è protetto dalle leggi sul copyright. Potete leggere quello che potete fare con i nostri modelli alla fine di ogni modello sul nostro sito. |
||||||||||


Con oltre 40 anni di esperienza nel design di modelli di maglia e uncinetto, DROPS Design offre la più estesa collezione di modelli gratuiti su internet - tradotti in 17 lingue. Ad oggi vi possiamo fornire 314 cataloghi e 11822 modelli - 9093 dei quali sono tradotti in Italiano.
Ci stiamo impegnando molto per darvi il meglio che vi possiamo offrire in termini di maglia e uncinetto, ispirazioni e consigli così come filati di grande qualità ad un prezzo incredibile! Volete utilizzare i nostri modelli per qualcosa d'altro oltre al vostro uso personale? Potete leggere tutto ciò che è consentito nel testo sul Copyright in basso su tutte le pagine dei nostri modelli. Buon lavoro!
Lasciare un commento sul modello DROPS Children 32-7
Noi saremmo felici di ricevere i tuoi commenti e opinioni su questo modello!
Se vuoi fare una domanda, fai per favore attenzione a selezionare la categoria corretta nella casella qui sotto per velocizzare il processo di risposta. I campi richiesti sono indicati da *.