
Popular categories
Looking for a yarn?


Comments / Questions (136)
![]() KLA wrote:
KLA wrote:
Stilte et spørsmål tidligere som jeg håper dere kan hjelpe meg med :-)
30.07.2019 - 21:19DROPS Design answered:
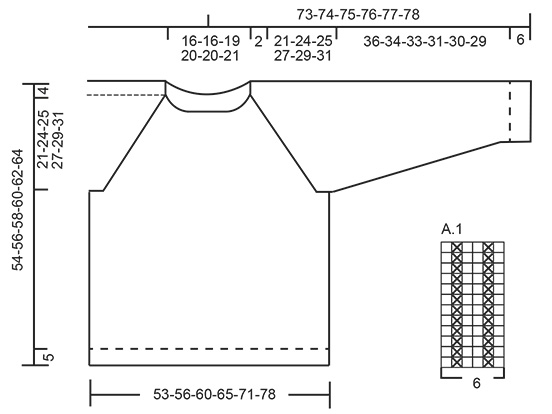
Hei KLA. A.1 er diagrammet nederst på siden, og dette strikkes over 6 masker i hver raglanlinje. Altså i hver overgang mellom bol og ermer. Du øker 1 maske på hver side av disse 6 maskene i hver A.1 annenhver omgang, som forklart. Kanskje kan det hjelp å sette 1 merke rett før og etter hver A.1 slik at du lettere holder oversikten over hvor det skal økes? God fornøyelse
31.07.2019 - 14:56
![]() KLA wrote:
KLA wrote:
Hei! Lurer bare på hva A1 symboliserer? Sliter med å forstå hvor det skal økes/markeres på raglanfellingen. Setter så pris på hjelp, da jeg er klar for å komme i gang :-D
30.07.2019 - 13:37
![]() Carla wrote:
Carla wrote:
Hello, before starting the body and separating the stitches for the sleeves, where do the raglan stithes go? to the body or the sleeves? or half on sleeves and half on body?
22.06.2019 - 05:52DROPS Design answered:
Dear Carla, the part of stitches from raglan line worked to the body/sleeves depends from the size, for ex. you will work 5-5-4-5-7-7 sts from raglan line to half back piece on dividing round. Make sure you have the correct number of sts increased on each piece and just work the dividing round as explained for your size. Happy knitting!
24.06.2019 - 07:21
![]() Nora wrote:
Nora wrote:
Jó napot! Elkészült a pulóverem, nagyon tetszik! A Drops Air fonallal csodás kötni, örülök,hogy kipróbálhattam, és máskor is szívesen kötök belőle valamit! Köszönöm!
13.06.2019 - 22:35DROPS Design answered:
Kedves Nora! Köszönjük, hogy megosztotta velünk a tapasztalatait. örülünk, hogy pulóvere jól sikerült. Örömmel látnánk, ha megosztaná a közösségi médiában #dropsfan taggel. További sikeres kézimunkázást!
21.06.2019 - 04:39
![]() Yolanda wrote:
Yolanda wrote:
Estoy haciendo el jersey en la talla L. Cuando dejó de aumentar para el raglán y sigo hasta los 27 cm.,en esas vueltas se continúa haciendo el diagrama A1 hasta que se divide la labor??... gracias por anticipado.
07.06.2019 - 15:54DROPS Design answered:
Hola Yolanda. Después de trabajar todos los aumentos continuamos con A.1 y punto jersey hasta completar las medidas del canesú (para la talla L son 27 cm)
09.06.2019 - 22:36
![]() Christiane wrote:
Christiane wrote:
Bonjour j'ai tricoté ce modèle. Il me semble bizarre de faire des augmentations à la fin juste avant les côtes. Tricoter une première fois puis enlever ses augmentations il tombait vraiment mieux.
04.06.2019 - 22:24DROPS Design answered:
Bonjour Christiane, on augmente avant les côtes pour éviter qu'elles ne resserrent le bas du pull - voir aussi ici. Bon tricot!
05.06.2019 - 10:18
![]() Gordon wrote:
Gordon wrote:
Hello, my sister is a UK size 10/12. What size pattern would you recommend I knit for her?
23.05.2019 - 22:57DROPS Design answered:
Dear Gordon, you will find all finished measurements in each size in the measurement chart - measured flat from side to side. Measure a similar garment she has and llike the shape and compare with those in the chart to find out the matching size. Read more about sizing here. Happy knitting!
24.05.2019 - 08:35
![]() Odile wrote:
Odile wrote:
Hello, Are the back and front necklines the same? I would like the front neckline to be lower than the back neckline for comfort. Should I do some adjustments, such as short rows? Thanks.
23.05.2019 - 16:46DROPS Design answered:
Dear Odile, that's right neckline is here the same on front and back piece. You can work some short rows to make the back neckline higher. Happy knitting!
24.05.2019 - 07:36
![]() Inge Elena Stage wrote:
Inge Elena Stage wrote:
Jeg er lige startet med at tage ud efter ribkantet. jeg kan ikke forstå, hvorfor jeg får så mange masker til ryggen allerede når jeg har strikket bare 3 omgange ud af de 20 der skal strikkes. Skal der ikke strikkes flere masker ret før A1 både på bagstykket og forstykket efterhånden som man strikker flere omgange? Der startes med 14 masker = halv ryg i str, S og 28 masker ret = forstykket. Synes der er noget der er undladt, På forhånd tak!
12.04.2019 - 11:02DROPS Design answered:
Hei Inge Elena. Før du begynner å øke til raglan har du 28 masker på for- og bakstykket og 4 masker på hvert erme. I hver overgang har du 6 masker i A.1. Du øker til raglan slik: 1 maske på hver side av A.1, annenhver omgang (= total 8 masker økt hver gang: 2 masker i hver side av for- og bakstykket, og 2 masker i hver side av hvert erme). Neste omgang strikkes kastene vridd, og så strikkes de videre i glattstrikk. Hver gang du øker vil du altså få 2 masker mer i glattstrikk på hver del. Etter første raglanøkning har du 30 masker på for- og bakstykket og 6 masker på hvert erme. Etter 20 økinger har du 108 masker mellom hver A.1 på for- og bakstykket. God fornøyelse
12.04.2019 - 12:11
![]() Sylwia wrote:
Sylwia wrote:
Hej!Dziekuje za szybka odpowiedz!
27.03.2019 - 10:48
|
|||||||
Carly Pullover#carlypullover |
|||||||
 |
 |
||||||
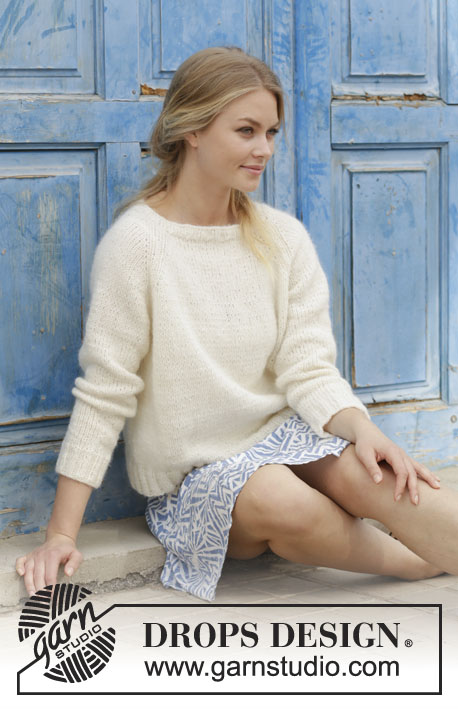
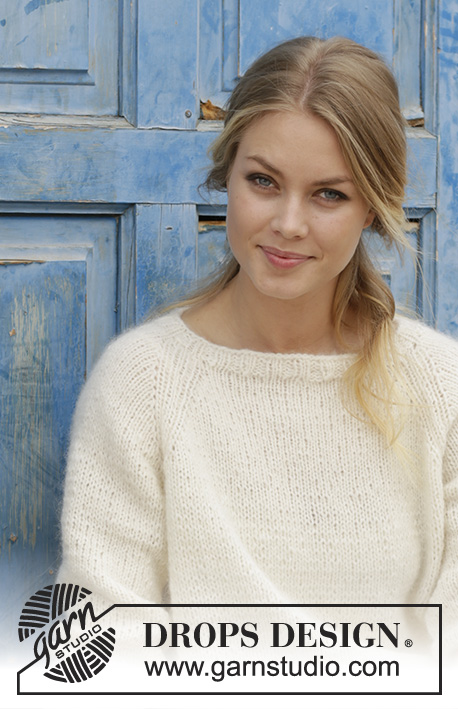
Knitted jumper with raglan, worked top down. Sizes S - XXXL. The piece is worked in DROPS Air.
DROPS 186-30 |
|||||||
|
INFORMATION FOR THE PATTERN: PATTERN: See diagram A.1. The diagram shows all the rows in the pattern seen from the right side. RAGLAN: Increase to raglan on each side of A.1 (= 8 stitches increased per round). Increase by making 1 yarn over, on the next round work the yarn over twisted to avoid a hole. INCREASE TIP (evenly spaced): To work out how to increase evenly, count the total number of stitches on the round (e.g. 168 stitches) and divide by the number of increases to be made (e.g. 24) = 7. In this example, increase by making 1 yarn over after every 7th stitch. On the next round, work the yarn overs twisted to avoid holes. DECREASE TIP (for sleeves): Decrease 1 stitch on each side of the marker thread as follows: Work until there are 3 stitches left before the marker thread, slip 1 stitch as if to knit, knit 1, pass the slipped stitch over the knitted stitch, knit 2 stitches (the marker thread sits in the middle of these 2 stitches) knit the next 2 stitches together. ---------------------------------------------------------- The piece is worked in the round with circular needle from mid back, top down. The sleeves are worked with short circular needle/double pointed needles. JUMPER: Cast on 80-84-88-96-96-104 stitches with circular needle size 4.5 mm and Air. Knit 1 round, then work rib (= knit 2 / purl 2) for 2 cm. The beginning of the round = mid back. Change to circular needle size 5.5 mm and work the next round as follows: Knit 15-16-17-18-18-20 stitches - AT THE SAME TIME as you increase 2-1-2-2-2-3 stitches evenly over these stitches, knit 10-10-10-12-12-12 stitches, knit 30-32-34-36-36-40 stitches – AT THE SAME TIME as you increase 4-2-4-4-4-6 stitches evenly over these stitches, knit 10-10-10-12-12-12 stitches, knit 15-16-17-18-18-20 stitches – AT THE SAME TIME as you increase 2-1-2-2-2-3 stitches evenly over these stitches = 88-88-96-104-104-116 stitches. REMEMBER THE KNITTING TENSION! The next round is worked as follows: Knit 14-14-16-17-17-20 stitches (=half back piece), A.1 (= 6 stitches), knit 4-4-4-6-6-6 stitches (= sleeve), A.1, knit 28-28-32-34-34-40 stitches (= front piece), A.1, knit 4-4-4-6-6-6 stitches (= sleeve), A.1, knit 14-14-16-17-17-20 stitches (= half back piece). Continue this pattern at the same time as you increase 1 stitch on each side of A.1 to RAGLAN – see description above. Increase every 2nd round a total of 20-23-23-26-28-30 times. After all the increases there are 248-272-280-312-328-356 stitches on the needle. Continue with pattern and stocking stitch (without increasing) until the piece measures 23-26-27-29-31-33 cm from the cast-on edge mid front. Work the next round as follows: Work 39-42-43-48-52-57 stitches (= half back piece), place the next 46-52-54-60-60-64 stitches on 1 thread (= sleeve), cast on 6-6-10-8-10-10 new stitches on the needle (= under the sleeve), knit 78-84-86-96-104-114 stitches (= front piece), place the next 46-52-54-60-60-64 stitches on 1 thread (= sleeve), cast on 6-6-10-8-10-10 new stitches on the needle (= under the sleeve), and work the remaining 39-42-43-48-52-57 stitches (= half back piece). BODY: = 168-180-192-208-228-248 stitches. Insert a marker. THE PIECE IS NOW MEASURED FROM HERE. Continue in the round with stocking stitch until the piece measures 25-24-25-24-24-24 cm. Knit 1 round where you increase 24-28-28-32-36-36 stitches evenly on round – read INCREASE TIP = 192-208-220-240-264-284 stitches. Change to circular needle size 4.5 mm and work rib (= knit 2 / purl 2) for 5 cm. Cast off with knit over knit and purl over purl - to avoid the cast-off edge being tight you can cast off with needle size 5.5 mm. The piece measures approx. 54-56-58-60-62-64 cm from the shoulder down. SLEEVE: The piece is worked in the round with short circular needle/double pointed needles. Place the 46-52-54-60-60-64 stitches from the thread on the one side of the piece on circular needle/double pointed needles size 5.5 mm and in addition cast on 6-6-10-8-10-10 new stitches mid under sleeve = 52-58-64-68-70-74 stitches. Insert 1 marker thread in the middle of the new stitches. THE PIECE IS NOW MEASURED FROM HERE. Work stocking stitch in the round. When the piece measures 2 cm decrease 2 stitches mid under sleeve – read DECREASE TIP. Decrease every 4-3-2-2-1½-1½ cm a total of 9-11-14-15-15-16 times = 34-36-36-38-40-42 stitches. When the piece measures 36-34-33-31-30-29 cm knit 1 round where you increase 6-4-8-6-8-6 stitches evenly on round = 40-40-44-44-48-48 stitches. Change to double pointed needles size 4.5 mm and work rib (= knit 2 / purl 2). Continue with rib for 5 cm, then cast off with knit over knit and purl over purl. The sleeve measures approx. 42-40-39-37-36-35 cm. Work the other sleeve in the same way. ASSEMBLY: Sew the openings under the sleeves. |
|||||||
Diagram explanations |
|||||||
|
|||||||
 |
|||||||
Have you finished this pattern?Tag your pictures with #dropspattern #carlypullover or submit them to the #dropsfan gallery. Do you need help with this pattern?You'll find 25 tutorial videos, a Comments/Questions area and more by visiting the pattern on garnstudio.com. © 1982-2026 DROPS Design A/S. We reserve all rights. This document, including all its sub-sections, has copyrights. Read more about what you can do with our patterns at the bottom of each pattern on our site. |
|||||||


With over 40 years in knitting and crochet design, DROPS Design offers one of the most extensive collections of free patterns on the internet - translated to 17 languages. As of today we count 324 catalogues and 12290 patterns translated into English (UK/cm). 12290
We work hard to bring you the best knitting and crochet have to offer, inspiration and advice as well as great quality yarns at incredible prices! Would you like to use our patterns for other than personal use? You can read what you are allowed to do in the Copyright text at the bottom of all our patterns. Happy crafting!
Post a comment to pattern DROPS 186-30
We would love to hear what you have to say about this pattern!
If you want to leave a question, please make sure you select the correct category in the form below, to speed up the answering process. Required fields are marked *.