
Popular categories
Looking for a yarn?


Comments / Questions (18)
![]() Veronique wrote:
Veronique wrote:
Quel laine peux ton prendre a la place de votre laine décrite dans votre patron
24.03.2026 - 23:54DROPS Design answered:
Bonjour Véronique, utilisez le convertisseur pour voir les alternatives possibles et les quantités correspondantes, cliquez ensuite sur le nom de chaque laine pour afficher leur nuancier et choisir les couleurs. Bon tricot!
25.03.2026 - 07:35
![]() Alice Augustsson wrote:
Alice Augustsson wrote:
Hej! Jag stickar Dear go My heart cardigan. På sticktips 1 står det att man ska sticka bottenfärgen i mönsterbården över de fem framkantsmaskorna. Hur ska man göra det? Vänliga hälsningar Alice
27.04.2025 - 07:30DROPS Design answered:
Hei Alice. Da strikker du bare de 5 kantmaskene med hovedfargen, først med natur og deretter med gråblå, se evnt nærbildet. mvh DROPS Design
05.05.2025 - 09:08
![]() Suzanne Crosier wrote:
Suzanne Crosier wrote:
I'm going to make Dear To My Heart Cardigan. I want to knit in the round so I'm going to add a steek this is first time for me steeking. Would I eliminate garter stitches and add stitches for steek then add button placket afterwards? Can I start steek at neck and end at ribbing? Is there anything else I need to remember or do to adjust pattern? It would have been helpful to include instructions on how to steek this pattern since most people prefer knitting in the round
07.02.2022 - 20:36DROPS Design answered:
Dear Mrs Crosier, this video might be the one that could help you to adapt the jacket as you liked it to be. Happy knitting!
08.02.2022 - 08:52
![]() Hatice wrote:
Hatice wrote:
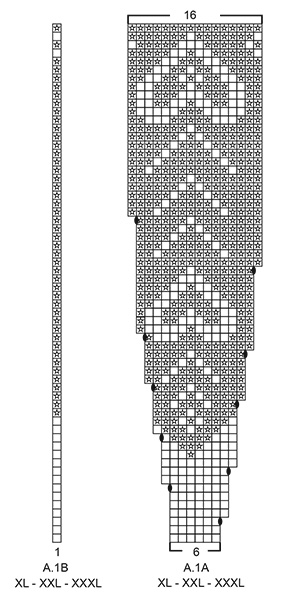
Hi, I can not progress because of increasing rows, I don't know why but I try over and over again,count every row and stitches several times but could'nt find my mistake. I don't remember how many times raveled it. and please explain what is the A.B1 one-stitched column and how am I supposed to use it. many thanks, love your everything:)
15.10.2021 - 00:04DROPS Design answered:
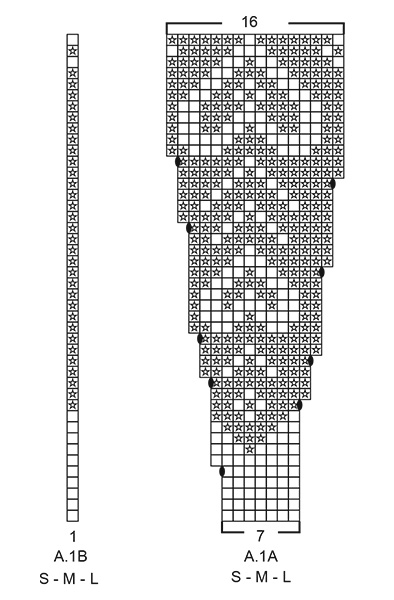
Dear Hatice, A.1B allows the pattern to be symmetrical on each side, in other words, A.1B is the same as the first stitch in A.1A so that pattern starts and ends the same way; you repeat A.1A the number of times stated for your size and end the row from RS with A.1B before the front band sts. From WS work A.1B and repeat then A.1B reading from left towards the right. Hope this will help, happy knitting!
15.10.2021 - 07:55
![]() Vaidehi wrote:
Vaidehi wrote:
What does stockinette st in nordic pattern mean?
28.08.2021 - 13:38DROPS Design answered:
Dear Vaidehi, stotckinett stitch knitted on the round is knitted stitches in each row. When knitted back and forth it is knit stitches from the right side and purl stitches on teh wrong side. Happy Knitting!
28.08.2021 - 18:31
![]() Christel wrote:
Christel wrote:
Hej Nu har jag kommit till den första ökningen på fram- och bakstycket. Det står ”Öka så med 8 cm mellanrum totalt 3 ggr i varje sida”. Undrar hur denna mätning ska ske? Jag är helt med på den första efter 4 cm men om den andra ökningen ska ske efter 8 cm från delningen då är det bara 4 cm mellan 1:a och 2:a ökningen. Hur ska jag mäta? Med vänlig hälsning Christel
29.01.2020 - 19:34DROPS Design answered:
Hej Du gör den första ökningen när arbetet mäter 4 cm, nästa gör du 8 cm efter den första ökningen och den sista ökningen gör du 8 cm efter den andra ökningen. Lycka till!
30.01.2020 - 13:27
![]() Maiken wrote:
Maiken wrote:
Hei. Målene på genseren, der det står 45-48-52-57-64-68, er det midje eller bryst?
24.12.2019 - 15:19DROPS Design answered:
Hej Maiken, det er brystvidden, du tager målet og ganger med 2. 45x2 = 90 cm i small. God fornøjelse!
15.01.2020 - 14:39
![]() Christel wrote:
Christel wrote:
Hej 1 Kan jag välja en annan typ av ökning på oket om jag tycker att den blir snyggare/bättre och vilken rekommenderar ni i så fall? 2 Jag tycker att det blir snyggare att ha resårstickning i början på kanterna, kan jag ändå ha 5 maskor eller ska jag öka?
15.12.2019 - 07:19DROPS Design answered:
Hej Christel, Ja det är bara att välja vilken ökning du tycker bäst om. Och vilken kant du vill ha. Nej du behöver inte ändra på antal maskor om du vill ha resår. Lycka till :)
17.12.2019 - 13:56
![]() Erica Branchi wrote:
Erica Branchi wrote:
Molto bello ed originale il ricamo a cuore!!!
15.01.2019 - 09:55
![]() Lisbeth G Tørvi wrote:
Lisbeth G Tørvi wrote:
Denne jakka var veldig fin🤗 Kan godt tenke meg å strikke denne👍
12.01.2019 - 15:05
|
||||||||||
Dear to my Heart#deartomyheartcardigan |
||||||||||
 |
 |
|||||||||
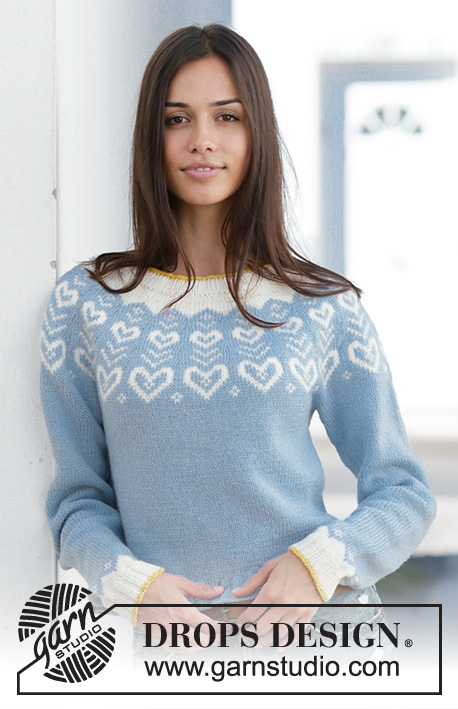
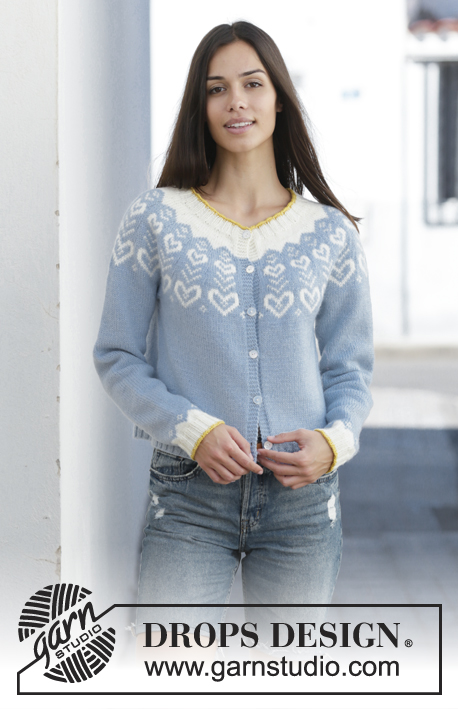
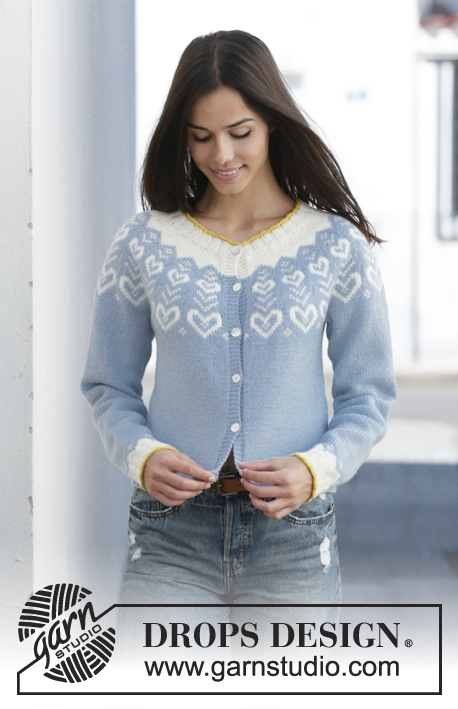
Knitted jacket in DROPS Merino Extra Fine. The piece is worked top down with round yoke and Nordic pattern. Sizes S - XXXL.
DROPS 199-6 |
||||||||||
|
------------------------------------------------------- EXPLANATIONS FOR THE PATTERN: ------------------------------------------------------- RIDGE/GARTER STITCH (worked back and forth): Knit all rows. 1 ridge in height = Knit 2 rows. ELEVATION (back of neck): To make the jacket slightly higher at the back of the neck when working the yoke, work an elevation as described below. Skip this section if you do not want an elevation. Insert 1 marker in the middle of the row (in sizes S, XL, XXL and XXXL the marker is inserted in the middle stitch on the row). Start from the right side with off white and knit 14-15-16-16-17-18 stitches past the marker/stitch with marker, turn, tighten strand and purl 29-30-32-33-35-37stitches. Turn, tighten strand and knit 43-45-48-49-52-55 stitches, turn, tighten strand and purl 57-60-64-65-69-73 stitches. Turn, tighten strand and knit 71-75-80-81-86-91 stitches, turn, tighten strand and purl to end of row (band is worked in garter stitch). Then work YOKE as described in text. PATTERN: See diagrams A.1 and A.2. Choose diagram for your size (applies to A.1). The diagrams show all the rows in the pattern seen from the right side. INCREASE TIP-1 (evenly spaced): To work out how to increase evenly, count all the stitches on the needle (e.g. 120 stitches), minus bands (e.g. 10 stitches) and divide the remaining stitches by the number of increases to be made (e.g. 17) = 6.5. In this example increase by making 1 yarn over after alternately each 6th and 7th stitch (do not increase on bands). On the next row work the yarn overs twisted to avoid holes. INCREASE TIP-2 (for sides of body): All increases are worked from the right side! Start 3 stitches before the marker thread, make 1 yarn over, knit 6 (marker thread sits in the middle of these 6 stitches), make 1 yarn over (= 2 stitches increased). Increase the same way at the second marker thread. On the next row (wrong side) purl the yarn overs twisted to avoid holes. Then work the new stitches in stocking stitch DECREASE TIP (for mid under sleeves): Start 3 stitches before the marker thread, knit 2 together, knit 2 (marker thread sits between these 2 stitches), slip 1 stitch as if to knit, knit 1 and pass the slipped stitch over the knitted stitch (= 2 stitches decreased). KNITTING TIP-1 (for bands): When working pattern with 2 colours, work the 5 stitches in both bands with the background colour of the pattern. KNITTING TIP-2: To avoid the knitting tension becoming tighter when working pattern, it is important not to have tight strands at the back. You can increase the needle size when working pattern if this is a problem. BUTTONHOLES: Work buttonholes on the right band (when garment is worn). Work from the right side when there are 3 stitches left on the row as follows: Make 1 yarn over, knit 2 together and knit the last stitch. On the next row (wrong side), knit the yarn over to leave a hole. The first buttonhole is worked when the rib in the neck measures approx. 1½-2 cm. Then work the other 5-5-6-6-6-6 buttonholes with 8-8½-7½-7½-8-8½ cm between each. CASTING-OFF TIP: To avoid the cast-off edge being tight, you can cast off with a larger needle size. Or make 1 yarn over after approx. each 8th stitch at the same time as you cast off (yarn overs cast off as normal stitches). ------------------------------------------------------- START THE PIECE HERE: ------------------------------------------------------- JACKET - SHORT OVERVIEW OF THE PIECE: Neck and yoke are worked back and forth with circular needle from mid front and top down. The yoke is divided for sleeves and body. The body is continued back and forth with circular needle from mid front, top down. The sleeves are worked in the round with short circular needle/double pointed needles, top down. NECK: Cast on 120-124-128-132-136-140 stitches (including 5 band stitches on each side towards mid front) with circular needle size 3 mm and mustard. Purl 1 row (= wrong side). Change to off white and work the next row as follows from the right side: 5 band stitches in GARTER STITCH – read description above, * knit 2, purl 2 *, work from *-* until there are 7 stitches left on the row, knit 2 and finish with 5 band stitches in garter stitch. Continue this rib for 3 cm. Remember BUTTONHOLE on right band – read description above. When the rib is finished changed to circular needle size 4 mm. Knit 1 row from the right side where you increase 17-20-30-17-25-27 stitches evenly spaced – read INCREASE TIP-1 = 137-144-158-149-161-167 stitches. Purl 1 row from the wrong side (bands are worked in garter stitch). Now you can work an ELEVATION in the back of the neck – read description above. If you do not want an elevation, go straight to YOKE. YOKE: Read KNITTING TIP-1 and KNITTING TIP-2! The first row is worked as follows from the right side: Work 5 band stitches in garter stitch with off white, work A.1A until there are 6 stitches left on row (= 18-19-21-23-25-26 repeats of 7-7-7-6-6-6 stitches), work A.1B (= 1 stitch) and finish with 5 band stitches in garter stitch and off white. Continue this pattern and increase as shown in the diagram. REMEMBER THE KNITTING TENSION and remember BUTTONHOLES on right band – read description above. When A.1 has been completed there are 299-315-347-379-411-427 stitches on the row. Continue with stocking stitch and grey blue, with 5 band stitches in garter stitch on each side until the piece measures 19-21-23-25-27-29 cm from the cast-on edge mid front. The next row is worked as follows: Work 48-51-55-60-66-69 stitches as before (= front piece), place the next 59-61-69-75-79-81 stitches on 1 thread for sleeve, cast on 8-10-10-10-12-16 new stitches on the needle (= in side under sleeve), work 85-91-99-109-121-127 stitches as before (= back piece), place the next 59-61-69-75-79-81 stitches on 1 thread for sleeve, cast on 8-10-10-10-12-16 new stitches on the needle (= in side under sleeve) and work the remaining 48-51-55-60-66-69 stitches as before (= front piece). Body and sleeves are finished separately. THE PIECE IS NOW MEASURED FROM HERE! BODY: = 197-213-229-249-277-297 stitches. Insert 1 marker thread 52-56-60-65-72-77 stitches in from each side (= sides of body). There are 93-101-109-119-133-143 stitches between the marker threads on the back piece. Allow the marker threads to follow your work onwards; they will be used when increasing in the sides. Work stocking stitch back and forth with grey blue and with 5 band stitches in garter stitch on each side towards mid front. When the piece measures 4 cm from the division in all sizes, increase 1 stitch on each side of both marker threads – read INCREASE TIP-2 (= 4 stitches increased). Increase like this every 8 cm a total of 3 times on each side = 209-225-241-261-289-309 stitches. Continue working until the piece measures 22 cm from the division in all sizes (or to desired length; there is 3 cm left to finished length). Purl 1 row from the wrong side (bands worked in garter stitch) where you increase 39-39-47-47-55-63 stitches evenly spaced = 248-264-288-308-344-372 stitches. This is done to avoid the rib being tight. Change to circular needle size 3 mm and work the next row from the right side as follows: 5 band stitches in garter stitch, * knit 2, purl 2 *, work from *-* until there are 7 stitches left on row, knit 2 and finish with 5 band stitches in garter stitch. Continue this rib for 3 cm. Cast off with garter stitch over garter stitch, knit over knit and purl over purl – read CASTING-OFF TIP! The jacket measures approx. 48-50-52-54-56-58 cm from the shoulder down. SLEEVE: Place the 59-61-69-75-79-81 stitches from the thread on the one side of the piece on circular needle/double pointed needles size 4 mm and knit up 1 stitch in each of the 8-10-10-10-12-16 stitches cast on under the sleeve = 67-71-79-85-91-97 stitches. Insert 1 marker thread in the middle of the 8-10-10-10-12-16 stitches under the sleeve. Allow the marker thread to follow your work onwards; it will be used when decreasing mid under sleeve. Start the round by the marker thread and work stocking stitch in the round with grey blue. When the piece measures 2 cm from the division in all sizes, decrease 2 stitches mid under sleeve – read DECREASE TIP! Decrease like this every 4½-3½-2½-2½-2-1½ cm a total of 9-11-14-14-17-20 times = 49-49-51-57-57-57 stitches. Continue working until the piece measures 40-39-37-36-34-33 cm from the division (or to desired length; there is 6 cm left to finished length, decreases are finished mid under sleeve and there are shorter measurements in larger sizes due to wider neck and longer yoke). Knit 1 round with grey blue where you decrease 1-1-3-1-1-1 stitches evenly spaced = 48-48-48-56-56-56 stitches. Work A.2 in the round (= 6-6-6-7-7-7 repeats of 8 stitches). When A.2 is finished knit 1 round with off white where you decrease 0-0-0-4-4-0 stitches evenly spaced = 48-48-48-52-52-56 stitches. There is now 3 cm left to finished length; if you want a longer sleeve continue with off white to desired length. Change to double pointed needles size 3 mm. Work rib in the round (= knit 2 / purl 2) for 3 cm. Change to mustard and work 1 round of rib. Then cast off with mustard and knit over knit and purl over purl – read CASTING-OFF TIP! The sleeve measures approx. 46-45-43-42-40-39 cm from the division. Work the other sleeve in the same way. ASSEMBLY: Sew buttons onto left band. |
||||||||||
Diagram explanations |
||||||||||
|
||||||||||
 |
||||||||||
 |
||||||||||
 |
||||||||||
Have you finished this pattern?Tag your pictures with #dropspattern #deartomyheartcardigan or submit them to the #dropsfan gallery. Do you need help with this pattern?You'll find 32 tutorial videos, a Comments/Questions area and more by visiting the pattern on garnstudio.com. © 1982-2026 DROPS Design A/S. We reserve all rights. This document, including all its sub-sections, has copyrights. Read more about what you can do with our patterns at the bottom of each pattern on our site. |
||||||||||


With over 40 years in knitting and crochet design, DROPS Design offers one of the most extensive collections of free patterns on the internet - translated to 17 languages. As of today we count 324 catalogues and 12290 patterns translated into English (UK/cm). 12290
We work hard to bring you the best knitting and crochet have to offer, inspiration and advice as well as great quality yarns at incredible prices! Would you like to use our patterns for other than personal use? You can read what you are allowed to do in the Copyright text at the bottom of all our patterns. Happy crafting!
Post a comment to pattern DROPS 199-6
We would love to hear what you have to say about this pattern!
If you want to leave a question, please make sure you select the correct category in the form below, to speed up the answering process. Required fields are marked *.