
Popular categories
Looking for a yarn?


Comments / Questions (57)
![]() Patricia THIOT wrote:
Patricia THIOT wrote:
J'ai oublié un mot dans ma question 🤔 j'ai fais aussi les 2 rangs en jaune et je dois intégrer le gris foncé... Je suis sur le devant de l'ouvrage...
16.10.2019 - 14:07DROPS Design answered:
Bonjour Mme Thiot, cette vidéo montre pour un autre modèle et donc un autre diagramme, comment on doit tricoter les mailles dans un point mosaïque sur l'endroit et sur l'envers (sans les augmentations, faites-les dans la couleur des mailles du rang). Bon tricot!
17.10.2019 - 09:15
![]() Patricia THIOT wrote:
Patricia THIOT wrote:
Bonjour, tout d'abord merci pour votre site que je trouve très sympa avec des explications très claires sauf sur ce modèle, je ne comprends pas bien. Je viens de faire mes 2 rangs mousse en gris perle et aussi les 2 rangs mousse et je dois intégrer le gris foncé. La 1ere maille est gris foncé (un carré noir) et ensuite doublé jetée mais en quelle couleur ? Pareil pour le milieu du châle avec les autres jetées...
16.10.2019 - 08:36DROPS Design answered:
Bonjour Mme Thiot, dansn A.3-A.4-A.5, vous commencez le point mosaïque (= 6ème rang du diagramme) en gris foncé (= 1ère m de A.3), vous glissez toutes les mailles avec une étoile et tricotez uniquement celles marquées en gris foncé, les jetés se font donc en gris foncé, et seront tricotés en gris foncé sur l'envers. Au rang suivant sur l'endroit, vous tricotez en jaune d'or uniquement les mailles avec une étoile, glissez les autres mailles, les jetés se font sur l'endroit en jaune d'or et se tricotent en jaune d'or sur l'envers; et ainsi de suite, en fonction de la couleur de A.3. Bon tricot!
17.10.2019 - 09:14
![]() Tine wrote:
Tine wrote:
Ik begrijp 2 dingen niet 1) hoe maak ik de meerderingen in de eerste rij van het mozaïekpatroon? ze staan tussen gele (afgehaalde) steken, neem ik dan een lus op tussen de afgehaalde steen en brei ik ze teruggaand met antraciet? 2) de eerste rij mozaïekpatroon brei ik met antraciet, de tweede rij met oker dus dan haal ik de antraciet steken af, maar op die rij zijn er meer donkere dan gele steken, dus die kan ik toch niet afhalen? in de video komt dit niet voor dus helpt niet
20.09.2019 - 13:12DROPS Design answered:
Dag Tine,
De meerderingen zijn verwerkt in het telpatroon in de vorm van omslagen Dus niet de lus opnmen tussen de afgehaalde steken. De meerderingen worden aangegeven met een staand ovaal symbool tussen 2 steken. Bij een open ovaal maak je 2 omslageen en op de volgende naald brei je 1 omslag en laat je de nadere vallen. Let erop dat de telpatronen anders zijn dan normaal; elke naald in deze telpatronen staat gelijk aan 2 gebreide naalden. (Zie uitleg bovenaan bij 'MOZAÏEKPATROON)
23.09.2019 - 10:29
![]() Helene Klippenstein wrote:
Helene Klippenstein wrote:
Liebes Anleitungsteam! Ich habe eine Frage zum Bereich A.X. Zuerst stricke ich in dunkel Grau und hebe die Maschen in Ocker nur ab. Bei der nächsten Reiche stricke ich in Ocker, aber wie kann ich die Masche von der unteren Reihe in dunkel Grau abheben, wenn da Ocker ist? Liebe Grüße
07.09.2019 - 16:31DROPS Design answered:
Liebe Frau Klippenstein, bei A.X stricken Sie nur die maschen mit der Farben in A.X gezeigt, dh, Sie stricken zuerst nur die Maschen mit dunkel grau, dann stricken Sie nur die Maschen mit ocker gezeichnet (die anderen Maschen im dunkel grau im diagram sollen abgehoben werden, auch wenn Sie früher mit Oker gestrickt waren). Viel Spaß beim stricken!
09.09.2019 - 08:24
![]() Lena wrote:
Lena wrote:
Vedrørende aflukningstips. Der skrives at man laver omslag over omslagene fra forrige pind - menes der at der laves omslag mellem alle masker - som en af jeres instruktionsvideoer viser - eller kun over de ekstra masker man laver - 2 i start af pind, 1 før og efter midtermasken samt 2 til sidst på retpinden. På forhånd tak for hjælpen.
22.04.2019 - 15:36DROPS Design answered:
Hei Lena. Lag kast på samme sted som siste pinne i diagram A.12 og A.13 - hullmønsteret. God fornøyelse
30.04.2019 - 14:57
![]() Henna wrote:
Henna wrote:
En osannut ohjeen mukaisesti tehda mosaiikkikuvion silmukoita jotka nostetaan neulomatta. Luin ohjeen monesti enka ymmartanyt. Muutoin ohje selkea.
24.03.2019 - 07:08DROPS Design answered:
Hei, lähin DROPS käsityöliike pystyy auttamaan sinua paikan päällä.
11.04.2019 - 17:15
![]() Carmen wrote:
Carmen wrote:
Puedo yo hacer este Chal en redondo ? Quiero decir que no caiga en pico la parte de atrás. Un saludo. Carmen
23.03.2019 - 15:35DROPS Design answered:
Hola Carmen. Para trabajar este chal en forma de medialuna tienes que modificar el diagrama. Mira en nuestra colección de chales para tomar referencia.
24.03.2019 - 20:36
![]() Claire wrote:
Claire wrote:
Merci pour votre réponse, mais je crois que je ne comprends toujours pas, désolée. Cela veut-il dire que au rang 7, par exemple, dans le diagramme A4B, on doit tricoter une maille jaune, glisser une maille jaune, puis glisser une maille grise, puis glisser une maille jaune à nouveau ? En effet je ne vois pas comment glisser trois mailles jaunes quand j'ai des mailles grises au rang précédent. Ou alors est-ce que j'ai mal compris le rang précédent ? Merci d'avance
13.03.2019 - 17:23DROPS Design answered:
Bonjour Claire, dans A.4B, vous tricotez 1 m jaune (= étoile) et glissez les 3 m suivantes sans les tricoter (= comme dans A.4A). Bon tricot!
14.03.2019 - 09:44
![]() Claire wrote:
Claire wrote:
Bonjour, je ne comprends pas quelque chose dans le point mosaïque. Au 7eme rang du diagramme A3/A4/A5, on doit faire un rang en tricottant les mailles jaunes et en glissant les mailles grises (car la couleur de A3 est le jaune) . Or, on doit parfois glisser 3 mailles grises alors que ce sont des mailles jaunes qui se présentent. En effet, au 6ieme rang on avait 3 mailles jaunes pour une maille grise et au 7eme on a 3 mailles grises pour une maille jaune. Pourriez-vous m'expliquer ? Merci !
13.03.2019 - 15:57DROPS Design answered:
Bonjour Claire, au 7ème rang de A.3, vous tricotez en coloris B = jaune d'or. Dans les diagrammes A.4- A.5 seules les mailles en jaune d'or seront tricotées, les autres mailles seront glissées. Bon tricot!
13.03.2019 - 16:12
![]() Vv wrote:
Vv wrote:
Hei, jeg forstår ikke rad to av AX: hvis farge A bare skal løftes av fra forrige pinne, hvordan kan jeg få tre masker i farge A når det bare var en på forrige pinne?
03.02.2019 - 10:20DROPS Design answered:
Hei Vv. Da løfter du disse maskene løst av (uansett hvilken farge de er) slik at de neste omgang kan strikkes med farge A. Altså på omgang 7 løfter du løst av 1 oker, 1 mørk grå, 1 oker. God fornøyelse.
08.02.2019 - 09:31
|
|||||||||||||||||||||||||||||||||||||
Nordic Romance#nordicromanceshawl |
|||||||||||||||||||||||||||||||||||||
 |
 |
||||||||||||||||||||||||||||||||||||
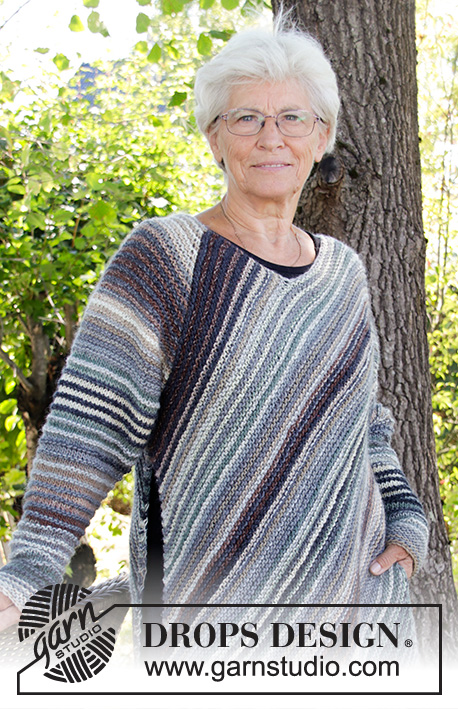
Knitted shawl in DROPS Nord. The piece is worked top down with garter stitch, mosaic pattern and wave pattern.
DROPS 195-5 |
|||||||||||||||||||||||||||||||||||||
|
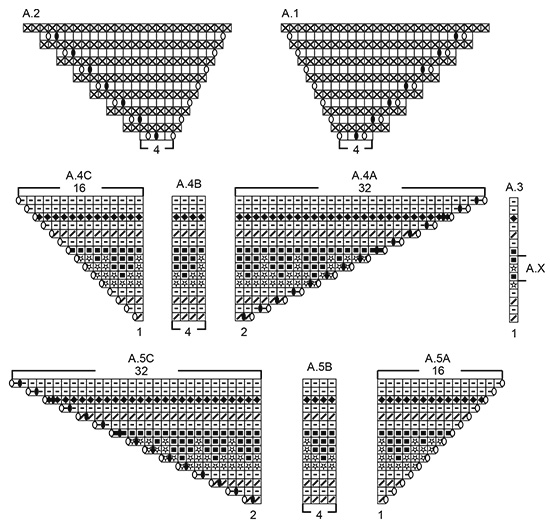
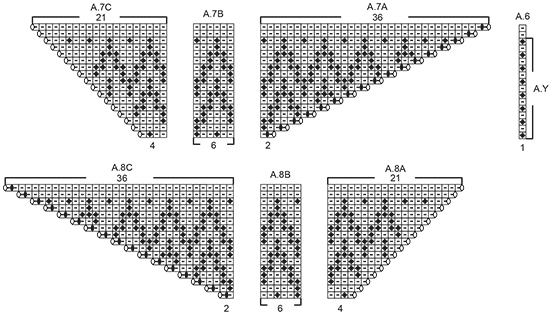
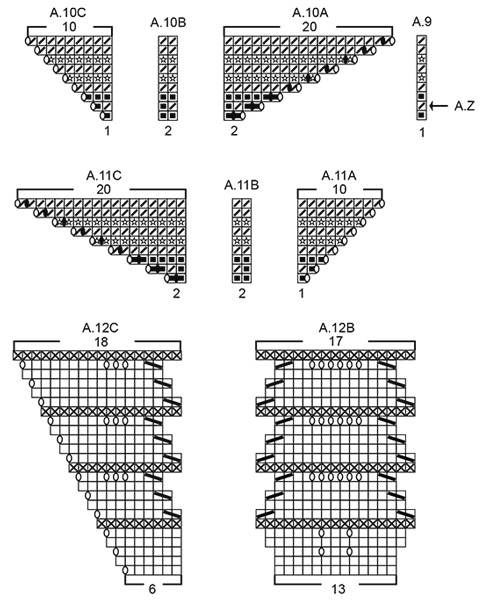
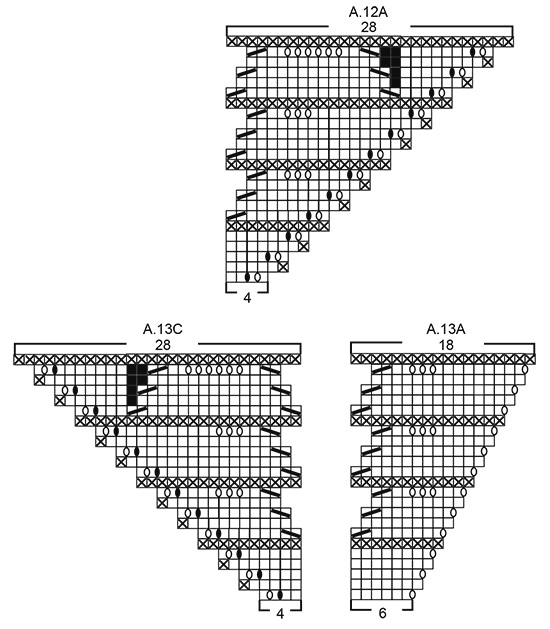
EXPLANATIONS FOR THE PATTERN: ------------------------------------------------------- RIDGE/GARTER STITCH (worked back and forth): 1 ridge = Knit 2 rows. INCREASE IN ONE-COLOURED GARTER STITCH SECTION: See diagrams A.1 and A.2. Each row in the diagrams is equivalent to one row worked. The diagrams show all the rows in the pattern seen from the right side. INCREASE TIP (evenly spaced): To work out how to increase evenly, count the total number of stitches on the needle (e.g. 261 stitches), minus the mid-stitch (= 1 stitch) and divide the remaining stitches by 2 = 130 stitches on each side of the mid-stitch. Then divide 130 stitches by the number of increases to be made before/after the mid-stitch (e.g. 3) = 43.3. In this example, increase by making 1 yarn over after approx. each 43rd stitch before the mid-stitch. Increase in the same way after the mid-stitch. On the next row knit the yarn overs twisted to avoid holes. CASTING-OFF TIP: So that the cast-off edge is not tight you can make 1 yarn over AT THE SAME TIME as casting off. Make 1 yarn over above all the yarn overs from the previous row, the yarn overs are then cast off as normal stitches. Make sure that you do not tighten the strand while casting off. If the cast-off edge is still tight, you can cast off with a size larger needle. MOSAIC PATTERN: See diagrams A.3 to A.11 and read description of the technique below. Each row in these diagrams is equivalent to 2 rows worked. I.e. from the right side the diagram is worked from right to left with increases as shown in the diagrams and from the wrong side you work the same row from left to right, but without the increases (i.e. increases are only done from the right side). On all rows from the right side, keep the strand at the back of the piece (i.e. on the wrong side) when a stitch is slipped. On all rows from the wrong side, keep the strand in front of the piece (i.e. towards you and still on the wrong side) when a stitch is slipped. Make sure the strands are not tight at the back of the piece! To keep track of the pattern, you can insert a marker between each pattern-repeat on A.4B/A.5B. A.3, A.6 and A.9 = start-stitch and end-stitch. This stitch is worked in the colour shown by the symbol, AT THE SAME TIME the symbol tells you how the pattern row is worked in A.X, A.Y and A.Z. A.X, A.Y and A.Z are sections which show the rows the mosaic pattern is worked on. On the other rows in A.4/A.5, A.7/A.8 and A.10/A.11 (i.e. the one-coloured rows) you work 1 ridge back and forth over all stitches without slipping stitches (mid-stitch always worked in stocking stitch). SECTION A.X: On each row of the pattern in A.3 which has a square with a small, black square inside (i.e. colour A), all stitches with colour A in A.4 and A.5 are knitted and all stitches with colour B are slipped. On each row of pattern in A.3 which has a square with an empty star inside (colour B), all stitches with colour B in A.4 and A.5 are knitted and all stitches with colour A are slipped. SECTION A.Y: On each row of pattern in A.6 which has a square with a small, black diamond inside (i.e. colour C), all stitches with colour C in A.7 and A.8 are knitted and all stitches with colour D are slipped. On each row of pattern in A.6 which has a square with a small, horizontal line inside (colour D), all stitches with colour D in A.7 and A.8 are knitted and all stitches with colour C are slipped. SECTION A.Z: On this row of pattern in A.9 which starts with a square with a diagonal line inside (i.e. colour E), all stitches with colour E in A.10 and A.11 are knitted and all stitches with colour A are slipped. WAVE PATTERN: See diagrams A.12 and A.13. Each row is equivalent to 1 row worked. The diagrams show all the rows in the pattern seen from the right side. ------------------------------------------------------- START THE PIECE HERE: ------------------------------------------------------- SHAWL - SHORT OVERVIEW OF THE PIECE: The piece is worked back and forth with circular needle (so that you have room for all stitches) and worked top down. Always increase 1 stitch on each side of the mid-stitch and 2 stitches in each side of each row from the right side as described in the text (= 6 stitches increased on each increase row). At the beginning of the shawl a section is worked in one-colour garter stitch. Then you work mosaic pattern. To finish an edge is worked in wave pattern. It is important to follow the diagrams carefully. The mosaic pattern itself is worked in garter stitch, but the pattern is not worked in normal garter stitch - it is made by by slipping stitches. Read description for Mosaic pattern before working it. Be aware that each row in the diagrams for the mosaic pattern (A.3 to A.11) is equivalent to 1 ridge (i.e. 2 rows). In the other diagrams (A.1, A.2, A.12 and A.13) 1 row in the diagram = 1 row worked. SHAWL: Cast on 5 stitches with circular needle size 3.5 mm and grey. The first 2 rows are worked as follows: ROW 1 (= right side): Work 1 edge stitch in GARTER STITCH – read description above, 1 yarn over, 1 stitch in stocking stitch, 1 yarn over, 1 stitch in stocking stitch, 1 yarn over, 1 stitch in stocking stitch, 1 yarn over and 1 edge stitch in garter stitch. ROW 2 (= wrong side): 2 edge stitches in garter stitch, purl until there are 2 stitches left on the row and finish with 2 edge stitches in garter stitch = 9 stitches on needle. Then work A.1 and A.2 as follows: Work A.1 over the first 4 stitches, work 1 stitch in stocking stitch (= mid-stitch – this stitch is worked in stocking stitch to finished length, irrespective of how the other stitches are worked), work A.2 over the last 4 stitches. REMEMBER THE KNITTING TENSION! Continue working and increasing as shown in A.1 and A.2 until you have worked a total of 43 ridges after the cast-on edge = 261 stitches on the needle. Work 1 more ridge with grey and increases in each side and in the middle as before, in addition increase 6 stitches evenly on row, i.e. increase 3 stitches before and 3 stitches after the mid-stitch - read INCREASE TIP. You have now worked a total of 44 ridges and there are 273 stitches on the needle. The piece measures approx. 19 cm from the middle out – measured in the knitting direction. Continue with MOSAIC PATTERN – read description above, i.e. the first row is from the right side as follows: Work A.3 (= 1 stitch), A.4A over 2 stitches, A.4B over the next 132 stitches (= 33 repeats of 4 stitches), work A.4C over 1 stitch, 1 stitch in stocking stitch (= mid-stitch – this stitch is worked in the background colour of the pattern stripe), work A.5A over 1 stitch, A.5B over the next 132 stitches (= 33 repeats of 4 stitches), work A.5C over 2 stitches and finish with A.3 (= 1 stitch). Continue this pattern, but remember that 1 row in each of these diagrams is equivalent to 1 ridge (2 rows). Make sure the strands at the back are not tight. When A.3, A.4 and A.5 have been completed in height there are 363 stitches on the needle. The next row is worked as follows from the right side: Work A.6 (= 1 stitch), A.7A over 2 stitches, A.7B over the next 174 stitches (= 29 repeats of 6 stitches), work A.7C over 4 stitches, 1 stitch in stocking stitch (= mid-stitch – this stitch is worked in the background colour of the pattern stripe), work A.8A over 4 stitches, A.8B over the next 174 stitches (= 29 repeats of 6 stitches), work A.8C over 2 stitches and finish with A.6 (= 1 stitch). When A.6, A.7 and A.8 have been completed in height there are 465 stitches on the needle. The next row is worked as follows from the right side: Work A.9 (= 1 stitch), A.10A over 2 stitches, A.10B over the next 228 stitches (= 114 repeats of 2 stitches), work A.10C over 1 stitch, 1 stitch in stocking stitch (= mid-stitch – this stitch is worked in the background colour of the pattern stripe), work A.11A over 1 stitch, A.11B over the next 228 stitches (= 114 repeats of 2 stitches), work A.11C over 2 stitches and finish with A.9 (= 1 stitch). When A.9, A.10 and A.11 have been completed in height there are 519 stitches on the needle. Continue with pearl grey and knit 2 rows where you increase 16 stitches evenly on the first row, i.e. the increases in sides and middle continue as before, in addition increase 8 stitches evenly both before and after the mid-stitch = 541 stitches on needle. Change to off white and work WAVE PATTERN – read description above, i.e. the first row is worked as follows from the right side: Work A.12A over 4 stitches, A.12B over the next 260 stitches (= 20 repeats of 13 stitches), work A.12C over 6 stitches, 1 stitch in stocking stitch (= mid-stitch), work A.13A over 6 stitches, A.12B over the next 260 stitches (= 20 repeats of 13 stitches) and finish with A.13C over the last 4 stitches. When the wave pattern is finished there are 773 stitches on the needle. Work 2 ridges back and forth over all stitches with increases in the sides and on each side of the mid-stitch as before = 785 stitches on the needle. Read CASTING-OFF TIP and cast off with knit from the right side. Cut and fasten the strands. SHAPING: Dampen the piece and carefully lay out in the right shape. Allow to dry. Repeat the process each time the shawl is washed. |
|||||||||||||||||||||||||||||||||||||
Diagram explanations |
|||||||||||||||||||||||||||||||||||||
|
|||||||||||||||||||||||||||||||||||||
 |
|||||||||||||||||||||||||||||||||||||
 |
|||||||||||||||||||||||||||||||||||||
 |
|||||||||||||||||||||||||||||||||||||
 |
|||||||||||||||||||||||||||||||||||||
Have you finished this pattern?Tag your pictures with #dropspattern #nordicromanceshawl or submit them to the #dropsfan gallery. Do you need help with this pattern?You'll find 18 tutorial videos, a Comments/Questions area and more by visiting the pattern on garnstudio.com. © 1982-2026 DROPS Design A/S. We reserve all rights. This document, including all its sub-sections, has copyrights. Read more about what you can do with our patterns at the bottom of each pattern on our site. |
|||||||||||||||||||||||||||||||||||||


With over 40 years in knitting and crochet design, DROPS Design offers one of the most extensive collections of free patterns on the internet - translated to 17 languages. As of today we count 324 catalogues and 12290 patterns translated into English (UK/cm). 12290
We work hard to bring you the best knitting and crochet have to offer, inspiration and advice as well as great quality yarns at incredible prices! Would you like to use our patterns for other than personal use? You can read what you are allowed to do in the Copyright text at the bottom of all our patterns. Happy crafting!
Post a comment to pattern DROPS 195-5
We would love to hear what you have to say about this pattern!
If you want to leave a question, please make sure you select the correct category in the form below, to speed up the answering process. Required fields are marked *.