DROPS Safran uni colour 100% Cotton |
1.55 € /50g |
Order |
Clicking the ORDER button will redirect you to Camellia website
The yarn cost is calculated from the pattern’s smallest size and the yarn’s cheapest product type. Looking for an even better price? You might find it on the DROPS Deals!
-------------------------------------------------------
Alternative Yarn – See how to change yarns here
Yarn Groups A to F – Use the same pattern and change the yarn here
Yarn usage using an alternative yarn – Use our yarn converter here
-------------------------------------------------------
DROPS Safran uni colour 100% Cotton 1.55 € /50g Order |
Clicking the ORDER button will redirect you to Camellia website
The yarn cost is calculated from the pattern’s smallest size and the yarn’s cheapest product type. Looking for an even better price? You might find it on the DROPS Deals!
= off-white | |
= ice blue | |
= beige | |
= pink/brown |
Each of our patterns has specific tutorial videos to help you.
These step-by-step tutorials might also help you:
Why is the knitting/crochet tension so important?
Knitting tension is what determines the final measurements of your work, and is usually measured per 10 x 10 cm. It is provided like so: number of stitches in width x number of rows in height - eg: 19 stitches x 26 rows = 10 x 10 cm.
The knitting tension is very individual; some people knit/crochet loosely while others work tightly. You adjust the knitting tension with the needle size, which is why the suggested needle size is only meant as a guide! You need to adjust this (up or down) to ensure that YOUR knitting tension matches the knitting tension provided in the pattern. If you work with a different knitting tension than provided you will have a different yarn consumption, and your work will have different measurements than what the pattern suggests.
The knitting tension also determines which yarns can replace each other. As long as you achieve the same knitting tension you can replace one yarn with another.
See DROPS lesson: How to measure your tension/gauge
See DROPS video: How to make a gauge tension swatch
How do I know how many balls of yarn I need?
The required amount of yarn is provided in grams, eg: 450 g. To calculate how many balls you’ll need you first need to know how many grams are in 1 ball (25g, 50g or 100g). This information is available if you click on the individual yarn quality on our pages. Divide the amount required with the amount of each ball. For example, if each ball is 50g (the most common amount), the calculation will be as follows: 450 / 50 = 9 balls.
Can I use a different yarn than what the pattern suggests?
The important thing when changing from one yarn to another is that the knitting/crochet tension remains the same. This is so that the measurements of the finished piece will be the same as on the sketch provided. It is easier to achieve the same knitting tension using yarns from the same yarn group. It is also possible to work with multiple strands of a thinner yarn to achieve the knitting tension of a thicker one. Please try our yarn converter. We recommend you to always work a test swatch.
Please NOTE: when changing yarn the garment might have a different look and feel to the garment in the photo, due to individual properties and qualities of each yarn.
See DROPS lesson: Can I use a different yarn than the one mentioned in the pattern?
What are the yarn groups?
All our yarns are categorised into yarn groups (from A to F) according to thickness and knitting tension – group A contains the thinnest yarns and group F the thickest. This makes it easier for you to find alternative yarns to our patterns, should you wish to switch yarn. All yarns within the same group have a similar knitting tension and can easily replace each other. However, different yarn qualities have different structures and properties which will give the finished work a unique look and feel.
How do I use the yarn calculator?
At the top of all our patterns you’ll find a link to our yarn calculator, which is a helpful tool should you wish to use a different yarn than suggested. By filling in the yarn quality you wish to replace, the amount (in your size) and number of strands, the calculator will present good alternative yarns with the same knitting tension. Additionally it will tell you how much you’ll require in the new qualities and whether you’ll need to work with multiple strands. Most skeins are 50g (some are 25g or 100g).
If the pattern is worked with multiple colours, every colour will have to be calculated separately. Similarly, if the pattern is worked with several strands of different yarns (for example 1 strand Alpaca and 1 strand Kid-Silk) you will have to find alternatives for each, individually.
Why do you show discontinued yarns in the patterns?
Since different yarns have different qualities and textures we have chosen to keep the original yarn in our patterns. However, you can easily find options among our available qualities by using our yarn calculator, or simply pick a yarn from the same yarn group.
It is possible that some retailers still have discontinued yarns in stock, or that someone has a few skeins at home that they would like to find patterns for.
The yarn calculator will provide both alternative yarn as well as required amount in the new quality.
What size should I knit?
If you think it's hard to decide what size to make, it can be a good idea to measure a garment you own already and like the size of. Then you can pick the size by comparing those measures with the ones available in the pattern's size chart.
You'll find the size chart at the bottom of the pattern.
See DROPS lesson: How to read size chart
Why do I get the wrong knitting tension with the suggested needle size?
The needle size provided in the pattern serves only as a guide, the important thing is to follow the knitting tension. And since knitting tension is very individual, you will have to adjust the needle size to ensure that YOUR tension is the same as in the pattern – maybe you’ll have to adjust 1, or even 2 needle sizes, up or down to achieve the correct tension. For this, we recommend that you work test swatches.
Should you work with a different knitting tension than the one provided, the measurements of the finished garment might deviate from the measurement sketch.
See DROPS lesson: How to measure your tension/gauge
See DROPS video: How to make a tension/gauge swatch
Why is the pattern worked top-down?
Working a garment top-down provides more flexibility and room for personal adjustment. For example it is easier to try the garment on while working, as well as making adjustments to length of yoke and shoulder caps.
The instructions are carefully explaining every step, in the correct order. Diagrams are adjusted to the knitting direction and are worked as usual.
How do I work according to a knitting diagram?
The diagram depicts all rows/rounds, and every stitch seen from the right side. It is read from bottom to top, from right to left. 1 square = 1 stitch.
When working back and forth, every other row is worked from the right side and every other row is worked from the wrong side. When working from the wrong side, the diagram will have to be worked reversed: from left to right, knit stitches are purled, purl stitches are knit etc.
When working in the round every round is worked from the right side and the diagram are worked from right to left on all rounds.
See DROPS lesson: How to read knitting diagrams
How do I work according to a crochet diagram?
The diagram depicts all rows/rounds, and every stitch seen from the right side. It is worked from bottom to top, from right to left.
When working back and forth every other row is worked from the right side: from right to left and every other row is worked from the wrong side: from left to right.
When working in the round, every row in the diagram are worked from the right side, from right to left.
When working a circular diagram you start in the middle and work your way outwards, counter clockwise, row by row.
The rows usually start with a given number of chain stitches (equivalent to the height of the following stitch), this will either be depicted in the diagram or explained in the pattern.
See DROPS lesson: How to read crochet diagrams
How do I work several diagrams simultaneously on the same row/round?
Instructions for working several diagrams after each other on the same row/round, will often be written like so: “work A.1, A.2, A.3 a total of 0-0-2-3-4 times". This means you work A.1 once, then A.2 is worked once, and A.3 is repeated (in width) the number of times provided for your size – in this case like so: S = 0 times, M = 0 times, L=2 times, XL= 3 times and XXL = 4 times.
The diagrams are worked as usual: begin with the first row in A.1, then work the first row in A.2 etc.
See DROPS lesson: How to read knitting diagrams
See DROPS lesson: How to read crochet diagrams
Why are the sleeves shorter in larger sizes?
The total width of the garment (from wrist-to-wrist) will be larger in the larger sizes, despite the actual sleeves being shorter. The larger sizes have longer sleeve caps and wider shoulders, so there will be a good fit in all sizes.
Where on the garment is the length measured?
The measurement sketch/schematic drawing provides information regarding the full length of the garment. If it’s a jumper or a jacket the length is measured from the highest point on the shoulder closest to the neckline, and straight down to the bottom of the garment. It is NOT measured from the tip of shoulder. Similarly, the length of yoke is measured from the highest point on the shoulder and down to where yoke is split into body and sleeves.
On a jacket measures are never taken along bands, unless specifically stated. Always measure inside band stitches when measuring the length.
See DROPS lesson: How to read a schematic drawing
What is a repeat?
Diagrams are often repeated on the round or in height. 1 repeat is the diagram the way it appears in the pattern. If it says to work 5 repeats of A.1 in the round, then you work A.1 a total of 5 times after/next to each other in the round. If it says to work 2 repeats of A.1 vertically/in height you work the entire diagram once, then begin again at the start and work the entire diagram one more time.
Why does the piece start with more chain stitches than it’s worked with?
Chain stitches are slightly narrower than other stitches and to avoid working the cast-on edge too tight, we simply chain more stitches to begin with. The stitch count will be adjusted on the following row to fit the pattern and measurement sketch.
Why increase before the rib edge when the piece is worked top-down?
The rib edge is more elastic and will contract slightly compared to, for example, stocking stitch. By increasing before the rib edge, you avoid a visible difference in width between the rib edge and the rest of the body.
Why increase in the cast-off edge?
It’s very easy to cast off too tightly, and by making yarn overs while casting off (and simultaneously casting these off) you avoid a too tight cast off edge.
See DROPS video: How to bind off with yarn overs (yo)
How do I increase/decrease on every 3rd and 4th row/round alternately?
To achieve an even increase (or decrease) you can increase on, for example: every 3rd and 4th row alternately, like so: work 2 rows and increase on the 3rd row, work 3 rows and increase on the 4th. Repeat this until the increase is complete.
See DROPS lesson: Increase or decrease 1 st on every 3rd and 4th row alternately
How can I work a jacket in the round instead of back and forth?
Should you prefer to work in the round instead of back and forth, you may of course adjust the pattern. You’ll need to add steeks mid-front (usually 5 stitches), and follow the instructions. When you would normally turn and work from the wrong side, simply work across the steek and continue in the round. At the end you’ll cut the piece open, pick up stitches to work bands, and cover the cut edges.
See DROPS video: How to knit steeks and cut open
Can I work a jumper back and forth instead of in the round?
Should you prefer to work back and forth instead of in the round, you may of course adjust the pattern so you work the pieces separately and then assemble them at the end. Divide the stitches for the body in 2, add 1 edge stitch in each side (for sewing) and work the front and back pieces separately.
See DROPS lesson: Can I adapt a pattern for circular needles into straight needles?
Why is the pattern slightly different than what I see in the photo?
Pattern repeats can vary slightly in the different sizes, in order to get the correct proportions. If you’re not working the exact same size as the garment in the photo, yours might deviate slightly. This has been carefully developed and adjusted so that the complete impression of the garment is the same in all sizes.
Make sure to follow instructions and diagrams for your size!
How do I make a women’s size garment into a men’s size one?
If you have found a pattern you like which is available in women’s size it’s not very difficult to convert it to men’s size. The biggest difference will be the length of sleeves and body. Start working on the women size that you think would fit across the chest. The additional length will be worked right before you cast off for the armhole/sleeve cap. If the pattern is worked top-down you can add the length right after the armhole or before the first decrease on sleeve.
Regarding additional yarn amount, this will depend on how much length you add, but it is better with a skein too many than too few.
How do I prevent a hairy garment from shedding?
All yarns will have excess fibres (from production) that might come off as lint or shedding. Brushed yarns (ie hairier yarns) have more of these loose, excess fibres, causing more shedding.
Shedding also depends on what is worn under or over the garment, and whether this pulls at the yarn fibres. It’s therefore not possible to guarantee that there will be no shedding
Below are some tips on how to get the best result when working with hairier yarns:
1. When the garment is finished (before you wash it) shake it vigorously so the looser hairs come off. NOTE: do NOT use a lint roller, brush or any method that pulls at the yarn.
2. Place the garment in a plastic bag and put it in your freezer - the temperature will cause the fibres to become less attached to each other, and excess fibres will come off easier.
3. Leave in the freezer for a few hours before taking it out and shaking it again.
4. Wash the garment according to the instructions on the yarn label.
Why does my garment pill?
Pilling is a natural process that happens to even the most exclusive of fibers. It's a natural sign of wear and tear that is hard to avoid, and that is most visible in high friction areas of your garment like a sweater's arms and cuffs.
You can make your garment look as new by removing the pilling, using a fabric comb or a pill/lint remover.
Sweet Cupcake |
|||||||||||||
|
|
||||||||||||
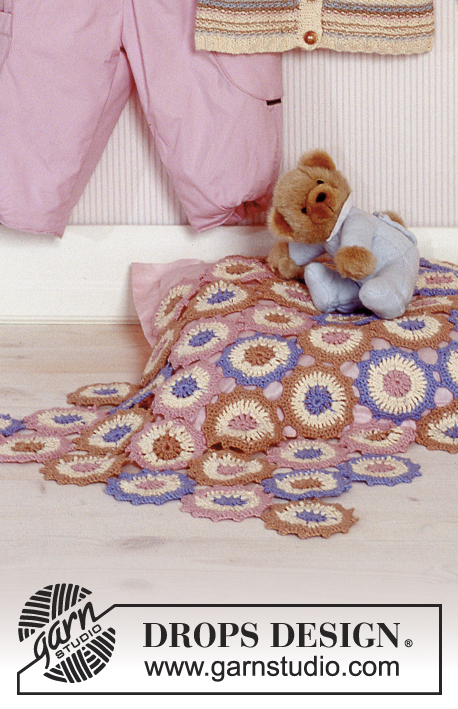
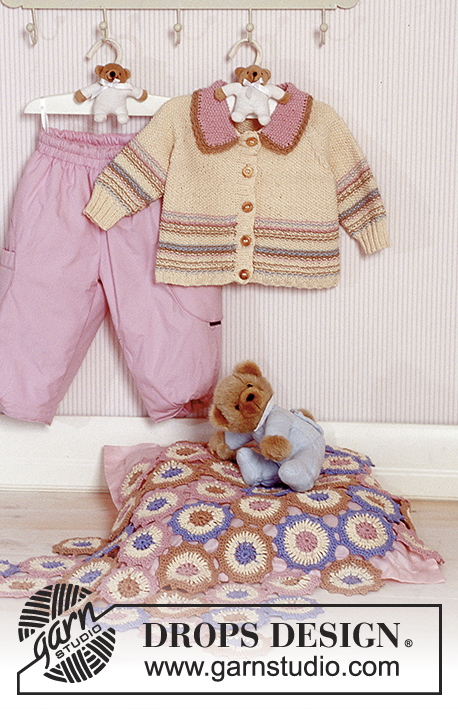
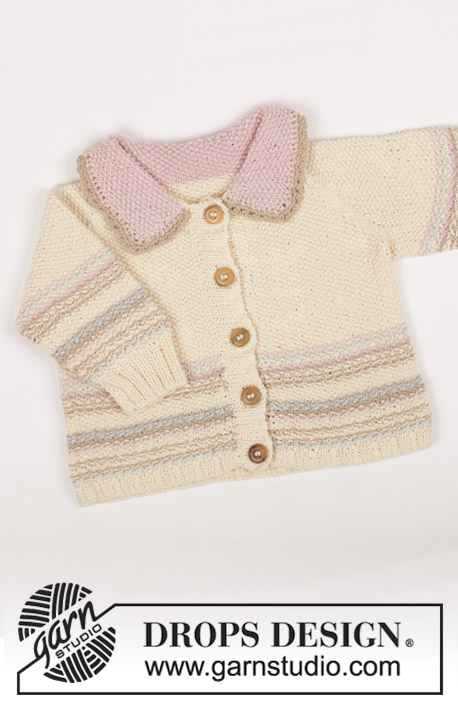
Jacket in moss sts with raglan sleeves and crochet blanket in Safran. Theme: Baby blanket
DROPS Baby 11-12 |
|||||||||||||
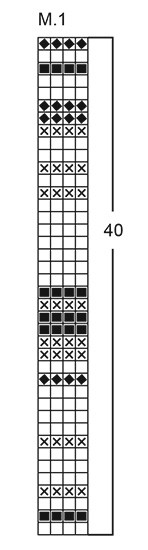
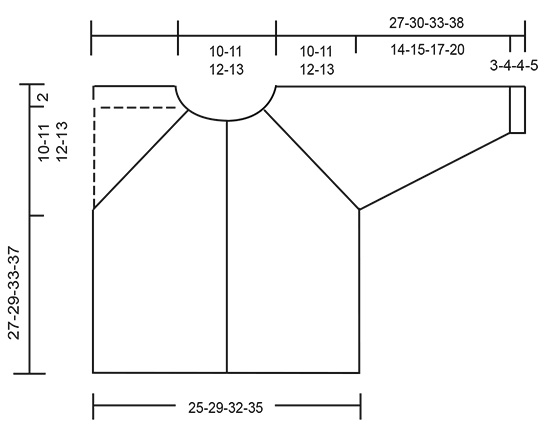
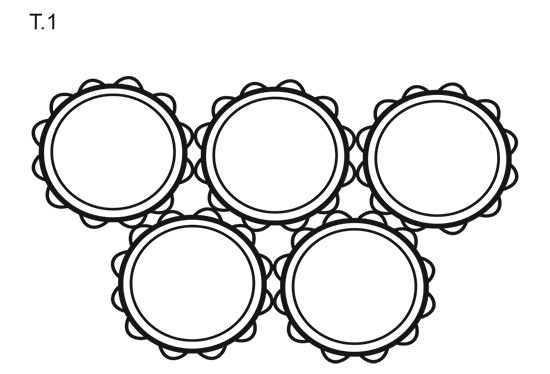
Knitting tension: 24 sts x 39 rows on needles size 3 mm in moss sts sts = 10 x 10 cm. Garter sts: Knit all rows Rib: *K2, P2*, repeat from *-*. Moss sts: 1st row: *K1, P1*, repeat from *-*. 2nd row: P over K, K over P. Repeat 2nd row. Pattern: See diagram.1. The entire pattern is knitted in moss sts and the diagram shows the pattern from the right side. Dec tips (apply to raglan): Dec inside 2 sts in garter sts from the RS. Dec as follows before 2 sts in garter sts: K2 tog. Dec as follows after 2 sts in garter sts: slip 1 st as if to knit, K1, psso. ---------------------------------------------------------------------- Front and back piece: Knitted back and forth on circular needle from mid front. Cast on 154-174-194-214 sts (incl 1 edge sts each side towards mid front, knitted in garter sts throughout) on circular needle size 2.5 mm with off-white. Continue as follows from the RS: 1 edge st, *K2, P3*, repeat from *-* and finish with K2 and 1 edge st. After 6 rows dec all P3 to P2 = 124-140-156-172 sts. Change to circular needle size 3 mm and knit M.1 until piece measures 11-12-13-15 cm. Now finish the piece in moss sts and off-white. At the same time when piece measures 15-16-19-22 cm knit next row as follows from the RS: Knit 28-32-36-40 sts (= right front piece), cast off 6 sts for armhole, knit 56-64-72-80 sts (= back piece), cast off 6 sts for armhole, knit 28-32-36-40 sts (= left front piece). Put the piece aside and knit the sleeves Sleeve: Knitted back and forth on pointed needles. Cast on 42-42-46-46 sts (incl 1 edge st each side, knitted in garter sts throughout) on needle size 2.5 mm with off-white. Knit 3-4-4-5 cm Rib with 1 edge st each side. Read all of the following section before knitting it! Change to needle size 3 mm and continue in M.1 until piece measures approx 12-14-15-18 cm (same number of pattern rows as on body piece) and finish the piece in moss sts and off-white. At the same time after the Rib inc 1 st each side on every 14-8-8-8 row a total of 4-7-8-10 times = 50-56-62-66 sts. When piece measures 17-19-21-25 cm cast off 4 sts each side for armhole = 42-48-54-58 sts. Put the piece aside and knit another sleeve. Yoke: Put sleeves in on the same needle as body piece where you cast off for armholes = 196-224-252-276 sts. Insert a marking thread in all transitions between sleeve and body pieces = 4 MT. Continue in moss sts, but with 1 st on each side of all MT in stocking sts. Raglan decreases: There are 8 dec per row and 2 sts between each dec (i.e 1 st on each side of the MT). Dec on every 4th row: 1 st 3-2-1-1 times and then on every other round: 1 st 13-17-21-23 times (a total of 128-152-176-192 sts dec for raglan). Neckline: At the same time when piece measures 23-25-28-32 cm cast off 8-9-20-22 sts each side towards mid front and dec to shape the neckline on every other row: 1 st 2 times. After all dec for raglan and neckline have been completed = 48-50-52-58 sts left and piece measures approx 27-29-33-37 cm. Assembly: Sew the sleeve seams and the openings under the arms. Collar: Put sts on neckline on circular needle size 2.5 mm and pick up approx 10 to15 sts on each front piece with pink (ice blue if for a boy) = 68 to 88 sts. Knit moss sts, at the same time inc 1 st inside 1 edge st at sides on every 3rd row a total of 3 times. When collar measures 4.5 cm dec as follows inside 1 edge st on every other row: 1 st 1 time, 3 sts 1 time and 4 sts 1 time. Cast of remaining sts. Crochet borders: Crochet round the collar with beige and crochet hook size 3 mm as follows: 1st row: 1 dc in each st. 2nd row: 1 ch, 1 dc in first dc, *3 ch, skip 1 dc, 1 dc in next st*, repeat from *-*. Front border: Pick up approx 60 to 80 sts (divisible by 4) along left front piece on needle size 2.5 mm with off-white. Knit Rib with 1 st in garter sts and K2 each end. Cast off in Rib when border measures 2.5 cm. Repeat along right front piece but after 1 cm make 5 buttonholes evenly distributed on row – the bottom one 1 cm from the edge and the top one 0.5 cm from the top. 1 buttonhole = cast off 2 sts and cast on 2 new sts in the same place on the return row. Sew on buttons. ---------------------------------------------------------------------- CROCHET BLANKET: Size: approx 45 x 65 cm Materials: DROPS Safran from Garnstudio 100 g colour no 18, off-white 50 g colour no 01, light pink 50 g colour no 05, light blue/purple 50 g colour no 21, beige DROPS crochet hook size 3 mm. Crochet tension: 1 circle = diameter approx 7.5 cm (incl the picots). Colours in circles: Crochet 6 different colour combinations A-F. A: 1st round: light blue/purple, 2nd round: off-white, 3rd and 4th round: beige B: 1st round: light pink, 2nd round: off-white, 3rd and 4th round: beige C: 1st round: light blue/purple, 2nd round: off-white, 3rd and 4th round: light pink D: 1st round: beige, 2nd round: off-white, 3rd and 4th round: light pink E: 1st round: light pink, 2nd round: off-white, 3rd and 4th round: light blue/purple F: 1st round: beige, 2nd round: off-white, 3rd and 4th round: light blue/purple Circle: Crochet in different colours, see above. Crochet 6 ch in the same colour as 1st round and form a ring with a sl st. 1st round: 5 ch, *1 dtr in ring, 1 ch*, repeat from *-* a total of 11 times and finish with 1 sl st in 4th ch from beg of round. 2nd round: 4 ch, 2 dtr in ch-loop, *1 ch, 3 dtr in next ch-loop*, repeat from *-* a total of 11 times and finish with 1 sl st in 4th ch from beg of round. 3rd round: *1 dc between each dtr, 2 dc in ch*, repeat from *-* a total of 12 times and finish with 1 sl st in dc from beg of round. 4th round: *1 dc in each of the next 3 st, 1 picot (3 ch, 1 dc in the first of the 3 ch), 1 dc in next st*, repeat from *-* a total of 12 times and finish with 1 sl st in dc from beg of round. Cut the thread. Blanket: Crochet 9 circles in colour combination A and B and 8 circles in colour combination C, D, E and F = 50 circles. Randomly place the circles in rows: 5 rows of 6 circles and 4 rows of 5 circles. Sew tog the circles with 2 picots against each other. Place the rows next to each other with half a circle’s displacement – see drawing 1. Begin and finish the blanket with a row of 6 circles. Sew tog the rows in the picots. |
|||||||||||||
Diagram explanations |
|||||||||||||
|
|||||||||||||
Have you made this or any other of our designs? Tag your pictures in social media with #dropsdesign so we can see them! Do you need help with this pattern?You'll find tutorial videos, a Comments/Questions area and more by visiting the pattern on garnstudio.com. © 1982-2024 DROPS Design A/S. We reserve all rights. This document, including all its sub-sections, has copyrights. Read more about what you can do with our patterns at the bottom of each pattern on our site. |
With over 40 years in knitting and crochet design, DROPS Design offers one of the most extensive collections of free patterns on the internet - translated to 17 languages. As of today we count 309 catalogues and 11518 patterns translated into English (UK/cm). 11518
We work hard to bring you the best knitting and crochet have to offer, inspiration and advice as well as great quality yarns at incredible prices! Would you like to use our patterns for other than personal use? You can read what you are allowed to do in the Copyright text at the bottom of all our patterns. Happy crafting!
Comments / Questions (7)
Françoise wrote:
Bonjour en taille 6 m. je tricote les manches avec 42 m au départ. Si je fais 7 augmentations je devrais obtenir 14 + 42 = 56 m. Or il est écrit 52m après les augmentations. Bonne journée
08.11.2023 - 07:11DROPS Design answered:
Bonjour Françoise, il s'agissait ici d'une simple faute de frappe, on a effectivement bien 56 mailles, merci pour votre retour. Bon tricot!
08.11.2023 - 09:47Françoise wrote:
Bonjour je me demande le dessin des côtes des manches ; 1/1 ? 2/3 comme le corps du tricot ? sur la photo on dirait que c'est 2/1 . Merci de votre réponse. J'aime beaucoup vos modèles et j'en fais souvent, avec plus ou moins de modifications à mon goût. Cordialement
06.11.2023 - 10:00DROPS Design answered:
Bonjour Françoise et merci; les côtes du bas des manches se tricotent en 2 m end, 2 m env (cf Côtes au tout début des explications). Bon tricot!
06.11.2023 - 15:02Graeme wrote:
Is the striped pattern M1 knitted as garter stitch and then does it change to moss stitch for the remainder?
18.11.2022 - 19:39DROPS Design answered:
Dear Graeme, the striped pattern is also worked in moss stitch. The only garter stitches in the pattern are the edge stitches (so you don't work entire rows in garter stitch, only a few stitches on each edge, which are always knitted). The rest of the garment will have either moss stitch or rib. Happy knitting!
20.11.2022 - 23:38Emilie Luckhardt wrote:
LS Ik heb lang niet gebreid en wil weer beginnen met een babyvestje (patroon heet; Sweet Cupcake) er wordt vermeld dat ik rondbreinaalden in 2,5 en 3mm nodig heb maar er staat niet bij hoe lang deze moeten zijn. Het gebruik van deze naalden is nieuw voor mij en ik weet niet of ik die van 40, 60 of 80 cm moet gebruiken en dus kopen. Ik zie ook niet of ik daarnaast gewone breinaalden van 2,5 en 3 mm nodig heb? Help! Bij deze mijndank voor de mooie pataonen die jullie gratis beschikbaar stellen!
15.08.2021 - 18:27DROPS Design answered:
Dag Emilie,
Zelf gebruik ik vaak een lange rondbreinaald (bijv 80 cm) in combinatie met de 'magic loop' techniek (zie hier). Mocht je het toch handiger vinden om kleinere rondbreinaalden te gebruiken, dan kun je die alsnog aanschaffen. In dit patroon heb je zowel een rondbreinaald als gewone naalden nodig, met knop.
17.08.2021 - 12:27Theresa wrote:
Initial directions state knit entire pattern in seed stitch. Directions for striping state " knit" , Enlarged screen suggests that it is " garter stitch - knit only . Following striping pattern says" finish in seed stitch.
18.01.2020 - 15:29Hanne Bakke wrote:
Lidt hjælp, evt. video på kraven til trøjen Cupcake. hvordan den strikkes. mvh Hanne
21.11.2019 - 16:16DROPS Design answered:
Hej Hanne, det har vi desværre ikke, men vi kan prøve at beskrive det lidt anderledes. Du samler masker op rundt i halsen, tager masker ud i hver side af kraven på hver 3.pind (inden for kantmasken). Når kraven måler 4,5 cm lukkes der af i starten af hver pind som vi har beskrevet i opskriften. God fornøjelse!
03.12.2019 - 11:29Hanne Bakke wrote:
Hej .. Trøjen, Sweet Cupcake, der står at der skal tages 3 vrangmasker ind til 2 vrangmasker, hvordan kan det lade sig gøre. Hvis man tager 3 vrang sammen bliver det da til 1 vrangmaske.. Evt. en video med metoden..
21.10.2019 - 16:46DROPS Design answered:
Hej Hanne, du strikker to af de tre vrangmasker sammen, da har du 2 tilbage. God fornøjelse!
How to decrease by purling 2 stitches together (P2 tog) from Garnstudio Drops design on Vimeo.
21.10.2019 - 16:53