
Popular categories
Looking for a yarn?


Comments / Questions (49)
![]() Britt-Marie Wallén wrote:
Britt-Marie Wallén wrote:
Hej! Har ännu inte börjat sticka - bara läst mönstret. Förstår jag rätt att framstyckena stickas för sig o bakstycket för sig när man kommit förbi oket. Och att det innebär att man syr ihop koftan i sidorna under ärmarna? Med vänlig hälsning, Britt-Marie
08.04.2026 - 12:12DROPS Design answered:
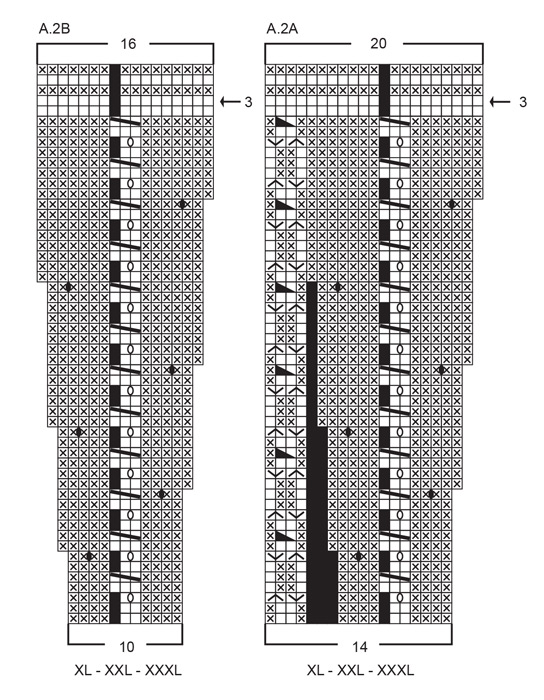
Hej Britt-Marie, Du stickar allt i ett ;) KOFTA - KORT ÖVERSIKT ÖVER ARBETET: Dubbel halskant och ok stickas fram och tillbaka på rundsticka från mitt fram, uppifrån och ner. Det kan stickas en förhöjning bak i nacken om man vill. Oket delas till fram- och bakstycke och ärmar. Fram- och bakstycket stickas fram och tillbaka på rundsticka. Ärmarna stickas runt på strumpstickor / kort rundsticka.
08.04.2026 - 15:01
![]() Inger Djønne wrote:
Inger Djønne wrote:
Når A.1 er strikket ferdig, måler arbeidet ca 10-11-13-11-13-15 cm fra merket. Neste pinne strikkes slik fra retten: 7 stolpemasker i rille, strikk A.2A totalt 24-25-27-24-26-28 ganger, A.2B, 7 stolpemasker i rille. Fortsett mønsteret slik og øk som vist i diagrammene. Skal A2A strikkes ferdig først og deretter A2B: Dette forstd eg ikkje!
30.01.2026 - 18:16DROPS Design answered:
Hei Inger. Etter A.1 strikkes A.2 Først strikker du 7 stolpemasker, deretter strikker du A.2A 24-25-27-24-26-28 ganger (avhengig av hvilken str. du strikker etter). Du skal nå ha 15 eller 17 masker igjen på pinnen. Strikk A.2B i din størrelse og avslutt pinnen med 7 stolpemasker. Nå vil mønstret bli likt i begge side. mvh DROPS Design
02.02.2026 - 09:28
![]() Maria wrote:
Maria wrote:
Czy moge ten sweter zrobic np. z wloczki Air? Czy da sie przeliczyc ten wzor na grubsza wloczke?
25.11.2025 - 09:27DROPS Design answered:
Witaj Mario, to zależy od Twoich umiejętności i poziomu zaawansowania. Wszystko da się przeliczyć, ale w tym przypadku tych obliczeń będzie bardzo dużo, będzie to całkiem inny wzór po prostu. Wzory na rozpinane swetry, z włóczki o grubości C (jak Air), z okrągłym karczkiem i przerabiane od góry znajdziesz TUTAJ. Część obliczeń możesz zaczerpnąć z nich. Zobacz np. sweter nr 255-25. Pozdrawiamy!
27.11.2025 - 11:52
![]() Lene wrote:
Lene wrote:
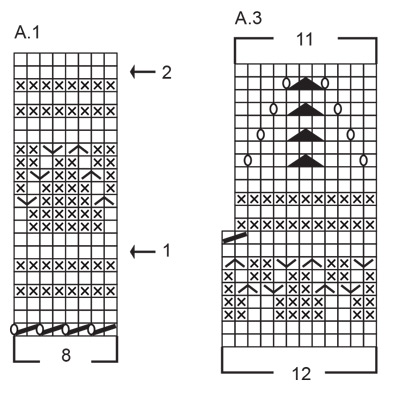
I A1, hvad betyder signaturen i først række, den tykke skråstreg fra venstre mod højre? Mangler i diagram forklaring
18.11.2025 - 17:33DROPS Design answered:
Hej Lene. Den betyr "2 ret sammen". Mvh DROPS Design
19.11.2025 - 13:50
![]() Marie-Laure wrote:
Marie-Laure wrote:
Excusez ma question précédente J’ai inversé les schémas A2A et A2B
11.08.2025 - 09:56
![]() Marie-Laure wrote:
Marie-Laure wrote:
Bonjour Lorsque l’on a fini A1 pour la taille XL j’ai 388 mailles et il est dit de tricotez 26 fois A2A(260 m) et A2B (14m) plus les 14 mailles de bordure on arrive à 288 m? Je ne comprends pas Merci de vos explications
11.08.2025 - 09:53DROPS Design answered:
Bonjour Marie-Laure, vous tricotez vos 388 mailles ainsi: 7 m point mousse, 26 fois les 14 mailles de A.2A (soit 26x14=364), 10 mailles deA.2B et 7 m point mousse = 7+364+10+7=388. Bon tricot!
11.08.2025 - 16:35
![]() Nicole wrote:
Nicole wrote:
Bonjour, Pourquoi tricoter les bordures de devants et du dos séparément? Ne serait-ce pas possible de tricoter la bordure des devants et du dos ensemble? Merci d‘avance pour votre réponse
03.08.2025 - 18:09DROPS Design answered:
Bonjour Nicole, la bordure des devants se tricote au point mousse tout du long, et n'est donc pas tricotée séparément. Ces mailles sont montées après la moitié du col, ainsi la bordure des devants n'est pas trop épaisse au niveau du col. Bon tricot!
04.08.2025 - 09:20
![]() Nicole wrote:
Nicole wrote:
Bonjour, j‘en suis au diagramme A3. C‘est bien juste que dans la partie du haut du diagramme, il y a une augmentation avec le jeté, une diminution avec les deux mailles tricotées ensemble et à nouveau une augmentation avec le jeté suivant? Il y a donc deux augmentations et une diminution. Le nombre de mailles augmentent à chaque motif ou je me trompe?
03.08.2025 - 17:49DROPS Design answered:
Bonjour Nicole, dans la partie ajouré de A.3, vous devez avoir autant de jetés que de mailles diminuées, quand on tricote le triangle noir au milieu de A.3, on diminue 2 mailles compensées par le jeté de chaque côté. Bon tricot!
04.08.2025 - 09:17
![]() Annely wrote:
Annely wrote:
Tere, A1 muster, ei saa aru mida tähistavad need poolikuks tehtud ruudud?
31.07.2025 - 16:46DROPS Design answered:
Tere Anneli! Mitmendat tingmärki te mõtlete?
01.08.2025 - 13:45
![]() Liv Kristin Gjøen wrote:
Liv Kristin Gjøen wrote:
Skal begynne på første mønster A1 på Avalanche cardigan, modell bm-112 Jeg finner ikke igjen det første mønstersymbolet i symbolforklaringen. Det som har 0 skråstrek 0 over 2 ruter. Hvordan strikkes det?
03.06.2025 - 21:20DROPS Design answered:
Hei Liv Kristin, Åpne sirkelen er å lage 1 kast mellom 2 masker (3. symbol i forklaringen). Skråstrek som dekker 2 ruter fra øverst på høyre til nederst på venstre er å strikke 2 rett sammen (5. symbol i forklaringen). Da får du 1 kast, strikke 2 rett sammen, 1 kast. Hilsen Drops Team.
04.06.2025 - 06:42
|
||||||||||||||||||||||||||||||||||
Avalanche Cardigan#avalanchecardigan |
||||||||||||||||||||||||||||||||||
 |
 |
|||||||||||||||||||||||||||||||||
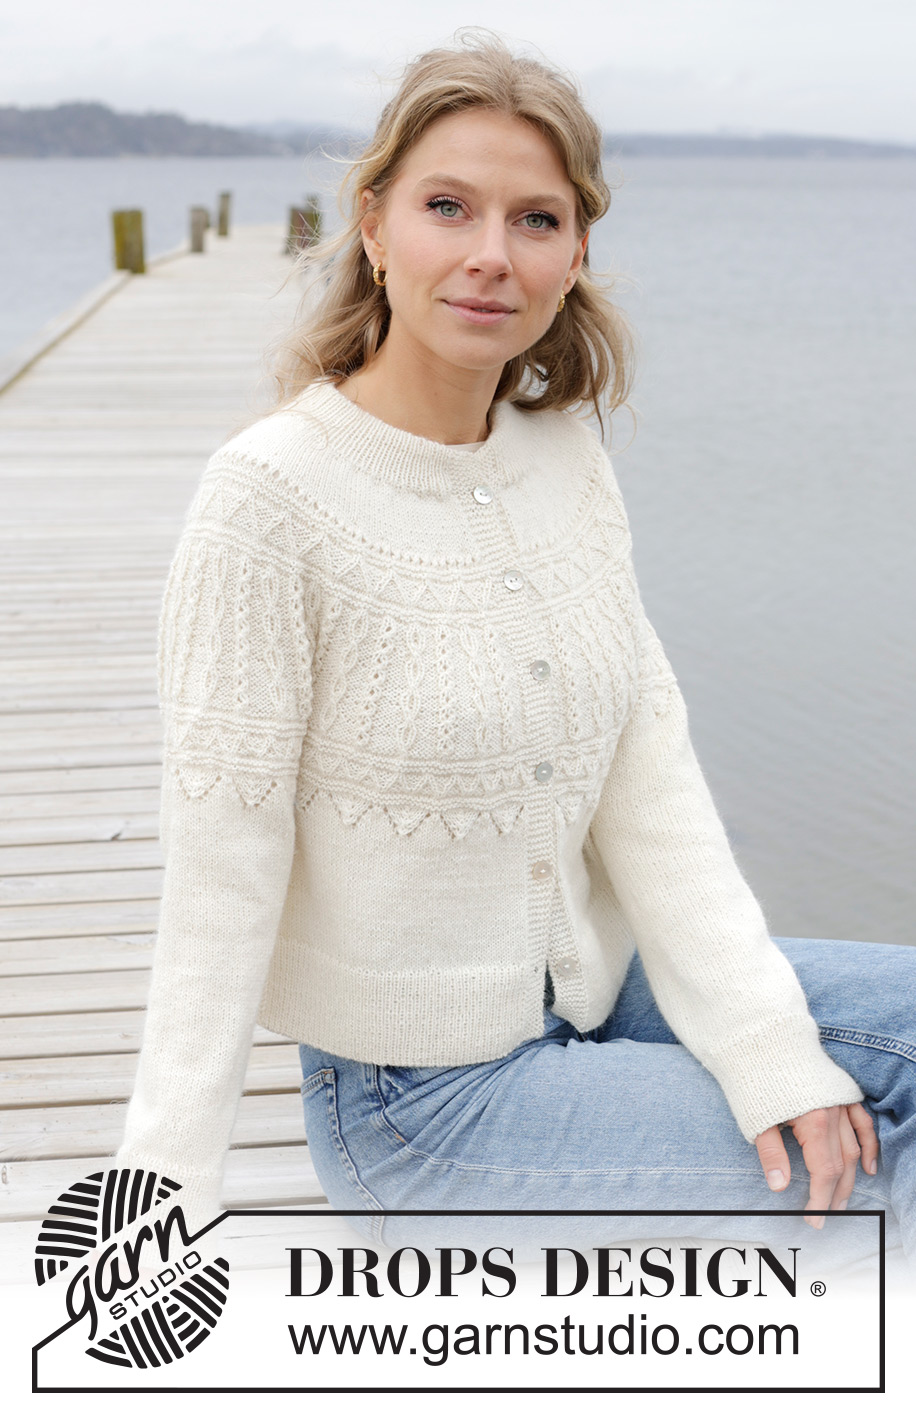
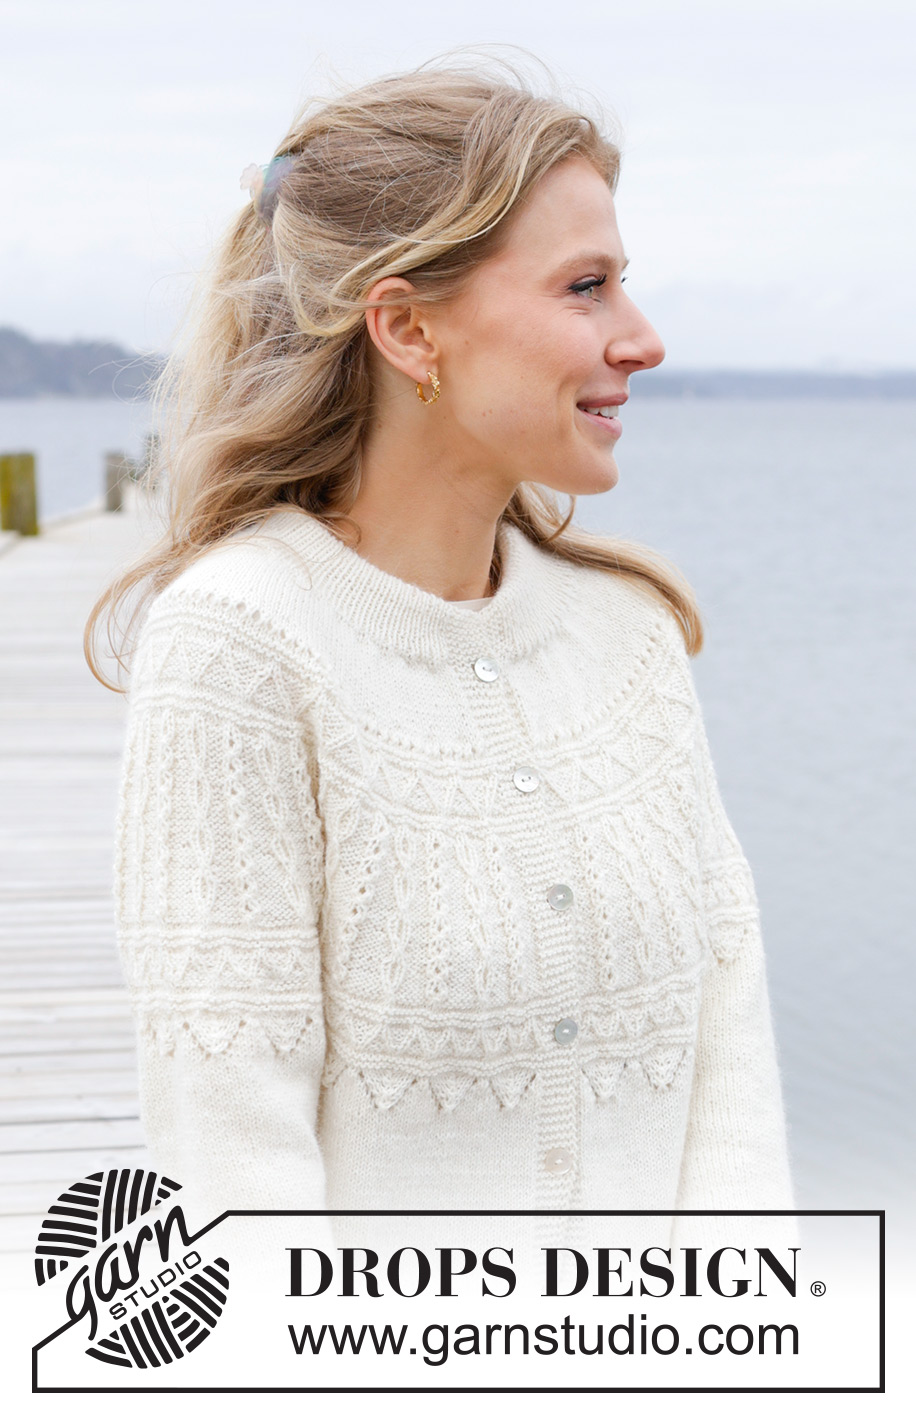
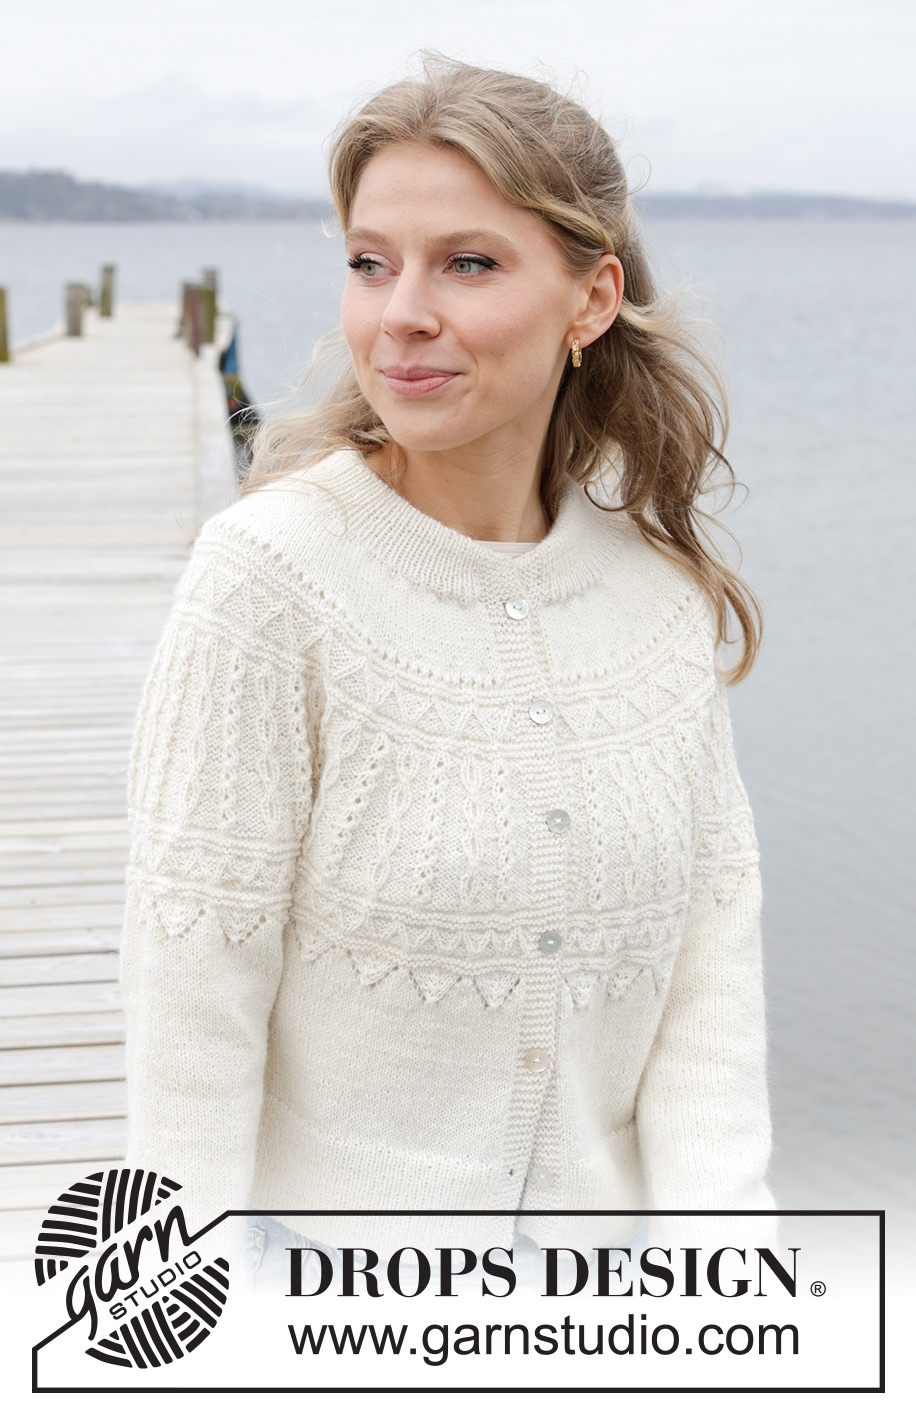
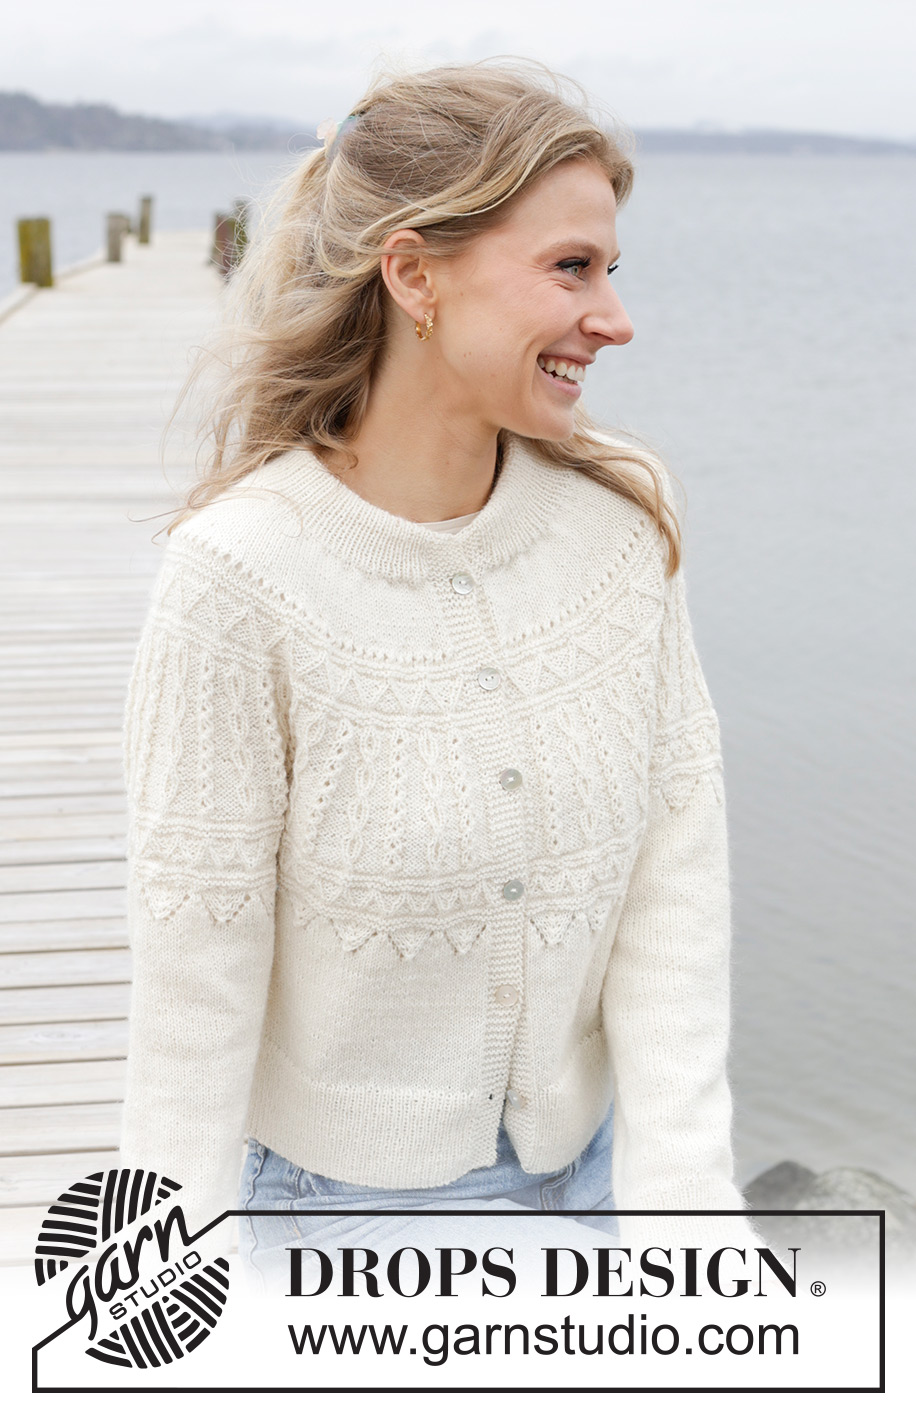
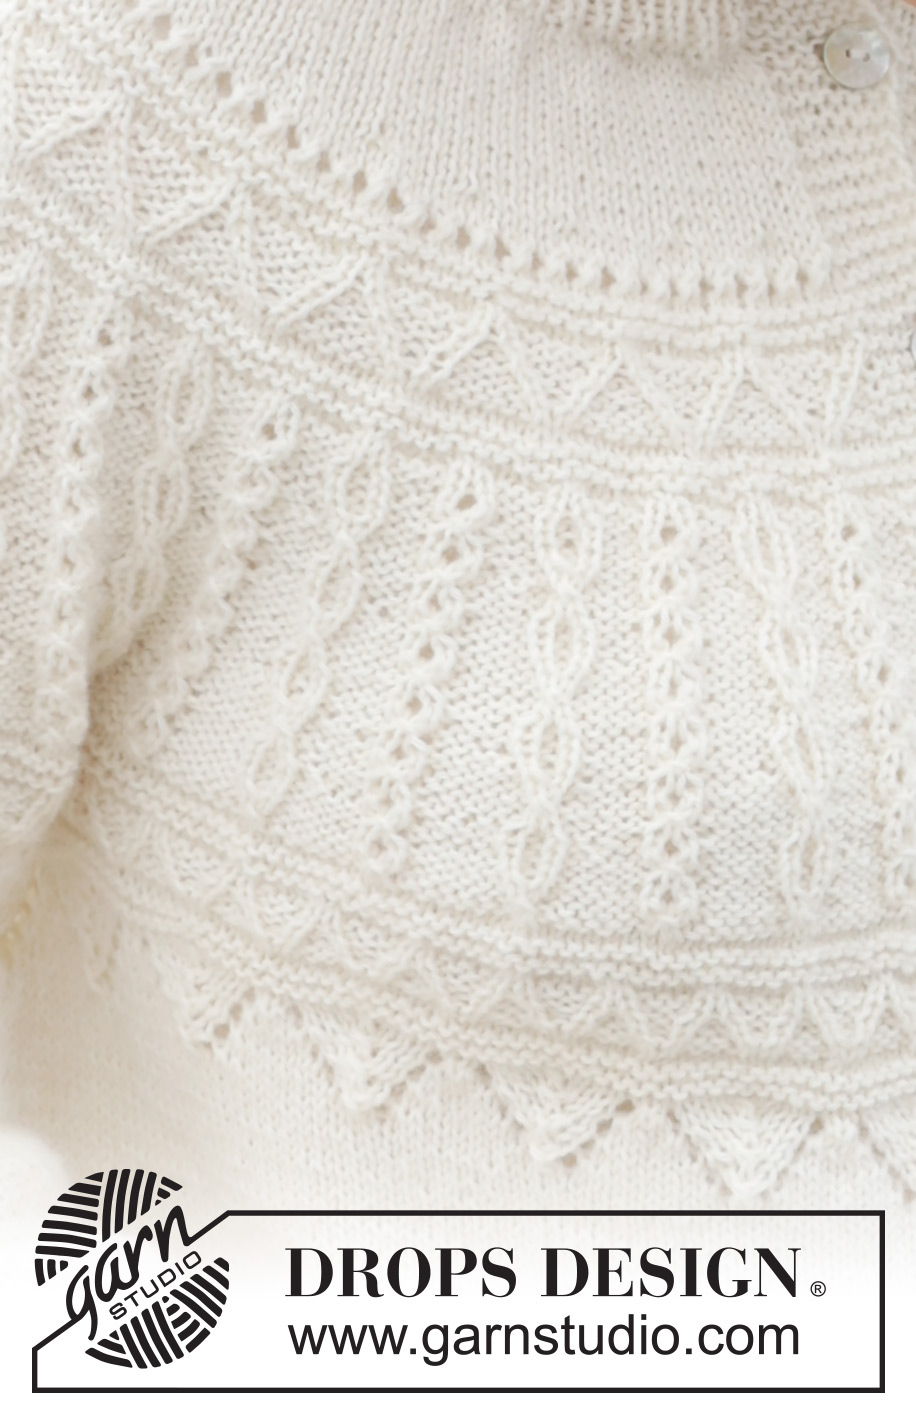
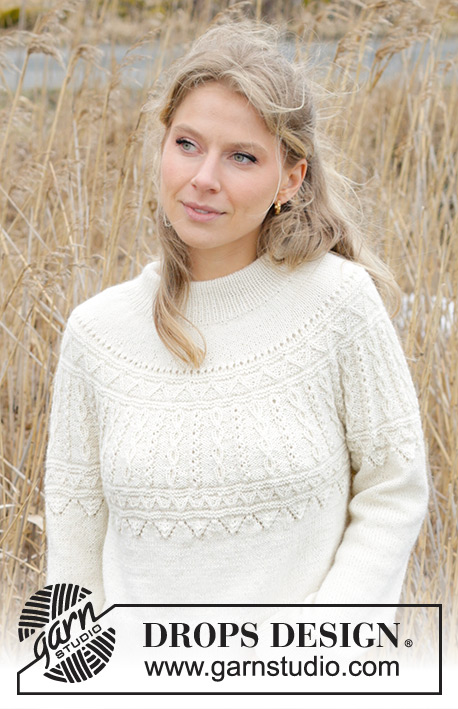
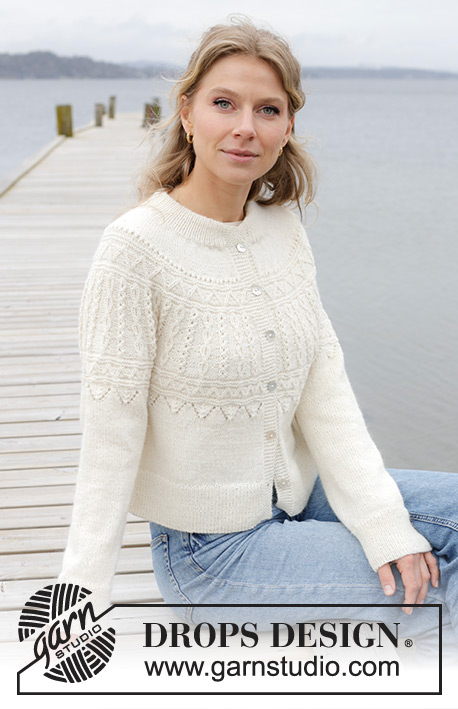
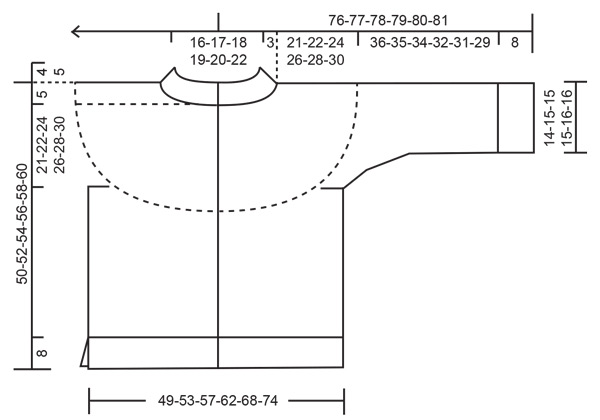
Knitted jacket in DROPS BabyMerino. The piece is worked top down with double neck, round yoke, relief-pattern and split in sides. Sizes S - XXXL.
DROPS 243-7 |
||||||||||||||||||||||||||||||||||
|
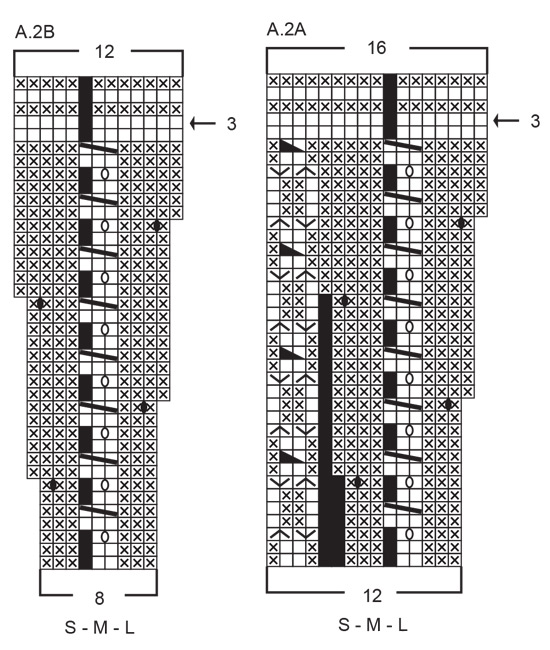
------------------------------------------------------- EXPLANATIONS FOR THE PATTERN: ------------------------------------------------------- GARTER STITCH (worked back and forth): Knit all rows. 1 ridge = knit 2 rows. ELEVATION (back of neck): To make the back of the neck slightly higher on a round yoke, you can work an elevation as described here. Skip this section if you do not want an elevation. Insert 1 marker in the middle stitch on the row. Start from the right side and knit 16-17-18-19-20-21 stitches past the marker-stitch, turn, tighten strand and purl 33-35-37-39-41-43 stitches back. Turn, tighten strand and knit 49-52-55-58-61-64 stitches, turn, tighten strand and purl 65-69-73-77-81-85 stitches back. Turn, tighten strand and knit 81-86-91-96-101-106 stitches, turn, tighten strand and purl 97-103-109-115-121-127 stitches. Turn, tighten strand, knit 1 row then purl 1 row (with the bands worked in garter stitch). Now work the yoke as described in the text. PATTERN: See diagrams A.1 to A.3. The diagrams show all rows in the pattern from the right side. Choose diagram for your size (applies to A.2). INCREASE TIP (evenly spaced): Increase 1 stitch by making 1 yarn over which is worked twisted on the next row/round to avoid a hole. DECREASE TIP (for sleeves): Decrease 1 stitch on each side of the marker-thread as follows: Work until there are 3 stitches left before the marker-thread, knit 2 together, knit 2 (marker-thread sits between these 2 stitches), slip 1 stitch knit-wise, knit 1 and pass the slipped stitch over the knitted stitch. BUTTONHOLES: Work buttonholes on the right band (when the garment is worn). Work from the right side when there are 4 stitches left on the row as follows: Make 1 yarn over, knit 2 together and knit 2. On the next row (wrong side), knit the yarn over to leave a hole. The first buttonhole is worked on the first knitted row after the neck, the other 5-5-5-6-6-6 buttonholes with approx. 7½-8-8½-7½-7½-8 cm between each one. ------------------------------------------------------- START THE PIECE HERE: ------------------------------------------------------- JACKET – SHORT OVERVIEW OF THE PIECE. The neck and yoke are worked back and forth with circular needle, from mid front and top down. You can work an elevation at the back of the neck if you wish. The yoke is divided for body and sleeves and the body continued back and forth with circular needle. The sleeves are worked in the round with short circular needle/double pointed needles, top down. DOUBLE NECK: Cast on 137-143-147-153-159-169 stitches with DROPS Baby Merino, using short circular needles size 2.5 and 3 mm held together. Remove the needle size 3 mm keeping stitches on needle size 2.5 mm (this gives you an elastic cast-on edge). Work as follows from the right side: 1 GARTER STITCH – read description above, * knit 1, purl 1 *, work from *-* until there are 2 stitches left on the row, knit 1 and 1 garter stitch. Continue this rib back and forth for 4-4-4-5-5-5 cm. Cast on 6 stitches for the bands at the end of the next 2 rows = 149-155-159-165-171-181 stitches. Continue the rib but with 7 band stitches in garter stitch on each side. When the rib measures 8-8-8-10-10-10 cm and the next row is from the right side, fold the neck double to the inside and work as follows: 7 band stitches in garter stitch, continue the rib but working every 4th stitch together with its corresponding stitch on the cast-on edge, until there are 7 stitches left, 7 band stitches in garter stitch. You now have a double neck. YOKE: Switch to circular needle size 3 mm. Work the first row as follows from the wrong side: 7 band stitches in garter stitch, purl until there are 7 stitches left and increase 34-36-36-38-40-42 stitches evenly over these stitches – read INCREASE TIP = 183-191-195-203-211-223 stitches. Insert 1 marker after the band at the beginning of the row – it will be used to measure the yoke. You can now work an ELEVATION in the back of the neck – read description above. Continue with the next section if you do not want an elevation. Work stocking stitch back and forth with 7 band stitches in garter stitch on each side – remember the BUTTONHOLES on the right band – read description above. REMEMBER THE KNITTING TENSION! When the yoke measures 3-4-6-2-3-4 cm from the marker, increase 39-39-43-39-39-41 stitches evenly spaced – remember INCREASE TIP (do not increase over the bands) = 222-230-238-242-250-264 stitches. The increases on the relief-pattern are finished in sizes S, M and L. SIZES XL, XXL and XXXL: When the yoke measures 4-6-8 cm from the marker, increase 36-36-38 stitches evenly spaced (do not increase over the bands) = 278-286-302 stitches. ALL SIZES: = 222-230-238-278-286-302 stitches. Continue with stocking stitch and 7 band stitches in garter stitch on each side until the yoke measures 4-5-7-5-7-9 cm from the marker. Work as follows from the right side: 7 band stitches in garter stitch, work A.1 26-27-28-33-34-36 times and 7 band stitches in garter stitch. Continue this pattern. AT THE SAME TIME on each row marked with an arrow in A.1, increase as follows (do not increase over the bands): Arrow-1: Increase 40-48-56-40-48-56 stitches evenly spaced = 262-278-294-318-334-358 stitches. Arrow-2: Increase 48-44-52-42-54-58 stitches evenly spaced = 310-322-346-360-388-416 stitches. When A.1 is finished, the yoke measures approx. 10-11-13-11-13-15 cm from the marker. Work as follows from the right side: 7 band stitches in garter stitch, work A.2A 24-25-27-24-26-28 times, A.2B, 7 band stitches in garter stitch. Continue this pattern according to the diagrams. When you reach the row marked with arrow-3 there are 410-426-458-510-550-590 stitches. Work this row and increase 1-7-11-3-10-3 stitches evenly spread = 411-433-469-513-560-593 stitches. When A.2 is finished, the yoke measures approx. 21-22-24-26-28-30 cm from the marker. Now divide for the body and sleeves as follows: Work 7 band stitches in garter stitch, work the first row in A.3 over the next 59-64-69-74-82-90 stitches and increase 6-7-7-8-8-9 stitches evenly over these stitches (= 72-78-83-89-97-106 stitches on the front piece), place the next 80-80-89-100-109-109 stitches on 1 thread for the sleeve, cast on 8-8-10-10-12-12 stitches under the sleeve, work the first row in A.3 over the next 119-131-139-151-164-181 stitches and increase 11-11-13-13-16-17 stitches evenly over these stitches (= 130-142-152-164-180-198 stitches on the back piece), place the next 80-80-89-100-109-109 stitches on 1 thread for the sleeve, cast on 8-8-10-10-12-12 stitches under the sleeve, work the first row in A.3 over the next 59-64-69-74-82-90 stitches and increase 6-7-7-8-8-9 stitches evenly over these stitches, 7 band stitches in garter stitch (= 72-78-83-89-97-106 stitches on the front piece). The body and sleeves are finished separately. The piece is now measured from here! BODY: = 290-314-338-362-398-434 stitches. Work as follows from the wrong side: 7 band stitches in garter stitch, work A.3 23-25-27-29-32-35 times, 7 band stitches in garter stitch. Continue this pattern. When A.3 is finished there are 267-289-311-333-366-399 stitches. Insert 2 marker-threads, each 70-75-81-86-95-103 stitches in from each side (= 127-139-149-161-176-193 stitches between the marker-threads on the back piece). Allow them to follow your work onwards; they are used when working the split in each side. Continue with stocking stitch and 7 band stitches in garter stitch on each side. When the body measures 16-17-17-17-17-17 cm from the division and the next row is from the right side, divide at both marker threads and finish the front and back pieces separately. LEFT FRONT PIECE: Place the 70-75-81-86-95-103 stitches for the left front piece on circular needle size 2.5 mm. Knit 1 row from the right side and increase 23-26-26-31-32-36 stitches evenly spaced (do not increase over the band) = 93-101-107-117-127-139 stitches. Work as follows from the wrong side: 3 stitches in garter stitch, * purl 1, knit 1 *, work from *-* until there are 8 stitches left, purl 1 and 7 band stitches in garter stitch. Continue this rib for 8 cm. Cast off – you can use Italian cast-off. The jacket measures approx. 50-52-54-56-58-60 cm from the shoulder. RIGHT FRONT PIECE: Place the 70-75-81-86-95-103 stitches for the right front piece on circular needle size 2.5 mm. Knit 1 row from the right side and increase 23-26-26-31-32-36 stitches evenly spaced (do not increase over the band) = 93-101-107-117-127-139 stitches. Work as follows from the wrong side: 7 band stitches in garter stitch, * purl 1, knit 1 *, work from *-* until there are 4 stitches left, purl 1 and 3 stitches in garter stitch. Continue this rib for 8 cm. Cast off in the same way as on the left front piece. BACK PIECE: Place the 127-139-149-161-176-193 m stitches for the back piece on circular needle size 2.5 mm. Knit 1 row from the right side and increase 46-48-52-58-65-70 stitches evenly spaced = 173-187-201-219-241-263 stitches. Work as follows from the wrong side: 3 stitches in garter stitch, * purl 1, knit 1 *, work from *-* until there are 4 stitches left, purl 1 and 3 stitches in garter stitch. Continue this rib for 8 cm. Cast off in the same way as on the front pieces. SLEEVES: Start mid-under one sleeve, use short circular needle or double pointed needles size 3 mm and knit up 1 stitch in each of the last 4-4-5-5-6-6 cast-on stitches, place the 80-80-89-100-109-109 stitches from the thread on short circular/double pointed needles size 3 mm, work the first row in A.3 and increase 8-8-9-10-11-11 stitches evenly, knit up 1 stitch in each of the first 4-4-5-5-6-6 cast-on stitches = 96-96-108-120-132-132 stitches. Work sleeve worked in the round. Insert 1 marker-thread at the beginning of the round (in the middle of the 8-8-10-10-12-12 new stitches under the sleeve) – allow the thread to follow your work onwards; it is used when decreasing under the sleeve. Work A.3 8-8-9-10-11-11 times on the round. When A.3 is finished, 1 stitch has been decreased in each repeat (8-8-9-10-11-11 decreased stitches). Continue with stocking stitch. AT THE SAME TIME, when the sleeve measures 2 cm, decrease 1 stitch on each side of the marker – read DECREASE TIP. Decrease like this every 2nd round a total of 2-0-3-7-10-10 times, then every 4th round 6-6-8-8-8-8 times = 72-76-77-80-85-85 stitches. Continue working until the sleeve measures 36-35-34-32-31-29 cm from the division (or to desired length. There is approx. 8 cm left ). Knit 1 round and increase 26-26-29-30-31-31 stitches evenly spaced = 98-102-106-110-116-116 stitches. Change to double pointed needles size 2.5 mm and work rib (knit 1, purl 1) for 8 cm. Cast off in the same way as on the body. Work the other sleeve in the same way. ASSEMBLY: Sew together the openings on the bands with small stitches. Sew the buttons onto the left band. |
||||||||||||||||||||||||||||||||||
Diagram explanations |
||||||||||||||||||||||||||||||||||
|
||||||||||||||||||||||||||||||||||
 |
||||||||||||||||||||||||||||||||||
 |
||||||||||||||||||||||||||||||||||
 |
||||||||||||||||||||||||||||||||||
 |
||||||||||||||||||||||||||||||||||
Have you finished this pattern?Tag your pictures with #dropspattern #avalanchecardigan or submit them to the #dropsfan gallery. Do you need help with this pattern?You'll find 40 tutorial videos, a Comments/Questions area and more by visiting the pattern on garnstudio.com. © 1982-2026 DROPS Design A/S. We reserve all rights. This document, including all its sub-sections, has copyrights. Read more about what you can do with our patterns at the bottom of each pattern on our site. |
||||||||||||||||||||||||||||||||||


With over 40 years in knitting and crochet design, DROPS Design offers one of the most extensive collections of free patterns on the internet - translated to 17 languages. As of today we count 324 catalogues and 12290 patterns translated into English (UK/cm). 12290
We work hard to bring you the best knitting and crochet have to offer, inspiration and advice as well as great quality yarns at incredible prices! Would you like to use our patterns for other than personal use? You can read what you are allowed to do in the Copyright text at the bottom of all our patterns. Happy crafting!
Post a comment to pattern DROPS 243-7
We would love to hear what you have to say about this pattern!
If you want to leave a question, please make sure you select the correct category in the form below, to speed up the answering process. Required fields are marked *.