
Popular categories
Looking for a yarn?


Comments / Questions (74)
![]() Ljubica wrote:
Ljubica wrote:
Modello meraviglioso.....grazie....
01.04.2020 - 21:47
![]() Laurence wrote:
Laurence wrote:
Je ne trouvais pas les jetés très jolis une fois tricotés, aussi j’ai recommencé et j’ai monté une maille à partir du fil entre deux mailles , c’est beaucoup plus joli.
27.03.2020 - 12:42
![]() Laurence wrote:
Laurence wrote:
Merci de me dire si les jetés de l’empiècement se font sur le rang endroit ou sur le rang mousse ? Cordialement
26.03.2020 - 12:53DROPS Design answered:
Bonjour Laurence, on commence à augmenter au 2ème tour, autrement dit au 2ème tour du point texturé. Bon tricot!
26.03.2020 - 13:21
![]() Marie wrote:
Marie wrote:
Bonjour , je ne comprends pas la lecture du motif de l'empiècement. Je n'arrive pas a faire la distinction entre point mousse et maille endroit . Je comprends que le point mousse en rond c'est un tour maille endroit et un tour maille envers Auriez vous les explications par le langage maille endroit et maille envers pour les différents rangs à répéter . Ou un diagramme . D'avance merci beaucoup .
23.03.2020 - 16:52DROPS Design answered:
Bonjour Marie, comme on doit tricoter 1 m point mousse 1 fois à l'endroit 1 fois à l'envers quand on la tricote en rond, on va tricoter le point texturé ainsi: Tour 1: 2 m end, Tour 2: 1 m end, 1 m env (= la 1ère maille sera toujours 1 m endroit, la 2ème maille sera 1 m point mousse). Bon tricot!
23.03.2020 - 16:54
![]() Val wrote:
Val wrote:
How is the yoke not a ribbing stitch? Garter in the round? Very confused...
22.03.2020 - 03:26DROPS Design answered:
Dear Val, the yoke is worked first with textured pattern, ie: (K1, 1 st in garter st) - all the round - to work 1 st in garter st you have to work it alternatively K and P, so that textured pattern will be worked: Row 1:(K2), Row 2 (K1, P1). Happy knitting!
23.03.2020 - 09:56
![]() Loredana wrote:
Loredana wrote:
Buonasera, volevo sapere se il motivo (1m dritto e 1m rovescio) finisce con gli aumenti. Dalle foto mi sembra di vedere aumenti anche dopo. Grazie Loredana
18.03.2020 - 16:21DROPS Design answered:
Buongiorno Loredana. Gli aumenti proseguono anche quando si inizia a lavorare a maglia rasata. Buon lavoro!
19.03.2020 - 12:30
![]() Marita wrote:
Marita wrote:
Av 171 oppskrifter for vaar og sommer er det ikke mange genser/jakke-oppskrifter med 100% bomullsgarn. Oppskriftene er oversatt til mange spraak og i mange land er det for varmt med ullgenser om sommeren. Om vaaren ogsaa!
16.03.2020 - 13:49
![]() Kari wrote:
Kari wrote:
Hei Av 171 Vår og Sommeroppskrifter er det kun 83 oppskrifter det er lagt ut mønster på til nå. Dvs det mangler 88 stk. Her jeg bor er våren igang for fullt med både blomster og fugler. Når starter egentlig vårsesongen hos Garnstudio/Drops? Jeg vil gjerne strikke denne oppskriften, men begynner å bli bittelitt lei av å sjekke om den er kommet. Det hadde vel ikke gjort noe om dere la ut alle samtidig i begynnelsen av året? Mvh Kari
12.03.2020 - 21:11DROPS Design answered:
Hei Kari. Denne oppskriften er nå lagt ut. Vi legger ut oppskriftene fortløpende, så snart de er ferdigskrevet. God Fornøyelse!
16.03.2020 - 12:53
![]() Roswitha wrote:
Roswitha wrote:
Diesen tollen Sommerpulli würde ich gerne stricken. Ich warte schon sehnsüchtig auf die Anleitung!
09.03.2020 - 07:43
![]() Sylvie wrote:
Sylvie wrote:
Mon préféré; j'attends le explications pour commander la laine!
24.02.2020 - 14:36
|
|
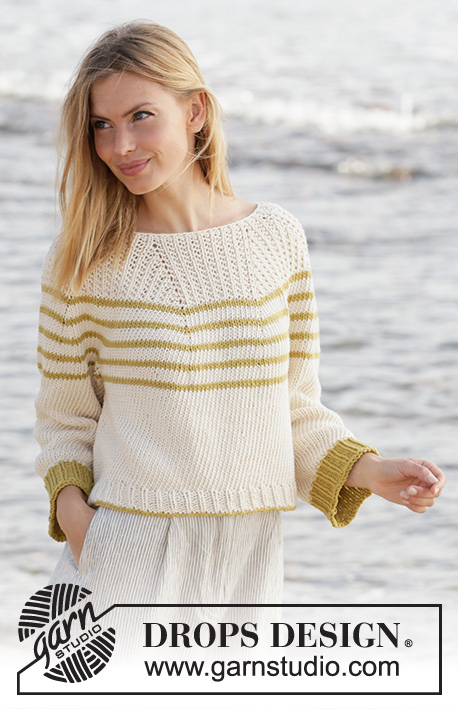
Breaking Sunlight#breakingsunlightsweater |
|
 |
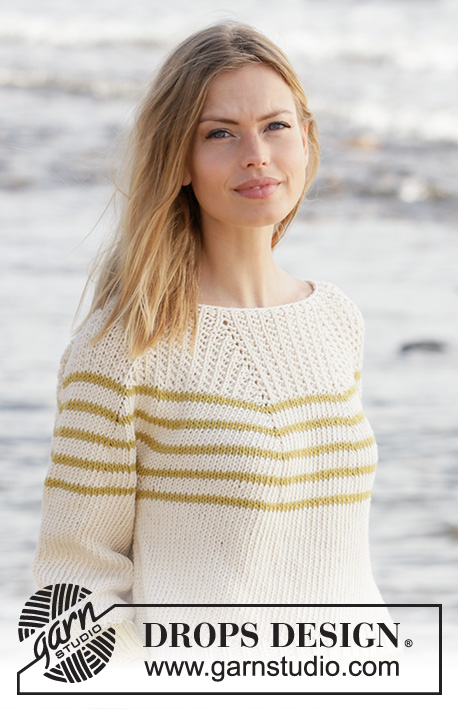 |
Knitted jumper with round yoke in DROPS Paris. The piece is worked top down with stripes and textured pattern. Sizes S - XXXL.
DROPS 213-36 |
|
|
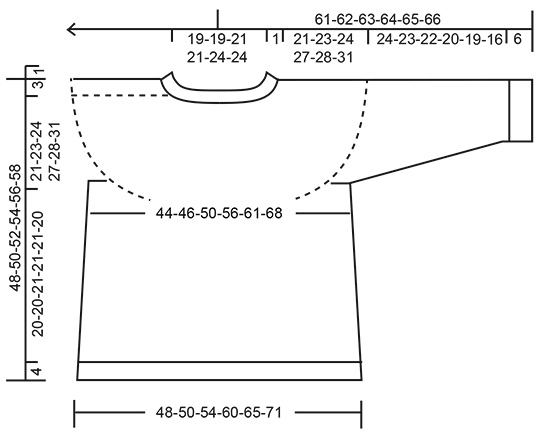
------------------------------------------------------- EXPLANATIONS FOR THE PATTERN: ------------------------------------------------------- RIDGE/GARTER STITCH (worked in the round): 1 ridge in height = 2 rounds; Knit 1 round and purl 1 round. INCREASE TIP-1 (for yoke): Increase with 1 yarn over after markers 1, 3, 5 and 7. Increase with 1 yarn over before markers 2, 4, 6 and 8. The yarn overs are worked twisted on the next round to avoid holes. The increase stitches are worked into the textured pattern as you go, i.e. increase-1 is worked in garter stitch, increase-2 is worked in stocking stitch etc. When the textured pattern is finished, work the increased stitches in stocking stitch. INCREASE TIP-2 (for sides of body): Work until there are 2 stitches left before the marker thread, make 1 yarn over, knit 4 (marker thread sits between these 4 stitches) make 1 yarn over (= 2 stitches increased at each marker thread; 4 stitches increased on round). On the next round work the yarn overs twisted to avoid holes. Then work the new stitches in stocking stitch. STRIPES: STRIPE 1: Work 13-13-14-14-14-14 cm with off-white and work textured pattern as follows: * Knit 1, work 1 stitch in GARTER STITCH – read description above *, work from *-* to end of round. STRIPE 2: Work stocking stitch and stripes as follows: Work * 2 rounds with lime, 4 rounds with off white *, work from *-* for 15-15-15-16-16-16 cm, adjust so you finish after a complete stripe (applies to the stripe with lime). STRIPE 3: Finish the piece with off-white and stocking stitch. DECREASE TIP (for sleeves): Decrease 1 stitch on each side of the marker thread as follows: Work until there are 3 stitches left before the marker thread, knit 2 together, knit 2 (marker thread sits between these 2 stitches), slip 1 stitch as if to knit, knit 1 and pass the slipped stitch over the knitted stitch. CASTING-OFF TIP: To avoid the cast-off edge being tight you can cast off with a larger size needle. If the edge is still tight, make 1 yarn over after approx. each 4th stitch at the same time as casting off and the yarn overs are cast off as normal stitches. ------------------------------------------------------- START THE PIECE HERE: ------------------------------------------------------- JUMPER – SHORT OVERVIEW OF THE PIECE: The neck and yoke are worked in the round with circular needle, from mid back and top down. The yoke is divided for body and sleeves and the body is continued in the round with circular needle. The sleeves are worked with double pointed needles, top down. NECK: Cast on 80-80-88-88-96-96 stitches with circular needle size 4.5 mm and off-white. Knit 1 round. The next round is worked as follows: * Knit 1, purl 1 *, work from *-* to end of round. Work 2 rounds like this and then change to circular needle size 5.5 mm. Insert 1 marker at the beginning of the round (= approx. mid back); the yoke will be measured from this marker! YOKE: The piece is worked in STRIPES – read description above. On the next round insert 8 markers (all markers are inserted into knitted stitches) as follows: Insert marker 1 in the 7th-7th-9th-9th-9th-9th stitch. Insert marker 2 in the 13th-13th-15th-15th-15th-15th stitch. Insert marker 3 in the 27th-27th-31st-31st-33rd-33rd stitch. Insert marker 4 in the 33rd-33rd-37th-37th-39th-39th stitch. Insert marker 5 in the 47th-47th-53rd-53rd-57th-57th stitch. Insert marker 6 in the 53rd-53rd-59th-59th-63rd-63rd stitch. Insert marker 7 in the 67th-67th-75th-75th-81st-81st stitch. Insert marker 8 in the 73rd-73rd-81st-81st-87th-87th stitch. On the next round increase 1 stich by each marker – read INCREASE TIP-1 (= 8 stitches increased). The number of stitches before marker 1, between markers 2 and 3, markers 4 and 5, markers 6 and 7 and after marker 8 remain the same. The increased stitches are between markers 1 and 2, markers 3 and 4, markers 5 and 6 and between markers 7 and 8. REMEMBER THE KNITTING TENSION! Increase like this every 2nd round a total of 15-17-19-23-24-27 times, every 4th round 1 time and every 6th round 1 time = 216-232-256-288-304-328 stitches. The piece measures approx. 19-21-23-27-28-31 cm from the marker. Continue working until the piece measures 21-23-24-27-28-31 cm. Now divide the piece for body and sleeves as follows: Work the first 31-33-36-41-44-49 stitches as before, place the next 46-50-56-62-64-66 stitches on a thread for sleeve and cast on 8-8-8-8-10-10 stitches under the sleeve, work 62-66-72-82-88-98 stitches as before, place the next 46-50-56-62-64-66 stitches on a thread for sleeve and cast on 8-8-8-8-10-10 stitches under the sleeve, and work 31-33-36-41-44-49 stitches as before. BODY: = 140-148-160-180-196-216 stitches. Insert 1 marker thread in the middle of the 8-8-8-8-10-10 stitches under each sleeve (= in sides of body). There are 70-74-80-90-98-108 stitches between the marker threads. Allow the threads to follow your work onwards; they will be used when increasing in the sides. When the piece measures 4 cm from the division, increase 1 stitch on each side of both marker threads – read INCREASE TIP-2 (= 4 stitches increased). Increase like this every 4 cm a total of 3 times = 152-160-172-192-208-228 stitches. When the body measures 20-20-21-21-21-20 cm from the division increase 10-11-11-12-11-12 stitches evenly on the next round = 162-171-183-204-219-240 stitches. Change to circular needle size 4.5 mm and work rib (= knit 1 / purl 2) for 4 cm. Cast off with knit using lime– read CASTING-OFF TIP! SLEEVES: Place the 46-50-56-62-64-66 stitches from the thread on the one side of the piece on double pointed needles size 5.5.mm and knit up 1 stitch in each of the 8-8-8-8-10-10 stitches cast on under the sleeve = 54-58-64-70-74-76 stitches. Insert a marker thread in the middle of the 8-8-8-8-10-10 stitches under the sleeve. Allow the thread to follow your work onwards; it will be used when decreasing under the sleeve. Continue with stocking stitch and stripes in the round. When the sleeve measures 3 cm from the division, decrease 1 stitch on each side of the marker thread – read DECREASE TIP (= 2 stitches decreased). Decrease like this every 3-2½-2-1½-1-1 cm a total of 6-7-9-11-12-12 times = 42-44-46-48-50-52 stitches. When the sleeve measures 24-23-22-20-19-16 cm from the division increase 0-1-2-0-1-2 stitches = 42-45-48-48-51-54 stitches. Change to double pointed needles size 4.5 mm and work rib (= knit 1 / purl 2) in the round using lime and for 6 cm. Cast off with knit using lime. Work the other sleeve in the same way. |
|
 |
|
Have you finished this pattern?Tag your pictures with #dropspattern #breakingsunlightsweater or submit them to the #dropsfan gallery. Do you need help with this pattern?You'll find 26 tutorial videos, a Comments/Questions area and more by visiting the pattern on garnstudio.com. © 1982-2026 DROPS Design A/S. We reserve all rights. This document, including all its sub-sections, has copyrights. Read more about what you can do with our patterns at the bottom of each pattern on our site. |
|


With over 40 years in knitting and crochet design, DROPS Design offers one of the most extensive collections of free patterns on the internet - translated to 17 languages. As of today we count 324 catalogues and 12290 patterns translated into English (UK/cm). 12290
We work hard to bring you the best knitting and crochet have to offer, inspiration and advice as well as great quality yarns at incredible prices! Would you like to use our patterns for other than personal use? You can read what you are allowed to do in the Copyright text at the bottom of all our patterns. Happy crafting!
Post a comment to pattern DROPS 213-36
We would love to hear what you have to say about this pattern!
If you want to leave a question, please make sure you select the correct category in the form below, to speed up the answering process. Required fields are marked *.