
Popular categories
Looking for a yarn?


Comments / Questions (74)
![]() Katarzyna Sorokosz wrote:
Katarzyna Sorokosz wrote:
Jak wykonac ścieg strukturalny ?
16.05.2020 - 14:32DROPS Design answered:
Witaj Kasiu! Ścieg strukturalny jest wykonywany następująco: 1 oczko prawe i 1 oczko ściegiem francuskim itd. A bardziej opisowo: 1-sze okr. ściegu strukturalnego: przerobić całe okrążenie na prawo. 2 -gie okrążenie: powtarzać na okrągło: 1 oczko prawe i 1 oczko lewe. 3-cie okrążenie: całe na prawo. 4-te okrążenie: 1 oczko prawe i 1 oczko lewe (pamiętaj aby oczka lewe znajdowały się dokładnie ponad oczkami lewymi okr. 2). Itd. Pozdrawiamy!
18.05.2020 - 10:43
![]() Maria Monica wrote:
Maria Monica wrote:
Grazie. Ci sono riuscita. Non e molto chiara la spiegazione ma alla fine ho capito come si esegue. 👍 Saluti
14.05.2020 - 15:30
![]() Maria Monica Urbani wrote:
Maria Monica Urbani wrote:
Buongiorno. Bellissimo modello. Ho appena iniziato la riga punto legaccio con l aumento yarn over. Il giro seguente sarà a maglia rasata. Come lavoro la maglia aumentata per trovarmi giusta con il pattern? Non capisco... Grazie se potrete rispondere Saluti Monica
13.05.2020 - 16:39DROPS Design answered:
Buongiorno Monica, in che punto del modello si trova? Nel paragrafo SUGGERIMENTO PER GLI AUMENTI trova l'indicazione su come vanno lavorati gli aumenti nei ferri successivi. Buon lavoro!
13.05.2020 - 18:06
![]() Lone Bergh Hansen wrote:
Lone Bergh Hansen wrote:
Jeg kan ikke forstå strukturmønstret: Der står: 1.stribe således: Strik *1 maske ret, 1 maske retstrik, strik fra * til * over alle masker. Retstrik forklares således: strik en omgang ret og 1 omgang vrang. Hvordan omsætter jeg omgange til masker? Det forvirrer mig nok mest at der står retstrik som masker mens det er forklaret som omgange. Og jeg kan ikke få indtagninger på hver anden omgang til skiftevis at være i glatstrik og retstrik.
05.05.2020 - 20:16DROPS Design answered:
Hej Lone, jo du strikker skiftevis 1 maske ret (glatstrik), 1 maske retstrik. Det vil sige på første omgang strikker du ret hele vejen rundt, på næste omgang strikker du 1 ret, 1 vrang hele vejen rundt, du gentager disse 2 pinde. God fornøjelse!
06.05.2020 - 08:07
![]() Anki Jürs wrote:
Anki Jürs wrote:
Tack för svaret men den biten ni beskrev hade jag klart för mig det var när man kom förbi detta och skall börja med Rand 1 som jag är osäker på vad man menar i beskrivningen, tror jag har kommit på det, Varannan maska slätstickning, varannan rätstickning tills man är klar med Rand 1, rand 2 enbart slätstickning
28.04.2020 - 07:02DROPS Design answered:
Hej Anki, ja det stemmer, varannan slätstickning, varannan rätstickning God fornøjelse! :)
28.04.2020 - 14:17
![]() Anki Jürs wrote:
Anki Jürs wrote:
Blir inte klok på hur rand 1 skall stickas, skall det vara rätstickning, eller fortsatt resår 1 r och 1 a, rand 2 står där tydligt att det skall vara slätstickning, men rand 1 blir jag inte klok på
27.04.2020 - 13:07DROPS Design answered:
Hei Anki. Først legger du opp 80-80-88-88-96-96 masker, så strikker du 1 omgang med kun rett masker (=første omgang). Neste omgang (2. omgang) begynner du med vrangborden (1 rett, 1 vrang , 1 rett, 1 vrang osv omgangen ut). Strikk 1 omganger til (=2 omganger med vrangbord). Da har du strikket en omgang med bare rettmasker og 2 omganger med vrangbord der det er strikket rett masker over rettmasker og vrang masker over vrangmasker. God Fornøyelse!
27.04.2020 - 13:48
![]() Magda Nowak wrote:
Magda Nowak wrote:
Witam! Właśnie robię tę bluzkę i stanęłam. Nie napisane od którego rzędu lub po ilu centymetrach zaczynać wrabiać paski.
17.04.2020 - 15:25DROPS Design answered:
Witaj Magdo! Przepraszam za późną odpowiedź. W części WYKORZYSTYWANE TECHNIKI patrz PASKI. Tam znajdziesz odpowiedź. Jeśli będziesz w przyszłości miała pytania, proszę zaznacz w formularzu PYTANIE, a nie KOMENTARZ, wtedy szybciej odpowiemy. A propos, czy już zagłosowałaś na nową kolekcję DROPS Jesień/Zima, zapraszamy serdecznie!
07.06.2020 - 15:44
![]() Irina Pagliainga wrote:
Irina Pagliainga wrote:
Bin eben fertig geworden. Habe die Farbe wiess gewählt mit roten Streifen. Es ist super geworden! Danke für dieses tolle Model und leicht verständliche Anleitung.
15.04.2020 - 17:04
![]() Marta wrote:
Marta wrote:
Hola! Estoy intentando hacer este proyecto, pero no me aclaro al empezar, es decir el primer tramo de color hueso. Hago los aumentos y el punto musgo (1 vuelta derecho, 1 vuelta revés) pero no se me queda el mismo dibujo de la foto. Ayuda !!!
12.04.2020 - 18:44DROPS Design answered:
Hola Marta. La parte de arriba del jersey después de la primera vuelta de derecho se trabaja en punto elástico: 1 derecho, 1 revés.
12.04.2020 - 19:15
![]() Giovanna wrote:
Giovanna wrote:
Buonasera non ho capito il punto fantasia in tondo. Non c’è uno schema o un video? Grazie
06.04.2020 - 22:08DROPS Design answered:
Buongiorno Giovanna. Per la striscia 1, dove trova indicato di lavorare: 1 m diritto, 1 m a legaccio, lavora come segue: giro 1: entrambe le maglie a diritto; giro 2: 1 m diritto, 1 m rov. Ripete sempre i giri 1 e 2. Buon lavoro!
06.04.2020 - 23:23
|
|
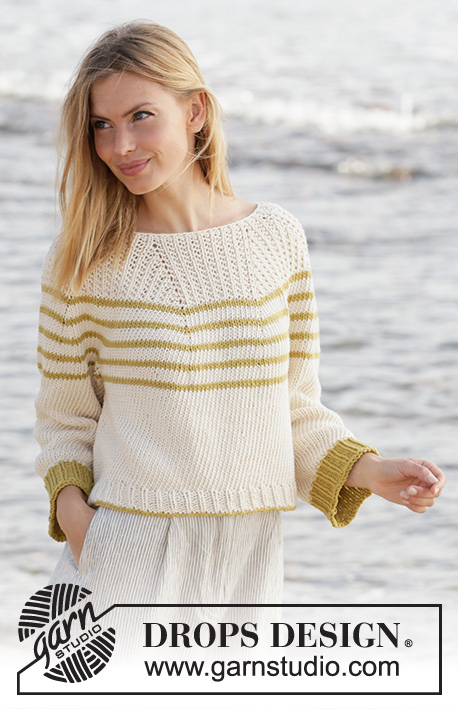
Breaking Sunlight#breakingsunlightsweater |
|
 |
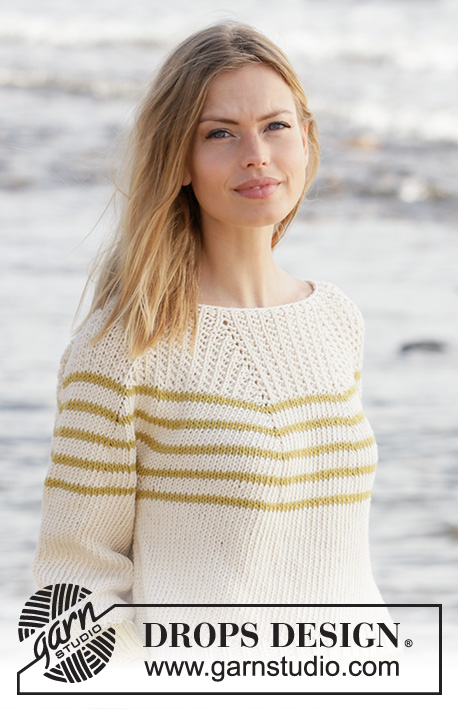 |
Knitted jumper with round yoke in DROPS Paris. The piece is worked top down with stripes and textured pattern. Sizes S - XXXL.
DROPS 213-36 |
|
|
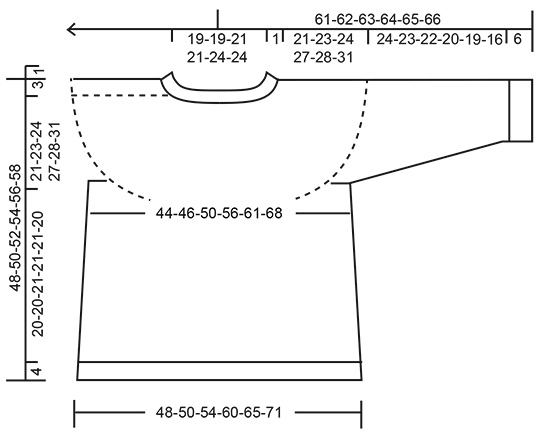
------------------------------------------------------- EXPLANATIONS FOR THE PATTERN: ------------------------------------------------------- RIDGE/GARTER STITCH (worked in the round): 1 ridge in height = 2 rounds; Knit 1 round and purl 1 round. INCREASE TIP-1 (for yoke): Increase with 1 yarn over after markers 1, 3, 5 and 7. Increase with 1 yarn over before markers 2, 4, 6 and 8. The yarn overs are worked twisted on the next round to avoid holes. The increase stitches are worked into the textured pattern as you go, i.e. increase-1 is worked in garter stitch, increase-2 is worked in stocking stitch etc. When the textured pattern is finished, work the increased stitches in stocking stitch. INCREASE TIP-2 (for sides of body): Work until there are 2 stitches left before the marker thread, make 1 yarn over, knit 4 (marker thread sits between these 4 stitches) make 1 yarn over (= 2 stitches increased at each marker thread; 4 stitches increased on round). On the next round work the yarn overs twisted to avoid holes. Then work the new stitches in stocking stitch. STRIPES: STRIPE 1: Work 13-13-14-14-14-14 cm with off-white and work textured pattern as follows: * Knit 1, work 1 stitch in GARTER STITCH – read description above *, work from *-* to end of round. STRIPE 2: Work stocking stitch and stripes as follows: Work * 2 rounds with lime, 4 rounds with off white *, work from *-* for 15-15-15-16-16-16 cm, adjust so you finish after a complete stripe (applies to the stripe with lime). STRIPE 3: Finish the piece with off-white and stocking stitch. DECREASE TIP (for sleeves): Decrease 1 stitch on each side of the marker thread as follows: Work until there are 3 stitches left before the marker thread, knit 2 together, knit 2 (marker thread sits between these 2 stitches), slip 1 stitch as if to knit, knit 1 and pass the slipped stitch over the knitted stitch. CASTING-OFF TIP: To avoid the cast-off edge being tight you can cast off with a larger size needle. If the edge is still tight, make 1 yarn over after approx. each 4th stitch at the same time as casting off and the yarn overs are cast off as normal stitches. ------------------------------------------------------- START THE PIECE HERE: ------------------------------------------------------- JUMPER – SHORT OVERVIEW OF THE PIECE: The neck and yoke are worked in the round with circular needle, from mid back and top down. The yoke is divided for body and sleeves and the body is continued in the round with circular needle. The sleeves are worked with double pointed needles, top down. NECK: Cast on 80-80-88-88-96-96 stitches with circular needle size 4.5 mm and off-white. Knit 1 round. The next round is worked as follows: * Knit 1, purl 1 *, work from *-* to end of round. Work 2 rounds like this and then change to circular needle size 5.5 mm. Insert 1 marker at the beginning of the round (= approx. mid back); the yoke will be measured from this marker! YOKE: The piece is worked in STRIPES – read description above. On the next round insert 8 markers (all markers are inserted into knitted stitches) as follows: Insert marker 1 in the 7th-7th-9th-9th-9th-9th stitch. Insert marker 2 in the 13th-13th-15th-15th-15th-15th stitch. Insert marker 3 in the 27th-27th-31st-31st-33rd-33rd stitch. Insert marker 4 in the 33rd-33rd-37th-37th-39th-39th stitch. Insert marker 5 in the 47th-47th-53rd-53rd-57th-57th stitch. Insert marker 6 in the 53rd-53rd-59th-59th-63rd-63rd stitch. Insert marker 7 in the 67th-67th-75th-75th-81st-81st stitch. Insert marker 8 in the 73rd-73rd-81st-81st-87th-87th stitch. On the next round increase 1 stich by each marker – read INCREASE TIP-1 (= 8 stitches increased). The number of stitches before marker 1, between markers 2 and 3, markers 4 and 5, markers 6 and 7 and after marker 8 remain the same. The increased stitches are between markers 1 and 2, markers 3 and 4, markers 5 and 6 and between markers 7 and 8. REMEMBER THE KNITTING TENSION! Increase like this every 2nd round a total of 15-17-19-23-24-27 times, every 4th round 1 time and every 6th round 1 time = 216-232-256-288-304-328 stitches. The piece measures approx. 19-21-23-27-28-31 cm from the marker. Continue working until the piece measures 21-23-24-27-28-31 cm. Now divide the piece for body and sleeves as follows: Work the first 31-33-36-41-44-49 stitches as before, place the next 46-50-56-62-64-66 stitches on a thread for sleeve and cast on 8-8-8-8-10-10 stitches under the sleeve, work 62-66-72-82-88-98 stitches as before, place the next 46-50-56-62-64-66 stitches on a thread for sleeve and cast on 8-8-8-8-10-10 stitches under the sleeve, and work 31-33-36-41-44-49 stitches as before. BODY: = 140-148-160-180-196-216 stitches. Insert 1 marker thread in the middle of the 8-8-8-8-10-10 stitches under each sleeve (= in sides of body). There are 70-74-80-90-98-108 stitches between the marker threads. Allow the threads to follow your work onwards; they will be used when increasing in the sides. When the piece measures 4 cm from the division, increase 1 stitch on each side of both marker threads – read INCREASE TIP-2 (= 4 stitches increased). Increase like this every 4 cm a total of 3 times = 152-160-172-192-208-228 stitches. When the body measures 20-20-21-21-21-20 cm from the division increase 10-11-11-12-11-12 stitches evenly on the next round = 162-171-183-204-219-240 stitches. Change to circular needle size 4.5 mm and work rib (= knit 1 / purl 2) for 4 cm. Cast off with knit using lime– read CASTING-OFF TIP! SLEEVES: Place the 46-50-56-62-64-66 stitches from the thread on the one side of the piece on double pointed needles size 5.5.mm and knit up 1 stitch in each of the 8-8-8-8-10-10 stitches cast on under the sleeve = 54-58-64-70-74-76 stitches. Insert a marker thread in the middle of the 8-8-8-8-10-10 stitches under the sleeve. Allow the thread to follow your work onwards; it will be used when decreasing under the sleeve. Continue with stocking stitch and stripes in the round. When the sleeve measures 3 cm from the division, decrease 1 stitch on each side of the marker thread – read DECREASE TIP (= 2 stitches decreased). Decrease like this every 3-2½-2-1½-1-1 cm a total of 6-7-9-11-12-12 times = 42-44-46-48-50-52 stitches. When the sleeve measures 24-23-22-20-19-16 cm from the division increase 0-1-2-0-1-2 stitches = 42-45-48-48-51-54 stitches. Change to double pointed needles size 4.5 mm and work rib (= knit 1 / purl 2) in the round using lime and for 6 cm. Cast off with knit using lime. Work the other sleeve in the same way. |
|
 |
|
Have you finished this pattern?Tag your pictures with #dropspattern #breakingsunlightsweater or submit them to the #dropsfan gallery. Do you need help with this pattern?You'll find 26 tutorial videos, a Comments/Questions area and more by visiting the pattern on garnstudio.com. © 1982-2026 DROPS Design A/S. We reserve all rights. This document, including all its sub-sections, has copyrights. Read more about what you can do with our patterns at the bottom of each pattern on our site. |
|


With over 40 years in knitting and crochet design, DROPS Design offers one of the most extensive collections of free patterns on the internet - translated to 17 languages. As of today we count 324 catalogues and 12290 patterns translated into English (UK/cm). 12290
We work hard to bring you the best knitting and crochet have to offer, inspiration and advice as well as great quality yarns at incredible prices! Would you like to use our patterns for other than personal use? You can read what you are allowed to do in the Copyright text at the bottom of all our patterns. Happy crafting!
Post a comment to pattern DROPS 213-36
We would love to hear what you have to say about this pattern!
If you want to leave a question, please make sure you select the correct category in the form below, to speed up the answering process. Required fields are marked *.