
Popular categories
Looking for a yarn?


Comments / Questions (47)
![]() Catherine wrote:
Catherine wrote:
Bonjour, je veux tricoter le modèle en en 5/6 ans mais je ne comprends pas le diagramme de l'empiècement. Les mailles du rang 1 sont tricotées à l'endroit et les mailles du rang 2 seraient tricotées à l'envers, donc on obtient un jersey et non plus du point mousse... Je suis perdue. Merci pour votre réponse
22.02.2021 - 19:20DROPS Design answered:
Bonjour Catherine, les premiers rangs de l'empiècement ne sont pas un vrai point mousse tricoté tout à l'endroit mais plutôt un point mousse fantaisie, espacé, autrement dit, en 5/6 ans vous tricotez 2 rangs jersey puis 1 rang envers sur l'endroit, 2 rangs jersey, puis 1 rang endroit sur l'envers (vous avez ainsi les 2 premières "côtes" ou "nervures" de l'empiècement), continuez ainsi, les carrés doivent être tricotés en jersey, les tirets en jersey envers (= à l'envers sur l'endroit et à l'endroit sur l'envers). Bon tricot!
23.02.2021 - 08:33
![]() Sylviane COLIN wrote:
Sylviane COLIN wrote:
Bonjour Je dois tricoter ce modele en 3/4 ans En ce qui concerne le diagramme A1 et A2 A.1 je dois le repeter seulement 13 fois ou je vais comme le A.2 jusqu'au 42° RANG, En vous remerciant par avance , bonne journée à vous En vous remerciant par avance Bonne journée à vous
27.09.2020 - 14:42DROPS Design answered:
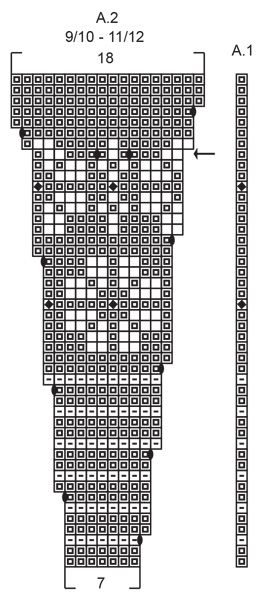
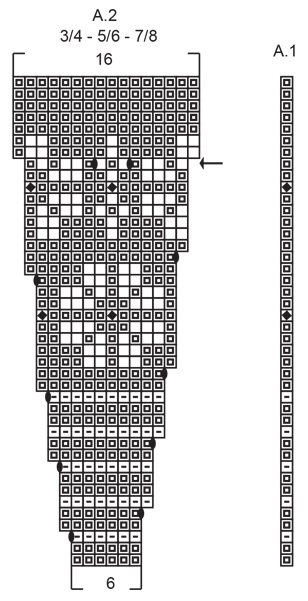
Bonjour Mme Colin, A.1 permet simplement de donner de la symétrie au motif, autrement dit, vous tricotez: 5 m point mousse, A.1 (= 1 maille), et vous répétez ensuite 13 fois A.2 en largeur et vous terminez par 5 m point mousse; Sur l'envers, tricotez 5 m point mousse, répétez A.2 en lisant le diagramme de gauche à droite, terminez par la maille de A.1 et 5 m point mousse. Bon tricot!
28.09.2020 - 10:10
![]() Penny wrote:
Penny wrote:
Oh!! Got it I think. Didn’t understand chart. Seems to be working out now. No need to reply. Thanks
18.08.2020 - 17:36
![]() Penny Warin wrote:
Penny Warin wrote:
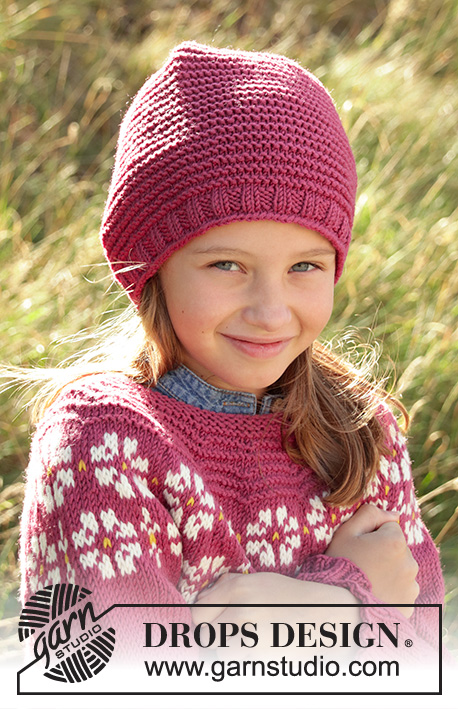
The picture looks Like the yoke is garter stitch down to the pattern but the diagram and instructions don’t seem to show that. Please can you explain . Thank you
18.08.2020 - 12:27DROPS Design answered:
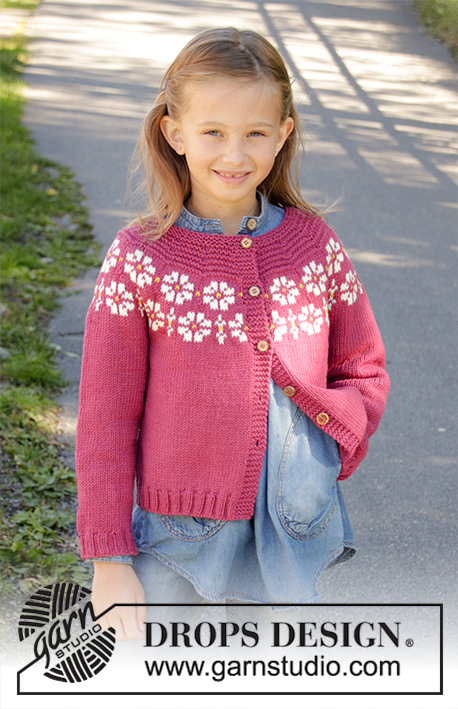
Dear Mrs Warin, first rows of yoke are worked in garter stitch, then the first rows in diagram are worked with (2 rows stocking stitch, Purl 1 row (purl from RS or knit from WS). You might be able to see the slight difference in the 4th picture which is somewhat close-up. Happy knitting!
18.08.2020 - 13:09
![]() Kathy wrote:
Kathy wrote:
I am having difficulty interpreting the pattern, I have never knitted top down before. Can you give me some tips?
18.06.2020 - 03:23DROPS Design answered:
Dear Kathy, this lesson shows how to work a jumper top down with raglan increases - this jacket will be worked with a round yoke, so that increases will be worked a different way but this lesson could still help you to understand how to work a pattern top down. Hope this helps. Happy knitting!
18.06.2020 - 10:25
![]() Joan wrote:
Joan wrote:
I'm all set. I misinterpreted the pattern. I think this time it will be fine. Thanks.
13.05.2020 - 01:12
![]() Joan wrote:
Joan wrote:
The pattern states that once patterns have been completed in height to continue in stockinette stitch until the piece measures 6" from the marker. Even though the gauge is correct, 6' from the marker will occur well before the patterns are finished. Did I miss a marker placement somewhere? What else could be the problem?
12.05.2020 - 19:34DROPS Design answered:
Dear Joan, if your tension in height is right, you should have approx. 6" when diagrams A.1/A.2 are done in height. When you work diagrams, all rows are drawn, those from RS as well as those from WS. Happy knitting!
13.05.2020 - 08:16
![]() Birgit Piotrowski wrote:
Birgit Piotrowski wrote:
Habe ich eben schon unter Kommentar geschrieben.
26.03.2020 - 20:17DROPS Design answered:
Liebe Frau Piotrowski, in der Größe 3/4 beginnen Sie mit 89 Maschen und wenn A.2 fertig ist haben Sie 16 M in jedem A.2 = 5 + 1 + 13x16 + 5 = 219 M + 3 M = 222 M. Dann verteilen Sie die Arbeit so: 5 + 31 M (= Vorderteil) + 6 M (die nächsten 44 M legen Sie still für den Ärmel) + 62 M (Rückenteil) + 6 M (die nächsten 44 M legen Sie still für den 2. Ärmel) + 31 M + 5 (= Vorderteil) = 36+ 6 + 62+6+36= 146 M. Viel Spaß beim stricken!
27.03.2020 - 09:53
![]() Birgit Piotrowski wrote:
Birgit Piotrowski wrote:
Hallo. Ich stricke die Größe 3/4 und habe es Problem, dass ich am Ende der passe nur 171 Maschen auf der Nadel habe. Das Muster passt aber perfekt und ich kann keinen Fehler finden. Was mache ich nun mit der Einteilung der Ärmel- und Rumpfmaschen? Liebe Grüße Birgit
26.03.2020 - 20:15
![]() Martina wrote:
Martina wrote:
Wofür steht der nach links zeigende Pfeil in der Strickschrift zu A2? Ich komme an dieser Stelle mit der Strickschrift nicht klar, ist sie dort um eins versetzt?
23.02.2020 - 13:28DROPS Design answered:
Liebe Martina, bei der Reihe mit dem Pfeil wird es in der Mitte von jedem Diagram zugnommen, bei und nach dieser Reihe müssen Sie aufpassen, daß das Muster immer schön übereinander liegt. Viel Spaß beim stricken!
24.02.2020 - 09:13
|
|||||||||||||||||||
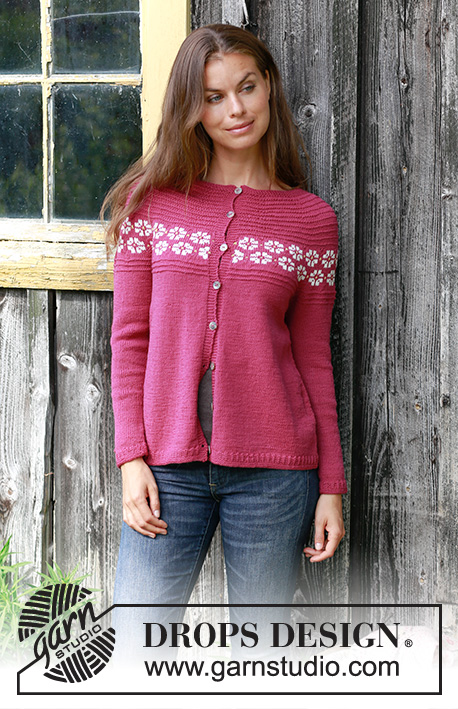
Daisy Delight Cardigan#daisydelightcardigan |
|||||||||||||||||||
 |
 |
||||||||||||||||||
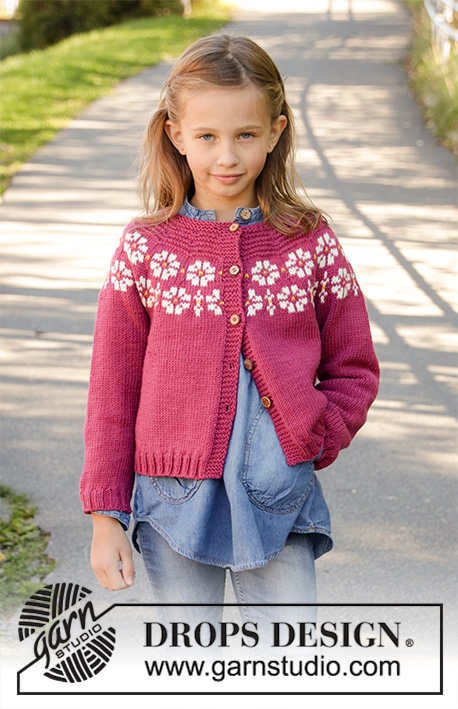
Knitted jacket for children in DROPS Merino Extra Fine. DROPS Lima or DROPS Cotton Light. The piece is worked top down with flowers, coloured pattern, garter stitch and stocking stitch. Sizes 3-12 years.
DROPS Children 34-5 |
|||||||||||||||||||
|
EXPLANATIONS FOR THE PATTERN: ------------------------------------------------------- RIDGE/GARTER STITCH (worked back and forth): 1 ridge = Knit 2 rows. PATTERN: See diagrams A.1 and A.2. Choose diagram for your size. The diagrams show all the rows in the pattern seen from the right side. INCREASE TIP-1 (evenly spaced): To work out how to increase evenly, count the total number of stitches on the needle (e.g. 72 stitches) and divide by the number of increases to be made (e.g. 17) = 4.2. In this example increase by making 1 yarn over after approx. each 4th stitch. On the next row work the yarn overs twisted to avoid holes. INCREASE TIP-2 (for sides of body): Work until there is 1 stitch left before the marker thread, 1 yarn over, knit 2 (marker thread sits in the middle of these 2 stitches), 1 yarn over = 2 stitches increased. On the next row work the yarn overs twisted to avoid holes. Then work the new stitches in stocking stitch. DECREASE TIP (for sleeves): Decrease 1 stitch on each side of the marker thread as follows: Work until there are 3 stitches left before the marker thread, knit 2 together, knit 2 (marker thread sits in the middle of these 2 stitches), slip 1 stitch as if to knit, knit 1 and pass the slipped stitch over the knitted stitch = 2 stitches decreased. BUTTONHOLES: Work buttonholes on the right band (when garment is worn). 1 buttonhole = start from the wrong side and knit together stitches 2 and 3 from the edge, make 1 yarn over. On the next row knit the yarn over to leave a hole. The first buttonhole is worked after 1 cm on the neck and then the other 4-4-5-5-5 buttonholes are worked every 6-6-6-7-7 cm. ------------------------------------------------------- START THE PIECE HERE: ------------------------------------------------------- JACKET - SHORT OVERVIEW OF THE PIECE: The piece is worked back and forth with circular needle, top down, then the front and back pieces are worked back and forth. The sleeves are worked in the round with short circular needle/double pointed needles. YOKE: Cast on 72-76-80-86-92 stitches with circular needle size 4 and heather/cerise/dark red. Work 2 RIDGES – see description above – remember BUTTONHOLES on right band – see description above. Knit 1 row where you increase 17-19-21-23-24 stitches evenly on row - READ INCREASE TIP-1! = 89-95-101-109-116 stitches on needle. Knit 1 row from the wrong side. Insert a marker in this row and measure onwards from here. Work according to diagrams A.1 and A.2 from the right side as follows: Work 5 band stitches in GARTER STITCH, A.1 over 1 stitch, A.2 a total of 13-14-15-14-15 times on the row and 5 band stitches in garter stitch. REMEMBER THE KNITTING TENSION! When diagrams A.1 and A.2 have been completed in height there are 219-235-251-263-281 stitches on the needle. On the next row from the right side increase 3-3-5-1-5 stitches evenly on row = 222-238-256-264-286 stitches. Continue with stocking stitch and 5 band stitches in garter stitch on each side until the piece measures 15-15-16-17-18 cm from the marker. The next row from the right side is worked as follows: Work 5 band stitches in garter stitch, 31-33-36-37-38 stitches in stocking stitch (= front piece), place the next 44-48-51-53-62 stitches on a thread (= sleeve), cast on 6 new stitches under the sleeve, work 62-66-72-74-76 stitches in stocking stitch (= back piece), place the next 44-48-51-53-62 stitches on a new thread (= sleeve), cast on 6 new stitches, work 31-33-36-37-38 stitches (= front piece) and 5 band stitches in garter stitch. BODY: There are 146-154-166-170-174 stitches on the needle. THE PIECE IS NOW MEASURED FROM HERE! Insert 1 marker thread in the middle of the 6 new stitches cast on under each sleeve. Work stocking stitch back and forth, with 5 band stitches in garter stitch on each side. When the piece measures 3 cm increase 1 stitch on each side of each marker (= 4 stitches increased) READ INCREASE TIP–2! Repeat the increase every 3-4-5-6-7 cm a total of 3 times = 158-166-178-182-186 stitches on the needle. Continue working as before until the piece measures 12-16-19-22-25 cm. Work 1 row from the right side where you increase 10-10-10-10-10 stitches evenly on row (do not increase on the bands) = 168-176-188-192-196 stitches. The next row is worked as follows from the right side: Work 5 band stitches in garter stitch, purl 2, * knit 2, purl 2 *. Work from *-* until there are 5 stitches left and work 5 band stitches in garter stitch. Continue this rib for 3 cm. On the next row from the right side cast off with garter stitch over garter stitch, knit over knit and purl over purl. Cut and fasten the strand. SLEEVE: Place the stitches from one thread on short circular needle/double pointed needles size 4 mm (= 44-48-51-53-62 stitches) and knit up 1 stitch in each of the 6 stitches cast on under the sleeve (= 50-54-57-59-68 stitches). Insert 1 marker thread in the middle of these 6 stitches. Work stocking stitch in the round for 2 cm. Now decrease 1 stitch on each side of the marker thread - READ DECREASE TIP. Continue with stocking stitch and repeat the decrease every 4-3½-4-4-3½ cm until you have decreased a total of 5-7-7-8-10 times = 40-40-43-43-48 stitches on the needles. Work stocking stitch until the sleeve measures 22-27-30-34-37 cm. Work 1 round and increase 4-4-5-5-4 stitches evenly on the round = 44-44-48-48-52 stitches. Work rib in the round with knit 2 / purl 2 for 3 cm. Loosely cast off with knit over knit and purl over purl. Cut and fasten strand. Work the other sleeve in the same way. ASSEMBLY: Sew opening under sleeves. Sew buttons onto left band. |
|||||||||||||||||||
Diagram explanations |
|||||||||||||||||||
|
|||||||||||||||||||
 |
|||||||||||||||||||
 |
|||||||||||||||||||
 |
|||||||||||||||||||
Have you finished this pattern?Tag your pictures with #dropspattern #daisydelightcardigan or submit them to the #dropsfan gallery. Do you need help with this pattern?You'll find 31 tutorial videos, a Comments/Questions area and more by visiting the pattern on garnstudio.com. © 1982-2026 DROPS Design A/S. We reserve all rights. This document, including all its sub-sections, has copyrights. Read more about what you can do with our patterns at the bottom of each pattern on our site. |
|||||||||||||||||||


With over 40 years in knitting and crochet design, DROPS Design offers one of the most extensive collections of free patterns on the internet - translated to 17 languages. As of today we count 324 catalogues and 12290 patterns translated into English (UK/cm). 12290
We work hard to bring you the best knitting and crochet have to offer, inspiration and advice as well as great quality yarns at incredible prices! Would you like to use our patterns for other than personal use? You can read what you are allowed to do in the Copyright text at the bottom of all our patterns. Happy crafting!
Post a comment to pattern DROPS Children 34-5
We would love to hear what you have to say about this pattern!
If you want to leave a question, please make sure you select the correct category in the form below, to speed up the answering process. Required fields are marked *.