
Popular categories
Looking for a yarn?


Comments / Questions (23)
![]() Lyse wrote:
Lyse wrote:
Bonjour,est ce qu'il y a des erreurs dans le patron :191-23??? Merci j'attends votre réponse merci
26.03.2026 - 16:47DROPS Design answered:
Bonjour Lyse, à quelle erreur / quelle taille faites-vous référence? N'hésitez pas à nous en dire davantage que nous puissions vérifier si besoin. Merci pour votre compréhension.
27.03.2026 - 07:09
![]() Lynne wrote:
Lynne wrote:
I have just started to work the sleeves in the round. Directionally, when I follow A3 for underarm pattern and also with the method for decreasing, does it make a difference? For example I picked up the 8 sts then commenced my first row so that the 8sts are at the end of the round. Does this effect the way the sts lean in anyway ? Decreased sts slope away from underarm and I wondered if the A3 pattern changes in anyway as a result?
28.05.2022 - 23:46DROPS Design answered:
Dear Lynne, that's okay how you did it, start then to decrease 2 sts before A.3 with k2 tog, then work A.3 and decrease the first 2 sts after A.3 with slip 1, K1, psso. You have so decreased 1 stitch on each side of A.3. Happy knitting!
30.05.2022 - 08:29
![]() Deborah Larson wrote:
Deborah Larson wrote:
First time knitting top down & following graphs. I found the instructions & graphs easy to follow. Best thing about top down knitting is that you can try it on as you go. Very pleased with results. Thankyou
13.05.2022 - 04:07
![]() Pia Olsson wrote:
Pia Olsson wrote:
Hej! Jag har stickat klart mönstret på oket i storlek M. I beskrivningen står det att det ska finnas 239 maskor men jag har 272 maskor inklusive framkantsmaskorna. Jag har uppenbarligen gjort något allvarligt fel i mönstret, kan ni förstå vad som har blivit fel? Mönstret ser helt rätt ut när jag tittar på det. Hälsningar Pia
06.03.2022 - 09:28DROPS Design answered:
Hej Pia, i størrelse M strikkes diagrammet 19 gange, du starter med 8 masker i diagrammet, tager ud og slutter med 12 masker i diagrammet. 12x19=228+11=239 masker. Sæt gerne et lille mærke imellem hver af de 19 rapporter. God fornøjelse!
09.03.2022 - 10:18
![]() Alice wrote:
Alice wrote:
Why are the buttonholes on the left band instead of the right?
18.04.2021 - 01:07DROPS Design answered:
Dear Alice, what we think is the "traditional" placement of the buttons are rather arbitrary, if you look at fashion history (before the Edwardian period), buttons/ buttonholes were used on both sides, mostly depending on wheter the owner of the dress dressed herself, or somebody else helped her, but also on the prefernace of the dressmaker. In our times, pllacement of buttons/ buttonholes can change for example, if someone is left handed. However, if you prefer your buttons on the other side, you can easily but the buttonholes differently. Happy Knitting!
18.04.2021 - 04:02
![]() Kat B wrote:
Kat B wrote:
I believe the pattern is set so the buttonholes are made on the LF side of the sweater, if I prefer my buttonholes on the Rt side can I move the A.1B to the Rt of A.1A while also removing the A.1A last row on the Rt & placing it instead on the 1st row on the LF. Would I achieve what I need to make the buttonholes on the Rt? Thank you so much for all the help.
18.09.2020 - 20:53DROPS Design answered:
Dear Kat B, you can work A.1 as explained, A.1B is just worked to make the pattern the same on each side, just decrease for the buttonholes in the right front band (instead of left band in the pattern) when stated for your size (or adjust as you like them to be). Happy knitting!
21.09.2020 - 08:20
![]() Kat B wrote:
Kat B wrote:
Is the 1st row After the Cast On row a Purl row? Thank you.
14.09.2020 - 00:06DROPS Design answered:
Dear KatB, on the first row after cast on knit all stitches from RS (= first of the 6 rows in stocking stitch). Happy knitting!
14.09.2020 - 09:26
![]() Kat B wrote:
Kat B wrote:
I've gotten to Row 14, which is an INC row but also a Purl Row. Am I to INC on the Purl side or have I somehow miscounted my rows? 6 rows of stocking knit; 1 row for the fold & then 7 more rows of stocking knit with the last row (14) being the Inc row. I thought all Incs were done on the Knit side. Thank you.
11.09.2020 - 01:21DROPS Design answered:
Dear KatB, the 7th row after the fold will be a WS row, this means you will make the yarn over on the purl row. On next row from RS you will work as explained under YOKE (work now the yarn over twisted). Happy knitting!
11.09.2020 - 08:10
![]() Kat B wrote:
Kat B wrote:
I LOVE this sweater but I don't know how to even start. Where does it say how many stitches are Cast On? And is this sweater done as 1 piece excluding the sleeves? Please help or maybe tell me what videos I need to watch. Thank You.
09.09.2020 - 21:22DROPS Design answered:
Dear KatB, our patterns always start with a description of techniques used in the pattern, then goto JACKET to see a description of the work, and start with NECK where you will find the number of stitches to cast on for your size. Happy knitting!
10.09.2020 - 09:29
![]() Fournière wrote:
Fournière wrote:
Merci beaucoup pour votre réponse rapide. Cordialement Martine
14.04.2020 - 22:47
|
||||||||||||||||||||||
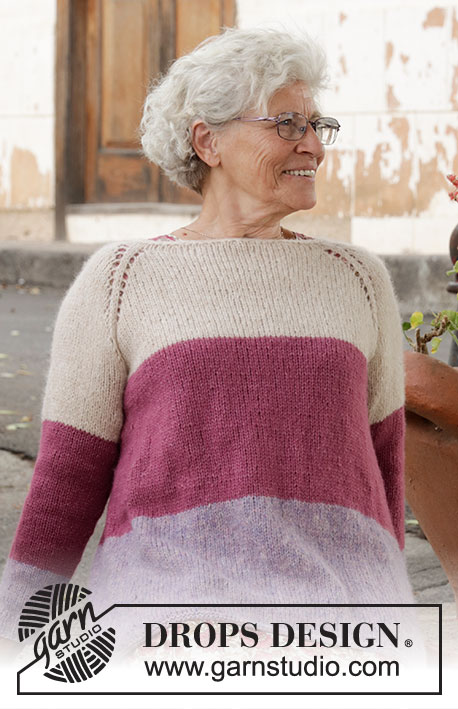
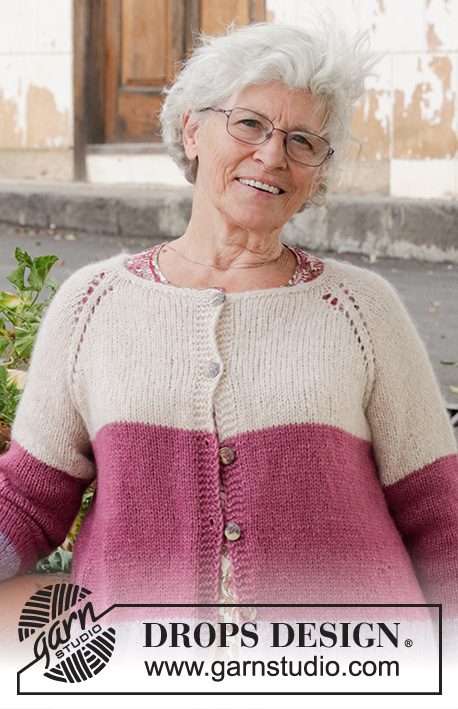
Summer Evening Cardigan#summereveningcardigan |
||||||||||||||||||||||
 |
 |
|||||||||||||||||||||
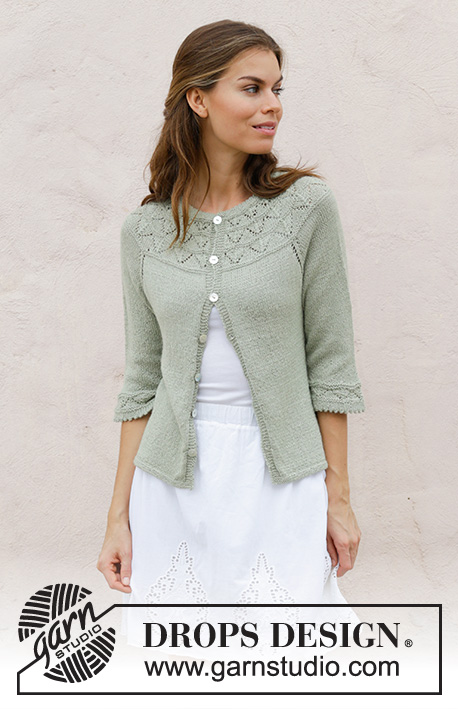
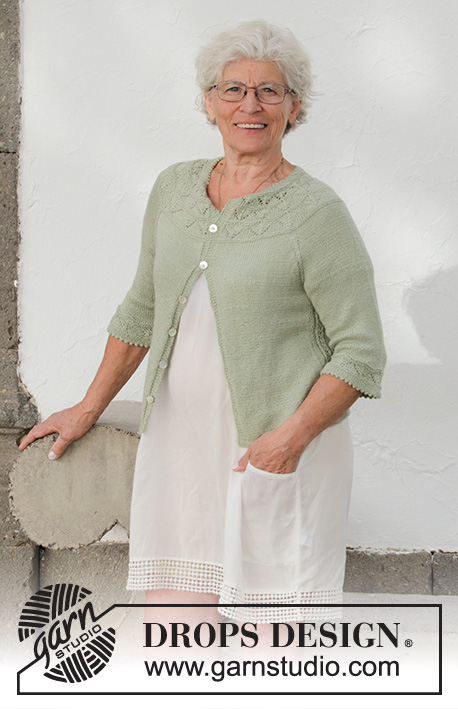
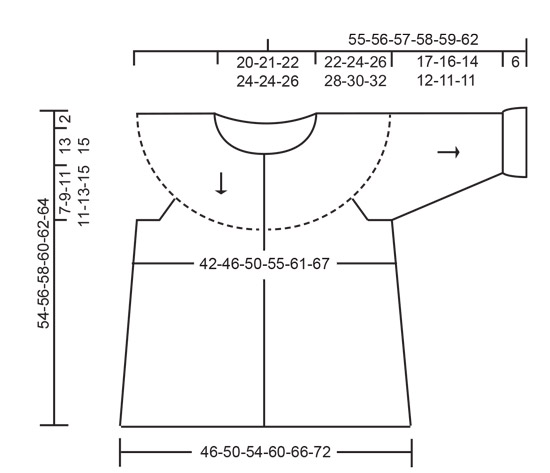
Knitted jacket with round yoke, lace pattern and ¾-length sleeves, worked top down. Sizes S - XXXL. The piece is worked in DROPS BabyAlpaca Silk.
DROPS 191-23 |
||||||||||||||||||||||
|
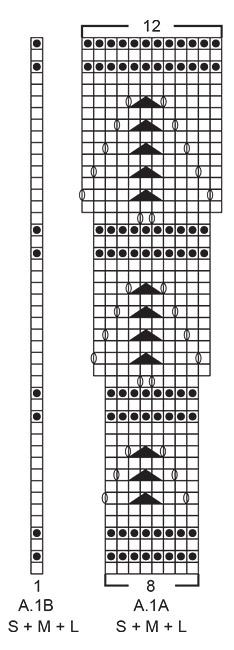
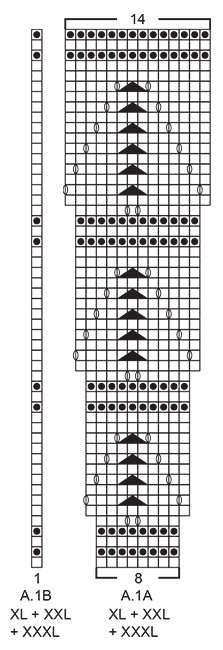
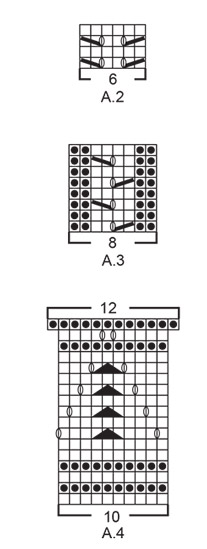
INFORMATION FOR THE PATTERN: RIDGE/GARTER STITCH (worked back and forth): 1 ridge = Knit 2 rows. INCREASE TIP-1 (evenly spaced): To work out how to increase evenly, count the total number of stitches on the needle (e.g. 126 stitches), minus the bands (e.g. 10 stitches) and divide the remaining 116 stitches by the number of increases to be made (e.g. 29) = 4. In this example, increase by making 1 yarn over after every 4th stitch. On the next row/round work the yarn overs twisted to avoid holes. NOTE Do not increase over the bands. PATTERN: See diagrams A.1 to A.4. Choose diagram for your size (applies to A.1). The diagrams show all the rows in the pattern seen from the right side. RAGLAN: All increases are made from the right side! Increase to raglan on each side of the 4 marker threads in each transition between body and sleeves as follows: Start 1 stitch before the marker thread, make 1 yarn over, knit 2 (the marker thread sits in the middle of these 2 stitches), make 1 yarn over (= 2 stitches increased). On the next row purl the yarn overs to leave holes. INCREASE TIP-2 (for sides of body): All increases are made from the right side! Start 6 stitches before the marker thread in the side, make 1 yarn over, knit 2, continue with A.3 (marker thread sits in the middle of A.3), knit 2 and make 1 yarn over (= 2 stitches increased). On the next row (wrong side) purl the yarn overs twisted to avoid holes. DECREASE TIP (for mid under sleeve): Start 2 stitches before A.3, knit 2 together, knit A.3 (= 8 stitches), slip 1 stitch as if to knit, knit 1, pass the slipped stitch over the knitted stitch (= 2 stitches decreased). BUTTONHOLES: Work buttonholes on the left band (when the garment is worn). Work from the right side; knit 1, knit 2 together 1 yarn over and knit to end of row. On the next row (wrong side) knit the yarn over to leave a hole. The first buttonhole is worked on the first row from the right side after the neck. Then work the other 6-6-6-7-7-7 buttonholes with approx. 7-7½-8-7-7-7½ cm between each. ---------------------------------------------------------- JACKET: The yoke and body are worked back and forth on circular needle from mid front and top down. The sleeves are worked in the round with short circular needle/double pointed needles, top down. NECK: Cast on 126-130-134-142-146-154 stitches (including 5 band stitches in each side towards mid front) with circular needle size 3 mm and BabyAlpaca Silk. Change to circular needle size 2.5 mm and work 6 rows stocking stitch for the lining, with 5 band stitches in GARTER STITCH in each side towards mid front – see description of GARTER STITCH above. Then work the next row as follows from the right side: 5 band stitches in garter stitch, * knit 2 together, make 1 yarn over *, work from *-* until there are 5 stitches left on the row and finish with 5 band stitches in garter stitch. You have now worked the folding edge. Work 7 rows stocking stitch with 5 band stitches in garter stitch in each side and increase AT THE SAME TIME 29-33-37-29-33-33 stitches evenly on the last row – read INCREASE TIP-1 = 155-163-171-171-179-187 stitches. Then work the yoke as described below. YOKE: Change to circular needle size 3 mm. The next row is worked as follows from the right side: Work 5 band stitches in garter stitch and work BUTTONHOLES on the band – see description above, work A.1A until there are 6 stitches left on the row (= 18-19-20-20-21-22 repeats of 8 stitches), work A.1B (= 1 stitch) and finish with 5 band stitches in garter stitch. Continue the pattern like this and increase as shown in A.1A. REMEMBER THE KNITTING TENSION! When A.1 has been completed, there are 227-239-251-291-305-319 stitches on the needle and the piece measures approx. 15-15-15-17-17-17 cm from the folding edge on the neck. Knit 1 row from the right side where you increase 23-27-31-23-33-31 stitches evenly on row = 250-266-282-314-338-350 stitches. Now insert 4 marker threads in the piece without working the stitches: The first marker thread is inserted after the first 41-43-45-51-56-60 stitches (i.e. after the front piece), 2nd marker thread after the next 48-52-56-60-62-60 stitches (= sleeve), 3rd marker thread after the next 72-76-80-92-102-110 stitches (= back piece) and 4th marker thread after the next 48-52-56-60-62-60 stitches (= sleeve). There are 41-43-45-51-56-60 stitches left after the last marker thread on the front piece. Continue back and forth with stocking stitch and 5 band stitches in garter stitch in each side towards mid front. AT THE SAME TIME on the first row from the right side increase to RAGLAN – see description above (= 8 stitches increased). Continue to increase to raglan every 2nd row (i.e. every row from the right side) until you have increased a total of 10-13-15-15-16-18 times on each side of the 4 marker threads = 330-370-402-434-466-494 stitches. Continue working as before without increasing to raglan, but to avoid breaking the line of holes on the raglan line, work A.2 (= 6 stitches) in each transition between body and sleeves (the marker threads sit in the middle of A.2). When the piece measures 22-24-26-28-30-32 cm, work the next row as follows from the right side: Work the first 51-56-60-66-72-78 stitches in garter stitch and stocking stitch as before (= front piece), place the next 68-78-86-90-94-96 stitches on a thread for sleeve, cast on 8-8-10-10-12-14 new stitches on the needle (= in side under sleeve), work 92-102-110-122-134-146 stitches stocking stitch (= back piece), place the next 68-78-86-90-94-96 stitches on a thread for sleeve, cast on 8-8-10-10-12-14 new stitches on the needle (= in side under sleeve) and work the last 51-56-60-66-72-78 stitches (= front piece). Body and sleeves are finished separately. THE PIECE IS NOW MEASURED FROM HERE! BODY: = 210-230-250-274-302-330 stitches. Insert 1 marker thread in the middle of the 8-8-10-10-12-14 stitches cast on under the sleeve in each side. Continue with stocking stitch and 5 band stitches in garter stitch in each side towards mid front; in addition work A.3 over the middle 8 stitches in each side (marker threads sit in the middle of A.3). Remember buttonholes on left band. When the piece measures 5-5-5-3-3-3 cm from the separation, increase 1 stitch on each side of A.3 in each side – read INCREASE TIP-2 (= 4 stitches increased). Increase like this every 5 cm a total of 5-5-5-6-6-6 times in each side = 230-250-270-298-326-354 stitches. When the piece measures 31 cm from the separation, work 3 ridges back and forth over all stitches. Then cast off with knit from the right side, but to avoid the cast-off edge being tight, you can make 1 yarn over after every 8th stitch at the same time as you cast off (the yarn overs are cast off as normal stitches). The jacket measures approx. 54-56-58-60-62-64 cm from the shoulder down. SLEEVE: Place the 68-78-86-90-94-96 stitches from the thread on the one side of the piece on double pointed needles or short circular needle size 3 mm and in addition knit up 1 stitch in each of the 8-8-10-10-12-14 stitches cast on under the sleeve = 76-86-96-100-106-110 stitches. Insert 1 marker thread in the middle of the 8-8-10-10-12-14 stitches under the sleeve. Work A.3 over the middle 8 stitches under the sleeve; the remaining stitches are worked in stocking stitch. When the piece measures 2-2-2-1-1-1 cm from the separation, decrease 1 stitch on each side of A.3 – read DECREASE TIP. Decrease like this a total of 8-11-15-16-17-17 times in Size S: Every 6th round, in Size M: Every 4th round, in Size L: Alternately every 2nd and 3rd round and in Sizes XL + XXL + XXXL: Every 2nd round = 60-64-66-68-72-76 stitches. Continue working in the round until the piece measures approx. 17-16-14-12-11-11 cm from the separation, but adjust so that the decreases under the sleeve are finished (NOTE: shorter measurements in the larger sizes due to wider neck and longer yoke). On the next round increase 10-6-4-12-8-4 stitches evenly on round = 70-70-70-80-80-80 stitches. Then work A.4 in the round (= 7-7-7-8-8-8 repeats of 10 stitches). When A.4 has been completed there are 84-84-84-96-96-96 stitches on the needle. Work 6 rounds of stocking stitch. The next round is worked as follows: * Knit 2 together, make 1 yarn over *, work from *-* to end of round (= folding edge). Work 6 rounds of stocking stitch and cast off, but to avoid the cast-off edge being tight, you can make 1 yarn over after every 6th stitch at the same time as you cast off (the yarn overs are cast off as normal stitches). Work the other sleeve in the same way. ASSEMBLY: Fold the lining in the neck towards the wrong side and fasten neatly with small, loose stitches. Do the same around the bottom of both sleeves. Sew on the buttons. |
||||||||||||||||||||||
Diagram explanations |
||||||||||||||||||||||
|
||||||||||||||||||||||
 |
||||||||||||||||||||||
 |
||||||||||||||||||||||
 |
||||||||||||||||||||||
 |
||||||||||||||||||||||
Have you finished this pattern?Tag your pictures with #dropspattern #summereveningcardigan or submit them to the #dropsfan gallery. Do you need help with this pattern?You'll find 27 tutorial videos, a Comments/Questions area and more by visiting the pattern on garnstudio.com. © 1982-2026 DROPS Design A/S. We reserve all rights. This document, including all its sub-sections, has copyrights. Read more about what you can do with our patterns at the bottom of each pattern on our site. |
||||||||||||||||||||||


With over 40 years in knitting and crochet design, DROPS Design offers one of the most extensive collections of free patterns on the internet - translated to 17 languages. As of today we count 324 catalogues and 12290 patterns translated into English (UK/cm). 12290
We work hard to bring you the best knitting and crochet have to offer, inspiration and advice as well as great quality yarns at incredible prices! Would you like to use our patterns for other than personal use? You can read what you are allowed to do in the Copyright text at the bottom of all our patterns. Happy crafting!
Post a comment to pattern DROPS 191-23
We would love to hear what you have to say about this pattern!
If you want to leave a question, please make sure you select the correct category in the form below, to speed up the answering process. Required fields are marked *.