
Popular categories
Looking for a yarn?


Comments / Questions (9)
![]() Ali wrote:
Ali wrote:
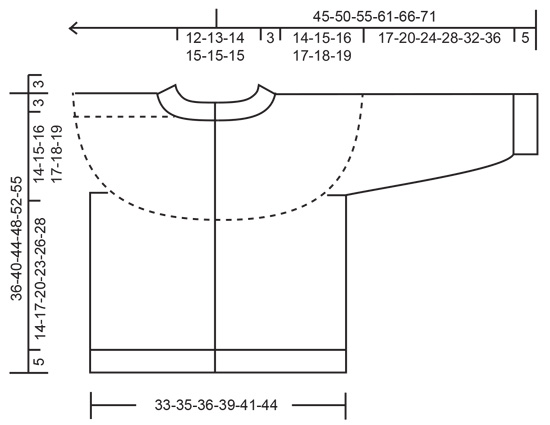
What are the all round chest sizes for this cardigan?
16.02.2026 - 23:35DROPS Design answered:
Hi Ali, There is a size chart at the bottom of the page, with all the measurements for the different sizes. Regards, Drops Team.
17.02.2026 - 06:35
![]() Maria Giulia wrote:
Maria Giulia wrote:
Vorrei realizzare questo modello 40-8 con un filato superwash, ho visto che posso usare baby merino per sostituire il flora, ma posso sempre abbinare drops kid'silk? O posso avere un buon risultato anche con 2 fili di bay merino? Oppure usare il big merino? Per favore mi potete consigliare per il risultato più simile al modello? Grazie
03.12.2025 - 09:59DROPS Design answered:
Buonasera Maria Giulia, per avere un risultato simile al modello deve usare un filato "pelosetto": se vuole sostituire DROPS Flora con Baby Merino, può mantenere Kid-Silk facendo attenzione al lavaggio corretto del capo alla fine. Buon lavoro!
04.12.2025 - 22:29
![]() Merethe wrote:
Merethe wrote:
Hej. Rapport i højden. Jeg forstår simpelthen ikke disse pinde . Skal man gentage mønstret over hinanden , både på vrang og retsiden.
21.09.2024 - 08:22DROPS Design answered:
Hei Merethe. Vi skal hjelpe deg så godt vi kan. Men fint om du opplyser hvilket / hvilken diagram du ikke forstår / hvor i oppskriften, og oppgi gjerne hvilken str. du strikker. mvh DROPS Design
23.09.2024 - 13:50
![]() Liza wrote:
Liza wrote:
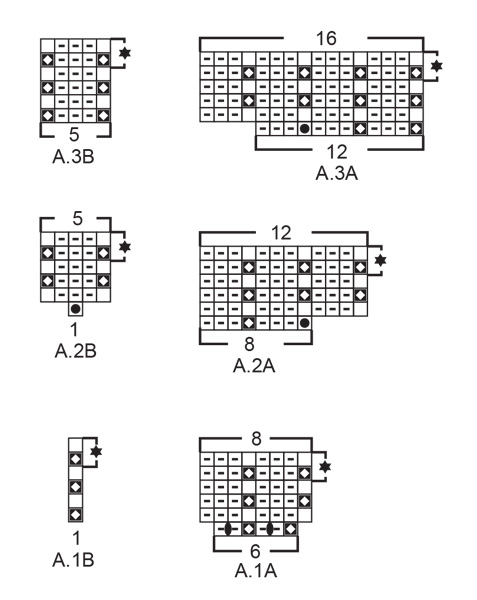
Hi, I have few questions regarding the pattern. When you say complete A1, does that mean combining A1A and A1B? For example, after the first row of A1 in the Yoke, I should repeat the pattern 3k 1P 3k 2p on the wrong side followed by 3p 1fisherman 3p 2fisherman on the right side? thanks
28.12.2023 - 22:20DROPS Design answered:
Dear Liza, "After the first row in A.1 there are 91-99-99-107-115-115 stitches. Complete A.1, then repeat the 2 rows with stars in A.1 until the piece measures 3-3-3-4-4-4 cm from the marker on the neck." You have established the pattern with A.1a and A.1b in the first row and have increased to 91-99-99-107-115-115 stitches. Now continue working both charts upwards, row by row, as established on the first row. After working all 6 rows of both charts, you will have completed A.1 ( or a repeat of A.1). Now repeat the last 2 rows of the chart, in the previously established pattern (so A.1a 10 to 13 times, depending on the size and A.1b). Happy knitting!
29.12.2023 - 00:31
![]() Dagny Djurhuus wrote:
Dagny Djurhuus wrote:
Hvad betyder en rapport i højden . Har aldrig set ordet rapport i en strikkeopskrif før, ved ikke hvad det betyder.
20.09.2023 - 10:36DROPS Design answered:
Hei Dagny. Om du scroller deg nederst på oppskriften ser du flere diagrammer. I oppskriften gjentar du f.eks A.1A flere ganger i bredden = gjentar rapporten A.1A i bredden. Når det står 1 rapport i høyden, gjentar du diagrammet i høyden (oppå hverandre). F.eks de 2 øverste pinnene i diagram A.2A er vist med en stjerne. Det er disse 2 radene som gjentas i høyden. mvh DROPS Design
26.09.2023 - 14:44
![]() Lena wrote:
Lena wrote:
Ska beställa garn till barnkofta 7/8 40-8 med Flora (200 g) och Kid-Silk (100 g) Jag hittar inte i mönstret när jag ska använda Kid -Silk. Vänligen Lena
23.07.2023 - 15:00DROPS Design answered:
Hei Lena. Du strikker Flora og Kid-Silk samtidig = det strikkes med 2 tråder. Slik starter oppskriften: Lägg upp 71-75-77-79-79-81 maskor (inklusive 5 framkantsmaskor i varje sida mot mitt fram) på rundsticka 5 med 1 tråd i varje kvalitet (= 2 trådar). mvh DROPS Design
25.07.2023 - 09:27
![]() Sophie wrote:
Sophie wrote:
Hallo, ich bin gerade beim Aufteilen der Passe. Ist es richtig, dass in den ersten 39 Maschen die Blenden-Maschen schon dabei sind? Und kann man die 6 neuen Maschen anschlagen, wenn man später die stillgelegten Maschen aufnimmt?
31.01.2023 - 21:32DROPS Design answered:
Liebe Sophie, ja richtig, die BlendenMaschen sind in den 39 ersten Maschen der Reihe mitgezählt; diese Lektion zeigt ab Bild 8 wie die Aufteilung gearbeitet wird, z.B. wie die neuen Maschen angeschlagen werden (Bild 11) und wie die Ärmel später gestrickt werden (Bild 18). Viel Spaß beim stricken!
01.02.2023 - 08:48
![]() Sophie wrote:
Sophie wrote:
Hallo, kann ich mit Garngruppe C auch eine einfache Halsblende stricken? Oder passt das nicht zum Muster?
17.01.2023 - 21:44DROPS Design answered:
Liebe Sophie, also gerne können Sie hier mit 1 Faden der Garngruppe C anstatt mit 2 Fäden der Gargruppe A stricken - die Halsblende können Sie auch verkürzten wenn Sie es so lieber möchten. Viel Spaß beim stricken!
18.01.2023 - 09:48
![]() Sophie wrote:
Sophie wrote:
Ich möchte die Jacke Forest Vines Kids stricken. Bitte helfrn Sie mir bei Garnberechnung. Ich würde gern mit Big Merino aus der Garngrppe C stricken und zwar Gr. 134/140 . Wie viel Garn werde ich dazu brauchen? Mit der Umrechnung bei 2 verschiedenen Garnen von A zu einem Garn aus Gruppe C bin ich leider nicht zurecht gekommen. Im Voraus vielen Dank!
02.01.2023 - 18:30DROPS Design answered:
Liebe Sophie, hier wird es erklärt, wie man das umrechnet - siehe 2 Fäden unterschiedlicher Garne durch 1 Faden ersetzen. Gerne wird Ihnen auch Ihr DROPS Händler damit (auch per Telefon oder per E-Mail) weiterhelfen. Viel Spaß beim stricken!
03.01.2023 - 09:11
|
|||||||||||||||||||
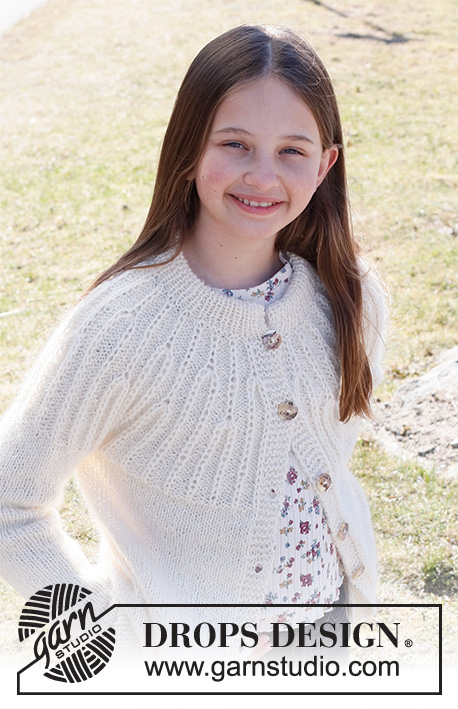
Forest Vines Kids Cardigan#forestvineskidscardigan |
|||||||||||||||||||
 |
 |
||||||||||||||||||
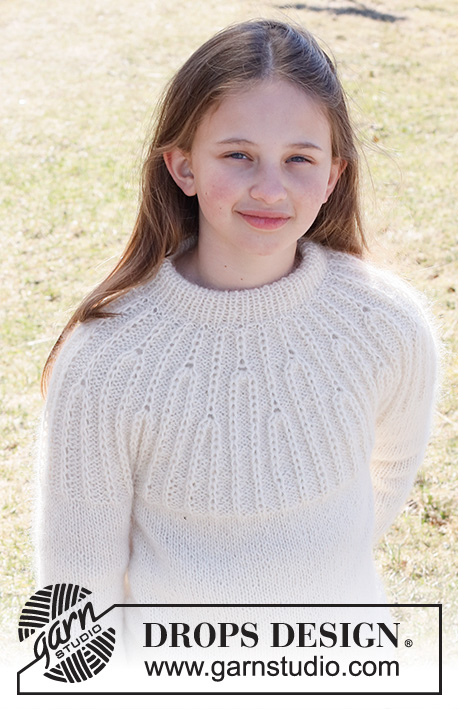
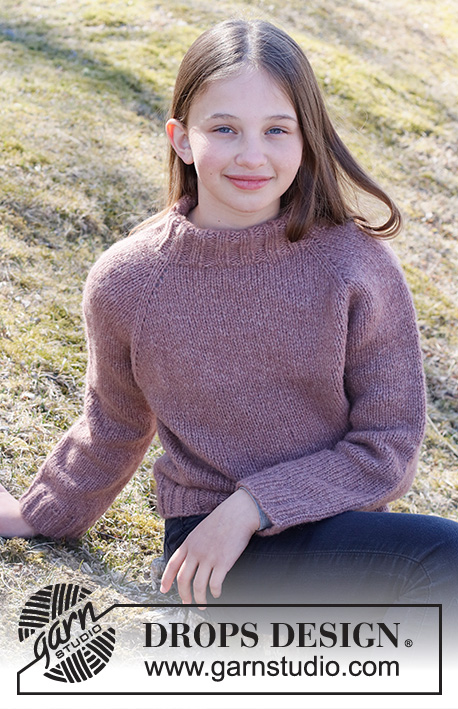
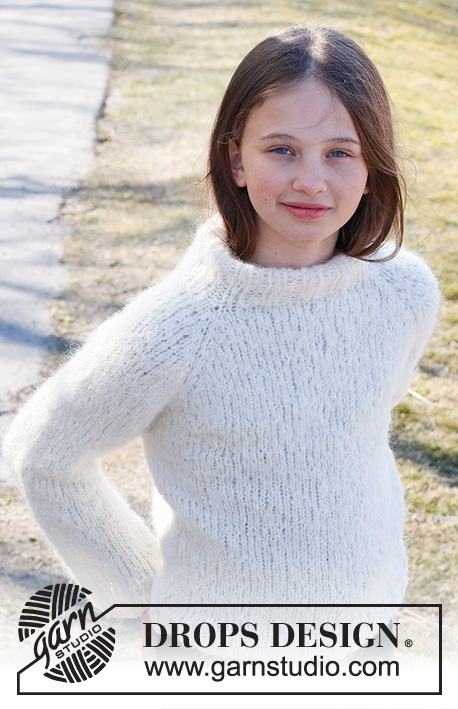
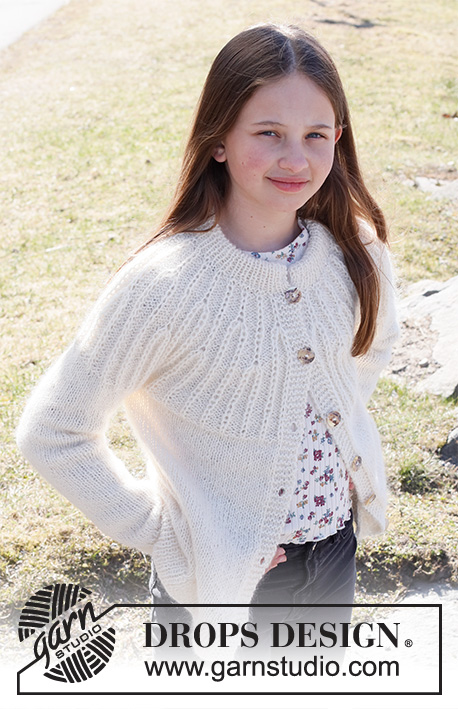
Knitted jacket for children in DROPS Flora and DROPS Kid-Silk. The piece is worked top down, with double neck, round yoke and textured pattern with Fisherman’s rib stitches on the yoke. Sizes 2 to 12 years.
DROPS Children 40-8 |
|||||||||||||||||||
|
------------------------------------------------------- EXPLANATIONS FOR THE PATTERN: ------------------------------------------------------- RIDGE/GARTER STITCH (worked back and forth): Knit all rows. 1 ridge = knit 2 rows. PATTERN: See diagrams A.1 to A.3. The diagrams show all rows in the pattern from the right side. INCREASE/DECREASE TIP (evenly spaced): To work out how to increase/decrease evenly, count the total number of stitches on needle (e.g. 89 stitches), minus the bands (e.g. 10 stitches) and divide the remaining stitches by the number of increases/decreases to be made (e.g. 8) = 9.9. In this example, increase by making 1 yarn over after approx. each 9th stitch. On the next row work the yarn overs twisted to avoid holes. When decreasing, knit together approx. each 9th and 10th stitch. Do not increase/decrease over the bands. DECREASE TIP (for sleeves): Start 3 stitches before the marker thread, knit 2 together, knit 2 (marker thread sits between these 2 stitches), slip 1 stitch as if to knit, knit 1 and pass the slipped stitch over the knitted stitch (2 stitches decreased). BUTTONHOLES: Work buttonholes on the right band (when the garment is worn). Work from the right side when there are 3 stitches left on the row as follows: Make 1 yarn over, knit 2 together and knit 1. On the next row (wrong side), knit the yarn over to leave a hole. The first buttonhole is worked when the neck measures approx. 7 cm. Then work the other 5-5-5-6-6-6 buttonholes with approx. 5½-6½-7½-6½-7½-8 cm between each one. CASTING-OFF TIP: To avoid the cast-off edge being tight you can cast off with a larger size needle. If the edge is still tight, make 1 yarn over after approx. each 6th stitch at the same time as casting off; the yarn overs are cast off as normal stitches. ------------------------------------------------------- START THE PIECE HERE: ------------------------------------------------------- JACKET – SHORT OVERVIEW OF THE PIECE. The neck and yoke are worked back and forth with circular needle, from mid front and top down. The yoke is divided for body and sleeves and the body continued back and forth with circular needle. The sleeves are worked in the round with double pointed needles, top down. DOUBLE NECK: Cast on 71-75-77-79-79-81 stitches (including 5 band stitches on each side towards mid-front) with circular needle size 5 mm and 1 strand of each quality (= 2 strands). Purl 1 row (= wrong side). Change to circular needle size 4 mm. Work as follows from the right side: 1 edge stitch in GARTER STITCH – see description above, * knit 1, purl 1 *, work from *-* until there are 2 stitches left, knit 1 and 1 edge stitch in garter stitch. Continue this rib for 7 cm. The neck is later folded double. Insert 1 marker after the band at the beginning of the row; the yoke is measured from this marker! Knit 1 row from the right side and increase 0-2-0-4-10-8 stitches evenly spaced – read INCREASE/DECREASE TIP. Remember the BUTTONHOLES on the right band – read description above = 71-77-77-83-89-89 stitches. Knit 1 row from the wrong side. YOKE: Change to circular needle size 5 mm. The first row is worked as follows from the right side: 5 band stitches in garter stitch, work A.1A until there are 6 stitches left (= 10-11-11-12-13-13 repeats of 6 stitches), A.1B (= 1 stitches) and 5 band stitches in garter stitch. After the first row in A.1 there are 91-99-99-107-115-115 stitches. Complete A.1, then repeat the 2 rows with stars in A.1 until the piece measures 3-3-3-4-4-4 cm from the marker on the neck. REMEMBER THE KNITTING TENSION! The next row is worked as follows from the right side: 5 band stitches in garter stitch, work A.2A until there are 6 stitches left (= 10-11-11-12-13-13 repeats of 8 stitches), A.2B and 5 band stitches in garter stitch. After the first row in A.2 there are 135-147-147-159-171-171 stitches. Complete A.2, then repeat the 2 rows with stars in A.2 until the piece measures 6-7-7-8-8-9 cm from the marker on the neck. The next row is worked as follows from the right side: 5 band stitches in garter stitch, work A.3A until there are 10 stitches left (= 10-11-11-12-13-13 repeats of 12 stitches), A.3B (= 5 stitches) and 5 band stitches in garter stitch. After the first row in A.3 there are 175-191-191-207-223-223 stitches. Complete A.3, then repeat the 2 rows with stars in A.3 until the piece measures 13-14-15-16-17-18 cm from the marker on the neck. Knit 1 row from the right side where you adjust the number of stitches to 178-190-198-210-222-234 stitches – remember INCREASE/DECREASE TIP. Continue with stocking stitch and 5 band stitches in garter stitch on each side until the piece measures 14-15-16-17-18-19 cm from the marker on the neck. On the next row divide the yoke for the body and sleeves as follows: Work the first 30-32-33-35-37-39 stitches as before (= front piece), place the next 34-36-38-40-42-44 stitches on a thread for the sleeve, cast on 6 stitches (= in side under sleeve), work the next 50-54-56-60-64-68 stitches (= back piece), place the next 34-36-38-40-42-44 stitches on a thread for the sleeve, cast on 6 stitches (= in side under sleeve), work the last 30-32-33-35-37-39 stitches (= front piece). The body and sleeves are finished separately. THE PIECE IS NOW MEASURED FROM HERE! BODY: = 122-130-134-142-150-158 stitches. Continue back and forth with stocking stitch and 5 band stitches in garter stitch on each side until the piece measures 14-17-20-23-26-28 cm from the division. There is approx. 5 cm left to finished length; try the jacket on and work to desired length. To avoid the following rib being tight, knit 1 row from the right side where you increase 13-15-15-15-17-17 stitches evenly spaced = 135-145-149-157-167-175 stitches. Change to circular needle size 4 mm. The first row is worked as follows from the wrong side: 5 band stitches in garter stitch, * purl 1, knit 1 *, work from *-* until there are 6 stitches left, purl 1 and 5 band stitches in garter stitch. Continue this rib for 5 cm. Cast off with garter stitch over garter stitch, knit over knit and purl over purl – read CASTING-OFF TIP! The jacket measures approx. 36-40-44-48-52-55 cm from the shoulder down. SLEEVES: Place the 34-36-38-40-42-44 stitches from the thread on the one side of the piece on double pointed needles size 5 mm and knit up 1 stitch in each of the 6 stitches cast on under the sleeve = 40-42-44-46-48-50 stitches. Insert a marker thread in the middle of the 6 stitches under the sleeve. Start at the marker thread and work stocking stitch in the round. When the sleeve measures 1 cm from the division, decrease 2 stitches under the sleeve – read DECREASE TIP. Decrease like this every 6th round a total of 4 times = 32-34-36-38-40-42 stitches. Continue working without further decreases until the piece measures 17-20-24-28-32-36 cm from the division. There is approx. 5 cm left to finished length; try the jacket on and work to desired length. Knit 1 round where you decrease 4 stitches evenly in all sizes = 28-30-32-34-36-38 stitches. Change to double pointed needles size 4 mm and work rib (knit 1, purl 1) for 5 cm. Cast off with knit over knit and purl over purl – remember CASTING-OFF TIP! The sleeve measures approx. 22-25-29-34-37-41 cm from the division. Work the other sleeve in the same way. ASSEMBLY: Fold the neck double to the inside and sew down. To avoid the neck being tight and rolling outwards, it is important that the seam is elastic. Sew the openings at the end of the neck with small stitches. Sew the buttons onto the left band. |
|||||||||||||||||||
Diagram explanations |
|||||||||||||||||||
|
|||||||||||||||||||
 |
|||||||||||||||||||
 |
|||||||||||||||||||
Have you finished this pattern?Tag your pictures with #dropspattern #forestvineskidscardigan or submit them to the #dropsfan gallery. Do you need help with this pattern?You'll find 33 tutorial videos, a Comments/Questions area and more by visiting the pattern on garnstudio.com. © 1982-2026 DROPS Design A/S. We reserve all rights. This document, including all its sub-sections, has copyrights. Read more about what you can do with our patterns at the bottom of each pattern on our site. |
|||||||||||||||||||


With over 40 years in knitting and crochet design, DROPS Design offers one of the most extensive collections of free patterns on the internet - translated to 17 languages. As of today we count 324 catalogues and 12290 patterns translated into English (UK/cm). 12290
We work hard to bring you the best knitting and crochet have to offer, inspiration and advice as well as great quality yarns at incredible prices! Would you like to use our patterns for other than personal use? You can read what you are allowed to do in the Copyright text at the bottom of all our patterns. Happy crafting!
Post a comment to pattern DROPS Children 40-8
We would love to hear what you have to say about this pattern!
If you want to leave a question, please make sure you select the correct category in the form below, to speed up the answering process. Required fields are marked *.